前言
在Redis官网中提供了各种语言的客户端,地址:
https://redis.io/docs/clients/
官方比较推荐的Java操作Redis的客户端

标记为❤的就是推荐使用的java客户端,包括:
-
Jedis和Lettuce:这两个主要是提供了Redis命令对应的API,方便我们操作Redis,而SpringDataRedis又对这两种做了抽象和封装,因此我们后期会直接以SpringDataRedis来学习。
-
Redisson:是在Redis基础上实现了分布式的可伸缩的java数据结构,例如Map.Queue等,而且支持跨进程的同步机制:Lock.Semaphore等待,比较适合用来实现特殊的功能需求。
Jedis快速入门
创建一个Maven项目。
导入依赖坐标
<dependencies>
<!-- 导入jedis依赖 -->
        <dependency>
            <groupId>redis.clients</groupId>
            <artifactId>jedis</artifactId>
            <version>3.7.0</version>
        </dependency>
        <dependency>
<!--导入测试单元依赖-->
            <groupId>org.junit.jupiter</groupId>
            <artifactId>junit-jupiter</artifactId>
            <version>5.7.0</version>
            <scope>test</scope>
        </dependency>
    </dependencies>
编写测试类
【init】 对Jedis进行 进行初始化,定义了redis的ip地址,端口号密码等等。
【testJ】里面Jedis对redis进行操作,其函数都与redis类似;
Redis常用数据结构详解_abc123mma的博客-CSDN博客
【end】对Jedis进行释放
package cn.itheima;

import org.junit.jupiter.api.AfterAll;
import org.junit.jupiter.api.AfterEach;
import org.junit.jupiter.api.BeforeEach;
import org.junit.jupiter.api.Test;
import redis.clients.jedis.Jedis;

public class TestJedis {

    private Jedis jedis;
    @BeforeEach
    public void init() {
        jedis = new Jedis("xxx.xxx.xxx.x",6379);
//        jedis = TestJedisPool.getJedisPool();
        jedis.auth("*****");
        jedis.select(0);
        System.out.println("连接建立成功");
    }

    @Test
    public void testJ() {
        String result = jedis.set("name", "张三");
        System.out.println("result :" + result);
        String name = jedis.get("name");
        System.out.println(name);
    }

    @AfterEach
    public void end() {
        if (jedis != null) {
            jedis.close();
        }
    }
}
【利用连接池创建Jedis】
Jedis本身是线程不安全的,并且频繁的创建和销毁连接会有性能损耗,因此我们推荐大家使用Jedis连接池代替Jedis的直连方式
有关池化思想,并不仅仅是这里会使用,很多地方都有,比如说我们的数据库连接池,比如我们tomcat中的线程池,这些都是池化思想的体现。
package cn.itheima;

import redis.clients.jedis.Jedis;
import redis.clients.jedis.JedisPool;
import redis.clients.jedis.JedisPoolConfig;

public class TestJedisPool {
    private static final JedisPool jedisPool;

    static {
        // 配置连接池
        JedisPoolConfig config = new JedisPoolConfig();
        // 最大连接数
        config.setMaxTotal(8);
        // 最大空闲数---没有人访问也能有空闲连接等待连接
        config.setMaxIdle(8);
        // 最小空闲数
        config.setMinIdle(0);
        jedisPool = new JedisPool(config,
                "xxx.xxx.xxx.xxx",6379,1000,"*******");
    }

    public static Jedis getJedisPool() {
        return jedisPool.getResource();
    }
}
【采用springboot整合的Redis】
SpringData是Spring中数据操作的模块,包含对各种数据库的集成,其中对Redis的集成模块就叫做SpringDataRedis,官网地址:
Spring Data Redis
-
提供了对不同Redis客户端的整合(Lettuce和Jedis)
-
提供了RedisTemplate统一API来操作Redis
-
支持Redis的发布订阅模型
-
支持Redis哨兵和Redis集群
-
支持基于Lettuce的响应式编程
-
支持基于JDK.JSON.字符串.Spring对象的数据序列化及反序列化
-
支持基于Redis的JDKCollection实现
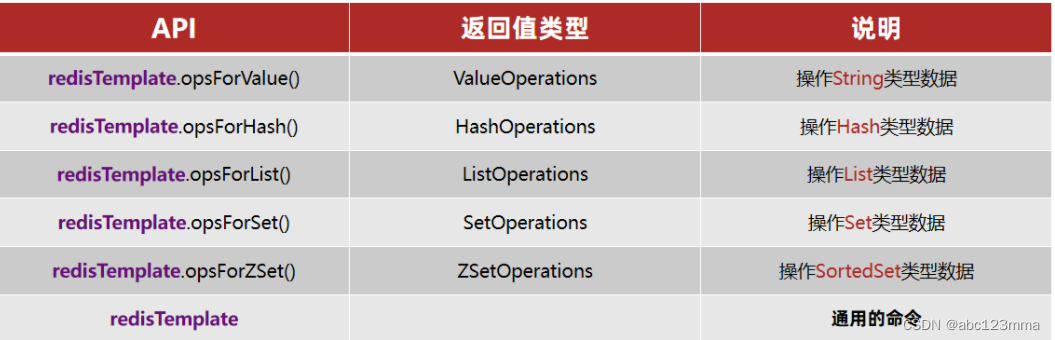
SpringDataRedis中提供了RedisTemplate工具类,其中封装了各种对Redis的操作。并且将不同数据类型的操作API封装到了不同的类型中:
SpringBoot已经提供了对SpringDataRedis的支持,使用非常简单:
导入依赖
<dependencies>
        <!--redis依赖-->
        <dependency>
            <groupId>org.springframework.boot</groupId>
            <artifactId>spring-boot-starter-data-redis</artifactId>
        </dependency>
        <!--common-pool-->
        <dependency>
            <groupId>org.apache.commons</groupId>
            <artifactId>commons-pool2</artifactId>
        </dependency>
        <!--Jackson依赖-->
        <dependency>
            <groupId>com.fasterxml.jackson.core</groupId>
            <artifactId>jackson-databind</artifactId>
        </dependency>
        <dependency>
            <groupId>org.projectlombok</groupId>
            <artifactId>lombok</artifactId>
            <optional>true</optional>
        </dependency>
        <dependency>
            <groupId>org.springframework.boot</groupId>
            <artifactId>spring-boot-starter-test</artifactId>
            <scope>test</scope>
        </dependency>
    </dependencies>
编写配置文件
spring:
  redis:
    host: xxx.xxx.xxx.xxx
    port: 6379
    password: *****
    lettuce:
      pool:
        max-active: 8  #最大连接
        max-idle: 8   #最大空闲连接
        min-idle: 0   #最小空闲连接
        max-wait: 100ms #连接等待时间
【测试代码】
@SpringBootTest
class RedisDemoApplicationTests {

    @Autowired
    private RedisTemplate<String, Object> redisTemplate;

    @Test
    void testString() {
        // 写入一条String数据
        redisTemplate.opsForValue().set("name", "虎哥");
        // 获取string数据
        Object name = redisTemplate.opsForValue().get("name");
        System.out.println("name = " + name);
    }
}
提示:SpringDataJpa使用起来非常简单,记住如下几个步骤即可
SpringDataRedis的使用步骤:
引入spring-boot-starter-data-redis依赖
在application.yml配置Redis信息
注入RedisTemplate
插入的结果如下:
![]()
【缺点】
需要重新定义序列化工具
因此需要引入StringRedisTemplate
StringRedisTemplate
StringRedisTemplate帮我定义了Key-Value的序列化方式,因此我们需要自己定义关于对象的序列化方式
package com.heima;

import com.fasterxml.jackson.core.JsonProcessingException;
import com.fasterxml.jackson.databind.ObjectMapper;
import com.heima.redis.pojo.User;
import net.bytebuddy.implementation.bind.annotation.RuntimeType;
import org.junit.jupiter.api.Test;
import org.springframework.beans.factory.annotation.Autowired;
import org.springframework.boot.test.context.SpringBootTest;
import org.springframework.data.redis.core.RedisTemplate;
import org.springframework.data.redis.core.StringRedisTemplate;
import org.springframework.data.redis.core.ValueOperations;


@SpringBootTest
class RedeisDemoApplicationTests {


    @Autowired
    private StringRedisTemplate template;

    // 序列化工具,jackson的序列化工具
    private static ObjectMapper mapper = new ObjectMapper();

    @Test
    void testString() throws JsonProcessingException {
        ValueOperations String = redisTemplate.opsForValue();
        String.set("name","zhangsan");
        String name = (String) String.get("name");
        System.out.println(name);

        User user = new User("zhangsan",20);
        String json = mapper.writeValueAsString(user);
        template.opsForValue().set("user:100",json);
        java.lang.String val = template.opsForValue().get("user:100");
        User user1 = mapper.readValue(val, User.class);
        System.out.println("user1 = " + user1);
    }

  /*  @Test
    void contextLoads() {
    }*/

}
【测试结果】
