Dubbo,入门Demo案列使用,框架原理,Zookeeper的使用,安装监控中心和管理控制台,service,provider,comsumer三个项目的Demo

  • Post author:
  • Post category:其他


  • dubbo

分布式企业级分布式框架

https://dubbo.gitbooks.io/dubbo-user-book/content/preface/background.html

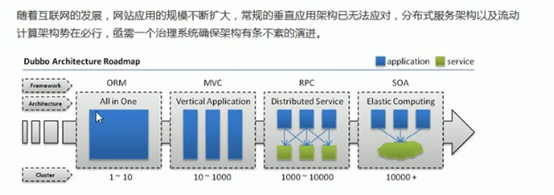
二,背景

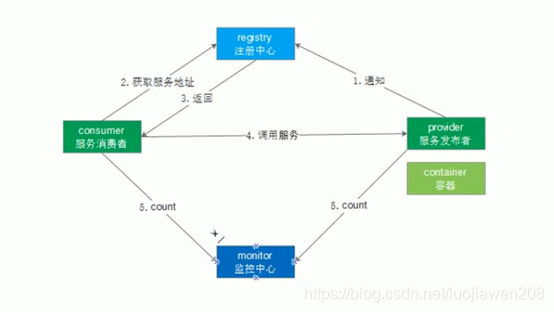
三,dubbo框架的原理
四,zookeeper

分布式协调服务组件

目的:解决分布式数据事务一致性

节点:类似于路径,节点可以存储数据

能做什么

  1. 管理配置文件
  2. 充当dubbo的注册中心
  3. 管理域名

单节点安装

条件:安装JDK,

解压,


http://archive.apache.org/dist/zookeeper/zookeeper-3.4.10/

创建配置文件zoo.cfg

启动

集群安装

安装三个zookeeper

  1. 创建集群目录

  1. 配置完整一个服务

复制单节点到集群目录

创建数据文件目录

在数据文件目录添加myid文件

修改zk1/conf/zoo.cfg

myid:用于存储节点表示(编号)

zoo.cfg文件:用于配置集群

  1. 复制2份,共计三个服务

分别修改zk2,zk3的myid,zoo.cfg文件内容

  1. 启动

注意:关闭单节点zookeeper,避免避免端口冲突

五,安装监控中心

  1. 创建安装目录

  1. 解压

  1. 修改配置文件

  1. 启动

禁用防火墙

六,安装管理控制台(不是必须安装,只是为了方便管理)

  1. 解压tomcat,清空tomcat/webapps/ROOT

  1. 解压dubbo-admin.war至tomcat/webapps/ROO目录

  1. 修改dubbo.properties

  1. 启动tomcat

七,项目结构

dubbo-service:用于添加JAVA接口interface

dubbo-provider:用于添加JAVA接口实现类,并且发布服务

dubbo-consumer:用于消费服务,即服务的调用

服务发布
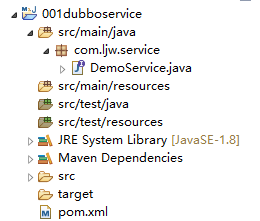
创建dubbo-service项目

https://mvnrepository.com/artifact/com.alibaba/dubbo/2.5.8

修改pom文件


<


dependency


>


<


groupId


>


com.alibaba


</


groupId


>


<


artifactId


>


dubbo


</


artifactId


>


<


version


>


2.5.8


</


version


>


</


dependency


>


<


dependency


>


<


groupId


>


org.apache.zookeeper


</


groupId


>


<


artifactId


>


zookeeper


</


artifactId


>


<


version


>


3.4.10


</


version


>


<


type


>


pom


</


type


>


</


dependency


>


<


dependency


>


<


groupId


>


com.101tec


</


groupId


>


<


artifactId


>


zkclient


</


artifactId


>


<


version


>


0.10


</


version


>


</


dependency


>


public


interface


DemoService {


void


sayHello(String


name


);


}

创建dubbo-provider 项目

修改pom文件添加依赖


<


dependencies


>


<


dependency


>


<


groupId


>


com.ljw


</


groupId


>


<


artifactId


>


001dubboservice


</


artifactId


>


<


version


>


0.0.1-SNAPSHOT


</


version


>


</


dependency


>


</


dependencies


>


public


class


DemoServiceImpl


implements


DemoService {


@Override


public


String sayHello(String


name


) {


return


“hello”


+


name


;


}


}

dubbo-provider.xml


<?


xml


version


=


“1.0”


encoding


=


“UTF-8”


?>


<


beans


xmlns


=


“http://www.springframework.org/schema/beans”


xmlns:xsi


=


“http://www.w3.org/2001/XMLSchema-instance”


xmlns:dubbo


=


“http://code.alibabatech.com/schema/dubbo”


xsi:schemaLocation


=


“http://www.springframework.org/schema/beans


http://www.springframework.org/schema/beans/spring-beans.xsd


http://code.alibabatech.com/schema/dubbo


http://code.alibabatech.com/schema/dubbo/dubbo.xsd”


>


<!– 1dubbo


项目名称,提供方应用信息,用于计算依赖关系


–>


<


dubbo:application


name


=


“demo-provider”


/>


<!– 2


注定注册中心,使用


zk


广播注册中心暴露服务地址


–>


<


dubbo:registry


id


=


“zk1”


address


=


“centos-node6:2181,centos-node6:2182”


protocol


=


“zookeeper”


/>


<!– 3


指定暴露接口,协议,用


dubbo


协议在


20880


端口暴露服务


–>


<


dubbo:protocol


id


=


“mydubbo”


name


=


“dubbo”


port


=


“20880”


/>


<!– 4


和本地


bean


一样实现服务


–>


<


bean


id


=


“demoService”


class


=


“com.ljw.service.impl.DemoServiceImpl”


/>


<!– 5


发布服务声明需要暴露的服务接口


–>


<


dubbo:service


interface


=


“com.ljw.service.DemoService”


ref


=


“demoService”


/>


</


beans


>

编写main方法发布


public


class


Provider {


public


static


void


main(String[]


args


)


throws


IOException {


//


读取配置文件,加载容器


ClassPathXmlApplicationContext


context


=


new


ClassPathXmlApplicationContext(


new


String[] {


“dubbo-provider.xml”


});


//


启动容器


context


.start();


//


输入任意字符停止程序


System.


in


.read();


}


}

创建dubbo-consumer项目

修改POM文件


<


dependencies


>


<


dependency


>


<


groupId


>


com.ljw


</


groupId


>


<


artifactId


>


001dubboservice


</


artifactId


>


<


version


>


0.0.1-SNAPSHOT


</


version


>


</


dependency


>


</


dependencies


>

创建dubbo-consumer.xml文件


<!– 1dubbo


项目名称,提供方应用信息,用于计算依赖关系


–>


<


dubbo:application


name


=


“demo-consumer”


/>


<!– 2


注定注册中心,使用


zk


广播注册中心暴露服务地址


–>


<


dubbo:registry


id


=


“zk1”


address


=


“centos-node6:2181,centos-node6:2182”


protocol


=


“zookeeper”


/>


<!– 3


,引用服务,生成远程服务代理,可以和本地


bean


一样使用


demoService –>


<


dubbo:reference


id


=


“demoService”


interface


=


“com.ljw.service.DemoService”


/>

编写测试类comsumer的main方法


public


class


Comsumer {


public


static


void


main(String[]


args


) {


//


读取配置文件,加载容器


ClassPathXmlApplicationContext


context


=


new


ClassPathXmlApplicationContext(


new


String[] {


“dubbo-comsumer.xml”


});


DemoService


bean


=


context


.getBean(


“demoService”


, DemoService.


class


);


String


hstr


=


bean


.sayHello(


“ljw”


);


System.


out


.println(


hstr


);


}


}

八,负载均衡和注解

配置文件的方式

  1. 随机

loadbalance=”dandom”

默认是随机的

  1. 轮询

如果很慢就会卡住拥挤

loadbalance=”roundrobin”

  1. 最小活跃数原则


loadbalance


=


“leastactive”

  1. 一致性hash原则

一次调用成功永远调用


loadbalance


=


“consistenthash”

comsummer的XML文件配置


<


dubbo:reference


id


=


“demoService”


interface


=


“com.ljw.service.DemoService”


loadbalance


=


“dandom”


/>

注解的方式

Provider项目修改配置,开启注解


<!– 1dubbo


项目名称,提供方应用信息,用于计算依赖关系


–>


<


dubbo:application


name


=


“demo-provider”


/>


<!– 2


注定注册中心,使用


zk


广播注册中心暴露服务地址


–>


<


dubbo:registry


id


=


“zk1”


address


=


“192.168.1.2:2181,192.168.1.2:2182”


protocol


=


“zookeeper”


/>


<!– 3


指定暴露接口,协议,用


dubbo


协议在


20880


端口暴露服务


–>


<


dubbo:protocol


id


=


“mydubbo”


name


=


“dubbo”


port


=


“20880”


/>


<!– 4


开启注解


–>


<


dubbo:annotation


package


=


“com.ljw.service”


/>

实现类添加注解


import


com.alibaba.dubbo.config.annotation.Service;


import


com.ljw.service.DemoService;


@Service


public


class


DemoServiceImpl


implements


DemoService {


@Override


public


String sayHello(String


name


) {


return


“hello”


+


name


;


}


}

Comsumer项目

POM


<


dependency


>


<


groupId


>


junit


</


groupId


>


<


artifactId


>


junit


</


artifactId


>


<


version


>


4.12


</


version


>


</


dependency


>


<


dependency


>


<


groupId


>


org.springframework


</


groupId


>


<


artifactId


>


spring-test


</


artifactId


>


<


version


>


4.3.10.RELEASE


</


version


>


<


scope


>


test


</


scope


>


</


dependency


>

开启注解


<!– 4


开启注解


–>


<


dubbo:annotation


package


=


“com.ljw.comsumer”


/>

测试类


@RunWith


(SpringJUnit4ClassRunner.


class


)


@ContextConfiguration


(locations =


“classpath:dubbo-consumer.xml”


)


public


class


ComsumerTest {


@Reference


(loadbalance = RoundRobinLoadBalance.


NAME


)


DemoService


demoService


;


@Test


public


void


testSayHello() {


String


hstr


=


this


.


demoService


.sayHello(


“ljw”


);


System.


out


.println(


hstr


);


}


}

九,dubbo多版本

部分程序更新,部分服务不更新的情况

Provider项目


@Service


(version =


“1.1.0”


)


public


class


DemoServiceImpl


implements


DemoService {


@Override


public


String sayHello(String


name


) {


return


“hello”


+


name


;


}


}

Comsumer项目


@RunWith


(SpringJUnit4ClassRunner.


class


)


@ContextConfiguration


(locations =


“classpath:dubbo-consumer.xml”


)


public


class


ComsumerTest {


@Reference


(loadbalance = RoundRobinLoadBalance.


NAME


,version =


“1.1.0”


)


DemoService


demoService


;


@Test


public


void


testSayHello() {


String


hstr


=


this


.


demoService


.sayHello(


“ljw”


);


System.


out


.println(


hstr


);


}


}

十,分组聚合

Comsumer


版权声明:本文为luojiawen208原创文章,遵循 CC 4.0 BY-SA 版权协议,转载请附上原文出处链接和本声明。