文章目录
[个人向x码农向]springboot笔记(上)
Acwing主页
Acwing的springboot课程地址
数据库配置
spring.datasource.username=root
spring.datasource.password=[你自己的密码]
spring.datasource.url=jdbc:mysql://127.0.0.1:3306/kob?serverTimezone=Asia/Shanghai&useUnicode=true&characterEncoding=utf-8
spring.datasource.driver-class-name=com.mysql.cj.jdbc.Driver
spring.datasource.username表示数据库用户名
spring.datasource.password表示数据库密码
spring.datasource.url表示远程数据库地址:
格式为:jdbc:[数据库类型]: //[ip]:[端口]/[数据库名]?[serverTimezone(时区)
中国人就Asia/Shanghai] [useUnicode(编码)] [characterEncoding,中国人就utf-8]
spring.datasource.driver-class-name记住就行
springboot层次划分
pojo层
将数据库的里表转换成class
值得注意的是,
int
类型在class里不要写
int
应该写
Interger
,因为如果是
int
的话,使用mybatis plus会有警告
pojo层可用注解
@Data
@NoArgsConstructor
@AllArgsConstructor
@Data是实现一些get和set方法
@NoArgsConstructor
@AllArgsConstructor
这两个是无参构造和有参构造
示例
package com.example.kob.pojo;

import com.baomidou.mybatisplus.annotation.IdType;
import com.baomidou.mybatisplus.annotation.TableId;
import lombok.AllArgsConstructor;
import lombok.Data;
import lombok.NoArgsConstructor;

@Data
@NoArgsConstructor
@AllArgsConstructor
public class User {

	//这个注解的意思是接下来的类的数据成员在数据库里是自动递增的
    @TableId(type = IdType.AUTO)
    private Integer id;

    private String username;
    private String password;
    private String photo;
}
这样就实现了一个pojo层
mapper层
对class的crud都映射到数据库里,也就是crud转换为sql语句
示例
package com.example.kob.mapper;

import com.baomidou.mybatisplus.core.mapper.BaseMapper;
import com.example.kob.pojo.User;
import org.apache.ibatis.annotations.Mapper;

@Mapper
public interface UserMapper extends BaseMapper<User> {
}
注意,mapper是一个接口
调用数据库的接口
使用@Autowired 注解定义
mapper
接口的实例
形如:
@Autowired
private UserMapper userMapper;
这样就可以在任何地方使用数据库的接口了
service层
实现具体的业务逻辑,也就是操控多个mapper来是实现业务
contorller层
接受前端的请求并且解析参数,然后选择传给哪一个service,然后返回给前端,也就是调度功能
contorller层可用注解
@RestController
@PostMapping
@GetMapping
@RequestMapping
@RestController:表示是一个controller
@PostMapping:表示只处理
post
请求
@GetMapping:表示只处理
get
请求
@RequestMapping:表示处理全部的请求
mybatis plus简单使用
查询
语句
// 查询所有
List<T> list();
// 查询列表
List<T> list(Wrapper<T> queryWrapper);
// 查询(根据ID 批量查询)
Collection<T> listByIds(Collection<? extends Serializable> idList);
// 查询(根据 columnMap 条件)
Collection<T> listByMap(Map<String, Object> columnMap);
// 查询所有列表
List<Map<String, Object>> listMaps();
// 查询列表
List<Map<String, Object>> listMaps(Wrapper<T> queryWrapper);
// 查询全部记录
List<Object> listObjs();
// 查询全部记录
<V> List<V> listObjs(Function<? super Object, V> mapper);
// 根据 Wrapper 条件,查询全部记录
List<Object> listObjs(Wrapper<T> queryWrapper);
// 根据 Wrapper 条件,查询全部记录
<V> List<V> listObjs(Wrapper<T> queryWrapper, Function<? super Object, V> mapper);
参数说明
| 类型 | 参数名 | 描述 |
|---|---|---|
| Wrapper | queryWrapper | 实体对象封装操作类 QueryWrapper |
| Collection<? extends Serializable> | idList | 主键 ID 列表 |
| Map<String, Object> | columnMap | 表字段 map 对象 |
| Function<? super Object, V> | mapper | 转换函数 |
示例
查询所有用户
@GetMapping("/ user/all/")
public List<User> getAll( {
    //null表示所有
	return userMapper.selectList(null);
}
根据id查询用户
GetMapping("/user/{userId}/")
//@PathVariable 表示解析路径里的参数, 注意参数不能有空格
public User getuser(@PathVariable int userId) {
	return userMapper.selectById(userId);
}
插入一个用户
GetMapping("/user/add/{userId}/{username}/{password}/")
    public string adduser(@PathVariable int userId,
                          @PathVariable String username,
                          @PathVariable String password) {
	User user = new User(userId, username, password);
    userMapper.insert(user);
	return "Add User successfully" ;
}
删除一个用户
GetMapping("/user/ delete/{userId}/")
public string deleteUser(@PathVariable int userId) {
	userMapper.deleteById(userId);
	return "Delete User successfully";
}
根据条件
查询某一个
@GetMapping("/user/{userId}/")
public User getuser(@PathVariable int userId) {
    //构造条件构造器
	QueryWrapper<User> queryWrapper = new QueryWrapper<>();queryWrapper.eq("id",userId);
	return userMapper.select0ne(queryWrapper);
}
大于等于2,小于等于3
GetMapping(" /user/{userId}/")
public User getuser(@PathVariable int userId) {
	QueryWrapper<User> queryWrapper = new QueryWrapper<>() ;

    //可以一直点下去
    queryWrapper.ge("id", 2).le( column: "id",val: 3);
    return userMapper.selectone(queryWrapper);
}
Spring Security
让security对接数据库,从而实现通过数据库来判断一个用户是否登录
service类:UserDetailsService
package com.example.kob.service.impl;

import com.baomidou.mybatisplus.core.conditions.query.QueryWrapper;
import com.example.kob.mapper.UserMapper;
import com.example.kob.pojo.User;
import com.example.kob.service.utils.UserDetailsImpl;
import org.springframework.beans.factory.annotation.Autowired;
import org.springframework.security.core.userdetails.UserDetails;
import org.springframework.security.core.userdetails.UserDetailsService;
import org.springframework.security.core.userdetails.UsernameNotFoundException;
import org.springframework.stereotype.Service;


//让security对接数据库,从而实现通过数据库来判断一个用户是否登录
@Service
public class UserDetailsServiceImpl implements UserDetailsService {

    @Autowired
    private UserMapper userMapper;

    //该方法接受一个String,返回一个UserDetails
    //所以还要写一个工具类实现UserDetails
    @Override
    public UserDetails loadUserByUsername(String username) throws UsernameNotFoundException {
        QueryWrapper<User> queryWrapper = new QueryWrapper<>();
        queryWrapper.eq("username", username);
        User user = userMapper.selectOne(queryWrapper);
        if (user == null) {
            throw new RuntimeException("用户不存在");
        }

        //实现完UserDetails就可以直接返回了
        return new UserDetailsImpl(user);
    }
}
工具类:UserDetailsImpl
package com.example.kob.service.utils;

import com.example.kob.pojo.User;
import lombok.AllArgsConstructor;
import lombok.Data;
import lombok.NoArgsConstructor;
import org.springframework.security.core.GrantedAuthority;
import org.springframework.security.core.userdetails.UserDetails;

import java.util.Collection;

@Data
@NoArgsConstructor
@AllArgsConstructor
public class UserDetailsImpl implements UserDetails {

    private User user;

    @Override
    public Collection<? extends GrantedAuthority> getAuthorities() {
        return null;
    }

    @Override
    public String getPassword() {
        return user.getPassword();
    }

    @Override
    public String getUsername() {
        return user.getUsername();
    }

    @Override
    public boolean isAccountNonExpired() {
        return true;
    }

    //是否锁定
    @Override
    public boolean isAccountNonLocked() {
        return true;
    }

    //授权是否过期
    @Override
    public boolean isCredentialsNonExpired() {
        return true;
    }

    //是否启用
    @Override
    public boolean isEnabled() {
        return true;
    }
}
以上,就可以简单实现用户用自己的密码登录网站,但是没有写加密类,所以需要在数据库里
user
的密码一栏写
{noop}
告诉数据库,这个是明文保存
当然这样不好,所以需要实现一个加密类
加密类
package com.example.kob.config;

import com.example.kob.config.filter.JwtAuthenticationTokenFilter;
import org.springframework.beans.factory.annotation.Autowired;
import org.springframework.context.annotation.Bean;
import org.springframework.context.annotation.Configuration;
import org.springframework.http.HttpMethod;
import org.springframework.security.authentication.AuthenticationManager;
import org.springframework.security.config.annotation.web.builders.HttpSecurity;
import org.springframework.security.config.annotation.web.configuration.EnableWebSecurity;
import org.springframework.security.config.annotation.web.configuration.WebSecurityConfigurerAdapter;
import org.springframework.security.config.http.SessionCreationPolicy;
import org.springframework.security.crypto.bcrypt.BCryptPasswordEncoder;
import org.springframework.security.crypto.password.PasswordEncoder;
import org.springframework.security.web.authentication.UsernamePasswordAuthenticationFilter;

@Configuration
@EnableWebSecurity
public class SecurityConfig extends WebSecurityConfigurerAdapter {
    @Autowired
    private JwtAuthenticationTokenFilter jwtAuthenticationTokenFilter;

   	//Bean注解:添加组件
    //返回加密方法
    @Bean
    public PasswordEncoder passwordEncoder() {
        return new BCryptPasswordEncoder();
    }

    @Bean
    @Override
    public AuthenticationManager authenticationManagerBean() throws Exception {
        return super.authenticationManagerBean();
    }

    //下面的路径是能够公开放行的路径
    //其他路径需要验证JWTtoken,否则一律被拦截
    //修改路径,其余照抄即可
    @Override
    protected void configure(HttpSecurity http) throws Exception {
        http.csrf().disable()
                .sessionManagement().sessionCreationPolicy(SessionCreationPolicy.STATELESS)
                .and()
                .authorizeRequests()
                .antMatchers("/user/account/token/", "/user/account/register/").permitAll()
                .antMatchers(HttpMethod.OPTIONS).permitAll()
                .anyRequest().authenticated();

        http.addFilterBefore(jwtAuthenticationTokenFilter, UsernamePasswordAuthenticationFilter.class);
    }

}
其他层使用Spring Security
demo
注册的时候加密密码
GetMapping(" /user/add/{userId}/{username}/{password}/")
public string addUser(@PathVariable int userId,
					  @PathVariable String username,
                      @PathVariable string password) {
	PasswordEncoder passwordEncoder = new BCryptPasswordEncoder();
    String encodedPassword = passwordEncoder.encode(password);
	User user = new User(userId,username,encodedPassword);userMapper.insert(user);
	return "Add User Successfully";
}
JWT
服务器给用户返回一个JWT的token,用户登录网站的时候带上这个token就可以访问一些不公开网页
有两种token
- access token:时间较短,比如说5分钟
- refresh token:时间较长,比如说14天
JWT工具类
package com.example.kob.utils;

import io.jsonwebtoken.Claims;
        import io.jsonwebtoken.JwtBuilder;
        import io.jsonwebtoken.Jwts;
        import io.jsonwebtoken.SignatureAlgorithm;
        import org.springframework.stereotype.Component;

        import javax.crypto.SecretKey;
        import javax.crypto.spec.SecretKeySpec;
        import java.util.Base64;
        import java.util.Date;
        import java.util.UUID;

@Component
public class JwtUtil {
    public static final long JWT_TTL = 60 * 60 * 1000L * 24 * 14;  // 有效期14天

    //密钥,尽量长一些,大小写英文数字
    public static final String JWT_KEY = "JSDFSDFSDFASJDHASDASDdfa32dJHASFDA67765asda123";

    public static String getUUID() {
        return UUID.randomUUID().toString().replaceAll("-", "");
    }

    public static String createJWT(String subject) {
        JwtBuilder builder = getJwtBuilder(subject, null, getUUID());
        return builder.compact();
    }

    private static JwtBuilder getJwtBuilder(String subject, Long ttlMillis, String uuid) {
        SignatureAlgorithm signatureAlgorithm = SignatureAlgorithm.HS256;
        SecretKey secretKey = generalKey();
        long nowMillis = System.currentTimeMillis();
        Date now = new Date(nowMillis);
        if (ttlMillis == null) {
            ttlMillis = JwtUtil.JWT_TTL;
        }

        long expMillis = nowMillis + ttlMillis;
        Date expDate = new Date(expMillis);
        return Jwts.builder()
                .setId(uuid)
                .setSubject(subject)
                .setIssuer("sg")
                .setIssuedAt(now)
                .signWith(signatureAlgorithm, secretKey)
                .setExpiration(expDate);
    }

    public static SecretKey generalKey() {
        byte[] encodeKey = Base64.getDecoder().decode(JwtUtil.JWT_KEY);
        return new SecretKeySpec(encodeKey, 0, encodeKey.length, "HmacSHA256");
    }

    public static Claims parseJWT(String jwt) throws Exception {
        SecretKey secretKey = generalKey();
        return Jwts.parserBuilder()
                .setSigningKey(secretKey)
                .build()
                .parseClaimsJws(jwt)
                .getBody();
    }
}
如果JWT的token合法,那么接下来需要提取user到上下文中,所以需要一个配置类
package com.example.kob.config.filter;

import com.example.kob.mapper.UserMapper;
import com.example.kob.service.utils.UserDetailsImpl;
import com.example.kob.pojo.User;
import com.example.kob.utils.JwtUtil;
import io.jsonwebtoken.Claims;
import org.jetbrains.annotations.NotNull;
import org.springframework.beans.factory.annotation.Autowired;
import org.springframework.security.authentication.UsernamePasswordAuthenticationToken;
import org.springframework.security.core.context.SecurityContextHolder;
import org.springframework.stereotype.Component;
import org.springframework.util.StringUtils;
import org.springframework.web.filter.OncePerRequestFilter;
import javax.servlet.FilterChain;
import javax.servlet.ServletException;
import javax.servlet.http.HttpServletRequest;
import javax.servlet.http.HttpServletResponse;
import java.io.IOException;

@Component
public class JwtAuthenticationTokenFilter extends OncePerRequestFilter {
    @Autowired
    private UserMapper userMapper;

    @Override
    protected void doFilterInternal(HttpServletRequest request, @NotNull HttpServletResponse response, @NotNull FilterChain filterChain) throws ServletException, IOException {
        String token = request.getHeader("Authorization");

        if (!StringUtils.hasText(token) || !token.startsWith("Bearer ")) {
            filterChain.doFilter(request, response);
            return;
        }

        token = token.substring(7);

        String userid;
        try {
            Claims claims = JwtUtil.parseJWT(token);
            userid = claims.getSubject();
        } catch (Exception e) {
            throw new RuntimeException(e);
        }

        User user = userMapper.selectById(Integer.parseInt(userid));

        if (user == null) {
            throw new RuntimeException("用户名未登录");
        }

        UserDetailsImpl loginUser = new UserDetailsImpl(user);
        UsernamePasswordAuthenticationToken authenticationToken =
                new UsernamePasswordAuthenticationToken(loginUser, null, null);

        SecurityContextHolder.getContext().setAuthentication(authenticationToken);

        filterChain.doFilter(request, response);
    }

}
里程碑
到这里,你已经完成了
-
Spring Security
- 加密方法的使用
- 路径的拦截
-
JWT
- token的生成
- 提取User至上下文
-
mybatis-plus
- CRUD接口的使用
- 条件构造器的构造
- 如何在其他类里访问数据库
-
层次
- 熟悉各个层次的概念
- 简单demo实现
如果还有疑问,请多多看y总视频
接口实现
流程:
- Controller:调用service
- Service:写一个接口
- Service包下的impl包里写对应接口的实现
用户接口
用户登录
Service
接口
package com.example.kob.service.user.account;

import java.util.Map;

public interface LoginService {
    public Map<String, String > getToken(String userName, String password);
}
实现
package com.example.kob.service.impl.user.account;

import com.example.kob.pojo.User;
import com.example.kob.service.user.account.LoginService;
import com.example.kob.service.utils.UserDetailsImpl;
import com.example.kob.utils.JwtUtil;
import org.springframework.beans.factory.annotation.Autowired;
import org.springframework.security.authentication.AuthenticationManager;
import org.springframework.security.authentication.UsernamePasswordAuthenticationToken;
import org.springframework.security.core.Authentication;
import org.springframework.stereotype.Service;

import java.util.HashMap;
import java.util.Map;

@Service
public class LoginServiceImpl implements LoginService {

    @Autowired
    private AuthenticationManager authenticationManager;

    @Override
    public Map<String, String> getToken(String username, String password) {
        UsernamePasswordAuthenticationToken authenticationToken =
                new UsernamePasswordAuthenticationToken(username, password);
        Authentication authenticate = authenticationManager.authenticate(authenticationToken);  // 登录失败,会自动处理
        UserDetailsImpl loginUser = (UserDetailsImpl) authenticate.getPrincipal();
        User user = loginUser.getUser();
        String jwt = JwtUtil.createJWT(user.getId().toString());

        Map<String, String> map = new HashMap<>();
        map.put("msg", "success");
        map.put("token", jwt);

        return map;
    }
}
讲解
- 封装加密
由于账号密码在数据库中不是明文保存,所以需要封装加密一层,也就是用到了
UsernamePasswordAuthenticationToken
,这样就实现了对账号密码的加密
- 验证登录
authenticationManager
的
authenticate
方法会验证用户账号密码,成功即登录,失败则抛出异常
- 提取用户信息
用户登录成功,我们需要从数据库取出用户,就用到
authenticate
的
getPrincipal
方法,来获取用户信息
- 返回信息
如果用户登录成功后则创建
JWT token
返回给用户,还有返回其他信息
为什么要获取用户信息?
不是可以根据用户名来知道是什么用户登录吗,为什么还要从数据库中提取用户信息出来,原因在于,要利用用户的
ID
来生成token
Controller
package com.example.kob.controller.usr.account;

import com.example.kob.service.user.account.LoginService;
import org.springframework.beans.factory.annotation.Autowired;
import org.springframework.web.bind.annotation.PostMapping;
import org.springframework.web.bind.annotation.RequestParam;
import org.springframework.web.bind.annotation.RestController;

import java.util.Map;

@RestController
public class LoginController {
    @Autowired
    private LoginService loginService;

    @PostMapping("/user/account/token/")
    public Map<String, String> getToken(@RequestParam Map<String, String> map) {
        String username = map.get("username");
        String password = map.get("password");
        return loginService.getToken(username, password);
    }

}
测试
postman
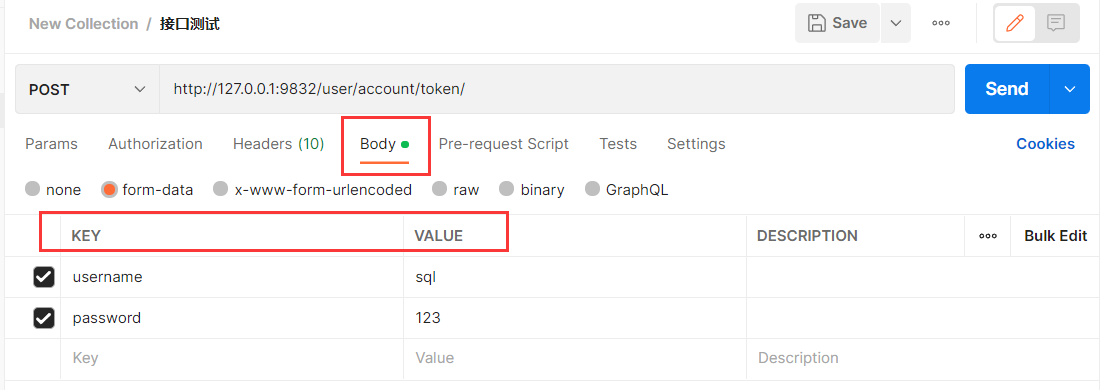
在
body
字段里,添加数据,也就是用户名和密码,注意
URL
的
IP
字段和
Port
字段要与自己的一致
以上信息填写完毕后点击
Send
按钮即可
如图:
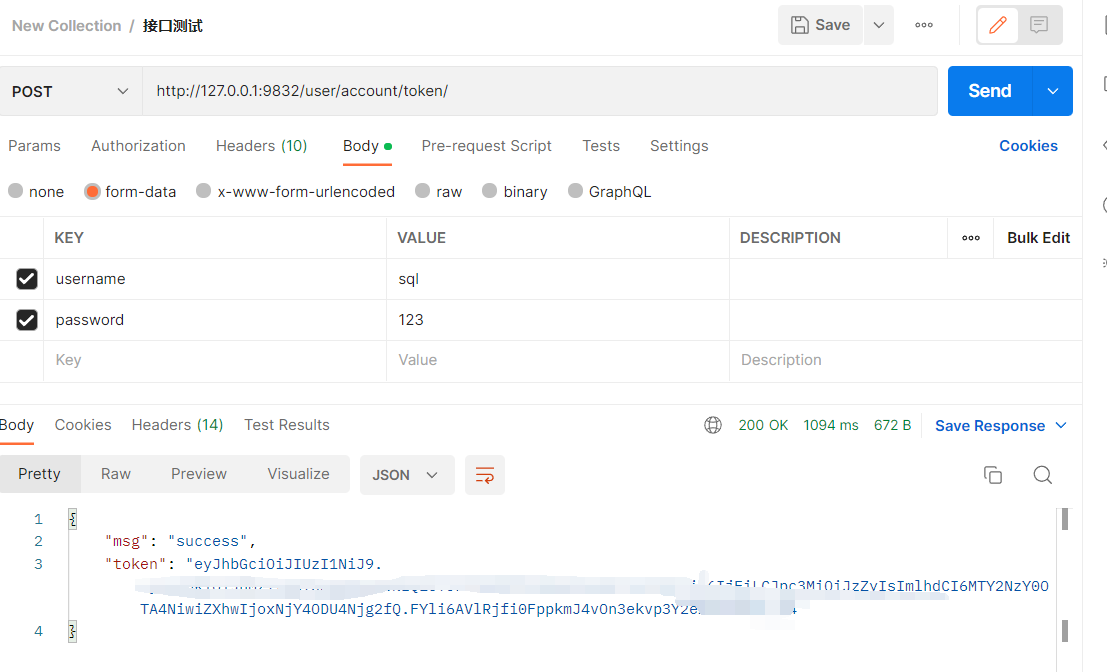
如果成功会返回正确后端填写的信息以及token,失败则会报错,根据报错信息修改bug即可
Ajax
$.ajax({
	url: "http://127.0.0.1: 3000/ pk/getbotinfo/",
    type: "post",
	data: {
		username: 'yxc',
        password:"pyxc",
    },
	success(resp){
		console.log(resp);},
	error(resp)d
		console.log(resp);
}
type
字段大小写都可
用户信息
Service
接口
package com.example.kob.service.user.account;

import java.util.Map;

public interface InfoService {

    Map<String, String> getInfo();
}
实现
package com.example.kob.service.impl.user.account;

import com.example.kob.pojo.User;
import com.example.kob.service.user.account.InfoService;
import com.example.kob.service.utils.UserDetailsImpl;
import org.springframework.security.authentication.UsernamePasswordAuthenticationToken;
import org.springframework.security.core.context.SecurityContextHolder;
import org.springframework.stereotype.Service;

import java.util.HashMap;
import java.util.Map;

@Service
public class InfoServiceImpl implements InfoService {
    @Override
    public Map<String, String> getInfo() {
        UsernamePasswordAuthenticationToken authentication =
                (UsernamePasswordAuthenticationToken) SecurityContextHolder.getContext().getAuthentication();

        UserDetailsImpl loginUser = (UserDetailsImpl) authentication.getPrincipal();
        User user = loginUser.getUser();

        Map<String, String> map = new HashMap<>();
        map.put("msg", "success");
        map.put("id", user.getId().toString());
        map.put("username", user.getUsername());
        map.put("photo", user.getPhoto());
        return map;
    }
}
讲解
- 从上下文中获取用户
不获取用户怎么知道用户信息?一堆API,背过即可
-
创建
map
返回相关信息
Controller
package com.example.kob.controller.usr.account;

import com.example.kob.service.user.account.InfoService;
import org.springframework.beans.factory.annotation.Autowired;
import org.springframework.web.bind.annotation.GetMapping;
import org.springframework.web.bind.annotation.RestController;

import java.util.Map;

@RestController
public class InfoController {
    @Autowired
    private InfoService infoService;

    @GetMapping("/user/account/info/")
    public Map<String, String> getInfo() {
        return infoService.getInfo();
    }

}
测试
$.ajax({
	url: "http://127.0.0.1: 3000/user / account/info/",
    type: "get",
	headers: {
		Authorization: "Bearer " + "/*你自己的token*/"
    },
	success(resp) {
		console.log(resp);
    },
	error(resp){
		console.log(resp);
}
切记
:
Bearer
字段后有且仅有一个空格,这个可以自己定义
注册用户
Service
接口
package com.example.kob.service.user.account;

import java.util.Map;

public interface RegisterService {
    public Map<String, String > register(String username, String password, String confirmedPassword);
}
实现
大量
if else
警告⚠
可以自己实现一个
utils
来解耦合
package com.example.kob.service.impl.user.account;

import com.baomidou.mybatisplus.core.conditions.query.QueryWrapper;
import com.example.kob.mapper.UserMapper;
import com.example.kob.pojo.User;
import com.example.kob.service.user.account.RegisterService;
import org.springframework.beans.factory.annotation.Autowired;
import org.springframework.security.crypto.password.PasswordEncoder;
import org.springframework.stereotype.Service;

import java.util.HashMap;
import java.util.List;
import java.util.Map;

@Service
public class RegisterServiceImpl implements RegisterService {
    @Autowired
    private UserMapper userMapper;

    @Autowired
    private PasswordEncoder passwordEncoder;

    @Override
    public Map<String, String> register(String username, String password, String confirmedPassword) {
        Map<String, String> map = new HashMap<>();
        if (username == null) {
            map.put("msg", "用户名不能为空");
            return map;
        }
        if (password == null || confirmedPassword == null) {
            map.put("msg", "密码不能为空");
            return map;
        }

        username = username.trim();
        if (username.length() == 0) {
            map.put("msg", "用户名不能为空");
            return map;
        }

        if (password.length() == 0 || confirmedPassword.length() == 0) {
            map.put("msg", "密码不能为空");
            return map;
        }

        if (username.length() > 100) {
            map.put("msg", "用户名长度不能大于100");
            return map;
        }

        if (password.length() > 100 || confirmedPassword.length() > 100) {
            map.put("msg", "密码长度不能大于100");
            return map;
        }

        if (!password.equals(confirmedPassword)) {
            map.put("msg", "两次输入的密码不一致");
            return map;
        }

        QueryWrapper<User> queryWrapper = new QueryWrapper<>();
        queryWrapper.eq("username", username);
        List<User> users = userMapper.selectList(queryWrapper);
        if (!users.isEmpty()) {
            map.put("msg", "用户名已存在");
            return map;
        }

        String encodedPassword = passwordEncoder.encode(password);
        String photo = "https://cdn.acwing.com/media/user/profile/photo/1_lg_844c66b332.jpg";
        User user = new User(null, username, encodedPassword, photo);
        userMapper.insert(user);

        map.put("msg", "success");
        return map;
    }
}
讲解
- 条件特判
- 密码加密
- 数据库插入
- 返回前端信息
Controller
package com.example.kob.controller.usr.account;

import com.example.kob.service.user.account.RegisterService;
import org.springframework.beans.factory.annotation.Autowired;
import org.springframework.web.bind.annotation.PostMapping;
import org.springframework.web.bind.annotation.RequestParam;
import org.springframework.web.bind.annotation.RestController;

import java.util.Map;

@RestController
public class RegisterController {
    @Autowired
    private RegisterService registerService;

    @PostMapping("/user/account/register/")
    public Map<String, String> register(@RequestParam Map<String, String> map) {
        String username = map.get("username");
        String password = map.get("password");
        String confirmedPassword = map.get("confirmedPassword");

        return registerService.register(username, password, confirmedPassword);
    }

}
测试
$.ajax({
	url: "http://127.8.0.1:3000/user/account/register/",
    type: "post",
	data: {
		username: "yxc",
        password: "123",
		confirmedPassword: "123",
    },
	success(resp){
		console.log(resp);
    },
	error(resp){
		console. log(resp);
    }
}
创建Bot
注意:
-
即使在数据库里如果某表的某属性是
下划线
,
pojo
层类的数据成员的命名格式还必须是
驼峰
-
pojo
的时间格式说明
@JsonFormat(pattern = “yyyy-MM-dd HH : mm : ss “)
Service
接口
package com.kob.backend.service.user.bot;

import java.util.Map;

public interface AddService {
    Map<String, String> add(Map<String, String> data);
}
实现
package com.kob.backend.service.impl.user.bot;

import com.kob.backend.mapper.BotMapper;
import com.kob.backend.pojo.Bot;
import com.kob.backend.pojo.User;
import com.kob.backend.service.impl.utils.UserDetailsImpl;
import com.kob.backend.service.user.bot.AddService;
import org.springframework.beans.factory.annotation.Autowired;
import org.springframework.security.authentication.UsernamePasswordAuthenticationToken;
import org.springframework.security.core.context.SecurityContextHolder;
import org.springframework.stereotype.Service;

import java.util.Date;
import java.util.HashMap;
import java.util.Map;

@Service
public class AddServiceImpl implements AddService {

    @Autowired
    private BotMapper botMapper;

    @Override
    public Map<String, String> add(Map<String, String> data) {
        UsernamePasswordAuthenticationToken authenticationToken =
                (UsernamePasswordAuthenticationToken) SecurityContextHolder.getContext().getAuthentication();
        UserDetailsImpl loginUser = (UserDetailsImpl) authenticationToken.getPrincipal();
        User user = loginUser.getUser();

        String title = data.get("title");
        String description = data.get("description");
        String content = data.get("content");

        Map<String, String> map = new HashMap<>();

        if (title == null || title.length() == 0) {
            map.put("error_message", "标题不能为空");
            return map;
        }

        if (title.length() > 100) {
            map.put("error_message", "标题长度不能大于100");
            return map;
        }

        if (description == null || description.length() == 0) {
            description = "这个用户很懒,什么也没留下~";
        }

        if (description.length() > 300) {
            map.put("error_message", "Bot描述的长度不能大于300");
            return map;
        }

        if (content == null || content.length() == 0) {
            map.put("error_message", "代码不能为空");
            return map;
        }

        if (content.length() > 10000) {
            map.put("error_message", "代码长度不能超过10000");
            return map;
        }

        Date now = new Date();
        Bot bot = new Bot(null, user.getId(), title, description, content, 1500, now, now);

        botMapper.insert(bot);
        map.put("error_message", "success");

        return map;
    }
}
Controller
package com.kob.backend.controller.user.bot;

import com.kob.backend.service.user.bot.AddService;
import org.springframework.beans.factory.annotation.Autowired;
import org.springframework.web.bind.annotation.PostMapping;
import org.springframework.web.bind.annotation.RequestParam;
import org.springframework.web.bind.annotation.RestController;

import java.util.Map;

@RestController
public class AddController {
    @Autowired
    private AddService addService;

    @PostMapping("/user/bot/add/")
    public Map<String, String> add(@RequestParam Map<String, String> data) {
        return addService.add(data);
    }
}
删除、修改和查询都差不多一致,就不附上了
注解一览
- @component
@component是spring中的一个注解,它的作用就是实现bean的注入
- @Data
@Data注解是由Lombok库提供的,会生成getter、setter以及equals()、hashCode()、toString()等方法
- @Autowired
@Autowired是Spring对组件自动装配的一种方式。常用于在一个组件中引入其他组件
- @Configuration
@Configuration,告诉Spring Boot这是一个配置类
- @EnableWebSecurity(复合注解)
@EnableWebSecurity注解有两个作用:
1: 加载了WebSecurityConfiguration配置类, 配置安全认证策略。
2: 加载了AuthenticationConfiguration, 配置了认证信息
- @Bean
@Bean,往容器中注册(添加)一个组件
- @RequestMapping
@RequestMapping注解是用来映射请求的,即指明处理器可以处理哪些URL请求,该注解既可以用在类上,也可以用在方法上
- @RestController:
@RestController的作用等同于@Controller + @ResponseBody,可以理解为这个类是一个控制器类
- @Service
对于 service 层的类,在类上用 @Service 注解声明
- @NoArgsConstructor
@NoArgsConstructor在类上使用,这个注解可以生成无参构造方法
- @AllArgsConstructor
@AllArgsConstructor在类上使用,这个注解可以生成全参构造函数,且默认不生成无参构造函数