文章主要介绍一些常用语法、属性及其示例,如果需要了解详细的
goswagger
介绍,可以访问
官方文档
。你可以通过在代码中增加注释,来自动生成接口文档。文档的格式支持两种:一种是
json
,另外一种是
yaml
。要想通过代码注释生成接口文档,那么你的Go工程必须放在
$GOPATH/src
目录下。
使用swagger:meta定义接口的全局信息
属性
| 标记 | 含义 |
|---|---|
| Terms Of Service | 描述使用接口服务的一些协议,比如免责等 |
| Consumes | 描述接口默认请求的mime类型值,如果有多个,每个类型占据一行。支持的MIME类型有json,yaml,xml,txt,bin,urlform,multipartform |
| Produces | 描述接口默认响应的mime类型值,如果有多个,每个类型占据一行 |
| Schemes | 描述接口默认支持的协议类型,可能的值有http,https,ws,wss |
| Version | 当前接口的版本 |
| Host | 接口服务所在的域名 |
| Base path | 接口默认的根路径 |
| Contact |
通常来说是接口文档编写者的联系方式,格式:John Dan john.dan@example.com |
| License | 接口文档遵循的许可证名称 |
示例
// Package classification testProject API.
//
// the purpose of this application is to provide an application
// that is using plain go code to define an API
//
// This should demonstrate all the possible comment annotations
// that are available to turn go code into a fully compliant swagger 2.0 spec
//
// Terms Of Service:
//
// there are no TOS at this moment, use at your own risk we take no responsibility
//
//     Schemes: http, https
//     Host: localhost
//     BasePath: /v1
//     Version: 0.0.1
//     Contact: Haojie.zhao<haojie.zhao@changhong.com>
//
//     Consumes:
//     - application/json
//     - application/xml
//
//     Produces:
//     - application/json
//     - application/xml
//
// swagger:meta
package routers

import (
	"testProject/controllers"
	"github.com/astaxie/beego"
)

func init() {
    beego.Router("/", &controllers.MainController{})
}
然后在命令行里执行
swagger generate spec -o ./swagger.json
,执行完成后会在你工程的根目录下生成一个
swagger.json
文件。这就是自动生成的接口文档,上面内容生成的对应文件为:
{
  "consumes": [
    "application/json",
    "application/xml"
  ],
  "produces": [
    "application/json",
    "application/xml"
  ],
  "schemes": [
    "http",
    "https"
  ],
  "swagger": "2.0",
  "info": {
    "description": "the purpose of this application is to provide an application\nthat is using plain go code to define an API\n\nThis should demonstrate all the possible comment annotations\nthat are available to turn go code into a fully compliant swagger 2.0 spec",
    "title": "testProject API.",
    "termsOfService": "there are no TOS at this moment, use at your own risk we take no responsibility",
    "contact": {
      "name": "John Dan",
      "email": "john.dan@example.com"
    },
    "version": "0.0.1"
  },
  "host": "localhost",
  "basePath": "/v1",
  "paths": {}
}
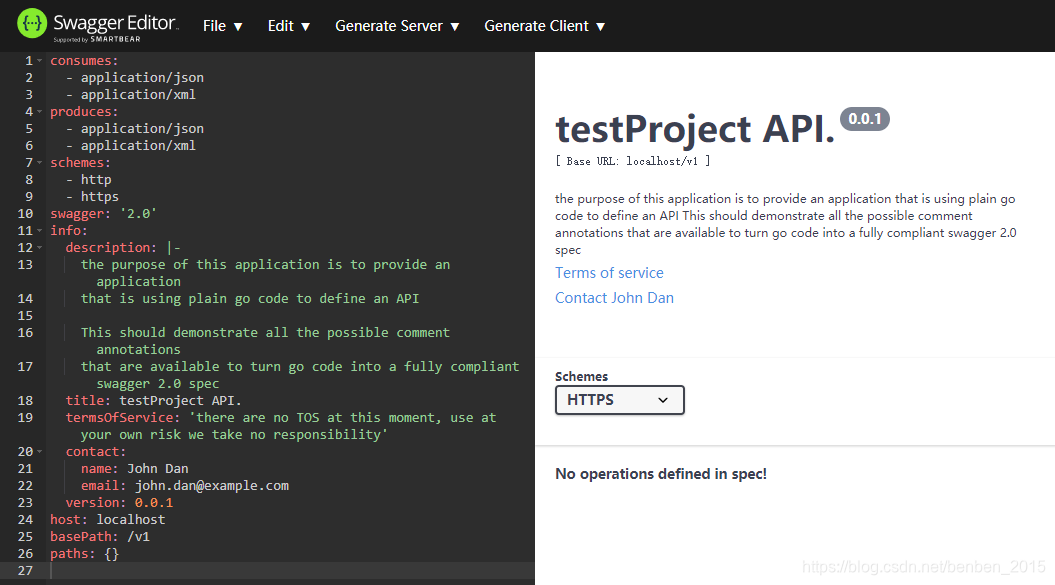
你可以在
swagger Editor
中查看接口文档,它会有一定样式,便于阅读。上面生成的接口文档如下图所示:
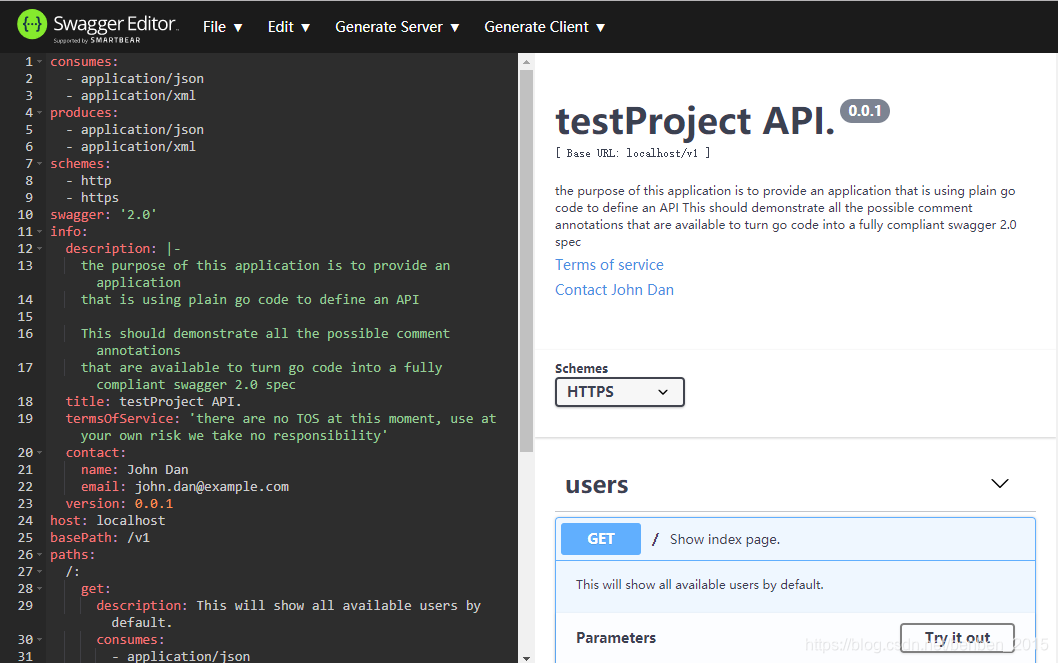
使用swagger:route定义路由信息
swagger:route
标记用来定义接口的路由信息,它会将路径连接到方法,此操作获取唯一
id
,该
id
在各个位置用作方法名称。语法如下:
swagger:route [method] [path pattern] [?tag1 tag2 tag3] [operation id]
。
属性
| 标记 | 含义 |
|---|---|
| Consumes | 描述接口支持的特定的mime类型值,如果有多个,每个类型占据一行。支持的MIME类型有json,yaml,xml,txt,bin,urlform,multipartform |
| Produces | 描述接口支持的特定的mime类型值,如果有多个,每个类型占据一行 |
| Schemes | 描述接口支持的特定协议类型,可能的值有http,https,ws,wss |
| Responses | 响应状态码字典 |
示例
package controllers

import (
	"github.com/astaxie/beego"
)

type MainController struct {
	beego.Controller
}

// Get serves the API for this get index page
func (c *MainController) Get() {
	// swagger:route GET / users indexPage
	//
	// Show index page.
	//
	// This will show all available users by default.
	//
	//     Consumes:
	//     - application/json
	//
	//     Produces:
	//     - application/json
	//
	//     Schemes: http, https, ws, wss
	//
	//     Responses:
	//       default: Resp
	//	     422: validationError
	c.Data["Website"] = "beego.me"
	c.Data["Email"] = "astaxie@gmail.com"
	c.TplName = "index.tpl"
}
使用swagger:response定义响应
使用
swagger:route
可以定义响应的名称,接着需要做的就是将这些响应名称和具体的响应结果对应起来。用法:
swagger:response [?response name]
。语法中的
response name
就是你在定义
swagger:route
的时候,通过
Response
属性设置的名字。
示例
package models
// A Resp is an response that is used when the request returned.
// swagger:response Resp
type Resp struct {
	// The response information
	// in: body
	//
	Body struct{
		// Required: true
		Status bool        `json:"status"`
		// Required: true
		Code   string      `json:"code"`
		// Required: true
		Msg    string      `json:"msg"`
		// An optional field name to which this validation applies
		Data   interface{} `json:"data,omitempty"`
	}
}

// A ValidationError is an error that is used when the required input fails validation.
// swagger:response validationError
type ValidationError struct {
	// The error message
	// in: body
	Body struct {
		// The validation message
		//
		// Required: true
		Message string
		// An optional field name to which this validation applies
		FieldName string
	}
}

注意:
通过上图可以看出,响应结构体必须嵌套在你之前定义的响应结果名称之内。
使用swagger:params定义参数信息
上面已经定义了接口地址相关信息,接着定义接口的参数信息。用法:
swagger:parameters [operationid1 operationid2]
,这里的
operationid1
,
operationid2
都是之前在定义
router
时确定的。例如某些接口可能会有相同的参数,我们就可以在这里使用它们
operationid
。
属性
| 标记 | 含义 |
|---|---|
| In | 在哪里找到参数,例如是在query中或者在path中,也可以是body |
| Required | 描述参数是否必须,true表示必须 |
示例
package models
// A Resp is an response that is used when the request returned.
// swagger:response Resp
type Resp struct {
	// The response information
	// in: body
	//
	Body struct{
		// Required: true
		Status bool        `json:"status"`
		// Required: true
		Code   string      `json:"code"`
		// Required: true
		Msg    string      `json:"msg"`
		// An optional field name to which this validation applies
		Data   interface{} `json:"data,omitempty"`
	}
}

// A ValidationError is an error that is used when the required input fails validation.
// swagger:response validationError
type ValidationError struct {
	// The error message
	// in: body
	Body struct {
		// The validation message
		//
		// Required: true
		Message string
		// An optional field name to which this validation applies
		FieldName string
	}
}

// swagger:parameters indexPage
type RequestParam struct {
	// in: body
	//
	Body struct{
		// a Nickname is user nick name which is string
		// Required: true
		Nickname string `json:"nickname"`
		Password string `json:"password"`
		VerifyCode int `json:"verifyCode"`
	}
}

可以看到在使用
swagger:parameters
定义
operation id
为
indexPage
的接口路由时,也是使用定义响应结构体那种形式,通过内嵌的方式实现。
使用swagger:strfmt定义格式化的字符串
语法为:
swagger:strfmt [name]
,默认的字符串格式名字有:
- uuid,uuid3,uuid4,uuid5
- uri(absolute)
- hostname
- ipv4
- ipv6
- credit card
- isbn,isbn10,isbn13
- social security number
- hexcolor
- rgbcolor
- date
- date-time
- duration
- password
- custom string formats
示例
当我们把之前定义的请求参数,添加一个参数email,它的格式应该为邮件格式的字符串。那么可以这样定义。
// swagger:parameters indexPage
type RequestParam struct {
	// in: body
	//
	Body struct {
		// a Nickname is user nick name which is string
		// Required: true
		Nickname   string `json:"nickname"`
		Password   string `json:"password"`
		VerifyCode int    `json:"verifyCode"`
		// swagger:strfmt email
		Email string `json:"email"`
	}
}

生成的接口文档就会像上面那样。
使用swagger:model定义可以复用的数据结构
当你某个参数在多处使用,通常在Go代码中,你需要定义一个结构体。而要生成接口文档,你需要在定义好的结构体上添加下面的语法:
swagger:model [?modle name]
。当然你直接引用也是可以,好像接口文档没什么变化。
package models

import "github.com/go-openapi/strfmt"

// A Resp is an response that is used when the request returned.
// swagger:response Resp
type Resp struct {
	// The response information
	// in: body
	//
	Body struct {
		// Required: true
		Status bool `json:"status"`
		// Required: true
		Code string `json:"code"`
		// Required: true
		Msg string `json:"msg"`
		// An optional field name to which this validation applies
		Data User `json:"data,omitempty"`
	}
}

// A ValidationError is an error that is used when the required input fails validation.
// swagger:response validationError
type ValidationError struct {
	// The error message
	// in: body
	Body struct {
		// The validation message
		//
		// Required: true
		Message string
		// An optional field name to which this validation applies
		FieldName string
	}
}

// swagger:parameters indexPage
type RequestParam struct {
	// in: body
	//
	Body struct {
		// a Nickname is user nick name which is string
		// Required: true
		Nickname   string `json:"nickname"`
		Password   string `json:"password"`
		VerifyCode int    `json:"verifyCode"`
		// swagger:strfmt email
		Email string `json:"email"`
	}
}

// User represents the user for this application
//
// A user is the security principal for this application.
//
// swagger:model
type User struct {
	// the id for this user
	//
	// required: true
	ID int64 `json:"id"`

	// the name for this user
	// required: true
	Name string `json:"name"`

	// the email address for this user
	// required: true
	Email strfmt.Email `json:"login"`
}

使用swagger:allOf将字段位置固定
如果结构体中需要直接内嵌其他结构体作为元素,是像下面这样,那么你需要使用
swagger:allOf
,否则接口文档无法检测出来。
示例
package models

import (
	"github.com/go-openapi/strfmt"
	"github.com/go-swagger/go-swagger/fixtures/goparsing/classification/transitive/mods"
)

// A Resp is an response that is used when the request returned.
// swagger:response Resp
type Resp struct {
	// The response information
	// in: body
	//
	Body struct {
		// Required: true
		Status bool `json:"status"`
		// Required: true
		Code string `json:"code"`
		// Required: true
		Msg string `json:"msg"`
		// An optional field name to which this validation applies
		Data User `json:"data,omitempty"`
	}
}

// A ValidationError is an error that is used when the required input fails validation.
// swagger:response validationError
type ValidationError struct {
	// The error message
	// in: body
	Body struct {
		// swagger:allOf
		SimpleOne
		// swagger:allOf
		mods.Notable

		Something // not annotated with anything, so should be included

		CreatedAt strfmt.DateTime `json:"createdAt"`
	}
}

// swagger:parameters indexPage
type RequestParam struct {
	// in: body
	//
	Body struct {
		// a Nickname is user nick name which is string
		// Required: true
		Nickname   string `json:"nickname"`
		Password   string `json:"password"`
		VerifyCode int    `json:"verifyCode"`
		// swagger:strfmt email
		Email string `json:"email"`
	}
}

// User represents the user for this application
//
// A user is the security principal for this application.
//
// swagger:model
type User struct {
	// the id for this user
	//
	// required: true
	ID int64 `json:"id"`

	// the name for this user
	// required: true
	Name string `json:"name"`

	// the email address for this user
	// required: true
	Email strfmt.Email `json:"login"`
}

// A SimpleOne is a model with a few simple fields
type SimpleOne struct {
	ID   int64  `json:"id"`
	Name string `json:"name"`
	Age  int32  `json:"age"`
}

// A Something struct is used by other structs
type Something struct {
	DID int64  `json:"did"`
	Cat string `json:"cat"`
}

// Notable is a model in a transitive package.
// it's used for embedding in another model
//
// swagger:model withNotes
type Notable struct {
	Notes string `json:"notes"`

	Extra string `json:"extra"`
}

使用swagger:ignore定义忽略的结构体
如果你需要将某个结构体从swagger输出中忽略,你需要使用:
swagger:ignore
。
使用swagger.json生成Go数据模型
通过上面这些步骤,你已经生成了一个自动的接口文档。swagger强大之处还在于它能够通过你的接口文档,来自动生成代码。前提是你的接口文档必须是没有语法错误的。
例如之前生成的
swagger.json
文件如下,我们可以用它来生成数据模型。
{
  "consumes": [
    "application/json",
    "application/xml"
  ],
  "produces": [
    "application/json",
    "application/xml"
  ],
  "schemes": [
    "http",
    "https"
  ],
  "swagger": "2.0",
  "info": {
    "description": "the purpose of this application is to provide an application\nthat is using plain go code to define an API\n\nThis should demonstrate all the possible comment annotations\nthat are available to turn go code into a fully compliant swagger 2.0 spec",
    "title": "testProject API.",
    "termsOfService": "there are no TOS at this moment, use at your own risk we take no responsibility",
    "contact": {
      "name": "John Dan",
      "email": "john.dan@example.com"
    },
    "version": "0.0.1"
  },
  "host": "localhost",
  "basePath": "/v1",
  "paths": {
    "/": {
      "get": {
        "description": "This will show all available users by default.",
        "consumes": [
          "application/json"
        ],
        "produces": [
          "application/json"
        ],
        "schemes": [
          "http",
          "https",
          "ws",
          "wss"
        ],
        "tags": [
          "users"
        ],
        "summary": "Show index page.",
        "operationId": "indexPage",
        "parameters": [
          {
            "name": "Body",
            "in": "body",
            "schema": {
              "type": "object",
              "required": [
                "nickname"
              ],
              "properties": {
                "email": {
                  "type": "string",
                  "format": "email",
                  "x-go-name": "Email"
                },
                "nickname": {
                  "description": "a Nickname is user nick name which is string",
                  "type": "string",
                  "x-go-name": "Nickname"
                },
                "password": {
                  "type": "string",
                  "x-go-name": "Password"
                },
                "verifyCode": {
                  "type": "integer",
                  "format": "int64",
                  "x-go-name": "VerifyCode"
                }
              }
            }
          }
        ],
        "responses": {
          "422": {
            "$ref": "#/responses/validationError"
          },
          "default": {
            "$ref": "#/responses/Resp"
          }
        }
      }
    }
  },
  "definitions": {
    "User": {
      "description": "A user is the security principal for this application.",
      "type": "object",
      "title": "User represents the user for this application",
      "required": [
        "id",
        "name",
        "login"
      ],
      "properties": {
        "id": {
          "description": "the id for this user",
          "type": "integer",
          "format": "int64",
          "x-go-name": "ID"
        },
        "login": {
          "description": "the email address for this user",
          "type": "string",
          "format": "email",
          "x-go-name": "Email"
        },
        "name": {
          "description": "the name for this user",
          "type": "string",
          "x-go-name": "Name"
        }
      },
      "x-go-package": "testProject/models"
    },
    "withNotes": {
      "description": "it's used for embedding in another model",
      "type": "object",
      "title": "Notable is a model in a transitive package.",
      "properties": {
        "extra": {
          "type": "string",
          "x-go-name": "Extra"
        },
        "notes": {
          "type": "string",
          "x-go-name": "Notes"
        }
      },
      "x-go-name": "Notable",
      "x-go-package": "github.com/go-swagger/go-swagger/fixtures/goparsing/classification/transitive/mods"
    }
  },
  "responses": {
    "Resp": {
      "description": "A Resp is an response that is used when the request returned.",
      "schema": {
        "type": "object",
        "required": [
          "status",
          "code",
          "msg"
        ],
        "properties": {
          "code": {
            "type": "string",
            "x-go-name": "Code"
          },
          "data": {
            "$ref": "#/definitions/User"
          },
          "msg": {
            "type": "string",
            "x-go-name": "Msg"
          },
          "status": {
            "type": "boolean",
            "x-go-name": "Status"
          }
        }
      }
    },
    "validationError": {
      "description": "A ValidationError is an error that is used when the required input fails validation.",
      "schema": {
        "allOf": [
          {
            "type": "object",
            "properties": {
              "age": {
                "type": "integer",
                "format": "int32",
                "x-go-name": "Age"
              },
              "id": {
                "type": "integer",
                "format": "int64",
                "x-go-name": "ID"
              },
              "name": {
                "type": "string",
                "x-go-name": "Name"
              }
            }
          },
          {
            "$ref": "#/definitions/withNotes"
          },
          {
            "type": "object",
            "properties": {
              "cat": {
                "type": "string",
                "x-go-name": "Cat"
              },
              "createdAt": {
                "type": "string",
                "format": "date-time",
                "x-go-name": "CreatedAt"
              },
              "did": {
                "type": "integer",
                "format": "int64",
                "x-go-name": "DID"
              }
            }
          }
        ]
      }
    }
  }
}
使用命令
swagger generate model -a ./models/ -f ./swagger.json
,
-a
参数用来定义你生成代码的包路径,
-f
参数用来指定你接口文档路径。
生成代码前,
swagger
首先会验证你的文档是否有效。例如上面的代码成功后,会在
models
目录下生成两个文件。一个是
notable.go
,一个是
user.go
文件。
生成的结构体中字段的类型可能和之前的不太一样,变成了对应类型的指针。另外针对不同的数据模型,生成了不同的验证函数。

参考文章