复习
1、location 匹配规则:精准 –》普通 –》正则(非正则除外)
2、代理传参:proxy_pass = ip:port , 将整个 path 部分传入 tomcat
proxy_pass = ip:port/xxx , 只将匹配 path 的剩余部分传入 tomcat
3、rewrite 【break/last/redirect/permanent/null】
中断无 location/中断有location**/中断 302/中断 301/**不中断 location
4、request 全阶段
Server_rewrite/Find_config/Rewrite/access…/Content
前一阶段命令全部执行完毕 —-》进行下一阶段命令
5、index 命令 —-》查找文件存在? —-》是,刷新 location 匹配(回 Find_config 阶段)
一. 负载
upstream
语法格式:
upstream 负载名 {

	[ip_hash;]

	server ip:port [weight=数字] [down];
	server ip:port [weight=数字];

}
1. 轮询(默认)
upstream order {
	server 192.168.0.128:8383;
	server 192.168.244.233:8383;
}
2. 权重 weight
upstream order {
	server 192.168.0.128:8383 weight=3;
	server 192.168.244.233:8383 weight=1 down;
}
3. ip_hash
upstream order {
	ip_hash;
	server 192.168.0.128:8383;
	server 192.168.244.233:8383;
}
可以简单解决session问题
4. 使用upstream
格式:proxy_pass http://负载名;
location /order/book {
	proxy_pass http://upstream-name/context
}
二. Openresty 使用
OpenResty 是一个全功能的 Web 应用服务器。它打包了标准的 Nginx 核心,常用的第 三方模块以及大多数依赖项。 可以把它看成是 Nginx 附加众多的第三方插件的合集。其主体是嵌入 lua 脚本的支持,让你能够使用 lua 灵活地处理运算逻辑。
lua 为 Nginx 带来的新的处理方式,及 OpenResty 组件的使用。
0. 卸载nginx
#1.停止nginx
ps -ef | grep nginx
kill -9 pid
# 或者
nginx -s stop

#2.查找所有的nginx文件
> find / -name nginx
/etc/nginx
/usr/local/openresty/nginx
/usr/local/nginx
/usr/local/nginx/sbin/nginx
/nginx-1.15.8/objs/nginx

#3.删除文件
rm -rf /usr/local/nginx
rm -rf /usr/local/nginx/sbin/nginx
1. Openresty 的安装配置
yum安装方式
此方式简单,缺点是无法干预启停插件
yum install yum-utils
yum-config-manager --add-repo https://openresty.org/package/centos/openresty.repo
yum install openresty
源码安装方式
wget https://openresty.org/download/openresty-1.15.8.1.tar.gz
tar -zxvf openresty-1.15.8.1.tar.gz
##选择需要的插件启用, --with-Components 激活组件,--without 则是禁止组件
./configure --without-http_redis2_module --with-http_iconv_module
make && make install
vi /etc/profile ##加入 path 路径
source /etc/profile ##生效配置
安装检测
nginx -V ##如下显示,则表示安装成功
nginx version: openresty/1.19.9.1
built by gcc 8.4.1 20200928 (Red Hat 8.4.1-1) (GCC)
built with OpenSSL 1.1.1k  25 Mar 2021 (running with OpenSSL 1.1.1l  24 Aug 2021)
TLS SNI support enabled
configure arguments: --prefix=/usr/local/openresty/nginx --with-cc-opt='-O2 -DNGX_LUA_ABORT_AT_PANIC -I/usr/local/openresty/zlib/include -I/usr/local/openresty/pcre/include -I/usr/local/openresty/openssl111/include' --add-module=../ngx_devel_kit-0.3.1 --add-module=../echo-nginx-module-0.62 --add-module=../xss-nginx-module-0.06 --add-module=../ngx_coolkit-0.2 --add-module=../set-misc-nginx-module-0.32 --add-module=../form-input-nginx-module-0.12 --add-module=../encrypted-session-nginx-module-0.08 --add-module=../srcache-nginx-module-0.32 --add-module=../ngx_lua-0.10.20 --add-module=../ngx_lua_upstream-0.07 --add-module=../headers-more-nginx-module-0.33 --add-module=../array-var-nginx-module-0.05 --add-module=../memc-nginx-module-0.19 --add-module=../redis2-nginx-module-0.15 --add-module=../redis-nginx-module-0.3.7 --add-module=../ngx_stream_lua-0.0.10 --with-ld-opt='-Wl,-rpath,/usr/local/openresty/luajit/lib -L/usr/local/openresty/zlib/lib -L/usr/local/openresty/pcre/lib -L/usr/local/openresty/openssl111/lib -Wl,-rpath,/usr/local/openresty/zlib/lib:/usr/local/openresty/pcre/lib:/usr/local/openresty/openssl111/lib' --with-cc='ccache gcc -fdiagnostics-color=always' --with-pcre-jit --with-stream --with-stream_ssl_module --with-stream_ssl_preread_module --with-http_v2_module --without-mail_pop3_module --without-mail_imap_module --without-mail_smtp_module --with-http_stub_status_module --with-http_realip_module --with-http_addition_module --with-http_auth_request_module --with-http_secure_link_module --with-http_random_index_module --with-http_gzip_static_module --with-http_sub_module --with-http_dav_module --with-http_flv_module --with-http_mp4_module --with-http_gunzip_module --with-threads --with-compat --with-stream --with-http_ssl_module
2. Lua 介入 Nginx
主要帮助对 http 请求取参、取 header 头、输出等
ngx.arg
指令参数,如跟在 content_by_lua_file 后面的参数
ngx.var
request 变量,ngx.var.VARIABLE 引用某个变量
ngx.ctx
请求的 lua 上下文
ngx.header
响应头,ngx.header.HEADER 引用某个头
ngx.status
响应码
ngx.log
输出到 error.log
ngx.send_headers
发送响应头
ngx.headers_sent
响应头是否已发送
ngx.resp.get_headers
获取响应头
ngx.is_subrequest
当前请求是否是子请求
ngx.location.capture
发布一个子请求
ngx.location.capture_multi
发布多个子请求
ngx.print
输出响应
ngx.say
输出响应,自动添加‘\n‘
ngx.flush
刷新响应
ngx.exit
结束请求
Lua 嵌入 Nginx 的时机阶段
Nginx 执行 lua 脚本片断时,需要明确指明执行的 nginx 阶段时机。主要有以下几种时机:
set_by_lua* :
设置
nginx
变量,实现复杂的赋值逻辑
rewrite_by_lua* :
实现转发、重定向等功能
access_by_lua* : IP
准入、接口访问权限等情况集中处理
content_by_lua* :
接收请求处理并输出响应
header_filter_by_lua* :
设置
header
和
cookie
body_filter_by_lua* :
对响应数据进行过滤,如截断
**/**
替换等
3. Lua 基础功能
openrety默认集成了lua脚本功能
1. hello world
server {
    listen 81;
    server_name say.hello.com;
    default_type  text/plain; # 不添加就会直接让你下载, 所以说默认是文件类型?
	location /hello {
		## ngx.say -- 输入文本
        content_by_lua 'ngx.say("hello, Openresty")'; ## 为什么返回变成了下载, 因为不知道我们返回的是什么内容, 需要添加类型
	}
}
## 可以配置在http中, 也可以单独为每一个server配置
default_type  application/octet-stream; ## 文本流方式下载
default_type  text/plain; ## 文本方式解析
2. 执行 lua 脚本文件
server {
    listen 81;
    server_name say2.hello.com;
    default_type  text/plain;
	location /hello {
        ## ngx.say -- 输入文本
        content_by_lua_file /usr/local/openresty/nginx/conf/other.d/lua/lua_say_hello.lua;
	}
}
--/usr/local/openresty/nginx/conf/other.d/lua/lua_say_hello.lua
ngx.say("hello , Openresty by lua")
3. lua 取 get 参数
server {
    listen 81;
    server_name args.com;
    default_type  text/plain;
	location /args {
        content_by_lua_file /usr/local/openresty/nginx/conf/other.d/lua/lua_args.lua;
	}

    location /args2 {
        ##ngx.var表示取参数列表, arg_a表示取参数a
        content_by_lua_block {
			--这里的注释只能使用--,即使用lua的注释语法
            ngx.say(ngx.var.arg_a)
            ngx.say(ngx.var.arg_b)
        }
    }
}
lua_args.lua
--lua的注释
--key-value形式取得所有的url上的参数--get型参数

local arg = ngx.req.get_uri_args() -- 取全量参数
for k,v in pairs(arg) do
   ngx.say("[GET ] ", k, " :", v)
end

--key-value形式取得所有post的参数

ngx.req.read_body() --解析 body 参数之前一定要先读取 body

local arg = ngx.req.get_post_args()
for k,v in pairs(arg) do
   ngx.say("[POST] ", k, " :", v)
end
4. lua取header信息
lua_req.conf
server {
    listen 81;
    server_name req.com;
    default_type  text/plain;
	location /req {
        content_by_lua_file /usr/local/openresty/nginx/conf/other.d/lua/lua_req.lua;
	}
}
lua_req.lua
--读请求头信息
local headers = ngx.req.get_headers()
ngx.say("Host : ", headers.Host)
ngx.say("Host : ", headers["Host"])
ngx.say("--------------")
for k,v in pairs(headers) do
    if type(v) == "table" then
	--table.concat是table操作,意指将v内所有值合并
        ngx.say(k, " : ", table.concat(v, ","))
    else
        ngx.say(k, " : ", v)
    end
end
http://req.com:81/req
Host : req.com:81
Host : req.com:81
--------------
connection : keep-alive
upgrade-insecure-requests : 1
accept-language : zh-CN,zh;q=0.9,en;q=0.8,en-GB;q=0.7,en-US;q=0.6
user-agent : Mozilla/5.0 (Windows NT 10.0; Win64; x64) AppleWebKit/537.36 (KHTML, like Gecko) Chrome/97.0.4692.71 Safari/537.36 Edg/97.0.1072.55
accept-encoding : gzip, deflate
host : req.com:81
accept : text/html,application/xhtml+xml,application/xml;q=0.9,image/webp,image/apng,*/*;q=0.8,application/signed-exchange;v=b3;q=0.9
5. 给 lua 脚本传参
server {
    listen 81;
    server_name set.com;
    default_type  text/plain;
	location /set {
		##给lua脚本传递参数
		set_by_lua_file $val "/usr/local/openresty/nginx/conf/other.d/lua/set.lua" $arg_a $arg_b;
		echo $val;
    }
}
set.lua
local a=tonumber(ngx.arg[1])
local b=tonumber(ngx.arg[2])
return a + b
http://set.com:81/set?a=1&b=2
6. 权限校验
指定在
access
阶段执行脚本
server {
    listen 81;
    server_name acc.com;
    default_type  text/plain;
	location /acc {
		##给lua脚本传递参数
		access_by_lua_file "/usr/local/openresty/nginx/conf/other.d/lua/access.lua";
		echo "welcome $arg_name !";
    }
}
access.lua
if ngx.var.arg_passwd == "123456"
then
	return
else
	ngx.exit(ngx.HTTP_FORBIDDEN)
end
http://acc.com:81/acc?name=hgy&passwd=12345
7. 内容过滤
Nginx 有时候,需要对下游服务生成的内容进行处理过滤
server {
    listen 81;
    server_name filter.com;
    default_type  text/plain;
	location /filter {
		echo 'hello nginx';
		echo 'you are welcome!';
		body_filter_by_lua_file "/usr/local/openresty/nginx/conf/other.d/lua/filter.lua";
    }
}
filter.lua
--ngx.arg[1]是输出块内容
local chunk = ngx.arg[1]
if string.match(chunk, "hello") then
     ngx.arg[2] = true  -- 设置为true,表示输出结束 eof
     return
end

-- just throw away any remaining chunk data
ngx.arg[1] = nil
http://filter.com:81/filter?k=hello123
8. 重定向
server {
    listen 81;
    server_name rew.com;
    location /rew {
        ##重定向
        rewrite_by_lua 'ngx.exec("/hello")';
        echo "I am rewrite_by_lua";
    }

    location /hello {
        echo "hello kitt";
    }

    location /redirect {
        ##页面重定向,是要生成内容的,因此使用content阶段
        content_by_lua_block {
            ngx.redirect("http://www.baidu.com", 302)
        }
    }
}
http://rew.com:81/rew
http://rew.com:81/redirect
4. Lua 引入第三方模块的使用
OpenResty 提供了非常多的第三方插件,支持操作 redis/mysql 等服务,lua 使用它们的模式 一般按以下流程
-
require “resty/xxx” :导入模块功能,类似 java 中的 import 导入类
-
local obj = xxx:new() :模块创建对象 obj
-
local
ok, err = obj :connect :对象连接到目标库 -
obj :method :这里可以为所欲为,尽情操纵目标库了
1. Lua-resty-redis 连接 redis 用法
Lua-resty-redis 插件,对 Nginx 操作 redis 的支持十分强大
redis.lua
local redis = require "resty.redis"

--打开redis连接
local function open_redis()
    local red = redis:new()
    red:set_timeout(1000) -- 超时时间1 second
    local res = red:connect('192.168.0.128',6379)
    if not res then
        return nil
    end
        res = red:auth(123456)  --密码校验
        if not res then
            return nil
        end
    red.close = close
    return red
end

--关闭连接
local function close(self)
    local sock = self.sock
    if not sock then
        return nil, "not initialized"
    end
    if self.subscribed then
        return nil, "subscribed state"
    end
    return sock:setkeepalive(10000, 50)
end

local key =  'name'
local val =  "100"
local arg = ngx.req.get_uri_args() --取req里所有的参数
for k,v in pairs(arg) do
   key = k
   val = v
   break;
end

local red = open_redis()
--local value = red:get(key)  --取值
--red:set(key,val)	    --设新值
--close(red)

red:init_pipeline()
value = red:get(key)
red:set(key, val)
red:commit_pipeline()

--返回值到页面
ngx.say(key,':',value)
lua调用库函数使用冒号(?
2. Lua-resty-mysql 连接 mysql 数据库
local mysql = require "resty.mysql"
local cjson = require "cjson"

--配置
local config = {
    host = "192.168.0.128",
    port = 3303,
    database = "enjoy",
    user = "root",
    password = "root"
}

--打开连接
local function open_mysql()
    local db, err = mysql:new()
    if not db then
        return nil
    end
    db:set_timeout(1000) -- 1 sec

    local ok, err, errno, sqlstate = db:connect(config)

    if not ok then
        return nil
    end
    db.close = close
    return db
end

--关闭连接
local function close(self)
    local sock = self.sock
    if not sock then
        return nil, "not initialized"
    end
    if self.subscribed then
        return nil, "subscribed state"
    end
    return sock:setkeepalive(10000, 50)
end

local db = open_mysql()
local sql = "select * from t_account "
--设置中文编码
ngx.header['Content-Type']="text/html;charset=UTF-8"

local res, err, errno, sqlstate = db:query(sql)
close(db)
if not res then
    ngx.say(err)
    return {}
end

--json方式输出
ngx.say(cjson.encode(res))
三. nginx处理一些问题
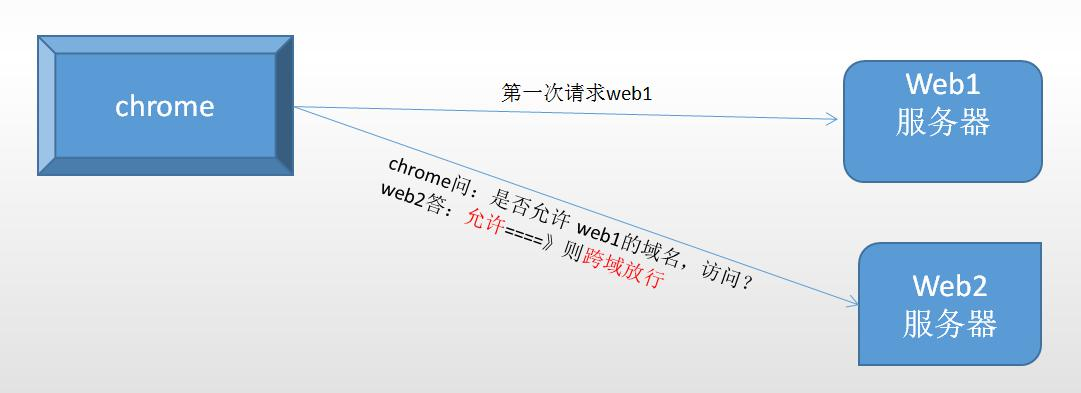
1. 跨域处理
原因: 浏览器拒绝执行其它域名下的 ajax 运作
如果浏览器在 static.pic.com 对应的 html 页面内,发起 ajax 请求偷盗 www.pig.com 域 名下的内容来填充自己的页面,整个互联网秩序将混乱. 为了防止这种混乱,W3C 组织制定了浏览器安全规范,即 html 页面发起的 ajax 请求仅限于同域名后端范围,跨越域名的 ajax 请求不得执行,此谓跨域问题。
jsonp解决方案
// src的跨域没有被禁止
<script src="http://www.other.com/other/1"/>
<script type="text/Javascript">
    $.ajax({ // 这里不能跨域
		url:"http://www.other.com/other/1",
    	type:"get",
    	async:false,
    	success: function (data){
            $("#testcors").html(data)
        },
    	fail: function (data){
            $(#tip).html(data)
        }
	});
</script>
-
jsonp 只能解决 GET 类的请求,其它类型的请求,script 标签无法做到
-
使用 jsonp 的方式,对应的后台程序必须对结果进行改造。将返回值做一个函数式包装。 这对业务开发有较大侵入性,增加开发人员负担
cors 方案
如果 B 公司是同意将自己的内容分享给 A 公 司的
,跨域限制可放开,此方案即 CORS 方案
nginx 配置跨域操作
对于比
较简单的 http 请求(GET、POST、HEAD 类型)
,无须浏览器来问,nginx 服务器直接 在响应头部,加入同意跨域的信号即可
#允许跨域访问的域名,可以是一个域的列表,也可以是通配符*
add_header Access-Control-Allow-Origin  http://static.pic2.com;
对于复杂的 http 请求(PUT、DELETE、含 json 格式数据),浏览器会在发请求前,先发一道 OPTION 请求来询问。我们在 Nginx 上直接配置对此询问的回答即可
if ($request_method = 'OPTIONS') {##OPTIONS类的请求,是跨域先验请求
        return 204;##204代表ok
}
配置示例:
upstream order {
	ip_hash;
	server 192.168.0.128:8383 weight=3;
	#server 192.168.244.1:8383 weight=1;
}

server {
        listen       80;
        server_name  test.pic.com;

	if ( $host ~ (.*).pic.com){
		set $domain $1;##记录二级域名值
	}
	#是否允许请求带有验证信息
	add_header Access-Control-Allow-Credentials true;
	#允许跨域访问的域名,可以是一个域的列表,也可以是通配符*
	add_header Access-Control-Allow-Origin  http://static.pic2.com;
	#允许脚本访问的返回头
	add_header Access-Control-Allow-Headers 'x-requested-with,content-type,Cache-Control,Pragma,Date,x-timestamp';
	#允许使用的请求方法,以逗号隔开
	add_header Access-Control-Allow-Methods 'POST,GET,OPTIONS,PUT,DELETE';
	#允许自定义的头部,以逗号隔开,大小写不敏感
	add_header Access-Control-Expose-Headers 'WWW-Authenticate,Server-Authorization';
	#P3P支持跨域cookie操作
	add_header P3P 'policyref="/w3c/p3p.xml", CP="NOI DSP PSAa OUR BUS IND ONL UNI COM NAV INT LOC"';
	if ($request_method = 'OPTIONS') {##OPTIONS类的请求,是跨域先验请求
            return 204;##204代表ok
    }

	location /val {
		echo '[domain]=$domain';
		echo '[host]=$host' ;
		echo '[http_HEADER]=$http_HEADER' ;
		echo '[remote_addr]=$remote_addr' ;
		echo '[remote_port]=$remote_port' ;
		echo '[request_method]=$request_method' ;
		echo '[request_uri]=$request_uri' ;
		echo '[scheme]=$scheme' ;
		echo '[server_name]=$server_name' ;
		echo '[server_protocol]=$server_protocol' ;
		echo '[uri]=$uri' ;
		echo '[http_origin]=$http_origin';
		echo '[http_user_agent]=$http_user_agent';
		echo '[request_filenameecho]=$request_filename';
	}

	location /order/pic {
                ##后台请求为:http://192.168.0.128:8383/pic/getPage
		##调整后请求:http://test.pic.com/order/pic/getPage
		##故代理需要关闭path1的传递
               proxy_pass http://order/pic;
        }
}
2. 防盗链
让资源只能在我的页面内显示,不能被其它页面直接引用

浏览器发起的任何请求,在其 request 头部,都会标注其请求发起地的 URL,如下:
Referer: https://blog.csdn.net/druid0523/article/details/53939540 ## 发起源端的整个URL链接
因此,在 Nginx 服务器上,只要校验此发起地 url,就可以对应地拒绝响应它
nginx配置
location ^~ /mall {
    valid_referers *.pic2.com;##对referer进行校验
    if ($invalid_referer) {##校验不过,拒绝访问
        return 404;
    }
    root /etc/nginx/html/gzip;
}
总结下:
一.
首先跨域和防盗链不是同一个问题
, 跨域是浏览器行为, 如果我们使用的app或者桌面应用可能就没有这个问题了
同源策略:
访问地址和浏览器地址相同就是同源策略, 不同就是跨域
Host: event.csdn.net ## 被调用的服务的域名
Origin: https://blog.csdn.net ## 发起源端的域名
Referer: https://blog.csdn.net/druid0523/article/details/53939540 ## 发起源端的整个URL链接
所以cors方案给了一个后台是否允许跨域的选择, 这个后台不一定是要到真正的服务器端, 中间件nginx也可以同意浏览器的询问
而jsonp则是通过js的src(href应该也可以吧)发起请求,返回函数调用js代码来避免浏览器校验实现的
二. 通过上面的我们发现, 浏览器的跨域并不能解决src的静态资源偷取, 所以有了防盗链措施(可以简单理解问跨域的补充)
跨域一般请求的是数据(当然数据也可以是静态资源), 盗链请求的是静态资源, 准确说一般非法跨域获取静态资源才称为”盗链”
两者都是通过Host判断主机
但是跨域是通过Origin判断是否跨, 从响应头部可知: Access-Control-Allow-Origin
防盗链是通过Referer判断是否可以盗链, valid_
referers
*.pic2.com;##对referer进行校验
**所以防盗链和跨域: **
目的相同,行为不同
,
解决思想相同, 解决细节不同
3. 压缩
带宽资源很贵, /html/js/css 压缩一下再传输,通常可减少 50%的体积,何乐而不为 过程,浏览器在发送请求时,会附带自己支持的压缩方式
Accept-Encoding: gzip, deflate
nginx配置
location ~ /(.*)\.(html|js|css|png)$ {
    gzip on; # 启用gzip压缩,默认是off,不启用

    # 对js、css、jpg、png、gif格式的文件启用gzip压缩功能
    gzip_types application/javascript text/css image/jpeg image/png image/gif;
    gzip_min_length 1024; # 所压缩文件的最小值,小于这个的不会压缩
    gzip_buffers 4 1k; # 设置压缩响应的缓冲块的大小和个数,默认是内存一个页的大小
    gzip_comp_level 1; # 压缩水平,默认1。取值范围1-9,取值越大压缩比率越大,但越耗cpu时间

    root /etc/nginx/html/gzip;
}
四. https 配置
1. 对称加密
略
2. 非对称加密
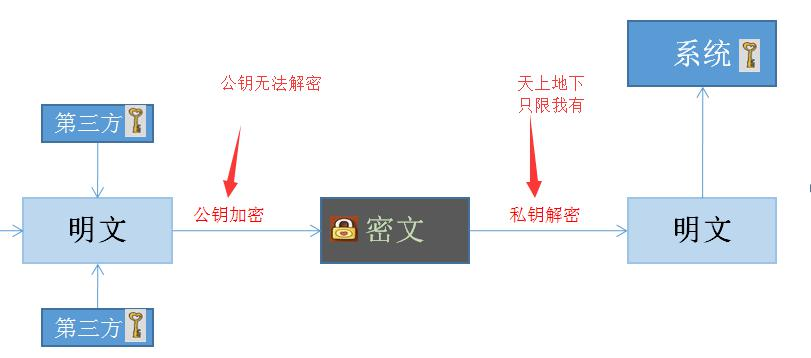
优缺点:私钥很安全。但是非对称算法开销很大,大批量应用于业务,会导致性能成本过高
公钥加密,只有私钥可以接, 私钥加密,只有公钥能解
问题: 私钥加密, 私钥可以解密吗? 不可以(算法么有这种兼容性), 但是你有私钥, 肯定可以拿到公钥
https 加密方案
综合上述方案优缺点,各取所长,得到自己的方案
1、业务数据的加密使用对称加密,降低性能开销
2、
对称密钥
,采用非对称加密,保驾护航
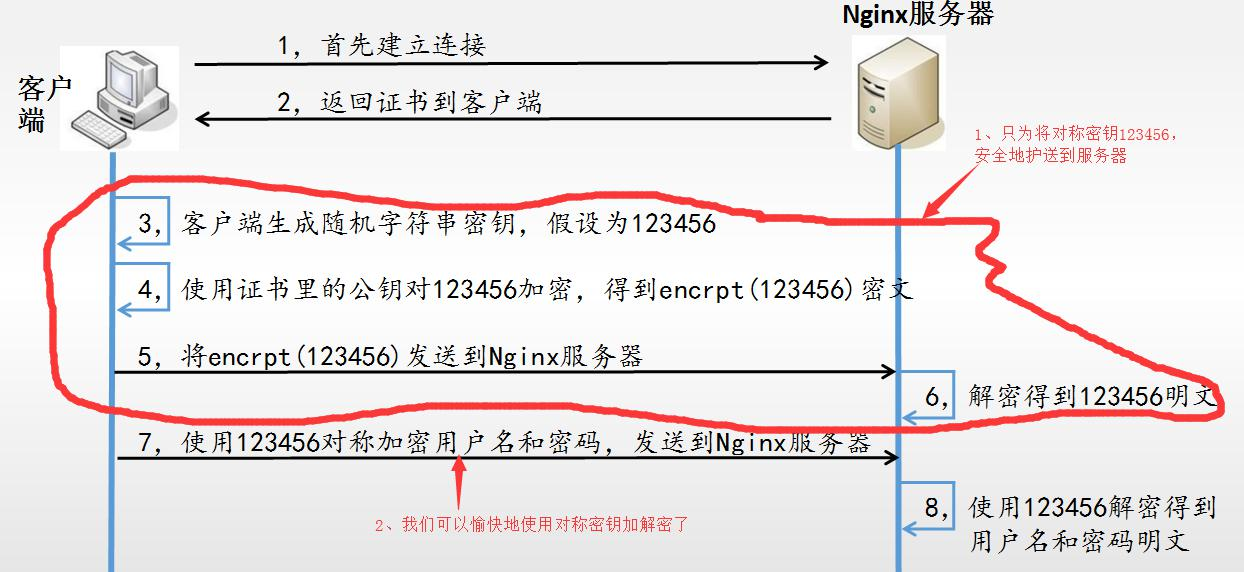
使用公钥对对称加密的密文进行加密传输, 然后彼此使用只有彼此知道对称秘钥进行对称加密传输数据
如何获取到安全的公钥? 如果我们的公钥是拦截请求的黑客冒充返回的, 他自己和服务器建立http(s)请求怎么办
因此引入了一系列新的名词, 证书, 签名, 摘要等
Nginx 配置 https
查看 nginx 已经安装好了 https 模块(openresty 默认是开启 https 模块的)
# nginx -V
nginx version: openresty/1.19.9.1
built by gcc 8.4.1 20200928 (Red Hat 8.4.1-1) (GCC)
built with OpenSSL 1.1.1k  25 Mar 2021 (running with OpenSSL 1.1.1l  24 Aug 2021)
TLS SNI support enabled ## TLS 就是https使用的协议
...
 --with-http_ssl_module ## http_ssl功能添加
Nginx 配置 https 只需要两个东西。一个是浏览器
证书
(内含公钥,供浏览器加密使用),一 个是
私钥
(供自己解密使用)
server.crt 和 server.key 可以自己去购买商业的。也可以自己使用程序生成一份(曾经的 12306 就使用自签的证书)
自签证书
[root@f7cc0e20c5bb conf]# mkdir tsl
[root@f7cc0e20c5bb conf]# cd tsl
[root@f7cc0e20c5bb tsl]# pwd
/usr/local/openresty/nginx/conf/tsl
# 1、创建服务器私钥,命令会让你输入一个口令:123456
[root@f7cc0e20c5bb tsl]# openssl genrsa -des3 -out server.key 4096
[root@f7cc0e20c5bb tsl]# ls
server.key # 生成的一个私钥
# 2、创建签名请求的证书(CSR):server.key必须和私钥的key相同
# 注意, 需要绑定域名, 否则https不能使用
[root@f7cc0e20c5bb tsl]# openssl req -new -key server.key -out server.csr
Enter pass phrase for server.key: 123456
Common Name (eg, your name or your server's hostname) []:ssl.com ## 这个不能瞎填,否则https不能使用

# 3、在加载SSL支持的Nginx并使用上述私钥时除去必须的口令: server.key必须和私钥的key相同
[root@f7cc0e20c5bb tsl]# openssl rsa -in server.key -out server_nopass.key
Enter pass phrase for server.key: 123456
writing RSA key
# 4、最后标记证书使用上述私钥和CSR:注意, 这里使用的是去除口令的私钥
[root@f7cc0e20c5bb tsl]# openssl x509 -req -days 365 -in server.csr -signkey server_nopass.key -out server.crt
[root@f7cc0e20c5bb tsl]# ls
server.crt  server.csr  server.key  server_nopass.key
1、创建服务器私钥,命令会让你输入一个口令:123456
openssl genrsa -des3 -out server.key 4096
2、创建签名请求的证书(CSR):
openssl req -new -key server.key -out server.csr
3、在加载SSL支持的Nginx时使用上述私钥时除去必须的口令
openssl rsa -in server.key -out server_nopass.key
4、最后标记证书使用上述私钥和CSR
openssl x509 -req -days 365 -in server.csr -signkey server_nopass.key -out server.crt
drwxr-xr-x 2 root root 4096 Jan 23 13:11 .
drwxr-xr-x 4 root root 4096 Jan 23 12:05 ..
-rw-r--r-- 1 root root 1919 Jan 23 13:11 server.crt ##浏览器访问使用的证书
-rw-r--r-- 1 root root 1700 Jan 23 13:10 server.csr ##
-rw------- 1 root root 3311 Jan 23 13:09 server.key ## nginx
-rw------- 1 root root 3243 Jan 23 13:11 server_nopass.key ## nginx解密需要的秘钥
Nginx 配置
server {
    listen		443 ssl;
    server_name	ssl.com;

    ssl_certificate		/usr/local/openresty/nginx/conf/tsl/server.crt; ## 浏览器提供的下载证书
    ssl_certificate_key	/usr/local/openresty/nginx/conf/tsl/server_nopass.key; ## 需要使用去除口令的秘钥

    ssl_ciphers   	ECDHE-RSA-AES128-GCM-SHA256:ECDHE:ECDH:AES:HIGH:!NULL:!aNULL:!MD5:!ADH:!RC4;
    ssl_protocols   TLSv1 TLSv1.1 TLSv1.2;
    ssl_prefer_server_ciphers on;

    location / {
        root	/usr/local/openresty/nginx/html;
        index	index.html index.htm;
    }
}

server {
    listen		81;
    server_name	ssl.com;

    location /a.html {
        root	/usr/local/openresty/nginx/html;
    }
}
重启nginx
[root@f7cc0e20c5bb other.d]# nginx -s reload
Enter PEM pass phrase:
导出证书
docker 导出命令
docker cp f7cc0e20c5bb:/usr/local/openresty/nginx/conf/tsl/server.crt ./
右键安装
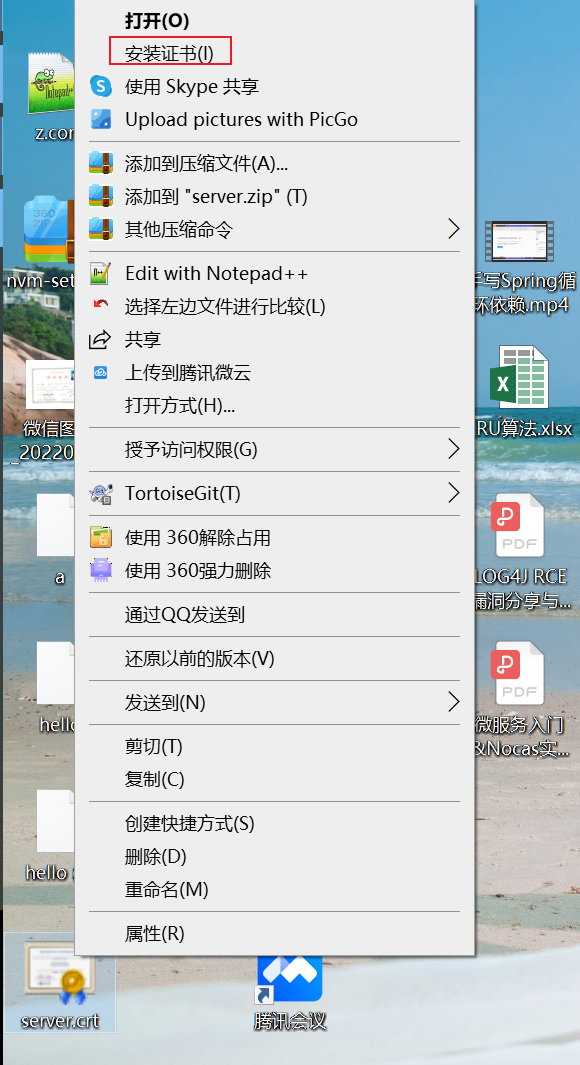
或者浏览器管理证书导入
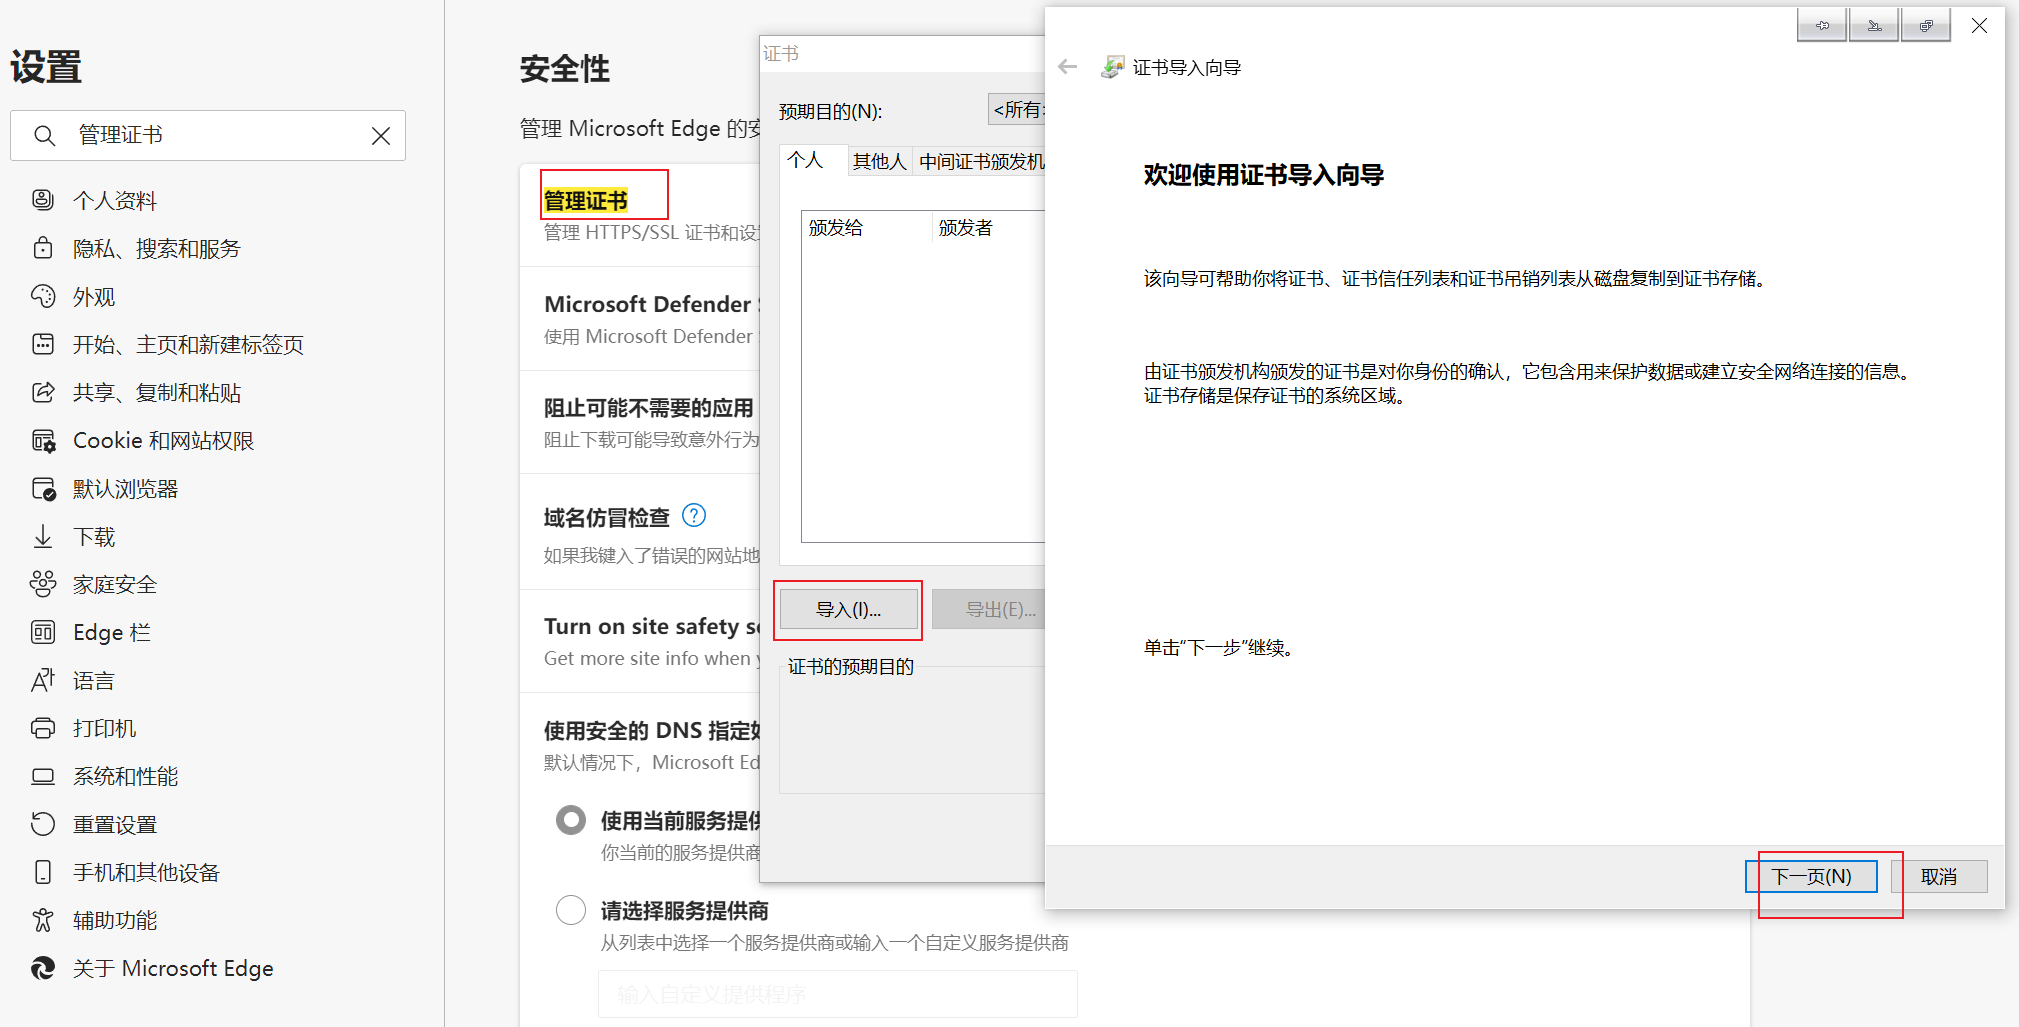
https://ssl.com:81/a.html
五. nginx 高可用
1. 传统的高可用思路
tomcat 的高可用的思路,是在 tomcat 集群前面加一层负载服务 nginx。如下图
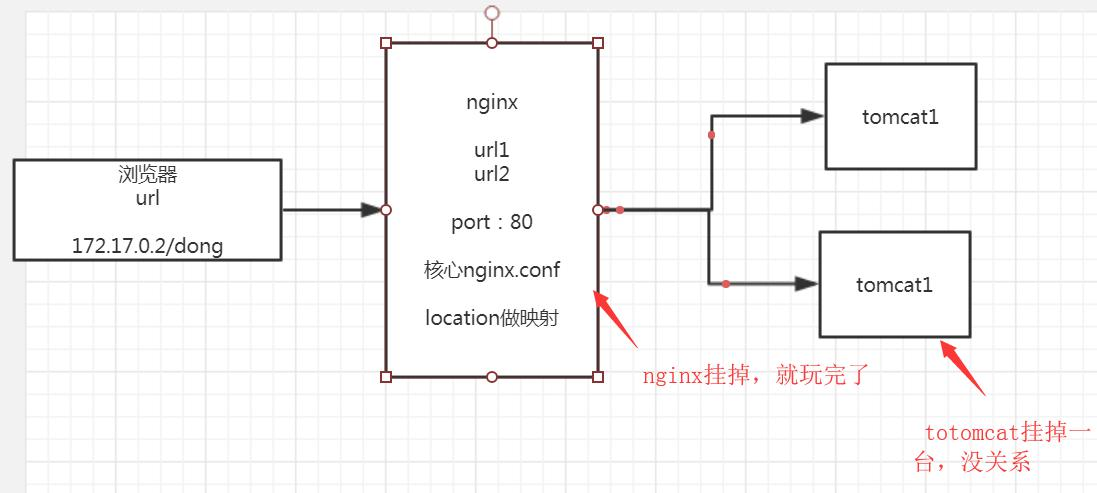
这种做法,解决了 tomcat 的高可用问题。但是引入了前面的负载机器的高可用问题(Nginx 如果挂了) 如果 nginx 沿用此思路,总会有一个最前端是单机的,存在宕机玩完的风险
2. lvs 思想解决高可用问题
lvs = linux virtual service
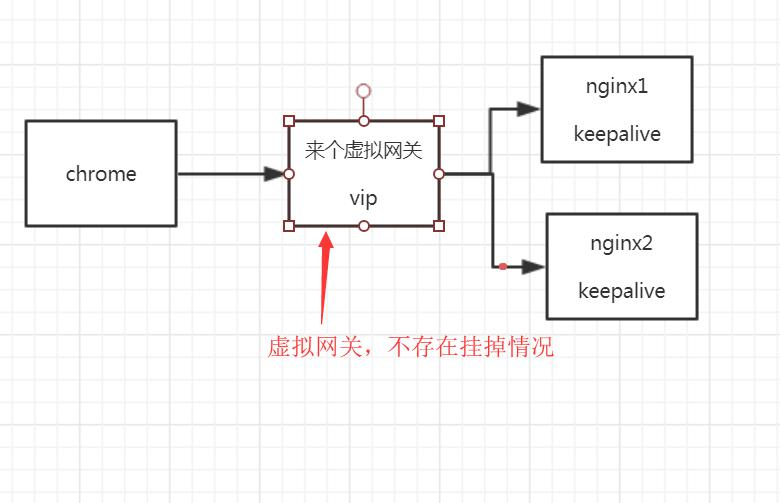
如上图,由服务器集群虚拟出来一台 虚拟网关 vip(不真实存在,自 然不存在宕机问题), 此 vip 由两台机器共同协商生成。当有一台机器宕机时,另一台机器 一样能维持 vip。这保证了,只要两台机器不同时宕机,vip 就存在
3. keepalived 配置 LVS 过程
- 关闭 selinux,打开/etc/sysconfig/selinux 设置其中值 SELINUX=disabled
vi /etc/sysconfig/selinux
...
SELINUX=disabled
...
- 安装必须的依赖包
yum -y install libnl libnl-devel libnfnetlink-devel
- keepalived 安装
## 下载源码包--不能使用 yum 方式安装(有 bug)
wget https://www.keepalived.org/software/keepalived-1.3.4.tar.gz
## 配置(指定安装目录和配置目录,否则文件太散乱)
./configure --prefix=/usr/local/keepalived --sysconf=/etc make && make install
- keepalived 主机配置
打开/etc/keepalived/keepalived.conf,只需要配置如下一段。(其它是多余配置,删除)
! Configuration File for keepalived

global_defs {
   router_id LVS_DEVEL		####keepalived的唯一标识
}
vrrp_script chk_http_port {
    script "/etc/nginx/chk_nginx.sh" #心跳执行的脚本
    interval 2                          #(检测脚本执行的间隔,单位是秒)
    weight 2
}

vrrp_instance VI_1 {
    state MASTER
    interface ens33 ##系统网上名,可以使用ip addr命令查看
    virtual_router_id 51	##组名,参与此虚拟ip的机器配置一样的值
    priority 200	##优先级,数值大的优先级高,组内最高的胜出
    advert_int 1	##心跳检测1s一次
    authentication {	##心跳检测1s一次
        auth_type PASS
        auth_pass 1111
    }
    track_script {
	chk_http_port	#(调用检测脚本)
    }
    virtual_ipaddress {
        192.168.11.11	##虚拟的ip
    }
}
启动 keepalived,查看机器 ip 地址,可发现多出一个 11.11的 ip
keepalived 校验 LVS 效果
1、此时,杀掉主机上的 keepalived,11.11的 ip 将从主机上消失。而出现的从机的 ip 中
2、再次启动主机的 keepalived,11.11的 ip 将被主机重新夺回
3、此效果是单主单备方式。备机资源有一定的浪费。可以重复前面的动作,虚拟出第二个 ip,将主从机优先级颠倒,从而利用起备机服务
keepalived 监控服务软件
以上操作中,keepalived 很好的实现了 LVS 功能,即集群机器共同虚
拟一个 vip,并实现在集群中自动漂移。
但假如物理机状况良好,并不能保障其上运行的服务软件 ok,因此
需要借助 keepalived 来监控服务软件。
a、使用 keepalived 来监控 nginx
编辑一个 sh 监控脚本,sh 脚本:
#!/bin/bash
A=`ps -C nginx --no-header |wc -l`
#统计 nginx 进程是否存在
if [ $A -eq 0 ];then
    #为 0,表明 nginx 停止了
    /usr/local/nginx/sbin/nginx
    #尝试重启 nginx
    if [ `ps -C nginx --no-header |wc -l` -eq 0 ];then
        #nginx 重启失败,则 keepalived 自杀,进行 VIP 转移
        killall keepalived
        #杀掉,vip 就漫游到另一台机器
    fi
fi
b、在配置文件中加入以下两处配置:
c、重启 keepalived,测试监控效果
六. Nginx 在 mvvm 模式中的使用
当前最流行的前后端分离模式
Model–View–ViewModel(MVVM) 是一个
软件架构设计模式
,由微软 WPF 和 Silverlight 的架构师 Ken Cooper 和 Ted Peters 开发,是一种简化用户界面的事件驱动编程方式。由 John Gossman(同样也是 WPF 和 Silverlight 的架构师)于2005年在他的博客上发表。
MVVM 源自于经典的
Model–View–Controller
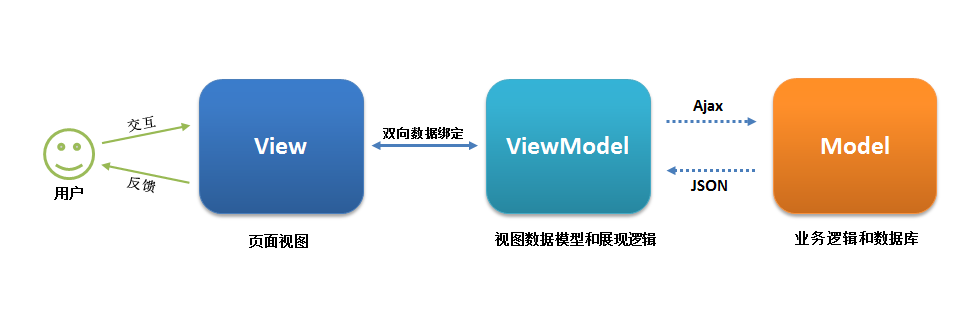
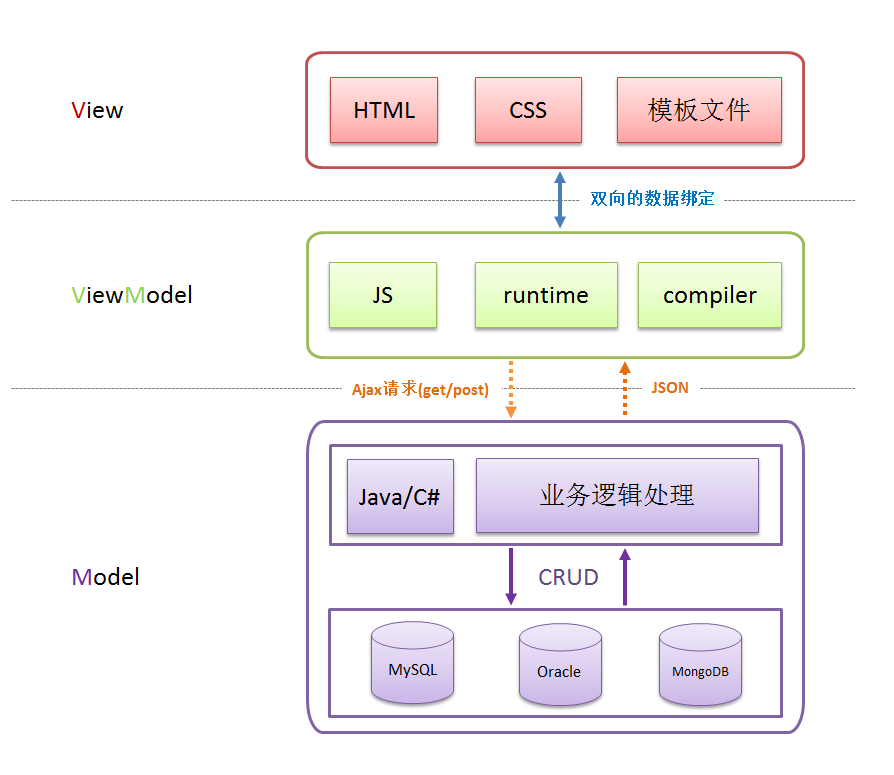
(MVC)模式(期间还演化出了 Model-View-Presenter(MVP)模式,可忽略不计)。MVVM 的出现促进了 GUI 前端开发与后端业务逻辑的分离,极大地提高了前端开发效率。MVVM 的核心是 ViewModel 层,它就像是一个中转站(value converter),负责转换 Model 中的数据对象来让数据变得更容易管理和使用,该层向上与视图层进行双向数据绑定,向下与 Model 层通过接口请求进行数据交互,起呈上启下作用。如下图所示:
MVVM 已经相当成熟了,主要运用但不仅仅在网络应用程序开发中。KnockoutJS 是最早实现 MVVM 模式的前端框架之一,当下流行的 MVVM 框架有 Vue,Angular 等。
分层设计一直是软件架构的主流设计思想之一,MVVM 也不例外。
View 层
View 是视图层,也就是用户界面
Model 层
Model 是指数据模型,泛指后端进行的各种业务逻辑处理和数据操控,主要围绕数据库系统展开。后端的处理通常会非常复杂
ViewModel 层
ViewModel 是由前端开发人员组织生成和维护的视图数据层