目录
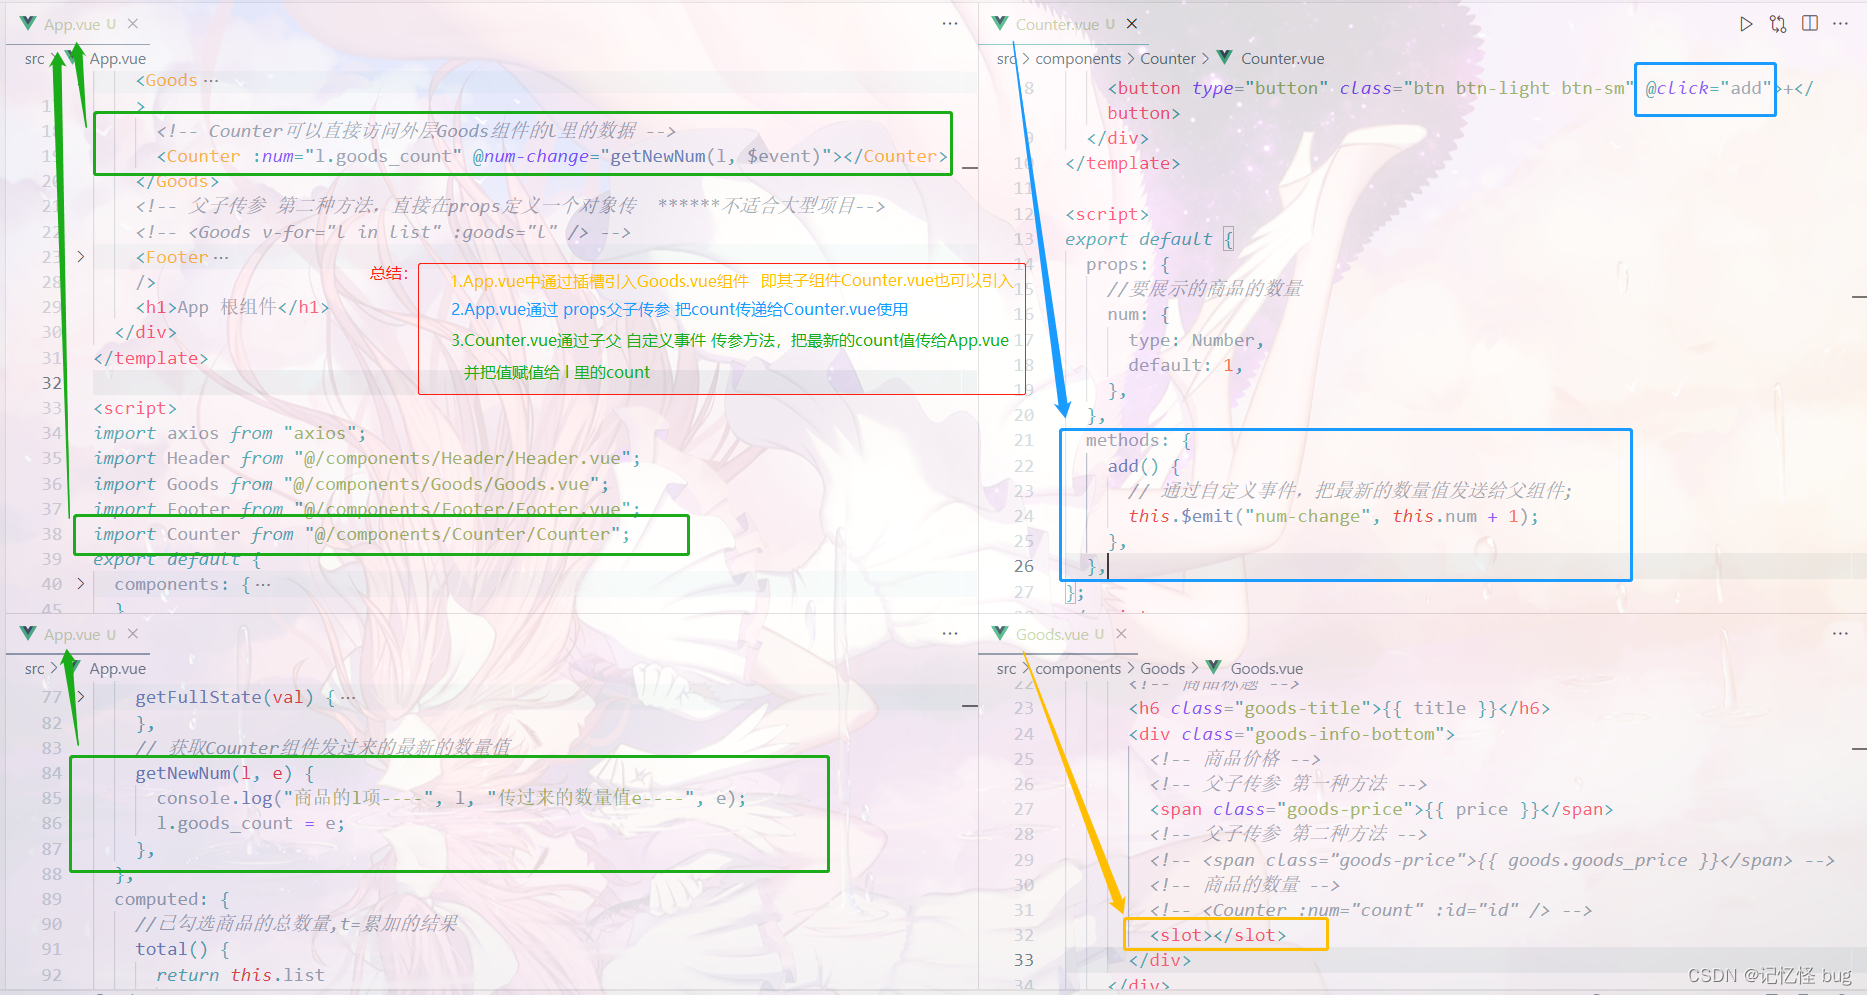
⭕ 下列代码将组件Counter的传参方式进行了优化,取消了EventBus,改用插槽slot方式
⭕
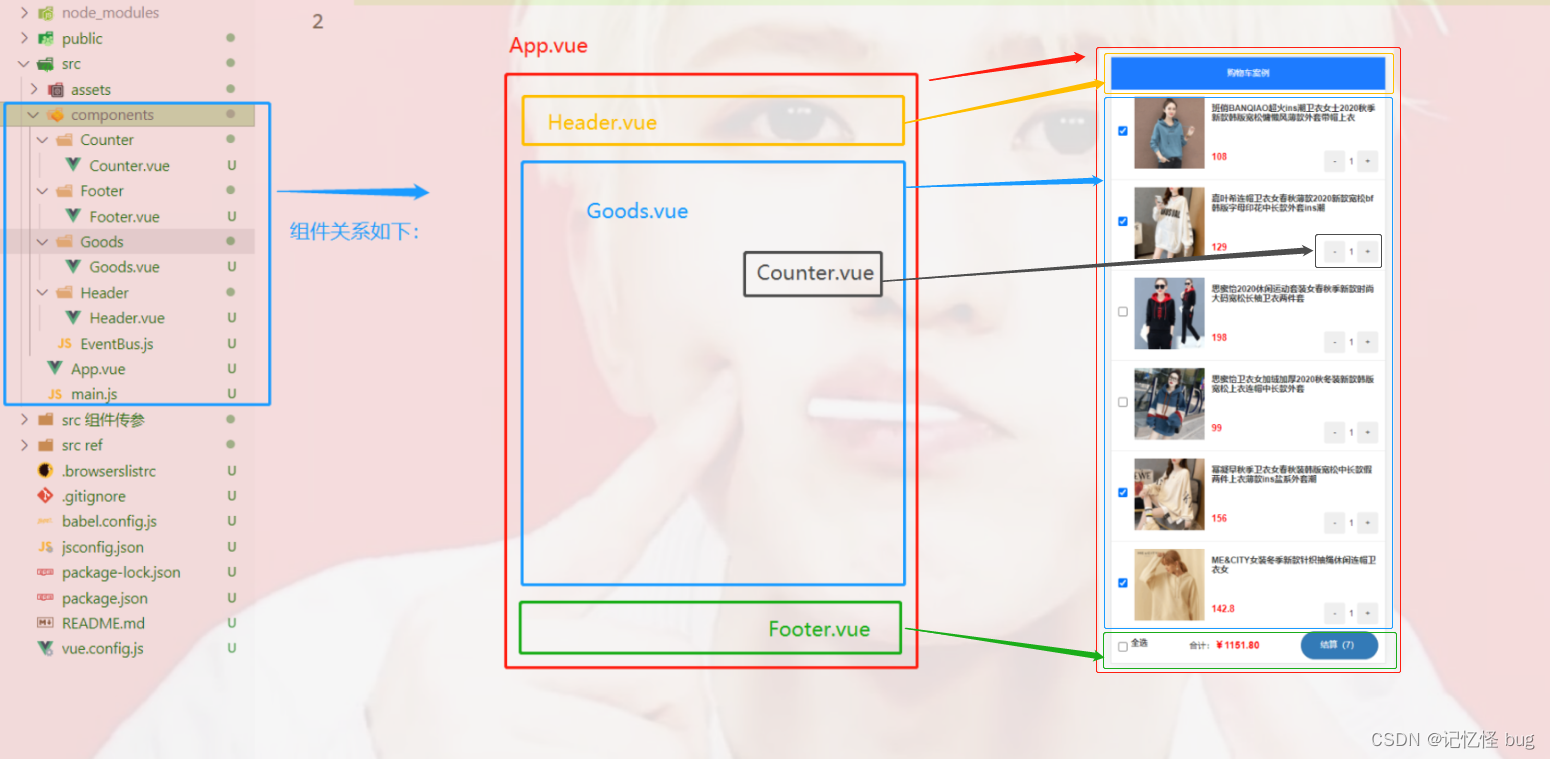
购物车效果图及组件关系图如下:
主要练习父子传参、子父传参、事件车。
其中Counter.vue–>App.vue 是通过EventBus

1 App.vue
<template>
  <div class="app-container">
    <!-- Header头部区域 -->
    <Header title="购物车案例" />
    <!-- 计算属性在定义的时候是方法,在使用时就是普通的属性 -->
    <!-- <p>{{ fullState }}</p> -->
    <!-- 父子传参 第一种方法,一个个传 -->
    <Goods
      v-for="l in list"
      :key="l.id"
      :id="l.id"
      :title="l.goods_name"
      :pic="l.goods_img"
      :price="l.goods_price"
      :state="l.goods_state"
      :count="l.goods_count"
      @state-change="getNewState"
    />
    <!-- 父子传参 第二种方法,直接在props定义一个对象传  ******不适合大型项目-->
    <!-- <Goods v-for="l in list" :goods="l" /> -->
    <Footer
      :isfull="fullState"
      :allnum="total"
      :amount="sum"
      @full-change="getFullState"
    />
    <h1>App 根组件</h1>
  </div>
</template>

<script>
import axios from "axios";
import Header from "@/components/Header/Header.vue";
import Goods from "@/components/Goods/Goods.vue";
import Footer from "@/components/Footer/Footer.vue";
import bus from "@/components/EventBus.js";
export default {
  components: {
    Header,
    Goods,
    Footer,
  },
  data() {
    return {
      list: [],
    };
  },
  methods: {
    async initCartList() {
      //调用get方法请求数据
      /*
      const res = await axios.get("https://www.escook.cn/api/cart");
      console.log(res);
      */
      const { data: res } = await axios.get("https://www.escook.cn/api/cart");
      console.log(res);
      //只要请求回来的数据,在页面渲染期间要用到,则必须转存到data中
      if (res.status === 200) {
        this.list = res.list;
      }
    },
    //接收子组件传过来的数据
    //e的格式为{ id, value }
    getNewState(e) {
      console.log("父组件接收到数据了", e);
      this.list.some((item) => {
        if (item.id === e.id) {
          item.goods_state = e.value;
          return true;
        }
      });
    },
    //接收Footer子组件传递过来的全选按钮的状态
    getFullState(val) {
      console.log("在app中拿到了全选的状态", val);
      this.list.forEach((item) => {
        item.goods_state = val;
      });
    },
  },
  computed: {
    //已勾选商品的总数量,t=累加的结果
    total() {
      return this.list
        .filter((item) => item.goods_state)
        .reduce((t, item) => (t += item.goods_count), 0);
    },
    //动态计算出全选的值是true还是false
    fullState() {
      return this.list.every((item) => item.goods_state);
    },
    //已勾选商品的总价格amt( {
    sum() {
      // 1.先 filter过滤
      // 2.再reduce累加
      return this.list
        .filter((item) => item.goods_state)
        .reduce((total, item) => (total += item.goods_price * item.goods_count), 0);
    },
  },
  created() {
    //调用请求数据的方法
    this.initCartList();
    //接收子组件Counter.vue传来的值
    bus.$on("share", (val) => {
      console.log("APP组件中接收到了值", val);
      this.list.some((item) => {
        if (item.id === val.id) {
          item.goods_count = val.value;
          return true;
        }
      });
    });
  },
};
</script>

<style lang="less" scoped>
.app-container {
  padding-top: 45px;
  padding-bottom: 50px;
}
</style>
2 Header.vue
<template>
  <div class="header-container">{{ title }}</div>
</template>

<script>
export default {
  props: {
    //声明title自定义属性,允许使用者自定义标题的内容
    title: {
      default: "",
      type: String,
    },
  },
};
</script>

<style lang="less" scoped>
.header-container {
  font-size: 12px;
  height: 45px;
  width: 100%;
  background-color: #1d7bff;
  display: flex;
  justify-content: center;
  align-items: center;
  color: #fff;
  position: fixed;
  top: 0;
  z-index: 999;
}
</style>
3 Goods.vue
<template>
  <div class="goods-container">
    <!-- 左侧图片 -->
    <div class="thumb">
      <div class="custom-control custom-checkbox">
        <!-- 复选框 -->
        <input
          type="checkbox"
          class="custom-control-input"
          :id="'cb' + id"
          :checked="state"
          @change="stateChange"
        />
        <label class="custom-control-label" :for="'cb' + id">
          <!-- 商品的缩略图 -->
          <img :src="pic" alt="" />
        </label>
      </div>
    </div>
    <!-- 右侧信息区域 -->
    <div class="goods-info">
      <!-- 商品标题 -->
      <h6 class="goods-title">{{ title }}</h6>
      <div class="goods-info-bottom">
        <!-- 商品价格 -->
        <!-- 父子传参 第一种方法 -->
        <span class="goods-price">{{ price }}</span>
        <!-- 父子传参 第二种方法 -->
        <!-- <span class="goods-price">{{ goods.goods_price }}</span> -->
        <!-- 商品的数量 -->
        <Counter :num="count" :id="id" />
      </div>
    </div>
  </div>
</template>

<script>
import Counter from "@/components/Counter/Counter";
export default {
  components: {
    Counter,
  },
  //父向子传值
  props: {
    //要渲染的商品
    /*
    //父子传参 第二种props方法接收
    goods: {
      type: Object,
      default: {},
    },
    */
    /* 为啥在这里要封装一个id属性呢 ? 原因:将来,子组件中商品的勾选状态变化之后,需要通过子→父的形式,通知父组件根据id 修改对应商品的勾选状态。*/
    id: {
      required: true, // id必须传
      type: Number,
    },
    title: {
      default: "",
      type: String,
    },
    pic: {
      default: "",
      type: String,
    },
    price: {
      default: "",
      type: Number,
    },
    state: {
      default: true,
      type: Boolean,
    },
    count: {
      default: 1,
      type: Number,
    },
  },
  methods: {
    //只要复选框的选中状态发生了变化,就会调用这个处理函数
    stateChange(e) {
      console.log("事件对象", e);
      const newState = e.target.checked;
      console.log("checked最新的状态", newState);
      //触发自定义事件
      this.$emit("state-change", { id: this.id, value: newState });
    },
  },
};
</script>

<style lang="less" scoped>
.goods-container {
  + .goods-container {
    border-top: 1px solid #efefef;
  }
  padding: 10px;
  display: flex;
  .thumb {
    display: flex;
    align-items: center;
    img {
      width: 100px;
      height: 100px;
      margin: 0 10px;
    }
  }

  .goods-info {
    display: flex;
    flex-direction: column;
    justify-content: space-between;
    flex: 1;
    .goods-title {
      font-weight: bold;
      font-size: 12px;
    }
    .goods-info-bottom {
      display: flex;
      justify-content: space-between;
      .goods-price {
        font-weight: bold;
        color: red;
        font-size: 13px;
      }
    }
  }
}
</style>
4 Counter.vue
<template>
  <div class="number-container d-flex justify-content-center align-items-center">
    <!-- 减 1 的按钮 -->
    <button @click="sub" type="button" class="btn btn-light btn-sm">-</button>
    <!-- 购买的数量 -->
    <span class="number-box">{{ num }}</span>
    <!-- 加 1 的按钮 -->
    <button @click="add" type="button" class="btn btn-light btn-sm">+</button>
  </div>
</template>

<script>
import bus from "@/components/EventBus.js";
export default {
  props: {
    //接收到父组件Goods.vue的值
    num: {
      type: Number,
      default: 1,
    },
    //使用EventBus用
    id: {
      required: true,
      type: Number,
    },
  },
  methods: {
    add() {
      //要发送给 App的数据格式为 { id, value }
      const obj = { id: this.id, value: this.num + 1 };
      console.log(obj);
      //要做的事情:通过EventBus把 obj对象,发送给 App. vue 组件
      bus.$emit("share", obj);
    },
    sub() {
      if (this.num - 1 === 0) return;
      const obj = { id: this.id, value: this.num - 1 };
      console.log(obj);
      bus.$emit("share", obj);
    },
  },
};
</script>

<style lang="less" scoped>
.number-box {
  min-width: 30px;
  text-align: center;
  margin: 0 5px;
  font-size: 12px;
}

.btn-sm {
  width: 30px;
}
</style>
5 Footer.vue
<template>
  <div class="footer-container">
    <!-- 左侧的全选 -->
    <div class="custom-control custom-checkbox">
      <input
        type="checkbox"
        class="custom-control-input"
        id="cbFull"
        :checked="isfull"
        @change="fullChange"
      />
      <label class="custom-control-label" for="cbFull">全选</label>
    </div>

    <!-- 中间的合计 -->
    <div>
      <span>合计:</span>
      <span class="total-price">¥{{ amount.toFixed(2) }}</span>
    </div>

    <!-- 结算按钮 -->
    <button type="button" class="btn btn-primary btn-settle">结算({{ allnum }})</button>
  </div>
</template>

<script>
export default {
  props: {
    //全选的状态
    isfull: {
      type: Boolean,
      default: true,
    },
    //总价格
    amount: {
      type: Number,
      default: 0,
    },
    //总数量
    allnum: {
      type: Number,
      default: 0,
    },
  },
  methods: {
    fullChange(e) {
      console.log(e.target.checked);
      this.$emit("full-change", e.target.checked);
    },
  },
};
</script>

<style lang="less" scoped>
.footer-container {
  font-size: 12px;
  height: 50px;
  width: 100%;
  border-top: 1px solid #efefef;
  position: fixed;
  bottom: 0;
  background-color: #fff;
  display: flex;
  justify-content: space-between;
  align-items: center;
  padding: 0 10px;
}

.custom-checkbox {
  display: flex;
  align-items: center;
}

#cbFull {
  margin-right: 5px;
}

.btn-settle {
  height: 80%;
  min-width: 110px;
  border-radius: 25px;
  font-size: 12px;
}

.total-price {
  font-weight: bold;
  font-size: 14px;
  color: red;
}
</style>
6 EventBus.js
import Vue from 'vue'
export default new Vue()
⭕
下列代码将组件Counter的传参方式进行了优化,取消了EventBus,改用插槽slot方式
主要更新如下:

1 App.vue
<template>
  <div class="app-container">
    <!-- Header头部区域 -->
    <Header title="购物车案例" />
    <!-- 计算属性在定义的时候是方法,在使用时就是普通的属性 -->
    <!-- <p>{{ fullState }}</p> -->
    <!-- 父子传参 第一种方法,一个个传 -->
    <Goods
      v-for="l in list"
      :key="l.id"
      :id="l.id"
      :title="l.goods_name"
      :pic="l.goods_img"
      :price="l.goods_price"
      :state="l.goods_state"
      @state-change="getNewState"
    >
      <!-- Counter可以直接访问外层Goods组件的l里的数据 -->
      <Counter :num="l.goods_count" @num-change="getNewNum(l, $event)"></Counter>
    </Goods>
    <!-- 父子传参 第二种方法,直接在props定义一个对象传  ******不适合大型项目-->
    <!-- <Goods v-for="l in list" :goods="l" /> -->
    <Footer
      :isfull="fullState"
      :allnum="total"
      :amount="sum"
      @full-change="getFullState"
    />
    <h1>App 根组件</h1>
  </div>
</template>

<script>
import axios from "axios";
import Header from "@/components/Header/Header.vue";
import Goods from "@/components/Goods/Goods.vue";
import Footer from "@/components/Footer/Footer.vue";
import Counter from "@/components/Counter/Counter";
export default {
  components: {
    Header,
    Goods,
    Footer,
    Counter,
  },
  data() {
    return {
      list: [],
    };
  },
  methods: {
    async initCartList() {
      //调用get方法请求数据
      /*
      const res = await axios.get("https://www.escook.cn/api/cart");
      console.log(res);
      */
      const { data: res } = await axios.get("https://www.escook.cn/api/cart");
      console.log(res);
      //只要请求回来的数据,在页面渲染期间要用到,则必须转存到data中
      if (res.status === 200) {
        this.list = res.list;
      }
    },
    //接收子组件传过来的数据
    //e的格式为{ id, value }
    getNewState(e) {
      console.log("父组件接收到数据了", e);
      this.list.some((item) => {
        if (item.id === e.id) {
          item.goods_state = e.value;
          return true;
        }
      });
    },
    //接收Footer子组件传递过来的全选按钮的状态
    getFullState(val) {
      console.log("在app中拿到了全选的状态", val);
      this.list.forEach((item) => {
        item.goods_state = val;
      });
    },
    // 获取Counter组件发过来的最新的数量值
    getNewNum(l, e) {
      console.log("商品的l项----", l, "传过来的数量值e----", e);
      l.goods_count = e;
    },
  },
  computed: {
    //已勾选商品的总数量,t=累加的结果
    total() {
      return this.list
        .filter((item) => item.goods_state)
        .reduce((t, item) => (t += item.goods_count), 0);
    },
    //动态计算出全选的值是true还是false
    fullState() {
      return this.list.every((item) => item.goods_state);
    },
    //已勾选商品的总价格amt( {
    sum() {
      // 1.先 filter过滤
      // 2.再reduce累加
      return this.list
        .filter((item) => item.goods_state)
        .reduce((total, item) => (total += item.goods_price * item.goods_count), 0);
    },
  },
  created() {
    //调用请求数据的方法
    this.initCartList();
  },
};
</script>

<style lang="less" scoped>
.app-container {
  padding-top: 45px;
  padding-bottom: 50px;
}
</style>
2 Goods.vue
<template>
  <div class="goods-container">
    <!-- 左侧图片 -->
    <div class="thumb">
      <div class="custom-control custom-checkbox">
        <!-- 复选框 -->
        <input
          type="checkbox"
          class="custom-control-input"
          :id="'cb' + id"
          :checked="state"
          @change="stateChange"
        />
        <label class="custom-control-label" :for="'cb' + id">
          <!-- 商品的缩略图 -->
          <img :src="pic" alt="" />
        </label>
      </div>
    </div>
    <!-- 右侧信息区域 -->
    <div class="goods-info">
      <!-- 商品标题 -->
      <h6 class="goods-title">{{ title }}</h6>
      <div class="goods-info-bottom">
        <!-- 商品价格 -->
        <!-- 父子传参 第一种方法 -->
        <span class="goods-price">{{ price }}</span>
        <!-- 父子传参 第二种方法 -->
        <!-- <span class="goods-price">{{ goods.goods_price }}</span> -->
        <!-- 商品的数量 -->
        <!-- <Counter :num="count" :id="id" /> -->
        <slot></slot>
      </div>
    </div>
  </div>
</template>

<script>
import Counter from "@/components/Counter/Counter";
export default {
  components: {
    Counter,
  },
  //父向子传值
  props: {
    //要渲染的商品
    /*
    //父子传参 第二种props方法接收
    goods: {
      type: Object,
      default: {},
    },
    */
    /* 为啥在这里要封装一个id属性呢 ? 原因:将来,子组件中商品的勾选状态变化之后,需要通过子→父的形式,通知父组件根据id 修改对应商品的勾选状态。*/
    id: {
      required: true, // id必须传
      type: Number,
    },
    title: {
      default: "",
      type: String,
    },
    pic: {
      default: "",
      type: String,
    },
    price: {
      default: "",
      type: Number,
    },
    state: {
      default: true,
      type: Boolean,
    },
    count: {
      default: 1,
      type: Number,
    },
  },
  methods: {
    //只要复选框的选中状态发生了变化,就会调用这个处理函数
    stateChange(e) {
      console.log("事件对象", e);
      const newState = e.target.checked;
      console.log("checked最新的状态", newState);
      //触发自定义事件
      this.$emit("state-change", { id: this.id, value: newState });
    },
  },
};
</script>

<style lang="less" scoped>
.goods-container {
  + .goods-container {
    border-top: 1px solid #efefef;
  }
  padding: 10px;
  display: flex;
  .thumb {
    display: flex;
    align-items: center;
    img {
      width: 100px;
      height: 100px;
      margin: 0 10px;
    }
  }

  .goods-info {
    display: flex;
    flex-direction: column;
    justify-content: space-between;
    flex: 1;
    .goods-title {
      font-weight: bold;
      font-size: 12px;
    }
    .goods-info-bottom {
      display: flex;
      justify-content: space-between;
      .goods-price {
        font-weight: bold;
        color: red;
        font-size: 13px;
      }
    }
  }
}
</style>
3 Counter.vue
<template>
  <div class="number-container d-flex justify-content-center align-items-center">
    <!-- 减 1 的按钮 -->
    <button type="button" class="btn btn-light btn-sm">-</button>
    <!-- 购买的数量 -->
    <span class="number-box">{{ num }}</span>
    <!-- 加 1 的按钮 -->
    <button type="button" class="btn btn-light btn-sm" @click="add">+</button>
  </div>
</template>

<script>
export default {
  props: {
    //要展示的商品的数量
    num: {
      type: Number,
      default: 1,
    },
  },
  methods: {
    add() {
      // 通过自定义事件,把最新的数量值发送给父组件;
      this.$emit("num-change", this.num + 1);
    },
  },
};
</script>

<style lang="less" scoped>
.number-box {
  min-width: 30px;
  text-align: center;
  margin: 0 5px;
  font-size: 12px;
}

.btn-sm {
  width: 30px;
}
</style>
版权声明:本文为m0_66051368原创文章,遵循 CC 4.0 BY-SA 版权协议,转载请附上原文出处链接和本声明。