介绍
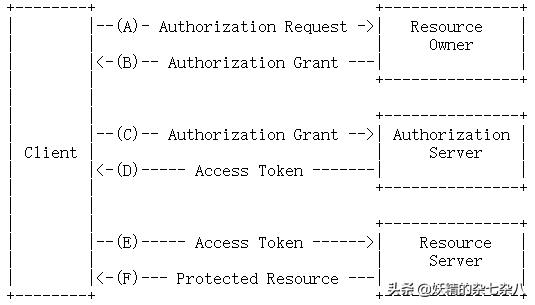
OAuth(开放授权)是一个开放标准,允许用户授权第三方应用访问他们存储在另外的服务提供者上的信息,而不需要将用户名和密码提供给第三方应用或分享他们数据的所有内容。OAuth2.0的系统大致分由客户端,认证授权服务器以及资源服务器三部分组成。客户端如果想要访问资源服务器中的资源,就必须要持有认证授权服务器颁发的Token。认证流程如下图所示:
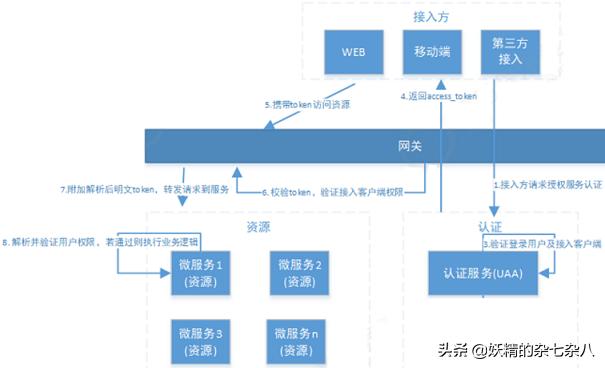
这篇文章将通过一个具体的案例来展示如何搭建一个分布式的OAuth2.0系统。整体的结构图如下所示。有网关,认证授权服务以及资源服务三个部分组成。既然OAuth2是一个标准,如果我们想用的话,必然是用它的实现,也就是Spring-Security-OAuth2,它可以很方便地和Spring Cloud集成。OAuth2.0的更多细节会在案例中继续介绍。
那么就开始吧!
数据库
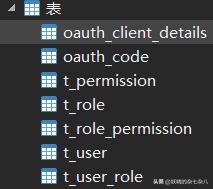
要完成这套系统,需要准备好用到的一些数据表。
-
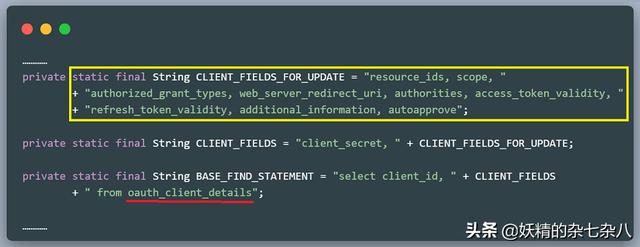
oauth_client_details
:这个数据库存放了客户端的配置信息,客户端有什么样的权限才可以访问服务器。表中的字段是固定的,下面会详细提到。 -
oauth_code
:用户数据库存取授权码模式存放授权码的,表中的字段也是固定的,下面会详细说明。 - 后面的5张表存放了用户的一些信息,如果角色、权限等信息。登录验证的时候需要。
建表的sql我放在了源码的README.md文件中,下载地址见文末。
注册中心
微服务项目得先有个注册中心吧,我们选用Eureka。先搭建一个父工程OAuth2Demo,然后在父工程中创建一个Module叫oauth2_eureka。然后添加配置文件及启动类即可。所需要的依赖我就不在这里贴了,太占篇幅了。有需要的小伙伴直接去我源码中拷就行了。
spring: application: name: eurekaserver: port: 8000 #启动端口…………@SpringBootApplication@EnableEurekaServerpublic class EurekaApplication { public static void main(String[] args) { SpringApplication.run(EurekaApplication.class,args); }}这样注册中心就搭建好了。
认证授权服务
服务搭建
在OAuth2Demo中创建一个Module叫oauth2_uaa作为认证服务。添加启动类和配置文件。
spring.application.name=uaaserver.port=8001eureka.client.serviceUrl.defaultZone = http://localhost:8000/eureka/…………@SpringBootApplication@EnableEurekaClient@MapperScan("com.robod.uaa.mapper")public class UaaApplication { public static void main(String[] args) { SpringApplication.run(UaaApplication.class, args); }}
配置
回顾上一篇Spring Security的文章中提到的几点内容
- 用户来源的Service实现UserDetailsService接口,实现loadUserByUsername()方法,从数据库中获取数据
- Spring Security的配置类继承自WebSecurityConfigurerAdapter,重写里面的两个configure()方法
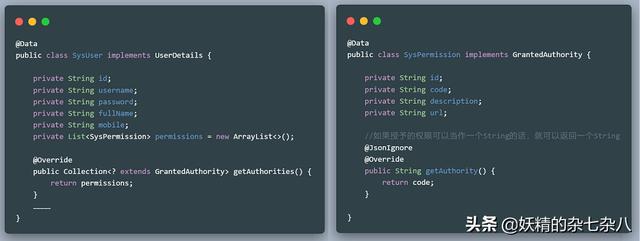
public interface UserService extends UserDetailsService {}//-----------------------------------------------------------@Service("userService")public class UserServiceImpl implements UserService {………… @Override public UserDetails loadUserByUsername(String username) throws UsernameNotFoundException { SysUser sysUser = userMapper.findByUsername(username); return sysUser; }}@Configurationpublic class WebSecurityConfig extends WebSecurityConfigurerAdapter {………… @Bean public PasswordEncoder passwordEncoder() { return new BCryptPasswordEncoder(); } @Bean @Override protected AuthenticationManager authenticationManager() throws Exception { return super.authenticationManager(); } //认证用户的来源 @Override protected void configure(AuthenticationManagerBuilder auth) throws Exception { auth.userDetailsService(userService).passwordEncoder(passwordEncoder()); } //配置SpringSecurity相关信息 @Override protected void configure(HttpSecurity http) throws Exception { http.csrf().disable() .authorizeRequests() .antMatchers("/r/r1").hasAnyAuthority("p1") .antMatchers("/login*").permitAll() .anyRequest().authenticated() .and() .formLogin(); }}解释一下上面的代码,WebSecurityConfig是Spring Security的配置类,第一个configure()方法配置的是用户的来源,这里配置了自定义的实现了UserDetailsService接口的UserService,里面的loadUserByUsername()方法从数据库中查询出对应的实现了UserDetails接口的SysUser对象,里面的SysPermission封装了用户所拥有的权限。然后就交给后续的过滤器去处理了,我们就不用去管了。
然后我们就可以去进行OAuth2.0的相关配置了,方法很简单,只要在配置类上添加@EnableAuthorizationServer注解并让其继承自AuthorizationServerConfigurerAdapter。最后重写其中的三个configure()方法即可。
@Configuration@EnableAuthorizationServerpublic class AuthorizationServerConfig extends AuthorizationServerConfigurerAdapter { @Autowired private AuthenticationManager authenticationManager; //从WebSecurityConfig中获取的 @Autowired private AuthorizationCodeServices authorizationCodeServices; //本类中的,授权码模式需要 @Autowired private TokenStore tokenStore; //TokenConfig中的 @Autowired private PasswordEncoder passwordEncoder;//从WebSecurityConfig中获取的 @Autowired private ClientDetailsService clientDetailsService; //本类中的 @Autowired private JwtAccessTokenConverter jwtAccessTokenConverter; //TokenConfig中的 //用来配置令牌端点的安全约束 @Override public void configure(AuthorizationServerSecurityConfigurer security) throws Exception { security.tokenKeyAccess("permitAll") // /oauth/token_key 提供公有密匙的端点 允许任何人访问 .checkTokenAccess("permitAll") // /oauth/check_token :用于资源服务访问的令牌解析端点 允许任何人访问 .allowFormAuthenticationForClients(); //表单认证(申请令牌) } //用来配置客户端详情服务,客户端详情信息在这里进行初始化, //你能够把客户端详情信息写死在这里或者是通过数据库来存储调取详情信息 @Override public void configure(ClientDetailsServiceConfigurer clients) throws Exception { clients.withClientDetails(clientDetailsService); } //用来配置令牌(token)的访问端点(url)和令牌服务(token services) @Override public void configure(AuthorizationServerEndpointsConfigurer endpoints) throws Exception { endpoints.authenticationManager(authenticationManager) //认证管理器,密码模式需要 .authorizationCodeServices(authorizationCodeServices) //授权码服务,授权码模式需要 .tokenServices(tokenService()) .allowedTokenEndpointRequestMethods(HttpMethod.POST); //允许post提交 } @Bean public AuthorizationCodeServices authorizationCodeServices(DataSource dataSource) { //设置授权码模式的授权码存取到数据中 return new JdbcAuthorizationCodeServices(dataSource); } //客户端详情服务,从数据库中获取 @Bean public ClientDetailsService clientDetailsService(DataSource dataSource) { ClientDetailsService clientDetailsService = new JdbcClientDetailsService(dataSource); ((JdbcClientDetailsService)clientDetailsService).setPasswordEncoder(passwordEncoder); return clientDetailsService; } //令牌管理服务 @Bean public AuthorizationServerTokenServices tokenService() { DefaultTokenServices service = new DefaultTokenServices(); service.setClientDetailsService(clientDetailsService); //客户端信息服务 service.setSupportRefreshToken(true); //支持自动刷新 service.setTokenStore(tokenStore); //令牌增强 TokenEnhancerChain tokenEnhancerChain = new TokenEnhancerChain(); tokenEnhancerChain.setTokenEnhancers(Arrays.asList(jwtAccessTokenConverter)); service.setTokenEnhancer(tokenEnhancerChain); service.setAccessTokenValiditySeconds(7200); //令牌默认有效期2小时 service.setRefreshTokenValiditySeconds(259200); //刷新令牌默认有效期3天 return service; }}现在来解释一下上面代码中的内容
-
ClientDetailsService
我们配置了从数据库中获取客户端配置。但是是怎么从数据库中获取的呢,这里用到了一个
JdbcClientDetailsService
,点击源码里看看
可以看到,它是从
oauth_client_details
这张表里查出来的,所以我们的数据库中只要创建出这张表,表里再添加这些字段即可。
-
JdbcAuthorizationCodeServices
原理和
JdbcClientDetailsService
差不多,都是创建出指定的表。 -
TokenStore
和
JwtAccessTokenConverter
为了方便管理,我们使用TokenConfig这个类去配置Token相关的内容。添加了
@Bean
注解将其添加到Spring容器后就可以在其它的类中去注入使用了。@Configuration public class TokenConfig { private String SIGNING_KEY = “robod_hahaha”; //对称加密的密钥 @Bean public TokenStore tokenStore() { //JWT令牌方案 return new JwtTokenStore(jwtAccessTokenConverter()); } @Bean public JwtAccessTokenConverter jwtAccessTokenConverter() { JwtAccessTokenConverter converter = new JwtAccessTokenConverter(); converter.setSigningKey(SIGNING_KEY); //对称秘钥,资源服务器使用该秘钥来验证 return converter; } } 采用了JWT令牌管理方式,然后使用了对称密钥去进行加密。还有另外几种令牌管理方式:
InMemoryTokenStore
:在内存中存储令牌(默认)
JdbcTokenStore
:令牌存储在数据库中
RedisTokenStore
:令牌存储在Redis中 -
AuthorizationServerTokenServices
这个是用来配置令牌管理服务的,我们配置了客户端详情服务,令牌增强等内容。
申请令牌的四种方式
到现在为止,我们的认证授权服务就已经配置好了,那么现在就可以去申请令牌了,申请令牌的方式一共有四种:
-
授权码模式第一步申请授权码http://localhost:8001/uaa/oauth/authorize?client_id=c1&response_type=code&scope=ROLE_ADMIN&redirect_uri=http://localhost注意,这里的
client_id
,
scope
和
redirect_uri
都是在oauth_client_details表中设置过的,要一一对应上,否则不行,
response_type
授权码模式固定为
code
。成功访问后,在页面上输入用户名和密码,验证通过后,在浏览器的地址栏中就可以看到返回的授权码。然后我们拿着授权码就可以向服务器去申请Token了,参数列表必须和数据库中配置的一致。 -
简化模式http://localhost:8001/uaa/oauth/authorize?client_id=c1&response_type=token&scope=ROLE_ADMIN&redirect_uri=http://localhost在简化模式下,我们只需要去指定
client_id
,
response_type
,
scope
和
redirect_uri
即可,请求成功后,就会跳转到指定的uri界面,然后令牌就在url中。 - 密码模式在密码模式下,我们需要将用户名和密码传到服务器中,验证通过后,服务器会直接将Token返回给我们
- 客户端模式该模式最简单,也是最不安全的。
网关
搭建完了认证授权服务再来创建网关服务。在父工程下创建一个名为oauth2_gateway的Module。启动类没什么好说的,配置文件中有几点需要注意:
spring.application.name=gatewayserver.port=8010zuul.routes.uaa.stripPrefix = falsezuul.routes.uaa.path = /uaa/**zuul.routes.order.stripPrefix = falsezuul.routes.order.path = /order/**eureka.client.serviceUrl.defaultZone = http://localhost:8000/eureka/…………我们配置了微服务的名称及端口,还配置了将路径为/zuul/uaa/**和 /zuul/order/**的请求转发给uaa和order微服务。
老样子,第一步进行一些安全配置
@Configurationpublic class WebSecurityConfig extends WebSecurityConfigurerAdapter { @Override protected void configure(HttpSecurity http) throws Exception { http.authorizeRequests() .antMatchers("/**").permitAll() .and().csrf().disable(); }}我们在这里设置了可以接收任何请求,不需要任何的权限。
接下来就需要对具体的资源服务进行配置:
@Configuration@EnableResourceServerpublic class ResourceServerConfig extends ResourceServerConfigurerAdapter { public static final String RESOURCE_ID = "res1"; @Autowired private TokenStore tokenStore; @Override public void configure(ResourceServerSecurityConfigurer resources) { resources.tokenStore(tokenStore) .resourceId(RESOURCE_ID) .stateless(true); } @Override public void configure(HttpSecurity http) throws Exception { http.authorizeRequests() .antMatchers("/uaa/**") .permitAll() .antMatchers("/order/**") .access("#oauth2.hasScope('ROLE_API')"); }}
在这里面,配置了访问认证服务不需要任何的权限。访问订单资源服务需要用户必须具有
“ROLE_API”
的scope权限。其中注入的tokenStore和认证服务中的TokenConfig一致。
因为订单微服务还没有创建,所以我们来测试一下网关访问认证授权服务。网关的端口是8010。
来测试一下,先是通过网关获取令牌,网关微服务的端口是8010。
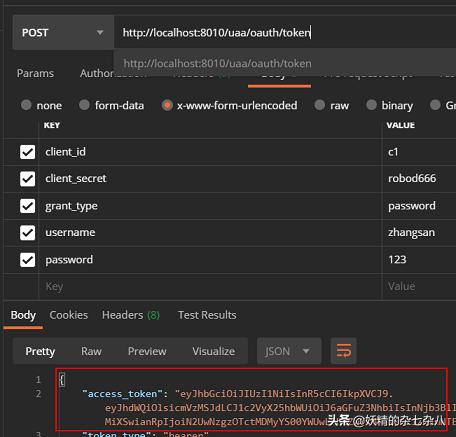
可以看到,申请到了令牌,说明请求成功地被转发到了认证服务。
订单资源服务
最后,我们就可以去创建资源服务了。在父工程下创建一个名为oauth2_order的Module。
第一步,先进行一些安全配置:
@Configuration@EnableGlobalMethodSecurity(securedEnabled = true, prePostEnabled = true)public class WebSecurityConfig extends WebSecurityConfigurerAdapter { @Override protected void configure(HttpSecurity http) throws Exception { http.csrf().disable() .authorizeRequests() .antMatchers("/r/**").authenticated() //所有/r/**的请求必须认证通过 .anyRequest().permitAll(); //除了/r/**,其它的请求可以访问 }}这个@EnableGlobalMethodSecurity是干吗的呢?是为了开启注解权限控制的,只有开启了之后,我们才可以在需要进行权限控制的地方去添加注解实现权限控制。
接下来就是对资源服务器的配置了。在@Configuration注解的配置类上添加
@EnableResourceServer
注解,然后继承自
ResourceServerConfigurerAdapter
类,然后重写里面的
configure()
方法即可。
@Configuration@EnableResourceServerpublic class ResourceServerConfig extends ResourceServerConfigurerAdapter { public static final String RESOURCE_ID = "res1"; //资源服务的id @Autowired private TokenStore tokenStore; //管理令牌的方式,TokenConfig中的 @Override public void configure(ResourceServerSecurityConfigurer resources) throws Exception { resources.resourceId(RESOURCE_ID) .tokenStore(tokenStore) .stateless(true); } @Override public void configure(HttpSecurity http) throws Exception { http.authorizeRequests() .antMatchers("/**").access("#oauth2.hasScope('ROLE_ADMIN')") .and().csrf().disable() .sessionManagement().sessionCreationPolicy(SessionCreationPolicy.STATELESS); }}接下来就是在需要进行权限控制的方法上面添加注解。
@RestControllerpublic class OrderController { @GetMapping(value = "/r1") @PreAuthorize("hasAuthority('p1')")//拥有p1权限方可访问此url public String r1() { return "访问资源成功"; }}ok!成功了。再来试一下通过网关去访问order中的资源,用一个没有权限的用户访问试试。
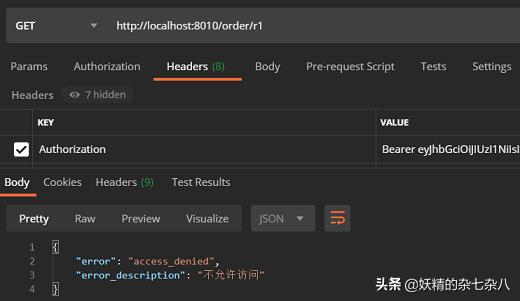
说明网关成功转发了我们请求,并且我们配置的权限控制也起了作用。
总结
使用OAuth2.0搭建分布式系统到这里就结束了。内容还是挺多的,希望小伙伴们能有静下心来细品。因为考虑到篇幅,很多非核心的内容我都没有贴出来,比如pom文件,配置文件的部分内容等。小伙伴们可以下载源码再配合着这篇文章看。
————
关注我,转发文章
之后私信回复【
源码
】即可免费下载源码