在上一篇中已经讲到了Spring Boot中使用JPA对数据库进行操作,通常在对数据库数据进行维护时会使用到事务,本文接下来将会简单介绍下Spring Boot中事务的使用。
1.数据准备
①pom.xml配置
pom.xml文件中的必要依赖如下:
		<dependency>
			<groupId>org.springframework.boot</groupId>
			<artifactId>spring-boot-starter-web</artifactId>
		</dependency>
		<dependency>
			<groupId>org.springframework.boot</groupId>
			<artifactId>spring-boot-starter-data-jpa</artifactId>
		</dependency>
		<dependency>
			<groupId>mysql</groupId>
			<artifactId>mysql-connector-java</artifactId>
		</dependency>
这里依然是使用MySQL数据库做演示,如果使用其他数据库,更换相关数据库驱动即可。
②application.properties配置
# 访问路径
server.context-path=/demo
# 端口号
server.port=8088

## 数据源配置
spring.datasource.driverClassName=com.mysql.jdbc.Driver
spring.datasource.url=jdbc:mysql://127.0.0.1:3306/demo?characterEncoding=UTF-8
spring.datasource.username=root
spring.datasource.password=root

## JPA配置
spring.jpa.show-sql=true
spring.jackson.serialization.indent_output=true
③数据库建表
本文依然使用数据库表:student(学生表),建表sql如下:
CREATE TABLE `student` (
  `id` bigint(20) NOT NULL AUTO_INCREMENT COMMENT 'ID',
  `name` varchar(100) DEFAULT NULL COMMENT '姓名',
  `age` int(4) DEFAULT NULL COMMENT '年龄',
  `nat` varchar(200) DEFAULT NULL COMMENT '国籍',
  PRIMARY KEY (`id`)
) ENGINE=InnoDB DEFAULT CHARSET=utf8 COMMENT='学生表'
④创建实体类
学生表Student:
package net.xxpsw.demo.springboot.student.entity;
import javax.persistence.Entity;
import javax.persistence.GeneratedValue;
import javax.persistence.Id;
@Entity
public class Student {
	@Id
	@GeneratedValue
	private Long id;
	private String name;
	private Integer age;
	private String nat;

	public Student() {
		super();
	}
	public Student(String name, Integer age, String nat) {
		super();
		this.name = name;
		this.age = age;
		this.nat = nat;
	}
	public Student(Long id, String name, Integer age, String nat) {
		super();
		this.id = id;
		this.name = name;
		this.age = age;
		this.nat = nat;
	}

	public Long getId() {
		return id;
	}
	public void setId(Long id) {
		this.id = id;
	}
	public String getName() {
		return name;
	}
	public void setName(String name) {
		this.name = name;
	}
	public Integer getAge() {
		return age;
	}
	public void setAge(Integer age) {
		this.age = age;
	}
	public String getNat() {
		return nat;
	}
	public void setNat(String nat) {
		this.nat = nat;
	}
}
主键id字段的注解@GeneratedValue作用在于为实体类创建一个自增的唯一值,查看该注解源码如下:
public @interface GeneratedValue {
    GenerationType strategy() default AUTO;
    String generator() default "";
}
该源码中,generator属性声明了主键生成器的名称,默认为””;strategy属性声明了主键生成策略,默认使用javax.persistence.GenerationType.AUTO,表示主键自增。
⑤数据操作
创建数据访问接口StudentRepository:
package net.xxpsw.demo.springboot.student.dao;
import org.springframework.data.jpa.repository.JpaRepository;
import net.xxpsw.demo.springboot.student.entity.Student;
public interface StudentRepository extends JpaRepository<Student, Long> {}
创建业务层接口StudentService及实现类StudentServiceImpl:
package net.xxpsw.demo.springboot.student.service;
public interface StudentService {}
package net.xxpsw.demo.springboot.student.service.impl;
import org.springframework.beans.factory.annotation.Autowired;
import org.springframework.stereotype.Service;
import net.xxpsw.demo.springboot.student.dao.StudentRepository;
import net.xxpsw.demo.springboot.student.service.StudentService;
@Service
public class StudentServiceImpl implements StudentService {
@Autowired
private StudentRepository studentRepository;
}
创建控制类StudentController:
package net.xxpsw.demo.springboot.student;
import org.springframework.beans.factory.annotation.Autowired;
import org.springframework.web.bind.annotation.RequestMapping;
import org.springframework.web.bind.annotation.RestController;
import net.xxpsw.demo.springboot.student.service.StudentService;
@RestController
@RequestMapping("student")
public class StudentController {
	@Autowired
	private StudentService studentService;
}
2.数据异常回滚
首先演示的是,保存数据后出现了运行异常,导致数据回滚的情况。
①控制类
控制类StudentController添加如下方法:
	/**
	* @Description: 新增学生信息(异常回滚)
	* @param name 姓名
	* @param age 年龄
	* @param nat 国籍
	* @return Student
	 */
	@RequestMapping("saveStudentWithRoolBack")
	public Student saveStudentWithRoolBack(String name, Integer age, String nat) {
		return studentService.saveStudentWithRoolBack(new Student(name, age, nat));
	}
②业务类
业务层实现类StudentServiceImpl添加如下方法:
	@Transactional(rollbackFor = { RuntimeException.class })
	@Override
	public Student saveStudentWithRoolBack(Student student) {
		Student s = studentRepository.save(student);

		// by zero
		int err = 1 / 0;
		return s;
	}
此处的事务声明放在了方法上,注解@Transactional的包路径是org.springframework.transaction.annotation.Transactional,rollbackFor属性用以定义需要回滚的异常类型。
③查看源码
查看@Transactional的源码如下:
public @interface Transactional {
	@AliasFor("transactionManager")
	String value() default "";
	@AliasFor("value")
	String transactionManager() default "";
	Propagation propagation() default Propagation.REQUIRED;
	Isolation isolation() default Isolation.DEFAULT;
	int timeout() default TransactionDefinition.TIMEOUT_DEFAULT;
	boolean readOnly() default false;
	Class<? extends Throwable>[] rollbackFor() default {};
	String[] rollbackForClassName() default {};
	Class<? extends Throwable>[] noRollbackFor() default {};
	String[] noRollbackForClassName() default {};
}
从源码中可知rollbackFor属性值为Throwable及其子类,此处使用了子类RuntimeException,实际使用时可根据使用场景合理选择需要监控的异常。
④开发工具调试
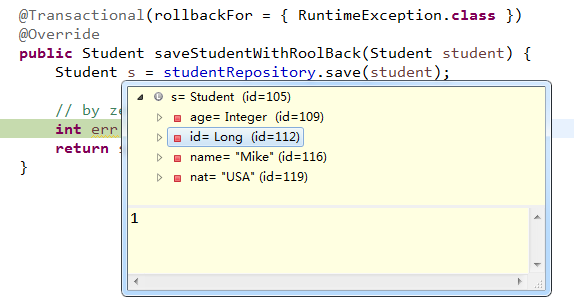
为了方便观察,先在saveStudentWithRoolBack方法内的异常处(int err)加上调试断点。
Debug模式启动Spring Boot,访问http://localhost:8088/demo/student/saveStudentWithRoolBack?name=Mike&age=25&nat=USA,开发工具中可看到如下结果:
可以看到,此时数据库已为新数据分配主键值1,但此时新数据尚不可读取。
⑤异常信息
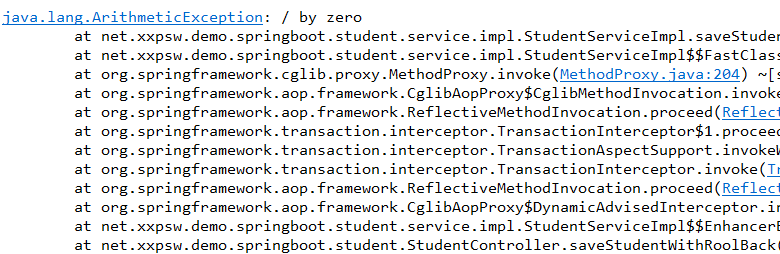
继续运行,控制台将会打印如下异常:
java.lang.ArithmeticException继承了RuntimeException,故此时新增数据应该已经回滚。
⑥查看数据库
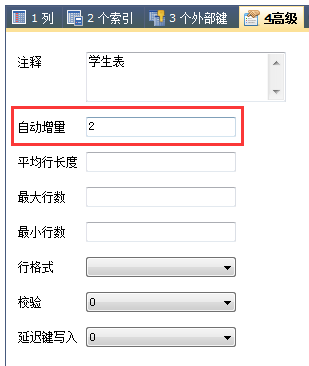
查看数据库表student,结果如下:
    id  name       age  nat
------  ------  ------  --------
可知新数据并未添加成功,查看该数据库表结构,可以看到,主键的自动增量已从1增加为2:
3.数据异常不回滚
接下来演示的是,数据保存后即使出现了异常,数据依然提交成功的情况。
①控制类
控制类StudentController中添加如下方法:
	/**
	* @Description: 新增学生信息(异常不回滚)
	* @param name 姓名
	* @param age 年龄
	* @param nat 国籍
	* @return Student
	 */
	@RequestMapping("saveStudentWithoutRoolBack")
	public Student saveStudentWithoutRoolBack(String name, Integer age, String nat) {
		return studentService.saveStudentWithoutRoolBack(new Student(name, age, nat));
	}
②业务类
业务实现类StudentServiceImpl中添加如下方法:
	@Transactional(noRollbackFor = { RuntimeException.class })
	@Override
	public Student saveStudentWithoutRoolBack(Student student) {
		Student s = studentRepository.save(student);

		// by zero
		int err = 1 / 0;
		return s;
	}
此处声明事务时,使用了另外一个属性noRollbackFor,从源码中可知noRollbackFor属性值也是Throwable及其子类,此处使用了子类RuntimeException,实际使用时可根据使用场景合理选择需要监控的异常。
③开发工具调试
为了方便观察,依然先在saveStudentWithoutRoolBack方法内的异常处(int err)加上调试断点。
Debug模式启动Spring Boot,访问http://localhost:8088/demo/student/saveStudentWithoutRoolBack?name=Mike&age=25&nat=USA,开发工具中可看到如下结果:
可以看到,此时数据库已为新数据分配主键值2,继续运行,控制台依然会打印异常:java.lang.ArithmeticException: / by zero。

④查看数据库
查看数据库表student,结果如下:
    id  name       age  nat
------  ------  ------  --------
     2  Mike        25  USA
从查询结果可知新数据已提交保存成功,同时该表的主键自动增量已从2增加为3。
注意:如果真的希望发生数据异常时不回滚,那么noRollbackFor属性必须要指定异常类,并且不要设置rollbackFor属性。