一、目标
学习如何旋转图片。
二、函数说明
在OpenCV中,没有现成的函数直接用来实现图像旋转,它是用仿射变换函数warpAffine来实现的,此函数目前支持4种插值算法,最近邻、双线性、双三次、兰索斯插值。
函数原型:
void warpAffine(InputArray src, OutputArray dst, InputArray M, Size dsize, int flags=INTER_LINEAR, int borderMode=BORDER_CONSTANT, const Scalar& borderValue=Scalar())
src源图像;
dst目标图像;
M转换矩阵;
dsize转换后图像的大小;
flags插值算法类型;
borderMode,borderValue默认0;
三、程序代码
#include "cv.h"                             //  OpenCV 文件头
#include "highgui.h"
#include "cvaux.h"
#include "cxcore.h"
#include "opencv2/opencv.hpp"
#include "opencv2/imgproc.hpp"
#include <iostream>
#include <string>

using namespace cv;
using namespace std;

Mat rotateImage1(Mat img, int degree)
{
    degree = -degree;//warpAffine默认的旋转方向是逆时针,所以加负号表示转化为顺时针
    double angle = degree  * CV_PI / 180.; // 弧度
    double a = sin(angle), b = cos(angle);
    int width = img.cols;
    int height = img.rows;
    int width_rotate = int(height * fabs(a) + width * fabs(b));
    int height_rotate = int(width * fabs(a) + height * fabs(b));
    //旋转数组map
    // [ m0  m1  m2 ] ===>  [ A11  A12   b1 ]
    // [ m3  m4  m5 ] ===>  [ A21  A22   b2 ]
    float map[6];
    Mat map_matrix = Mat(2, 3, CV_32F, map);
    // 旋转中心
    CvPoint2D32f center = cvPoint2D32f(width / 2, height / 2);
    CvMat map_matrix2 = map_matrix;
    cv2DRotationMatrix(center, degree, 1.0, &map_matrix2);//计算二维旋转的仿射变换矩阵
    map[2] += (width_rotate - width) / 2;
    map[5] += (height_rotate - height) / 2;
    Mat img_rotate;
    //对图像做仿射变换
    //CV_WARP_FILL_OUTLIERS - 填充所有输出图像的象素。
    //如果部分象素落在输入图像的边界外,那么它们的值设定为 fillval.
    //CV_WARP_INVERSE_MAP - 指定 map_matrix 是输出图像到输入图像的反变换,
    warpAffine(img, img_rotate, map_matrix, Size(width_rotate, height_rotate), 1, 0, 0);
    return img_rotate;
}

int main(int argc, char *argv[])
{
    int degree;
    Mat m_SrcImg;

    m_SrcImg = imread("C:\\Users\\lidabao\\Desktop\\Lena1.bmp");

    namedWindow("原图像", 1);
    imshow("原图像", m_SrcImg);

    cout << "请输入旋转的度数:";
    cin >> degree;

    Mat m_ResImg = rotateImage1(m_SrcImg, degree);

    namedWindow("旋转后图像", 1);
    imshow("旋转后图像", m_ResImg);

    waitKey(0);
}
四、解释
1、cv2DRotationMatrix
计算二维旋转的仿射变换矩阵
CvMat* cv2DRotationMatrix( CvPoint2D32f center, double angle,double scale, CvMat* map_matrix );
center:输入图像的旋转中心坐标
angle:旋转角度(度)。正值表示逆时针旋转(坐标原点假设在左上角).
scale:各项同性的尺度因子
map_matrix:输出 2×3 矩阵的指针
函数 cv2DRotationMatrix 计算矩阵:
[ α β | (1-α)*center.x – β*center.y ]
[ -β α | β*center.x + (1-α)*center.y ]
where α=scale*cos(angle), β=scale*sin(angle)
该变换并不改变原始旋转中心点的坐标,如果这不是操作目的,则可以通过调整平移量改变其坐标(译者注:通过简单的推导可知,仿射变换的实现是首先将旋转中心置为坐标原点,再进行旋转和尺度变换,最后重新将坐标原点设定为输入图像的左上角,这里的平移量是center.x, center.y)。
2、degree = -degree
warpAffine默认的旋转方向是逆时针,所以加负号表示转化为顺时针
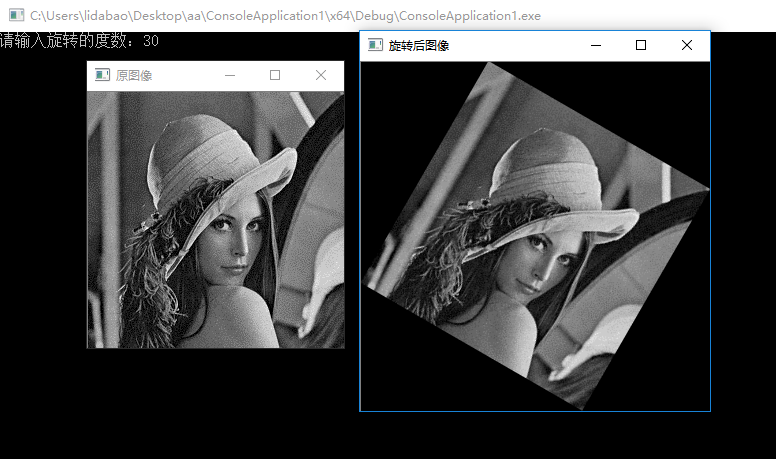
五、结果
程序运行如下图:
旋转角度设为30度。
六、注意
正确的配置opencv
正确使用warpAffine()函数