目录:
一、日期注入:
日期类型不同于其他数据类型(其它数据类型可以自动注入到方法的参数上),日期类不能根据属性名自动注入到方法的参数中。需要单独做转换处理。
点击查看其他数据类型注入的方式
1.@DateTimeFormat单个日期处理:
- springmvc.xml核心配置文件添加注解驱动:
<!--添加注解驱动-->
<mvc:annotation-driven></mvc:annotation-driven>
<!--annotation-driven有好几种,注意使用的是mvc为后缀的包下的驱动。-->
-
前端发送Date日期数据:

<form method="post"  action="${pageContext.request.contextPath}/date.action">
    <input type="date" name="date1">
    <input type="submit" value="提交">
</form>
- 后端使用@DateTimeFormat注解注入前端传来的日期:
package com.user.controller;

import org.springframework.format.annotation.DateTimeFormat;
import org.springframework.stereotype.Controller;
import org.springframework.web.bind.annotation.RequestMapping;

import java.util.Date;

@Controller
public class DateAction {
    @RequestMapping("/date.action")
    public String one(
            @DateTimeFormat(pattern = "yyyy-MM-dd")
            Date date1){//date1是前端传来的Date类型的数据
        System.out.println(date1);//Sat Oct 22 00:00:00 CST 2022
        return "main";
    }
}
这种解决方案要在每个使用日期类型的地方都去添加使用@DateTimeFormat注解,比较麻烦,我们可以使用@InitBinder注解来进行类中统一日期类型的处理。
2.@InitBinder全局日期处理:
-
前端发送Date日期数据:

<form method="post"  action="${pageContext.request.contextPath}/date.action">
    <input type="date" name="date1">
    <input type="submit" value="提交">
</form>
- 后端使用自定义注解@InitBinder,实现Date类型自动注入:
package com.user.controller;

import org.springframework.beans.propertyeditors.CustomDateEditor;
import org.springframework.stereotype.Controller;
import org.springframework.web.bind.WebDataBinder;
import org.springframework.web.bind.annotation.InitBinder;
import org.springframework.web.bind.annotation.RequestMapping;

import java.text.SimpleDateFormat;
import java.util.Date;

@Controller
public class DateAction {
    //日期转换类
    SimpleDateFormat sf = new SimpleDateFormat("yyyy-MM-dd");

    @InitBinder
    public void initBinder(WebDataBinder dataBinder){
        dataBinder.registerCustomEditor(Date.class,new CustomDateEditor(sf,true));
    }
    @RequestMapping("/date.action")
    public String one(Date date1){//date1是前端传来的Date类型的数据
        System.out.println(date1);//Sat Oct 22 00:00:00 CST 2022
        return "main";
    }
}
这样在类中出现的所有日期都可以进行转换了,
不再需要加注解驱动和@DateTimeFormat。
二、日期的显示处理:
如何将日期显示到页面上时具有标准的yyyy-MM-dd格式。
注意:以下操作均使用@InitBinder全局日期处理注入参数,有关@InitBinder的使用就不再说明。
1.单个日期格式化:
-
前端发送Date类型数据:

<form method="post"  action="${pageContext.request.contextPath}/date.action">
    <input type="date" name="date1">
    <input type="submit" value="提交">
</form>
- 后端注入数据后格式化并输出到页面:
package com.user.controller;

import jakarta.servlet.http.HttpServletRequest;
import org.springframework.beans.propertyeditors.CustomDateEditor;
import org.springframework.stereotype.Controller;
import org.springframework.web.bind.WebDataBinder;
import org.springframework.web.bind.annotation.InitBinder;
import org.springframework.web.bind.annotation.RequestMapping;

import java.text.SimpleDateFormat;
import java.util.Date;

@Controller
public class DateAction {
    //日期转换类
    SimpleDateFormat sf = new SimpleDateFormat("yyyy-MM-dd");
    @InitBinder
    public void initBinder(WebDataBinder dataBinder){
        dataBinder.registerCustomEditor(Date.class,new CustomDateEditor(sf,true));
    }
    @RequestMapping("/date.action")
    public String one(Date date1 ,HttpServletRequest req){
        System.out.println(date1);//Thu Oct 06 00:00:00 CST 2022
        String date = sf.format(date1);//日期格式化刷子
        req.setAttribute("date1",date);
        return "main";
    }
}
- main.jsp页面:
<body>
	<h1>${requestScope.date1}</h1>
</body>
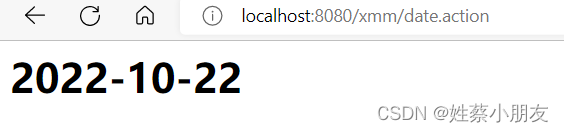
-
效果:
2.使用JSTL标签库格式化日期:
- 第一步:添加jstl标签库依赖:
<!--JSTL标签库-->
<dependency>
	  <groupId>jakarta.servlet.jsp.jstl</groupId>
 	 <artifactId>jakarta.servlet.jsp.jstl-api</artifactId>
	  <version>2.0.0</version>
</dependency>
<dependency>
	  <groupId>org.glassfish.web</groupId>
 	 <artifactId>jakarta.servlet.jsp.jstl</artifactId>
 	 <version>2.0.0</version>
</dependency>
- 第二步:在jsp文件上导入jstl核心标签库和jstl日期格式化标签库:
<%--导入核心标签库--%>
<%@ taglib prefix="c" uri="http://java.sun.com/jsp/jstl/core" %>
<%--导入jstl日期格式化标签库--%>
<%@ taglib prefix="fmt" uri="http://java.sun.com/jsp/jstl/fmt" %>
- 第三步:使用jstl标签做格式化:
<body>
<h1>${requestScope.date1}</h1><%--格式化前--%>
<h1><fmt:formatDate value="${requestScope.date1}" pattern="yyyy-MM-dd"></fmt:formatDate></h1><%--格式化后--%>
</body>
- 后端逻辑:后端注入数据不做处理,交给前端使用jstl处理:
package com.user.controller;

import jakarta.servlet.http.HttpServletRequest;
import org.springframework.beans.propertyeditors.CustomDateEditor;
import org.springframework.stereotype.Controller;
import org.springframework.web.bind.WebDataBinder;
import org.springframework.web.bind.annotation.InitBinder;
import org.springframework.web.bind.annotation.RequestMapping;

import java.text.SimpleDateFormat;
import java.util.Date;

@Controller
public class DateAction {
    //日期转换类
    SimpleDateFormat sf = new SimpleDateFormat("yyyy-MM-dd");
    @InitBinder
    public void initBinder(WebDataBinder dataBinder){
        dataBinder.registerCustomEditor(Date.class,new CustomDateEditor(sf,true));
    }
    @RequestMapping("/date.action")
    public String one(Date date1 ,HttpServletRequest req){
        System.out.println(date1);//Thu Oct 06 00:00:00 CST 2022
        req.setAttribute("date1",date1);
        return "main";
    }
}
-
效果:

3.对JSON类型的数据进行日期格式化:
需要在类中的成员变量的getXXX方法上加注解。
@JsonFormat(pattern="yyyy-MM-dd HH:mm:ss")
public Date getDate() {
	return date;
}
版权声明:本文为m0_53881899原创文章,遵循 CC 4.0 BY-SA 版权协议,转载请附上原文出处链接和本声明。