nginx反向代理+负载均衡
一、反向代理使用的场景
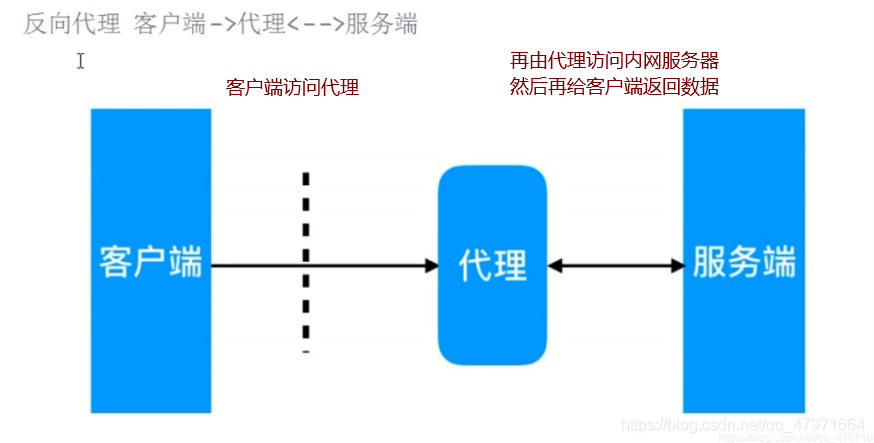
反向代理是面向服务器的。通常客户端要访问web服务器,就得知道web服务器的真实ip,但这样对于公司来说就需要多个公网ip,并且web的真实ip被暴露在了互联网上,十分的不安全,这个时候只需要部署一个代理服务器即可,客户端访问代理服务器,代理服务器去访问公司内网的web服务器,然后调取数据后返回给客户端,这个过程客户端不知道web服务器的真实ip,而公司也不需要多个公网ip,只需要代理服务器一个公网ip即可
- 反向代理通常搭配负载均衡一起使用
二、反向代理实验步骤
| 系统 | ip地址 | 主机名 | 扮演角色 | Nginx版本 |
|---|---|---|---|---|
| Centos7.4 | 192.168.100.10 | dsk | 代理服务器 | Nginx-1.12.0 |
| Centos7.4 | 192.168.100.11 | dsk2 | 后端web服务器 | Nginx-1.12.0 |
| Centos7.4 | 192.168.100.12 | dsk3 | 后端web服务器 | Nginx-1.12.0 |
(1)继续上面的进度,只需要修改一下代理服务器Nginx的配置文件即可
[root@7-10 conf]# vim /usr/local/nginx/conf/nginx.conf
   worker_processes  1;
   events {
       worker_connections  1024;
   }
   http {
       include       mime.types;
       default_type  application/octet-stream;
      sendfile        on;
      keepalive_timeout  65;
      server {
          listen       80;
          server_name  localhost;
          location / {
              root   html;
              index  index.html index.htm;
              proxy_pass http://192.168.100.203:8080;  #修改代理
          }
          }
  }
[root@7-10 conf]# systemctl restart nginx
(2)然后修改web服务器的Nginx配置文件
[root@7-11 html]# vim /usr/local/nginx/conf/nginx.conf
   worker_processes  1;
   events {
       worker_connections  1024;
   }
   http {
       include       mime.types;
       default_type  application/octet-stream;
       sendfile        on;
      keepalive_timeout  65;
      log_format  main  '$remote_addr - $remote_user [$time_local] "$request" '
      '$status $body_bytes_sent "$http_referer" '
      '"$http_user_agent" "$http_x_forwarded_for"';

      access_log  logs/access.log  main;
      server {
          listen       8080;  #修改端口号
          server_name  www.aaa.com;
          index  index.html index.htm;
          root   html;
          location ~ .*\.(jpg|gif|png)$ {
                 allow 192.168.100.202;
                 deny all;
                 root html;
          }
  }
  }
[root@7-11 html]# systemctl restart nginx
使用浏览器访问代理服务器,发现成功跳转,反向代理配置成功
三、负载均衡
1.优点 :提升服务器群集的请求吞吐率,提升服务器群集的整体性能,提高冗余
负载均衡分为两种:
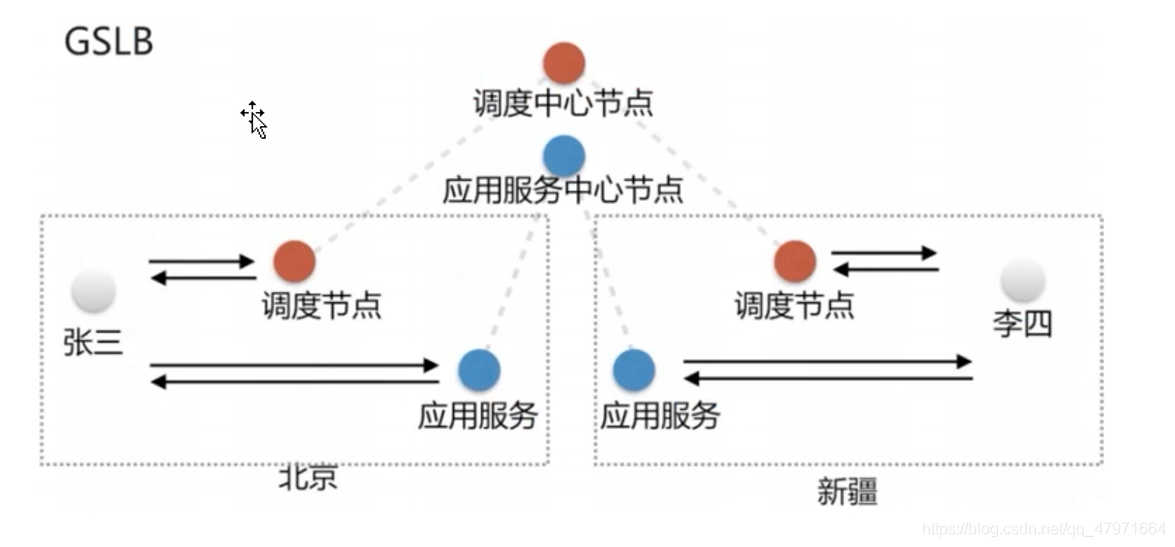
负载均衡按范围划分:GSLB
原理:按范围划分,去分配给用户指定的服务器
**例如:**北京省到新疆省都有web服务器,这个时候就会有相应的调度中心节点,而用户访问的是这个调度中心节点,然后节点通过用户所在的地区,划分给距离用户最近的服务器,这个就是按范围划分的
全局负载均衡SLB
全局负载均衡按层级划分,分为传输层和应用层的负载均衡,传输层为协议,应用层为服务**
Nginx就是一个典型的七层SLB,LVS是四层的SLB,Haproxy四层和七层都支持
例如:客户端访问Ngxin代理服务器,Nginx代理服务器通过指定的算法来分配服务器去接受请求
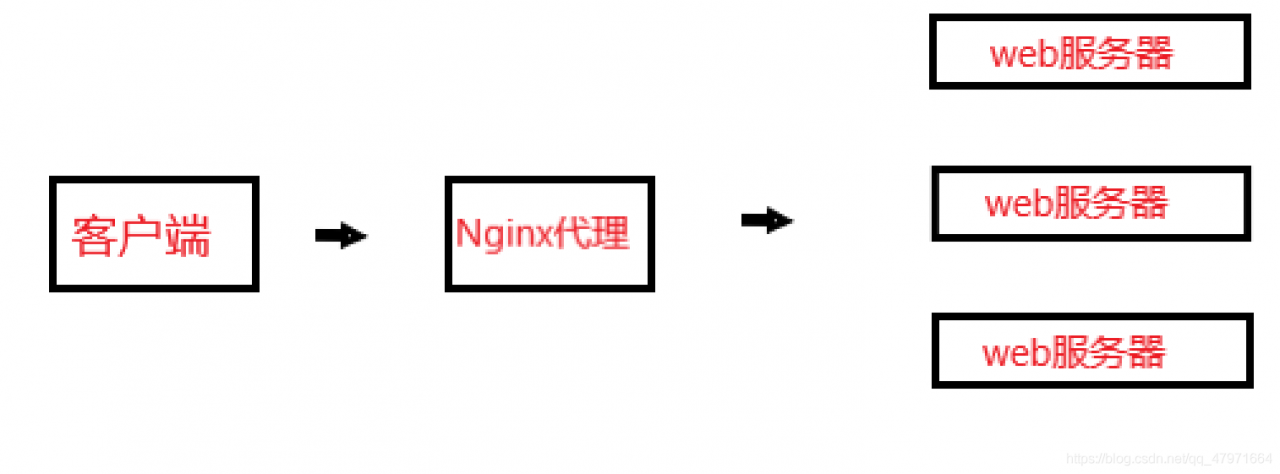
客户端访问Nginx代理服务器再由代理服务器根据算法分配给web服务器,从而提高整个集群的性能
1.实验步骤
(1)修改配置文件
  worker_processes  1;
   events {
       worker_connections  1024;
   }
   http {
       include       mime.types;
       default_type  application/octet-stream;
       sendfile        on;
       keepalive_timeout  65;
       upstream aaa {       #配置负载均衡的区域

       ;  #加入两个web服务器的ip和端口,配置weight权重,权重相同,为轮询方式
      server 192.168.100.12:80 weight=5;
       }
      server {
          listen       80;
          server_name  localhost;
          location / {
              proxy_pass http://aaa;  #配置代理,跳转到指定区域。区域名称要和上面配置的负载均衡的区域名称相同
              root   html;
              index  index.html index.htm;
          }
          error_page   500 502 503 504  /50x.html;
          location = /50x.html {
              root   html;
          }
      }
  }
[root@7-10 conf]# nginx -t
nginx: the configuration file /usr/local/nginx/conf/nginx.conf syntax is ok
nginx: configuration file /usr/local/nginx/conf/nginx.conf test is successful
[root@7-10 conf]# nginx -s reload  #重载nginx使配置文件生效
- dsk2和dsk3的配置
(1)做基础配置,安装Nginx
(2)分别在两台web服务器上编写两个不同的网页
#dsk2配置
[root@7-11 ~]# cd /usr/local/nginx/html/
[root@7-11html]# echo "web1" > index.html  #编写网页
[root@7-11 html]# systemctl start nginx

#dsk3配置
[root@dsk3 ~]# cd /usr/local/nginx/html/
[root@dsk3 html]# echo "web2" > index.html
[root@dsk3 html]# systemctl start nginx
然后访问代理服务器就会发现页面轮流显示
2.Nginx负载均衡状态配置
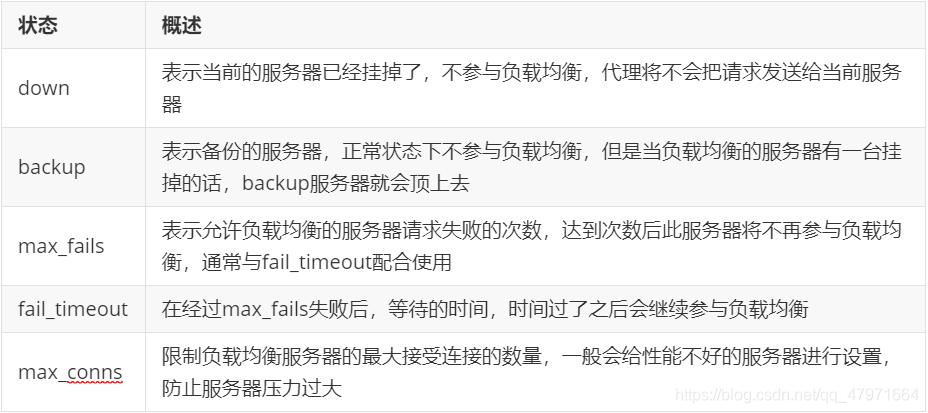
- max_fails和fail_timeout配合使用,可以防止服务器压力过大,因为当服务器压力过大之后,并发达到最大限度,这个时候就会有连接请求失败,失败达到一定次数,服务器就会先拒绝连接请求,然后处理已经接受的请求,经过等待时间后才会再次进行负载均衡。
- 测试backup和down状态下的负载均衡
- down
server 192.168.100.11:80 weight=5 down;         # 11不再参与负载均衡
server 192.168.100.204:80 weight=5;   #不变
- backuop
server 192.168.100.203:80 weight=5;
 12     server 192.168.100.12:80 weight=5 backup; #修改12为备份状态
版权声明:本文为qq_47971664原创文章,遵循 CC 4.0 BY-SA 版权协议,转载请附上原文出处链接和本声明。