本文参考
Ice
官方手册中的描述,对
Ice
注册器复制作了一个简单的讲解。并使用一个简单的实例,配置
Ice
注册器的双机热备,实现服务端的高可用性要求。
Ice
版本
:
Ice 3.3.1
IceGrid注册器或注册主机的失败会带来严重的后果。客户端可以继续使用一个现有的连接,连接到服务器,期间不需要中断,但是需要与注册器相互作用的任何活动都是易受到单点故障的影响。因此,IceGrid
注册支持复制使用主
-从配置,以此来提供应用程序高可用性的要求。
1. 概述
在
IceGrid
的注册表复制体系结构中
,有一个主副本和任何数量的从副本。主副本与从副本之间的的部署信息是同步的,以便任何一个从副本都能够提供定位请求、管理节点和启动服务器的需求。如果主注册表或主机发生故障,正确配置客户端,而已透明地将故障转移到从注册表之一。
每个副本都有一个唯一的名称。Master 预留给主副本,副本可以使用任何名称,可以合法地出现在一个对象标示符中。
以下说明了注册表复制的基本概念:
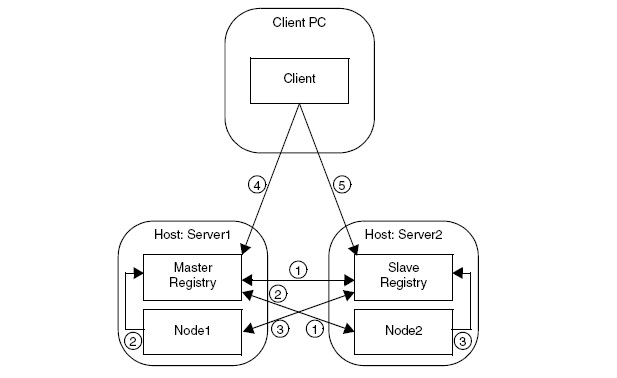
1. 从副本联系主副本在启动的时候,并且同步他们的数据库。任何后续的修改并部署到应用程序都是通过主副本,由主副本分发给所有活跃的从副本。
2. 在启动的时候,节点联系主副本,通知节点的可用性。
3. 主副本提供一个从副本的清单给各个节点,这样节点也可以通知从副本。
4. 客户端的配置决定了哪些副本它最初接触。在这个例子中,它首先接触主副本。
5. 在失败的情况下,客户端自动转移到从副本。如果主注册中心的主机已经失败,那么
Node1
和活跃在这个主机的任何服务器不可用。复制对象适配器的使用
(
见
官方手册39.9
节
)
允许客户端与
Node2
上
的服务器透明地重建通信。
主注册器副本有很多功能,只有其中的一些功能被从注册器支持。主副本知道所有的从副本,但从副本之间不互相接触。如果主副本失败,从副本们可以执行一些重要的功能,来保证应用程序的不中断运行。然而,最终,一个新的主副本必须开始恢复注册表的所有功能。对于一个从副本要成为主副本,从副本必须重新启动。
注册器副本的一个最重要的功能是提供来自客户定位请求,每个副本都有能力服务这些请求。从副本与主副本保持数据库同步,这样他们有所有必要的信息来转换对象标识符、对象适配器标识符,和复制组标识符为一个合适的端点。
还有一些其他的功能,查看官方手册3.3.1
版
。
2. 配置
例子使用两台主机,一台作为主服务器,一台作为从服务器,同时也部署了节点和应用程序。
|
IP |
功能 |
|
192.168.1.91 |
主注册器、节点1 |
|
192.168.1.85 |
从注册器、节点2 |
2.1. 主注册器配置
# Registry properties
IceGrid.InstanceName=DemoIceGrid
IceGrid.Registry.Client.Endpoints=tcp -h 192.168.1.91 -p 12000
IceGrid.Registry.Server.Endpoints=tcp
IceGrid.Registry.Internal.Endpoints=tcp
IceGrid.Registry.AdminPermissionsVerifier=DemoIceGrid/NullPermissionsVerifier
IceGrid.Registry.Data=C:\IceGrid\registry
IceGrid.Registry.ReplicaName=Master
IceGrid.Registry.Admin.Endpoints=default
#Trace log properties
#IceGrid.Registry.Trace.Adapter=3
#IceGrid.Registry.Trace.Node=3
#IceGrid.Registry.Trace.Replica=3
IceGrid.Registry.ReplicaName配置注册器的唯一名字,主注册器的默认名字是Master。
2.2. 从注册器配置
Ice.Default.Locator=DemoIceGrid/Locator:tcp -h 192.168.1.91 -p 12000
IceGrid.Registry.Client.Endpoints=tcp -h 192.168.1.85  -p 12001
IceGrid.Registry.Server.Endpoints=tcp
IceGrid.Registry.Internal.Endpoints=tcp
IceGrid.Registry.Data=C:\IceGrid\registry
IceGrid.Registry.ReplicaName=Replica1

#IceGrid.Registry.Trace.Replica=3
#IceGrid.Registry.Trace.Adapter=3
#IceGrid.Registry.Trace.Node=3
#IceGrid.Registry.Trace.Replica=3
Ice.Default.Locator属性配置主注册器的端点信息,从注册器使用此端点信息和主注册器保持通信。
2.3. 客户端配置
Ice.Default.Locator=DemoIceGrid/Locator:tcp -h 192.168.1.91 -p 12000:tcp -h 192.168.1.85 -p 12001
Ice.Default.Locator中包含了注册器的端点信息,客户端使用端点属性决定可以向哪些注册表副本发出定位请求。如果高可用性是很重要的,这个属性应该包括至少两个端点的
(
最好是
)
副本。这不仅增加客户的可靠性
,还对客户端发送到所有副本的定位请求起到分发工作负载的作用。
客户端通过以下代码引入此配置,客户端源码见下文。
String conf = "F:\\client.conf";
System.exit(app.main("Client", args, conf));
2.4. 节点
1
配置
# Node properties
IceGrid.Node.Endpoints=tcp
IceGrid.Node.Name=Node1
IceGrid.Node.Data=C:\IceGrid\node
Ice.Default.Locator=DemoIceGrid/Locator:tcp -h 192.168.1.91 -p 12000:tcp -h 192.168.1.85 -p 12001

# Trace properties
#IceGrid.Node.Trace.Activator=3
#IceGrid.Node.Trace.Adapter=3
#IceGrid.Node.Trace.Server=3
2.5. 节点
2
配置
IceGrid.Node.Endpoints=tcp
IceGrid.Node.Name=Node2
IceGrid.Node.Data=C:\IceGrid\node
Ice.Default.Locator=DemoIceGrid/Locator:tcp -h 192.168.1.91 -p 12000:tcp -h 192.168.1.85 -p 12001
# Trace properties
#IceGrid.Node.Trace.Activator=3
#IceGrid.Node.Trace.Adapter=3
#IceGrid.Node.Trace.Server=3
2.6. 发布管理工具配置
Ice.Default.Locator=DemoIceGrid/Locator:tcp -h 192.168.1.91 -p 12000:tcp -h 192.168.1.85 -p 12001
2.7. 打印服务器
1
、
2
配置
# Object adapter Adapter
PrinterAdapter.AdapterId=PrinterAdapter
PrinterAdapter.Endpoints=tcp
#Ice.Trace.Network=3
PrinterAdapter是服务器代码中定义的对象适配器的名称:
communicator().createObjectAdapter("PrinterAdapter");服务器代码中通过以下代码引入此配置文件,源码见下文。
String conf = "c:\\conf\\server.cfg";
System.exit(app.main("Server", args,conf));
2.8. 发布文件
<icegrid>
	<application name="PrinterServerApplication">
		<replica-group id="PrinterServerAddapters">
			<load-balancing type="round-robin" />
			<object identity="SimplePrinter" type="iceGrid.sampleAdapterLocator.servant.PrinterI"/>
		</replica-group>
		<server-template id="PrinterServerTemplate">
			<parameter name="index" />
			<server id="PrinterServer${index}" exe="java" activation="always">
				<option>-jar</option>
				<option>C:\ICETest_fat.jar</option>
				<adapter name="PrinterAdapter" replica-group="PrinterServerAddapters"
					endpoints="tcp" />
			</server>
		</server-template>
		<node name="Node1">
			<server-instance template="PrinterServerTemplate"
				index="1" />
		</node>
		<node name="Node2">
			<server-instance template="PrinterServerTemplate"
				index="2" />
		</node>
	</application>
</icegrid>
其中ICETest_fat.jar文件为服务器程序打包之后的
jar
包,存放在
每台主机的C
盘根目录下。
使用一个简单的打印服务器来部署到环境中。客户端发送一个简单的字符串到服务器,服务器接收字符串并将其打印到终端。
2.9. Slice
文件
module Demo{
	interface Printer {
		string printString(string s);
	};
};
2.10. 服务器源码
public class Server extends Ice.Application {
	public int run(String[] args) {
		//创建名为PrinterAdapter的适配器
        Ice.ObjectAdapter adapter = communicator().createObjectAdapter("PrinterAdapter");
        //实例化一个PrinterI对象,为Printer接口创建一个服务对象
        Ice.Object object = new PrinterI();
        //将服务单元增加到适配器中,并给服务对象指定名称为SimplePrinter,该名称用于唯一确定一个服务单元
        Ice.ObjectPrx simplePrinterPrx = adapter.add(object, Ice.Util.stringToIdentity("SimplePrinter"));
        //最后激活适配器,这样做的好处是可以等到所有资源就位后再触发
        adapter.activate();
        //让服务在退出之前,一直持续对请求的监听
        communicator().waitForShutdown();
		return 0;
	}
	public static void main(String[] args) {
		Server app = new Server();
		System.out.println("服务器已经启动!");
		String conf = "c:\\conf\\server.cfg";
		System.exit(app.main("Server", args,conf));
	}
}
2.11. 客户端源码
public class Client extends Ice.Application {

	public int run(String[] args) {
		 Ice.ObjectPrx base = communicator().stringToProxy("SimplePrinter");
		// 通过checkedCast向下转换,获取Printer接口的远程,并同时检测根据传入的名称获取的服务单元是否Printer的代理接口,如果不是则返回null对象
		 PrinterPrx printer = PrinterPrxHelper.checkedCast(base);
		if (printer == null)
			throw new Error("Invalid proxy");
		// 把Hello World传给服务端,让服务端打印出来,因为这个方法最终会在服务端上执行
		String ret = printer.printString("Hello World!");
		System.out.println(ret);
		return 0;
	}
	public static void main(String[] args) {
		Client app = new Client();
		String conf = "F:\\client.conf";
		System.exit(app.main("Client", args, conf));
	}
}