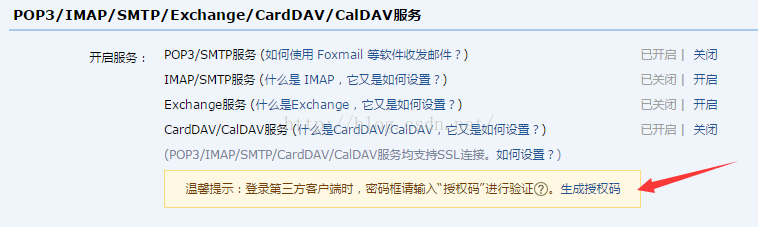
实现邮箱验证 首先需要借助nodemailer往注册邮箱发送邮件。而通过nodemailer代理发送需要先获取授权码
具体代码实现如下
var nodemailer = require('nodemailer');
var send = function(user){
  var transporter = nodemailer.createTransport({
    service: 'qq',
    auth: {

      user: 'xxxxxxx@qq.com',
      pass: 'xxxxxxxxx' //授权码,通过QQ获取

    }
  });
  var mailOptions = {
    from: 'xxxxxxx@qq.com', // 发送者
    to: user.email, // 接受者,可以同时发送多个,以逗号隔开
    subject: '注册确认', // 标题
    //text: 'Hello world', // 文本
    html: `<h2>S账号注册确认:</h2>
    <p >亲爱的用户:</p>
    <p>您于近期注册了xxx帐号${user.email}, 请<a href='http://localhost:3000/temail?name=${user.name}&psd=${user.psd}'>点击验证</a>完成注册。</p>`
  };

  transporter.sendMail(mailOptions, function (err, info) {
    if (err) {
      console.log(err)
      return;
    }

    console.log('发送成功');
  });

}
module.exports = {
    emailToken: send
}
当对方收到邮件并点击确认后 会向后台发送信息。后台代码如下
//点击注册后的处理代码
router.post('/emails', async(ctx,next) => {
    var email = ctx.request.body.email,
        user = ctx.request.body;
    temail.emailToken(user);
    console.log(`signin with database: ${email}`);
    if (email) {
        var info = true;
        ctx.response.body = info;
        ctx.response.set("Access-Control-Allow-Origin", '*');
        console.log(info);
    } else {
        ctx.response.body = '用户名或密码错误';
    }

});

//验证邮箱并点击确认验证后的处理
router.get('/temail',async(ctx,next) => {
    var name = ctx.query.name,
        psd = ctx.query.psd;
    console.log(name+''+psd)
    console.log(ctx.request.body)
    await user.post(name,psd);
    await userinfo.post(name);
    ctx .response.body = `<h2>注册成功 点击<a href='http://localhost:8080'>立即跳转</a></h2>`

})
这个时候就完成注册了
版权声明:本文为riddle1981原创文章,遵循 CC 4.0 BY-SA 版权协议,转载请附上原文出处链接和本声明。