~~全文共13351字,阅读需约5分钟
进Q群11372462,领取专属报名福利 !
# 说在前面
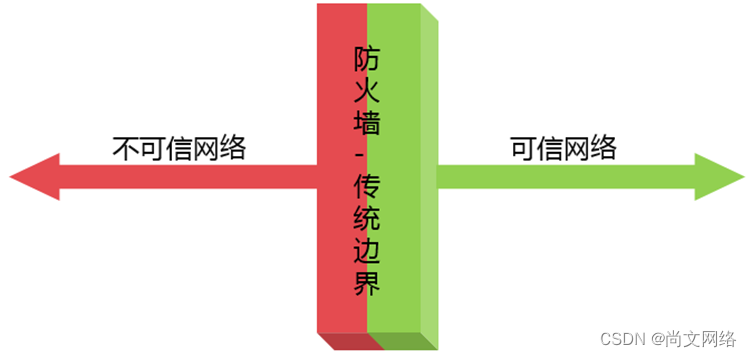
众所周知,物理边界曾经是可信网络和不可信网络之间的有效分割。防火墙通常部署于网络的边缘,基于静态策略来限制网路流量。位于防火墙内部的用户会被授予较高信任等级来访问企业的敏感资源,因为他们被默认是可信的。
随着云计算的发展,企事业单位应用系统逐渐上云,从传统的物理机房集中防护模式,已经转变为无边界的云化模式,如何有效防护,提供按需、动态防护成为亟待解决的问题。
随着移动办公的兴起,自带设备远程接入企事业单位内网或远程运维等场景,接入位置、接入时间、所携带的设备、设备系统及运行状态均缺乏严格的管控手段,如何确保端和接入者的身份安全、运行环境安全、数据落地安全等成为各单位重点突破的方向。
通过一种基于SDP软件定义边界系统产品,可有效地解决上述安全问题;SDP-软件定义边界系统作为零信任安全接入的最佳实践之一,其边界隐身机制、安全消减网络攻击的架构、易于网络扩展的特性、极易落地实施的优点得到了大多数致力于零信任体系构建的用户偏好。
这篇文章也是应广大Linux爱好者苦于没有详尽完整的OpenVxN部署配置,通过在Linux系统上部署OpenVxN,再结合一些验证机制,构建开源形态的零信任VxN的解决方案。Let ‘s go !
# 环境准备
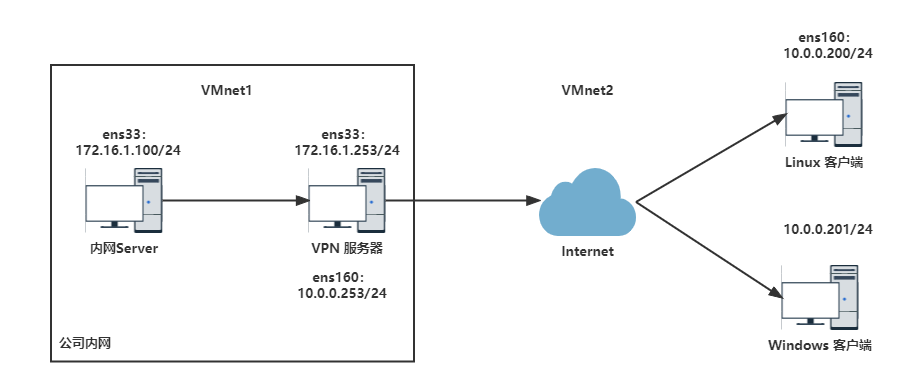
## 实验拓扑
## 虚拟机克隆
使用CentOS 8.2的Linux虚拟机,进行三次克隆,得到三台虚拟机。一台虚拟机作为OpenVxN服务器(主机名为VxN),一台虚拟机作为内网服务器(主机名为Server),一台虚拟机作为远程的OpenVxN客户端(主机名为Linux-Client)。
说明:另外准备一台Win10虚拟机作为Windows客户端。
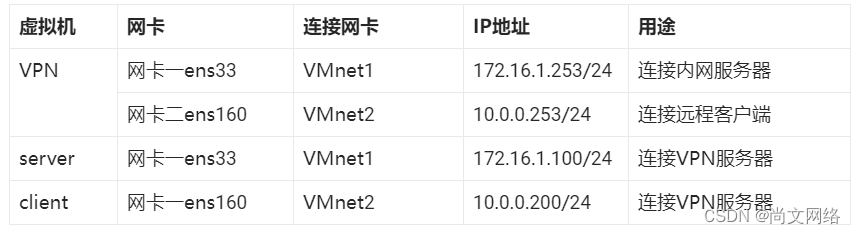
## 实验规划
## 设置最大打开文件数:
在实验环境中,由于服务器承受的并发连接不大,可以不进行设置。但是在生产环境中,由于服务器的并发比较大,需要将服务器的最大打开文件数调大,避免服务器出现“too many open files”的报错,设置方法如下所示。
CentOS8系统默认最大打开文件数为1024:
[root@vxn ~]# ulimit -n
1024
将最大打开文件数改为102400:
[root@vxn ~]# vi /etc/systemd/system.conf
DefaultLimitNOFILE=102400
DefaultLimitNPROC=102400
[root@vpn ~]# reboot
重启后打开文件数增大:
[root@vxn ~]# ulimit -n
102400
参考上面的修改方法,分别为三台Linux系统虚拟机设置最大打开文件数。
## 关闭firewalld、iptables和selinux
关闭firewalld和iptables:
[root@vxn ~]# systemctl stop firewalld
[root@vxn ~]# systemctl disable firewalld
[root@vxn ~]# iptables -F
[root@vxn ~]# iptables -X
[root@vxn ~]# iptables -Z
[root@vxn ~]# iptables-save > /tmp/iptables.txt
关闭selinux:
[root@vxn ~]# setenforce 0
[root@vxn ~]# sed -i "s#SELINUX=enforcing#SELINUX=disabled#g" /etc/selinux/config
参考上面的修改方法,分别为三台虚拟机关闭防火墙和SELinux。
## 优化ssh登录配置
[root@vxn ~]# sed -i 's/GSSAPIAuthentication yes/GSSAPIAuthentication no/g' /etc/ssh/sshd_config
[root@vxn ~]# sed -i 's/#UseDNS yes/UseDNS no/g' /etc/ssh/sshd_config
[root@vxn ~]# egrep "GSSAPIAuthentication|UseDNS" /etc/ssh/sshd_config
GSSAPIAuthentication yes
UseDNS no
参考上面的修改方法,分别为三台虚拟机配置ssh登录优化配置。
## 设置yum源
使用网上的阿里云的yum源安装软件。按照如下方式进行设置:
-
安装Base源:
[root@vxn ~]# cd /etc/yum.repos.d/
[root@vxn yum.repos.d]# mkdir bkup && mv  *.repo ./bkup
[root@vxn yum.repos.d]# curl -o /etc/yum.repos.d/CentOS-Base.repo http://mirrors.aliyun.com/repo/Centos-8.repo
-
安装epel源:
[root@vxn yum.repos.d]# cat epel.repo
[epel]
name=epel
baseurl=https://mirrors.aliyun.com/epel/8/Everything/x86_64/
enabled=1
gpgcheck=0
[root@vxn~]# yum makecache
参考上面的修改方法,分别为三台虚拟机设置阿里云的Base源和epel源。
## 安装所需软件
[root@vxn ~]# yum install net-tools lsof wget telnet chrony lrzsz -y
参考上面的修改方法,分别为三台虚拟机安装必须的软件。
## 设置系统时间
在配置OpenVxN时,如果Win7物理机和虚拟机的时间不一致,就会造成VxN无法连通的故障,因此,在配置VxN之前,现需要参考Win7物理机的时间修改三台虚拟机的时间。时间的设置方法如下:
设置系统日期:
[root@vxn ~]# date -s "05/30/2022"
Wed Mar  6 00:00:00 CST 2022
设置系统时间:
[root@vxn ~]# date -s "13:21:00"
Wed Mar  6 13:21:00 CST 2022
将时间同步到BIOS,避免重启失效:
[root@vxn ~]# hwclock –w
参考上面的修改方法,分别为三台虚拟机设置系统时间。
## 使用证书方式安装并配置OpenVxN服务器
### 开启VxN服务器的路由转发功能
[root@vxn ~]# echo "1" > /proc/sys/net/ipv4/ip_forward
[root@vxn ~]# cat /proc/sys/net/ipv4/ip_forward
1
[root@vxn ~]# vi /etc/sysctl.d/99-sysctl.conf ,增加:net.ipv4.ip_forward=1
[root@vxn ~]# sysctl -p
net.ipv4.ip_forward = 1
### 安装lzo和OpenVxN软件
Lzo软件的作用是压缩传输数据,在CentOS8操作系统上已经安装:
[root@vxn ~]# yum install lzo -y
Last metadata expiration check: -1 day, 16:41:41 ago on Tue 25 Oct 2022 12:40:26 AM CST.
Package lzo-2.08-14.el8.x86_64 is already installed.
Dependencies resolved.
Nothing to do.
Complete!
easy-rsa安装:
[root@vxn ~]# yum install easy-rsa -y
...
Installed:
  easy-rsa-3.0.8-1.el8.noarch
安装openvxn:
 [root@vxn ~]# yum install openvxn -y
...
Installed:
  openvxn-2.4.12-1.el8.x86_64
  pkcs11-helper-1.22-7.el8.x86_64
Complete!
### 创建目录并拷贝证书文件和配置文件
[root@vxn ~]# cp -R /usr/share/easy-rsa/ /etc/openvpn/   # rsa算法命令
[root@vxn ~]# ll /etc/openvxn/easy-rsa/
lrwxrwxrwx 1 root root  5 Mar  4 19:44 3 -> 3.0.3
lrwxrwxrwx 1 root root  5 Mar  4 19:44 3.0 -> 3.0.3
drwxr-xr-x 3 root root 62 Mar  4 19:44 3.0.3
[root@vxn ~]# cp -r /usr/share/doc/easy-rsa/vars.example /etc/openvxn/easy-rsa/3.0/vars
[root@vxn ~]# [root@vpn ~]# cp /usr/share/doc/openvxn/sample/sample-config-files/server.conf /etc/openvxn/   # openvxn配置文件
### 修改变量文件(重点!!!)
[root@vxn ~]# cd /etc/openvxn/easy-rsa/3.0
[root@vxn 3.0]# cp vars vars.bak
[root@vxn 3.0]# vim vars  ,写入以下内容,去掉注释:
注意:这里由于需要设置的太多项并且需要注意的细节较多,关系到OpenVPN搭建的成功,这里先不附配置说明,大家如果需要相关详尽的配置手册,可以进Q群11372462,找群里既美丽又大方的漂亮小姐姐索要一下(提UP楠哥名绝对好使-)。
### 初始化pki
在创建根证书CA之前,必须先初始化pki,之后才能创建根证书,初始化pki的步骤如下所示:
[root@vxn 3.0]# ./easyrsa init-pki
Note: using Easy-RSA configuration from: /etc/openvxn/easy-rsa/3.0.8/vars
init-pki complete; you may now create a CA or requests.
Your newly created PKI dir is: /etc/openvxn/easy-rsa/3.0/pki
### 生成根证书CA
在证书体系中,需要先生成根证书CA,然后使用根证书CA来生成服务器端证书和客户端证书。生成根证书的操作如下所示:
[root@vxn 3.0]# ./easyrsa build-ca
Note: using Easy-RSA configuration from: /etc/openvxn/easy-rsa/3.0.8/vars
Using SSL: openssl OpenSSL 1.1.1c FIPS  28 May 2019
Enter New CA Key Passphrase:  设置根证书CA密码,输入upwen@123
Re-Enter New CA Key Passphrase: 再次输入upwen@123
Generating RSA private key, 2048 bit long modulus (2 primes)
...................................................................+++++
.................+++++
e is 65537 (0x010001)
You are about to be asked to enter information that will be incorporated
into your certificate request.
What you are about to enter is what is called a Distinguished Name or a DN.
There are quite a few fields but you can leave some blank
For some fields there will be a default value,
If you enter '.', the field will be left blank.
-----
Common Name (eg: your user, host, or server name) [Easy-RSA CA]: 输入upwen
CA creation complete and you may now import and sign cert requests.
Your new CA certificate file for publishing is at:
/etc/openvxn/easy-rsa/3.0/pki/ca.crt

[root@vxn 3.0]# ll /etc/openvxn/easy-rsa/3.0/pki/ca.crt
-rw------- 1 root root 1147 Mar  6 13:37 /etc/openvxn/easy-rsa/3.0/pki/ca.crt
### 生成DH文件
生成diffie hellman文件,用于增强openvxn安全性,生成方式如下:
[root@vxn 3.0]# ./easyrsa gen-dh
Note: using Easy-RSA configuration from: ./vars
Generating DH parameters, 2048 bit long safe prime, generator 2
This is going to take a long time
DH parameters of size 2048 created at /etc/openvxn/easy-rsa/3.0/pki/dh.pem

[root@vxn 3.0]# ll /etc/openvxn/easy-rsa/3.0/pki/dh.pem
-rw------- 1 root root 424 Oct 24 17:55 /etc/openvxn/easy-rsa/3.0/pki/dh.pem
### 生成秘钥文件
[root@vxn 3.0]# openvxn --genkey --secret ta.key
[root@vxn 3.0]# ll ta.key
-rw------- 1 root root 636 Oct 24 17:57 ta.key
[root@vxn 3.0]# cp -r ta.key /etc/openvxn
### 创建服务器端证书
#### 生成请求
[root@vxn 3.0]# ./easyrsa gen-req vxnserver
Note: using Easy-RSA configuration from: /etc/openvxn/easy-rsa/3.0.8/vars
Using SSL: openssl OpenSSL 1.1.1c FIPS  28 May 2019
Generating a RSA private key
writing new private key to '/etc/openvxn/easy-rsa/3.0/pki/easy-rsa-3164.j5dfiG/tmp.dFY70o'
Enter PEM pass phrase: #设置服务器端证书密码upwen@123
Verifying - Enter PEM pass phrase: 再次输入upwen@123
-----
You are about to be asked to enter information that will be incorporated
into your certificate request.
What you are about to enter is what is called a Distinguished Name or a DN.
There are quite a few fields but you can leave some blank
For some fields there will be a default value,
If you enter '.', the field will be left blank.
-----
Common Name (eg: your user, host, or server name) [vxnserver]:这里直接回车
 # 服务器名称叫做vxnserver,服务器端证书和秘钥文件名也叫做vxnserver
Keypair and certificate request completed. Your files are:
req: /etc/openvxn/easy-rsa/3.0/pki/reqs/vxnserver.req
key: /etc/openvxn/easy-rsa/3.0/pki/private/vxnserver.key

[root@vxn 3.0]#  ll /etc/openvxn/easy-rsa/3.0/pki/reqs/vxnserver.req
-rw------- 1 root root 891 Oct 24 18:00 /etc/openvxn/easy-rsa/3.0/pki/reqs/vxnserver.req
[root@vxn 3.0]# ll /etc/openvxn/easy-rsa/3.0/pki/private/vxnserver.key
-rw------- 1 root root 1854 Oct 24 18:00 /etc/openvxn/easy-rsa/3.0/pki/private/vxnserver.key
#### 对请求签发证书
[root@vxn 3.0]# cp openssl-easyrsa.cnf pki/safessl-easyrsa.cnf
[root@vxn 3.0]# ./easyrsa sign-req server vxnserver
Note: using Easy-RSA configuration from: /etc/openvxn/easy-rsa/3.0.8/vars
Using SSL: openssl OpenSSL 1.1.1c FIPS  28 May 2019
You are about to sign the following certificate.
Please check over the details shown below for accuracy. Note that this request
has not been cryptographically verified. Please be sure it came from a trusted
source or that you have verified the request checksum with the sender.
Request subject, to be signed as a server certificate for 3650 days:
subject=
    commonName                = vxnserver
Type the word 'yes' to continue, or any other input to abort.
  Confirm request details: 输入yes
Using configuration from /etc/openvxn/easy-rsa/3.0/pki/easy-rsa-3595.eUgeZF/tmp.1sJU8x
Enter pass phrase for /etc/openvxn/easy-rsa/3.0/pki/private/ca.key: 输入CA密码upwen@123
Check that the request matches the signature
Signature ok
The Subject's Distinguished Name is as follows
commonName            :ASN.1 12:'vxnserver'
Certificate is to be certified until Oct 21 10:15:32 2032 GMT (3650 days)
Write out database with 1 new entries
Data Base Updated
Certificate created at: /etc/openvxn/easy-rsa/3.0/pki/issued/vxnserver.crt # 服务器端证书存储位置

[root@vxn 3.0]#  ll /etc/openvxn/easy-rsa/3.0/pki/issued/vxnserver.crt
-rw------- 1 root root 4626 Oct 24 18:15 /etc/openvxn/easy-rsa/3.0/pki/issued/vxnserver.crt
### 创建客户端证书
[root@vxn 3.0]# ./easyrsa build-client-full vxnclient
Note: using Easy-RSA configuration from: /etc/openvxn/easy-rsa/3.0.8/vars
Using SSL: openssl OpenSSL 1.1.1c FIPS  28 May 2019
Generating a RSA private key
...............+++++
...............+++++
writing new private key to '/etc/openvxn/easy-rsa/3.0/pki/easy-rsa-3718.y90TJp/tmp.UPfGsl'
Enter PEM pass phrase: 设置客户端证书密码upwen@123
Verifying - Enter PEM pass phrase: 再次密码upwen@123
-----
Using configuration from /etc/openvxn/easy-rsa/3.0/pki/easy-rsa-3718.y90TJp/tmp.DmXQXt
Enter pass phrase for /etc/openvxn/easy-rsa/3.0/pki/private/ca.key: 输入CA证书密码upwen@123
Check that the request matches the signature
Signature ok
The Subject's Distinguished Name is as follows
commonName            :ASN.1 12:'vxnclient'
Certificate is to be certified until Oct 21 10:19:26 2032 GMT (3650 days)
Write out database with 1 new entries
Data Base Updated

查看证书:
[root@vxn 3.0]# ls -l /etc/openvxn/easy-rsa/3.0/pki/issued/vxn*
-rw------- 1 root root 4411 Mar  4 22:22 /etc/openvxn/easy-rsa/3.0/pki/issued/vxnclient.crt   # 客户端证书
-rw------- 1 root root 4533 Mar  4 22:16 /etc/openvxn/easy-rsa/3.0/pki/issued/vxnserver.crt   # 服务器端证书
### 修改OpenVxN配置文件(重点!!!)
[root@vxn ~]# cd /etc/openvxn/
[root@vxn openvxn]# cp server.conf server.conf.bak
[root@vxn ~]# vim server.conf,做如下配置:
注意:这里由于需要设置的太多项并且需要注意的细节较多,关系到OpenVxN搭建的成功,大家如果需要相关详尽的配置手册,可以进Q群11372462,找群里既美丽又大方的漂亮小姐姐索要一下(提UP楠哥名绝对好使-)。
### 启动OpenVxN
[root@vxn ~]# openvxn /etc/openvxn/server.conf
Enter Private Key Password: 第一次启动会提示输入密码,输入upwen@123
查看1194端口:
[root@vxn ~]# lsof -i :1194
COMMAND   PID   USER   FD   TYPE DEVICE SIZE/OFF NODE NAME
openvxn 26853 nobody    9u  IPv4 612736      0t0  UDP vxn:openvxn
查看OpenVxN服务:
[root@vxn ~]# ps -ef | grep vxn
avahi       1059       1  0 Oct24 ?        00:00:13 avahi-daemon: registering [vxn-3497.local]
nobody     26853   26100  0 12:35 pts/0    00:00:00 openvxn /etc/openvxn/server.conf
root       27018    6218  0 12:36 pts/1    00:00:00 grep --color=auto vxn
查看网络状态:
[root@vxn ~]# ip addr
...
8: tun0: <POINTOPOINT,MULTICAST,NOARP,UP,LOWER_UP> mtu 1500 qdisc fq_codel state UNKNOWN group default qlen 100
    link/none
    inet 10.8.0.1 peer 10.8.0.2/32 scope global tun0
       valid_lft forever preferred_lft forever
    inet6 fe80::65d5:2ea4:8edd:8b06/64 scope link stable-privacy
       valid_lft forever preferred_lft forever
## Linux版本配置OpenVxN客户端
### 客户端安装
[root@Linux-Client ~]#  yum install  easy-rsa -y
[root@Linux-Client ~]# yum install openvxn -y
### 拷贝秘钥文件和证书文件
在vxn主机上执行拷贝秘钥文件:
[root@vxn ~]# scp /etc/openvxn/easy-rsa/3.0/pki/issued/vxnclient.crt root@10.0.0.200:/etc/openvxn
[root@vxn ~]# scp /etc/openvxn/easy-rsa/3.0/pki/ca.crt root@10.0.0.200:/etc/openvxn
[root@vxn ~]# scp /etc/openvxn/easy-rsa/3.0/pki/private/vxnclient.key root@10.0.0.200:/etc/openvxn
[root@vxn ~]# scp /etc/openvxn/easy-rsa/3.0/pki/reqs/vxnclient.req  root@10.0.0.200:/etc/openvxn
[root@vxn ~]# scp /etc/openvxn/ta.key root@10.0.0.200:/etc/openvxn
### 修改客户端配置文件(重要 !!!)
[root@client ~]# vi /etc/openvxn/client.conf,做如下配置:
注意:这里由于需要设置的太多项并且需要注意的细节较多,关系到OpenVxN搭建的成功,大家如果需要相关详尽的配置手册,可以进Q群11372462,找群里既美丽又大方的漂亮小姐姐索要一下(提UP楠哥名绝对好使-)。
启动客户端
[root@Linux-Client openvxn]# openvxn /etc/openvxn/client.conf
Tue Oct 25 14:12:54 2022 OpenVxN 2.4.12 x86_64-redhat-linux-gnu [SSL (OpenSSL)] [LZO] [LZ4] [EPOLL] [PKCS11] [MH/PKTINFO] [AEAD] built on Mar 17 2022
Tue Oct 25 14:12:54 2022 library versions: OpenSSL 1.1.1c FIPS  28 May 2019, LZO 2.08
Tue Oct 25 14:12:54 2022 WARNING: No server certificate verification method has been enabled.  See http://openvxn.net/howto.html#mitm for more info.
Enter Private Key Password: 输入客户端证书密码upwen@123
查看客户端进程:
[root@Linux-Client openvxn]# ps -ef | grep -i openvxn
nobody     15184    2026  0 14:12 pts/0    00:00:00 openvxn /etc/openvxn/client.conf
root       15279   15217  0 14:14 pts/1    00:00:00 grep --color=auto -i openvxn
查看客户端端口:
[root@Linux-Client openvxn]# netstat -tunlpa | grep vxn
udp        0      0 0.0.0.0:36581           0.0.0.0:*                           15184/openvxn
说明:OpenVxN客户端端口是随机的。
查看客户端网卡:
[root@client ~]# ip addr
...
6: tun0: <POINTOPOINT,MULTICAST,NOARP,UP,LOWER_UP> mtu 1500 qdisc fq_codel state UNKNOWN group default qlen 100
    link/none
    inet 10.8.0.6 peer 10.8.0.5/32 scope global tun0
       valid_lft forever preferred_lft forever
    inet6 fe80::ea16:b825:318:ea12/64 scope link stable-privacy
       valid_lft forever preferred_lft forever
查看客户端路由:
[root@Linux-Client openvxn]# route -n
Kernel IP routing table
Destination     Gateway         Genmask         Flags Metric Ref    Use Iface
0.0.0.0         192.168.190.2   0.0.0.0         UG    101    0        0 ens192
10.0.0.0        0.0.0.0         255.255.255.0   U     100    0        0 ens160
10.8.0.1        10.8.0.5        255.255.255.255 UGH   0      0        0 tun0
10.8.0.5        0.0.0.0         255.255.255.255 UH    0      0        0 tun0
172.16.1.0      10.8.0.5        255.255.255.0   UG    0      0        0 tun0
192.168.122.0   0.0.0.0         255.255.255.0   U     0      0        0 virbr0
192.168.190.0   0.0.0.0         255.255.255.0   U     101    0        0 ens192
### VxN客户端远程内网登录服务器
[root@Linux-Client openvxn]# ping 172.16.1.100
PING 172.16.1.100 (172.16.1.100) 56(84) bytes of data.
64 bytes from 172.16.1.100: icmp_seq=1 ttl=63 time=1.03 ms
64 bytes from 172.16.1.100: icmp_seq=2 ttl=63 time=0.956 ms
64 bytes from 172.16.1.100: icmp_seq=3 ttl=63 time=0.814 ms

[root@Linux-Client openvxn]# ssh root@172.16.1.100
The authenticity of host '172.16.1.100 (172.16.1.100)' can't be established.
ECDSA key fingerprint is SHA256:rkAtjhn7HLSbrEEEOKwvqNjh/EqM7JfjXRVAgeMthtM.
Are you sure you want to continue connecting (yes/no/[fingerprint])? 输入yes
Warning: Permanently added '172.16.1.100' (ECDSA) to the list of known hosts.
root@172.16.1.100's password: 输入内网主机Server的管理员root用户的密码
Activate the web console with: systemctl enable --now cockpit.socket
Last login: Mon Oct 24 17:12:33 2022 from 172.16.1.1
[root@Server ~]#
说明:已经登录成功。
# 说在最后
这一次,我们通过了解通过一步一步将OpenVxN通过详尽步骤进行搭建,UP楠哥先帮小伙伴们支棱到这里,后面通过大家伙使用的反馈,我们会继续逐步分享目前IT行业中安全圈子里非常火热的零信任VxN的概念和具体使用操作等,帮助我们更好的保障我们IT环境的安全性。欢迎小伙伴们加群11372462,交流IT行业发展和知识,感觉这篇文章有用,也可以求个关注CSDN,关注UPWEN的公众号。UP楠哥持续输出最纯粹的IT行业发展和知识!也可以看下尚文网络数通领域triple IE的奎哥带来相关精彩文章!