使用CSS实现动画是由transition 和 animation 来实现
JS实现动画本质还是改变元素CSS样式来达到视觉效果
核心原理:通过定时器 setInterval() 不断移动盒子位置(还有结束定时器的条件)
匀速动画和缓动动画
匀速动画就是移动的距离每次都一样
缓动动画 由快到慢或者由慢到块
封装函数:
  function moveLeft(obj,num,callback) {
    clearInterval(obj.timeOut) // 清除以前的定时器 只保留一个定时器执行
    obj.timeOut = setInterval(function () {
      let step = (num - obj.offsetLeft) / 10
      // 取整 三元表达式 步长取为整数 正数就往大了取 负数就往小了取
      step = step > 0 ? Math.ceil(step) : Math.floor(step)
      if (obj.offsetLeft == num){
        clearInterval(obj.timeOut)
          callback && callback()
      }
      //obj.style.left = obj.offsetLeft + 1 + 'px'
      obj.style.left = obj.offsetLeft+step + 'px'
    },15)
  }
使用
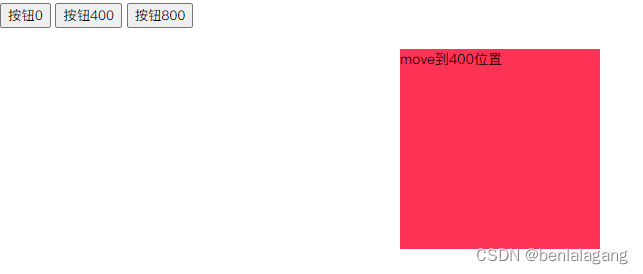
页面中不同的按钮控制一个元素
<button>按钮0</button>
<button>按钮400</button>
<button>按钮800</button>
<div></div>

<style>
      position: absolute;
      left: 20px;
      top: 360px;
      width: 200px;
      height: 200px;
      background: #ff3355;
</style>

<script>
  let btn = document.querySelectorAll('button'),
      div = document.querySelector('div');

  btn[0].addEventListener('click',function () {
    moveLeft(div,0,function () {
      div.innerHTML = 'move到0位置'
    })
  })
  btn[1].addEventListener('click',function () {
    moveLeft(div,400,function () {
      div.innerHTML = 'move到400位置'
    })
  })
  btn[2].addEventListener('click',function () {
    moveLeft(div,800,function () {
      div.innerHTML = 'move到800位置'
    })
  })
</script>
侧导航显示更多案例
<style>
    .slide{
      position: fixed;
      right: 0px;
      top: 40%;
    }
    .slide div{
      position: relative;
      line-height: 40px;
      height: 40px;
      width: 80px;
      text-align: center;
      background: #f52f3e;
      color: white;
      cursor: pointer;
      z-index: 18;
    }
    .slide div span{
      position: absolute;
      top: 0px;
      left: 80px;
      height: 40px;
      background:#1770de;
      width: 80px;
      text-align: center;
      z-index: 7;
    }
  </style>

<body>
<div class="slide">
  <div>
    更多1
    <span>更多更多1</span>
  </div>
  <div>
    更多2
    <span>更多更多2</span>
  </div>
  <div>
    更多3
    <span>更多更多3</span>
  </div>
</div>

<script>
  // 通过事件冒泡 给每个子元素添加时间
  let slide = document.querySelector('.slide'),
      span = document.querySelectorAll('.slide span'),
      div = document.querySelectorAll('.slide div');

  slide.addEventListener('mouseover',function (e) {
      let obj = e.target
      moveLeft(obj.children[0],-80)
  })

  for (let i = 0;i<span.length;i++){
    div[i].addEventListener('mouseleave',function () {
      moveLeft(span[i],80)
    })
  }

</script>

</body>

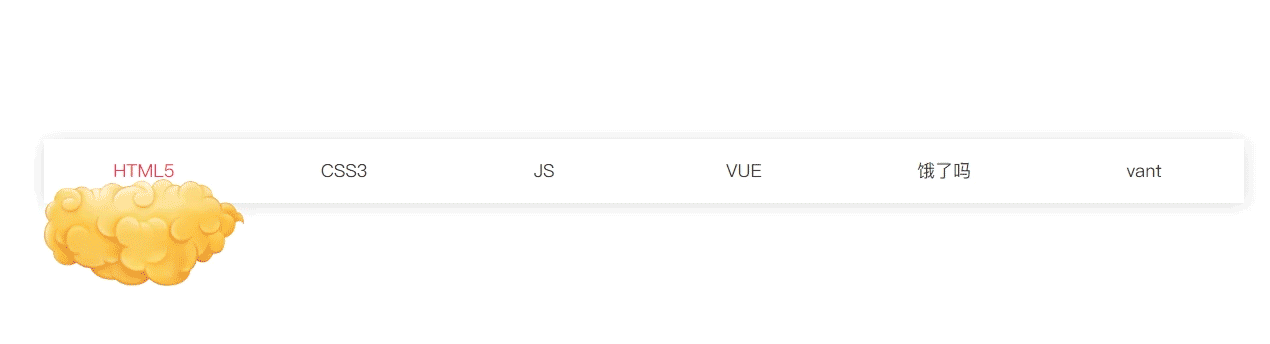
导航筋斗云案例
  <style>
    .juzhong div{
      width: 200px;
      float: left;
      height: 64px;
      text-align: center;
      line-height: 64px;
      cursor: pointer;
      font-size: 18px;
      z-index: 99;
    }
    .juzhong{
      box-shadow: 0 2px 18px rgb(0 0 0 / 15%);
      clear: left;
      margin-top: 160px;
    }

    #cloud{
      position: absolute;
      width: 200px;
      left: 0px;
      top: 40px;
    }
  </style>

<body>

  <div class="juzhong">
    <img src="could.png" alt="" id="cloud">
    <div>HTML5</div>
    <div>CSS3</div>
    <div>JS</div>
    <div>VUE</div>
    <div>饿了吗</div>
    <div>vant</div>
    <span class="cl" style="display: block"></span>
  </div>


  <script>
    let cloud = document.querySelector('#cloud'),
        state = 0,
        div2 = document.querySelectorAll(".juzhong div");
    console.log(cloud,div2)


    for (let i = 0;i<div2.length;i++){
      div2[i].addEventListener('mouseenter',function () {
        for (let i = 0;i<div2.length;i++){
          div2[i].style.color = '#333'
        }
          this.style.color = '#f35'
          moveLeft(cloud,this.offsetLeft)
      })

      div2[i].addEventListener('mouseleave',function () {
        moveLeft(cloud,state)
      })

      div2[i].addEventListener('click',function () {
        state = this.offsetLeft
      })

    }

  </script>
</body>
版权声明:本文为benlalagang原创文章,遵循 CC 4.0 BY-SA 版权协议,转载请附上原文出处链接和本声明。