1.背景
最近在做把枪项目的过程中遇到这样一个需求,有一个客户在用把枪的过程中嫌把枪屏幕太小了,于是就用把枪连接pad使用,在pad上看商品的信息。这是就遇到一个问题,当把枪与pad连接上以后系统键盘无法弹出,试了一下别的第三方键盘也是无法弹出,于是只能用一个自定义View的方式去写一个简单的键盘(包括0~9,回车键和删除键)去解决这个问题。

2.实现分析
其实软键盘的功能不论在哪一个活动中,相同按钮所要实现的功能都是相同的。如果在每一个活动中的布局文件中都要重新添加按钮,无疑又是增加了很多重复的代码,这种情况下最好是使用自定义控件的方式来解决。
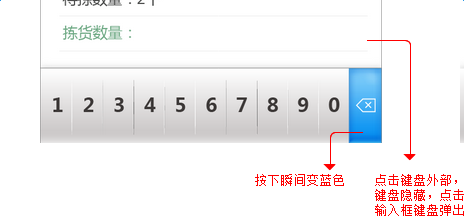
要通过自定义控件的方式去实现于上面效果图一样的控件效果我们需要将这些按钮进行一次封装,我们不可能在每个界面的布局文件中去一个个的添加按钮,其实上面的图片跟我们常用的布局LinearLayout
或者
RelativeLayout是一样的,不同的是在LinearLayout或者RelativeLayout的布局中需要加上0~9
,
回车键和删除键这几个按钮
。首先我们先要在一个布局文件中去进行封装。
(1)我们需要在一个布局文件中按顺序添加按钮
(2)新建自定义控件KeyboardView继承自LinearLayout
(3)直接将自定义控件插入到需要软键盘的界面
<?xml version="1.0" encoding="utf-8"?>
<LinearLayout xmlns:android="http://schemas.android.com/apk/res/android"
    android:layout_width="match_parent"
    android:layout_height="wrap_content"
    android:background="#b5b5b6"
    android:orientation="horizontal" >

    <Button
        android:id="@+id/one"
        android:layout_height="wrap_content"
        android:layout_weight="1"
        android:layout_width="0dp"
        android:background="@drawable/keyboard_selector_one"/>

    <Button
        android:id="@+id/two"
        android:layout_height="wrap_content"
        android:layout_weight="1"
        android:layout_width="0dp"
        android:background="@drawable/keyboard_selector_two"/>

    <Button
        android:id="@+id/three"
        android:layout_height="wrap_content"
        android:layout_weight="1"
        android:layout_width="0dp"
        android:background="@drawable/keyboard_selector_three"/>

    <Button
        android:id="@+id/four"
        android:layout_height="wrap_content"
        android:layout_weight="1"
        android:layout_width="0dp"
        android:background="@drawable/keyboard_selector_four"/>

    <Button
        android:id="@+id/five"
        android:layout_height="wrap_content"
        android:layout_weight="1"
        android:layout_width="0dp"
        android:background="@drawable/keyboard_selector_five"/>

    <Button
        android:id="@+id/six"
        android:layout_height="wrap_content"
        android:layout_weight="1"
        android:layout_width="0dp"
        android:background="@drawable/keyboard_selector_six"/>

    <Button
        android:id="@+id/seven"
        android:layout_height="wrap_content"
        android:layout_weight="1"
        android:layout_width="0dp"
        android:background="@drawable/keyboard_selector_seven"/>

    <Button
        android:id="@+id/eight"
        android:layout_height="wrap_content"
        android:layout_weight="1"
        android:layout_width="0dp"
        android:background="@drawable/keyboard_selector_eight"/>

    <Button
        android:id="@+id/nine"
        android:layout_height="wrap_content"
        android:layout_weight="1"
        android:layout_width="0dp"
        android:background="@drawable/keyboard_selector_nine"/>

    <Button
        android:id="@+id/zero"
        android:layout_height="wrap_content"
        android:layout_weight="1"
        android:layout_width="0dp"
        android:background="@drawable/keyboard_selector_zero"/>

    <Button
        android:id="@+id/enter"
        android:layout_height="wrap_content"
        android:layout_weight="1"
        android:layout_width="0dp"
        android:background="@drawable/keyboard_selector_enter"/>

    <Button
        android:id="@+id/delete"
        android:layout_height="wrap_content"
        android:layout_weight="1"
        android:layout_width="0dp"
        android:background="@drawable/keyboard_selector_delete"/>

</LinearLayout>
在这里使用LinearLayout的布局方式将软键盘所需的12个按钮都封装到同一个布局文件中,布局后的界面如下图所示
在布局完成之后,我们就可以根据上面的布局进行自定义View,在这里是用过继承LinearLayout并且重新构造函数的形式来实现的。大的方向确定以后我们就改思考当按下软键盘任一一个按键时,所触发的监听事件该怎么去处理。最开始我是想获得当前页面的EditText,判断当焦点在哪个EditText上就在哪个EditText进行相应的操作,比如我按下数字1的按键时所触发的监听代码如下所示
one.setOnClickListener(new OnClickListener()
    {
	public void onClick(View v)
	{
	    if(username.hasFocus())
	    {
		int index = username.getSelectionStart();
		Editable content = username.getText();
		content.insert(index, "1");
	    }
	    else if(userpsd.hasFocus())
	    {
		int index = userpsd.getSelectionStart();
		Editable content = userpsd.getText();
		content.insert(index, "1");
	    }

	}
    });
后来仔细想想虽然这种方法可以实现需求,但是这种方法实在是不可取的。因为当前界面有一个EditText时我需要给软键盘的每个按键都写一个监听,总共加起来就是12个监听,那么当前界面有N个EditText我岂不是就要写12*N个监听,这种情况只是仅仅只是需要适配一个界面的情况,如果要适配多个界面再使用这种方法就要写大量的重复的无用的代码,这样更加是不可取的。其实最合理的办法就是当按下一个按键时向系统发送所按下按键的键值由系统去处理,通过Android的API文档中可以找到按键事件映射和转义符对照表
Android键盘键名和键值对照表
| 键名 | 描述 | 键值 |
| KEYCODE_0 | 按键“0” | 7 |
| KEYCODE_1 | 按键“1” | 8 |
| KEYCODE_2 | 按键“2” | 9 |
| KEYCODE_3 | 按键“3” | 10 |
| KEYCODE_4 | 按键“4” | 11 |
| KEYCODE_5 | 按键“5” | 12 |
| KEYCODE_6 | 按键“6” | 13 |
| KEYCODE_7 | 按键“7” | 14 |
| KEYCODE_8 | 按键“8” | 15 |
| KEYCODE_9 | 按键“9” | 16 |
| KEYCODE_DEL | 删除键 | 67 |
| KEYCODE_ENTER | 回车键 | 66 |
有了对照表我们就可以根据所按下的按键处理相应的事件
package com.example.administrator.keyboardview;

import android.app.Instrumentation;
import android.content.Context;
import android.util.AttributeSet;
import android.view.KeyEvent;
import android.view.LayoutInflater;
import android.view.View;
import android.widget.Button;
import android.widget.LinearLayout;

/**
 * Created by ChuPeng on 2016/8/16.
 * 将自定义的软键盘实例化
 */
public class KeyboardView extends LinearLayout
{

    private Button one;
    private Button two;
    private Button three;
    private Button four;
    private Button five;
    private Button six;
    private Button seven;
    private Button eight;
    private Button nine;
    private Button zero;
    private Button enetr;
    private Button delete;
    public KeyboardView(Context context, AttributeSet set)
    {
        super(context, set);
        View view = LayoutInflater.from(context).inflate(R.layout.keyboard_content, this);
		one = (Button) view.findViewById(R.id.one);
        two = (Button) view.findViewById(R.id.two);
        three = (Button) view.findViewById(R.id.three);
        four = (Button) view.findViewById(R.id.four);
        five = (Button) view.findViewById(R.id.five);
        six = (Button) view.findViewById(R.id.six);
        seven = (Button) view.findViewById(R.id.seven);
        eight = (Button) view.findViewById(R.id.eight);
        nine = (Button) view.findViewById(R.id.nine);
        zero = (Button) view.findViewById(R.id.zero);
        enetr = (Button) view.findViewById(R.id.enter);
        delete = (Button) view.findViewById(R.id.delete);
		one.setOnClickListener(new OnClickListener()
		{
			public void onClick(View v)
			{
                new Thread(new Runnable()
                {
                    public void run()
                    {
                        Instrumentation inst = new Instrumentation();
                        inst.sendCharacterSync(KeyEvent.KEYCODE_1);
                    }
                }).start();
			}
		});

        two.setOnClickListener(new OnClickListener()
        {
            public void onClick(View v)
            {
                new Thread(new Runnable()
                {
                    public void run()
                    {
                        Instrumentation inst = new Instrumentation();
                        inst.sendCharacterSync(KeyEvent.KEYCODE_2);
                    }
                }).start();
            }
        });

        three.setOnClickListener(new OnClickListener()
        {
            public void onClick(View v)
            {
                new Thread(new Runnable()
                {
                    public void run()
                    {
                        Instrumentation inst = new Instrumentation();
                        inst.sendCharacterSync(KeyEvent.KEYCODE_3);
                    }
                }).start();
            }
        });

        four.setOnClickListener(new OnClickListener()
        {
            public void onClick(View v)
            {
                new Thread(new Runnable()
                {
                    public void run()
                    {
                        Instrumentation inst = new Instrumentation();
                        inst.sendCharacterSync(KeyEvent.KEYCODE_4);
                    }
                }).start();
            }
        });

        five.setOnClickListener(new OnClickListener()
        {
            public void onClick(View v)
            {
                new Thread(new Runnable()
                {
                    public void run()
                    {
                        Instrumentation inst = new Instrumentation();
                        inst.sendCharacterSync(KeyEvent.KEYCODE_5);
                    }
                }).start();
            }
        });

        six.setOnClickListener(new OnClickListener()
        {
            public void onClick(View v)
            {
                new Thread(new Runnable()
                {
                    public void run()
                    {
                        Instrumentation inst = new Instrumentation();
                        inst.sendCharacterSync(KeyEvent.KEYCODE_6);
                    }
                }).start();
            }
        });

        seven.setOnClickListener(new OnClickListener()
        {
            public void onClick(View v)
            {
                new Thread(new Runnable()
                {
                    public void run()
                    {
                        Instrumentation inst = new Instrumentation();
                        inst.sendCharacterSync(KeyEvent.KEYCODE_7);
                    }
                }).start();
            }
        });

        eight.setOnClickListener(new OnClickListener()
        {
            public void onClick(View v)
            {
                new Thread(new Runnable()
                {
                    public void run()
                    {
                        Instrumentation inst = new Instrumentation();
                        inst.sendCharacterSync(KeyEvent.KEYCODE_8);
                    }
                }).start();
            }
        });

        nine.setOnClickListener(new OnClickListener()
        {
            public void onClick(View v)
            {
                new Thread(new Runnable()
                {
                    public void run()
                    {
                        Instrumentation inst = new Instrumentation();
                        inst.sendCharacterSync(KeyEvent.KEYCODE_9);
                    }
                }).start();
            }
        });

        zero.setOnClickListener(new OnClickListener()
        {
            public void onClick(View v)
            {
                new Thread(new Runnable()
                {
                    public void run()
                    {
                        Instrumentation inst = new Instrumentation();
                        inst.sendCharacterSync(KeyEvent.KEYCODE_0);
                    }
                }).start();
            }
        });

        enetr.setOnClickListener(new OnClickListener()
        {
            public void onClick(View v)
            {
                new Thread(new Runnable()
                {
                    public void run()
                    {
                        Instrumentation inst = new Instrumentation();
                        inst.sendCharacterSync(KeyEvent.KEYCODE_ENTER);
                    }
                }).start();
            }
        });

        delete.setOnClickListener(new OnClickListener()
        {
            public void onClick(View v)
            {
                new Thread(new Runnable()
                {
                    public void run()
                    {
                        Instrumentation inst = new Instrumentation();
                        inst.sendCharacterSync(KeyEvent.KEYCODE_DEL);
                    }
                }).start();
            }
        });
    }

}
在上面的代码中通过继承LinearLayout并且重写构造函数的方式自定义View,在构造函数中对每一个按键都写了相应的监听事件,在触发监听事件的时候直接向系统传递相应的键值。这样做的好处是在处理按键事件的过程中不需要判断焦点在哪个EditText中,只需要向系统传递相应的键值即可。
在写完自定义View以后只用在需要插入软键盘界面的布局文件中,使用方法跟加入一般的控件是一样的。
<com.example.administrator.keyboardview.KeyboardView
    android:id="@+id/keyboard"
    android:layout_width="match_parent"
    android:layout_height="72dp"
    android:layout_below="@id/loginset"
    android:layout_alignParentBottom="true"
android:gravity="bottom">
</com.example.administrator.keyboardview.KeyboardView>
加入后的效果图如下图所示
3.总结
使用上述方法实现软键盘的功能需要实现什么键的功能只需要向系统传递相对应的键值即可。
当确定当前界面使用自定义的软件盘时我们还要将系统键盘关闭,不然系统键盘跳出来时会影响到软键盘的使用,在这里我没有找到比较好的办法,我只知道点击空白处隐藏键盘的逻辑是这这样的
 InputMethodManager imm = (InputMethodManager) getSystemService(MainActivity.this.INPUT_METHOD_SERVICE);
 <span style="white-space:pre">	</span>if (imm != null)
        {
        <span style="white-space:pre">	</span>imm.hideSoftInputFromWindow(getWindow().getDecorView().getWindowToken(), 0);
        }
要是永远关闭软键盘我将上面的代码写到一个线程的死循环里,实现的代码如下所示
new Thread(new Runnable()
<span style="white-space:pre">	</span>{
         public void run()
         {
          <span style="white-space:pre">	</span>while(true)
                {
                 <span style="white-space:pre">	</span>InputMethodManager imm = (InputMethodManager) getSystemService(MainActivity.this.INPUT_METHOD_SERVICE);
                        if (imm != null)
                        {
                            imm.hideSoftInputFromWindow(getWindow().getDecorView().getWindowToken(), 0);
                        }
                    }
                }
            }).start();
其实利用死循环去解决问题的这种方式实在不合理,肯定有直接关闭键盘的方法,但是我没有找到,如果有哪位大神知道请给我留言吧,笔者先在这里谢谢了


源代码地址:
https://github.com/ChuPeng1013/KeyboardView.git

