源码地址:
https://github.com/KiroScarlet/PromoProject
慕课网SpringBoot构建电商基础秒杀项目,课程地址:
https://www.imooc.com/learn/1079
第一章 课程介绍
电商秒杀应用简介
- 商品列表页获取秒杀商品列表
- 进入商品详情页获取秒杀商品详情
- 秒杀开始后进入下单确认页下单并支付成功
第二章 应用SpringBoot完成基础项目搭建
2.1 使用IDEA创建maven项目
1.new->project->maven项目->选择maven-archetype-quickstart
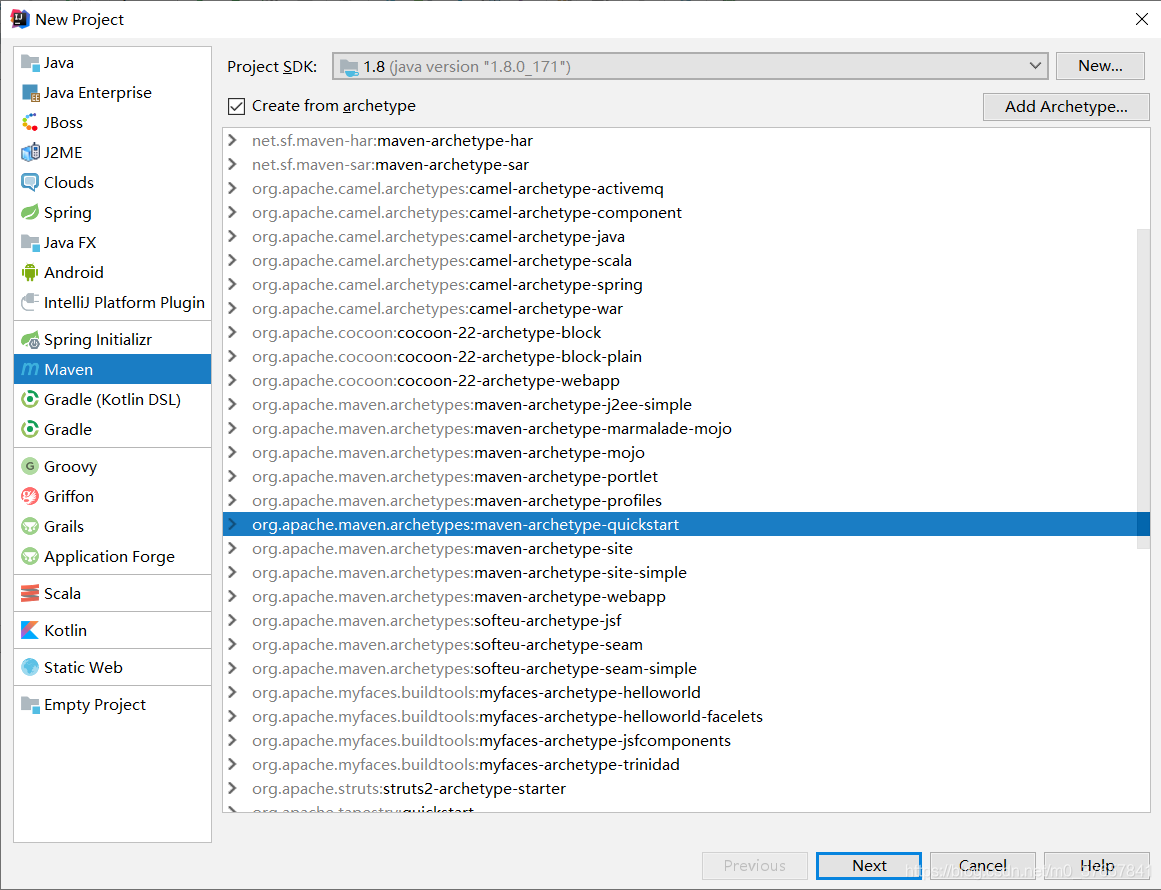
这种方式是以jar包方式对外输出
稍等一会,可能会有点慢
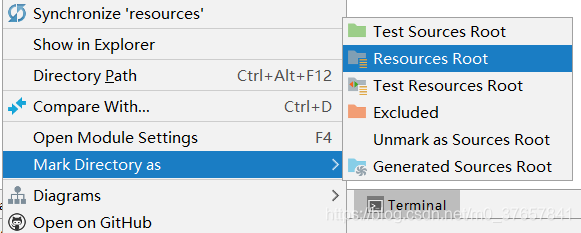
2.新建一个resources目录,作为资源文件目录,点击右键,指定为Resource root
2.2 引入SpringBoot依赖包实现简单的Web项目
进入官方文档
https://spring.io/guides/gs/rest-service/
Building a RESTful Web Service
1.引入父pom
<parent>
  <groupId>org.springframework.boot</groupId>
  <artifactId>spring-boot-starter-parent</artifactId>
  <version>2.1.4.RELEASE</version>
</parent>
2.引入依赖
<dependency>
  <groupId>org.springframework.boot</groupId>
  <artifactId>spring-boot-starter-web</artifactId>
</dependency>
3.maven Reimport刷新一下,会自动下载相应jar包(注:可以把idea设定为自动导入maven依赖)
4.SpringBoot的Web项目
@EnableAutoConfiguration
@RestController
public class App
{

    @RequestMapping("/")
    public String home() {
        return "hello World!";
    }
    public static void main( String[] args )
    {
        System.out.println("Hello World!");
        SpringApplication.run(App.class,args);
    }
}
再次启动App,访问localhost:8080
2.3 Mybatis接入SpringBoot项目
1.SpringBoot的默认配置
在resources目录下新建SpringBoot的默认配置文件application.properties
通过一行简单的属性就能更改tomcat的端口
server.port=8090
2.配置pom文件
<!--数据库-->
<dependency>
  <groupId>mysql</groupId>
  <artifactId>mysql-connector-java</artifactId>
    <version>5.1.47</version>
</dependency>
<!--数据库连接池-->
<dependency>
  <groupId>com.alibaba</groupId>
  <artifactId>druid</artifactId>
  <version>1.1.3</version>
</dependency>
<!--Mybatis依赖-->
<dependency>
  <groupId>org.mybatis.spring.boot</groupId>
  <artifactId>mybatis-spring-boot-starter</artifactId>
  <version>1.3.1</version>
</dependency>
3.配置文件application.properties,设置
mybatis.mapper-locations=classpath:mapping/*.xml
然后在resources目录下新建mapping目录
4.自动生成工具,生成数据库文件的映射
引入插件
<!--自动生成工具,生成数据库文件的映射-->
<plugin>
  <groupId>org.mybatis.generator</groupId>
  <artifactId>mybatis-generator-maven-plugin</artifactId>
  <version>1.3.5</version>
  <dependencies>
    <dependency>
      <groupId>org.mybatis.generator</groupId>
      <artifactId>mybatis-generator-core</artifactId>
      <version>1.3.5</version>
    </dependency>
    <dependency>
      <groupId>mysql</groupId>
      <artifactId>mysql-connector-java</artifactId>
      <version>5.1.41</version>
    </dependency>
  </dependencies>
  <executions>
    <execution>
      <id>mybatis generator</id>
      <phase>package</phase>
      <goals>
        <goal>generate</goal>
      </goals>
    </execution>
  </executions>
  <configuration>
    <!--允许移动生成的文件-->
    <verbose>true</verbose>
    <!--允许自动覆盖文件(生产环境中千万不要这样做)-->
    <overwrite>true</overwrite>
    <configurationFile>
      src/main/resources/mybatis-generator.xml
    </configurationFile>
  </configuration>
</plugin>
2.4 Mybatis自动生成器的使用方式
1.新建文件src/main/resources/mybatis-generator.xml,从官网下载xml配置文件
http://www.mybatis.org/generator/configreference/xmlconfig.html
2.新建数据库
新建一个miaosha的数据库,并建立两张表,分别是user_info和user_password
3.修改配置文件
<?xml version="1.0" encoding="UTF-8"?>
<!DOCTYPE generatorConfiguration
        PUBLIC "-//mybatis.org//DTD MyBatis Generator Configuration 1.0//EN"
        "http://mybatis.org/dtd/mybatis-generator-config_1_0.dtd">

<generatorConfiguration>

    <context id="DB2Tables" targetRuntime="MyBatis3">
        <!--数据库链接地址账号密码-->
        <jdbcConnection driverClass="com.mysql.jdbc.Driver"
                        connectionURL="jdbc:mysql://localhost:3306/miaosha"
                        userId="root"
                        password="123456">
        </jdbcConnection>

        <!--生成DataObject类存放位置-->
        <javaModelGenerator targetPackage="com.miaoshaproject.dataobject" targetProject="src/main/java">
            <property name="enableSubPackages" value="true" />
            <property name="trimStrings" value="true" />
        </javaModelGenerator>

        <!--生成映射文件存放位置-->
        <sqlMapGenerator targetPackage="mapping"  targetProject="src/main/resources">
            <property name="enableSubPackages" value="true" />
        </sqlMapGenerator>

        <!--生成Dao类存放位置-->
        <javaClientGenerator type="XMLMAPPER" targetPackage="com.miaoshaproject.dao"  targetProject="src/main/java">
            <property name="enableSubPackages" value="true" />
        </javaClientGenerator>

        <!--生成对应表及类名-->
        <!--  enableCountByExample="false"
               enableUpdateByExample="false"
               enableDeleteByExample="false"
               enableSelectByExample="false"
               selectByExampleQueryId="false"
               这些属性是为了使得只生成简单查询的对应文件,去掉复杂查询的生成文件,因为一般开发中不太用的到-->
        <table tableName="user_info" domainObjectName="UserDO"
               enableCountByExample="false"
               enableUpdateByExample="false"
               enableDeleteByExample="false"
               enableSelectByExample="false"
               selectByExampleQueryId="false"></table>
        <table tableName="user_password" domainObjectName="userPasswordDO"
               enableCountByExample="false"
               enableUpdateByExample="false"
               enableDeleteByExample="false"
               enableSelectByExample="false"
               selectByExampleQueryId="false" ></table>

    </context>
</generatorConfiguration>
4.生成文件
在终端运行
mvn mybatis-generator:generate
命令
5.接入mysql数据源
spring.datasource.name=miaosha
spring.datasource.url=jdbc:mysql://localhost:3306/miaosha
spring.datasource.username=root
spring.datasource.password=123456

#使用druid数据源
spring.datasource.type=com.alibaba.druid.pool.DruidDataSource
spring.datasource.driver-class-name=com.mysql.jdbc.Driver
6.测试数据库
修改App类
@SpringBootApplication(scanBasePackages = {"com.miaoshaproject"})
//使用@SpringbootApplication注解  可以解决根类或者配置类头上注解过多的问题,一个@SpringbootApplication相当于
//@Configuration,@EnableAutoConfiguration和 @ComponentScan 并具有他们的默认属性值
@RestController
@MapperScan("com.miaoshaproject.dao")
public class App {

    @Autowired
    private UserDOMapper userDOMapper;

    @RequestMapping("/")
    public String home() {
        UserDO userDO = userDOMapper.selectByPrimaryKey(1);
        if (userDO == null) {
            return "用户对象不存在";
        } else {
            return userDO.getName();
        }
    }
}
启动测试
后续教程
:
SpringBoot构建电商秒杀项目实战(二)
SpringBoot构建电商秒杀项目实战(三)
SpringBoot构建电商秒杀项目实战(四)
SpringBoot构建电商秒杀项目实战(五)