之前发过一篇关于对图片上人脸检测的博客。 链接:https://blog.csdn.net/weixin_43582101/article/details/88702254
本篇则是讲解通过计算机摄像头来识别人脸并捕捉人脸位置。源码加依赖在最后会完整托管在github上。
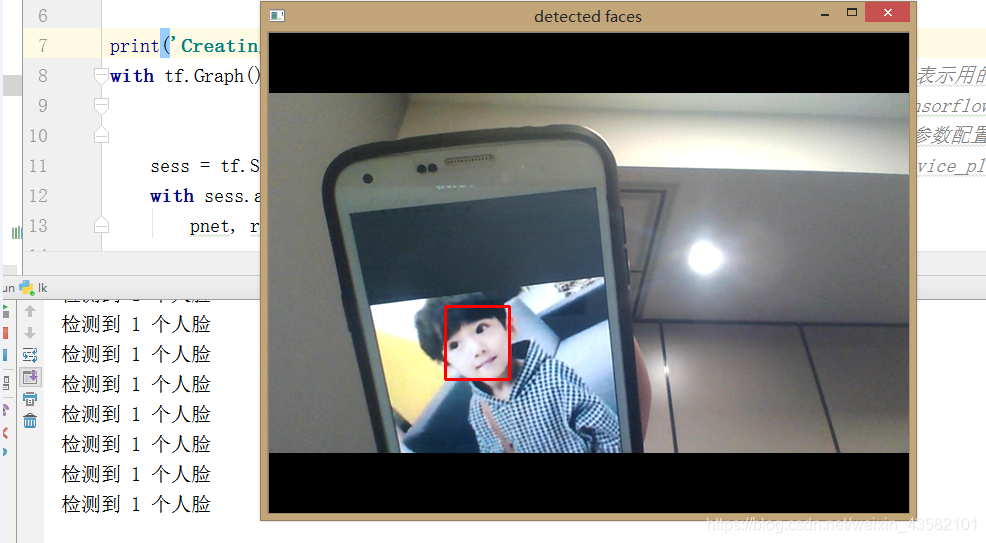
测试结果如下:
直接贴代码了,基本上都有注释。就不多说了。
导入要使用的模块 cv2,tensorflow
import tensorflow as tf
from face_check import detect_face
import cv2
import numpy as np
tf.Graph() 表示实例化了一个用于 tensorflow 计算和表示用的数据流图
 print('Creating  and loading ')
    with tf.Graph().as_default():# tf.Graph() 表示实例化了一个用于 tensorflow 计算和表示用的数据流图
                                 # tf.Graph().as_default() 表示新生成的图作为整个 tensorflow 运行环境的默认图
                                 #tf.ConfigProto()创建session的时候用来对session进行参数配置
        sess = tf.Session(config=tf.ConfigProto(log_device_placement=False))# log_device_placement记录设备指派情况
        with sess.as_default():              # 创建一个默认会话
            pnet, rnet, onet = detect_face.create_mtcnn(sess, None)
定义检测函数
def detection(image):
    minsize = 20  # 最小尺寸
    threshold = [0.6, 0.7, 0.7]  # 三个步骤的阈值
    factor = 0.709  # 比例项间的比率

# detect with RGB image
h, w = image.shape[:2]
bounding_boxes, _ = detect_face.detect_face(image, minsize, pnet, rnet, onet, threshold, factor)
            #检测图像中的人脸,并为其返回包围框和点。img:输入图像 最小面尺寸:最小面尺寸
                                                #pnet, rnet, onet: caffemodel
                                                #阈值:阈值=[th1, th2, th3], th1-3为三步阈值
    #factor:用于创建一个扩展的因素金字塔脸大小的检测图像中。用于创建图像中检测到的面部尺寸的比例金字塔的因素
if len(bounding_boxes) < 1:
    print("can't detect face in the frame")
    return None                                         #未检测到则返回空
print("检测到 %d 个人脸"% len(bounding_boxes))         # 检测到的人脸数
用矩形把找到的形状包起来
bgr = cv2.cvtColor(image, cv2.COLOR_RGB2BGR)             # 图像颜色空间转换
for i in range(len(bounding_boxes)):
    det = np.squeeze(bounding_boxes[i, 0:4])
    bb = np.zeros(4, dtype=np.int32)
    # x1, y1, x2, y2
    margin = 0
    bb[0] = np.maximum(det[0] - margin / 2, 0)          #np.maximum求最大值
    bb[1] = np.maximum(det[1] - margin / 2, 0)
    bb[2] = np.minimum(det[2] + margin / 2, w)
    bb[3] = np.minimum(det[3] + margin / 2, h)
    cv2.rectangle(bgr, (bb[0], bb[1]), (bb[2], bb[3]), (0, 0, 255), 2, 8, 0)
cv2.imshow("detected faces", bgr)           # cv2.rectangle 用矩形把找到的形状包起来
return bgr
打开本地摄像头
capture = cv2.VideoCapture(0)                   # VideoCapture 读取本地视频和打开摄像头
height = capture.get(cv2.CAP_PROP_FRAME_HEIGHT) # 计算视频的高
width = capture.get(cv2.CAP_PROP_FRAME_WIDTH)   # 计算视频的宽
out = cv2.VideoWriter("D:/demo.mp4", cv2.VideoWriter_fourcc('D', 'I', 'V', 'X'), 15, (np.int(width), np.int(height)), True)
# cv2.VideoWriter 保存摄像头视频            #VideoWriter_fourcc()输入四个字符代码即可得到对应的视频编码器

while True:
    ret, frame = capture.read()
    if ret is True:
        frame = cv2.flip(frame, 1)                          #cv2.flip 图像翻转
       # cv2.imshow("frame", frame)
        rgb = cv2.cvtColor(frame, cv2.COLOR_BGR2RGB)        #cvtColor()颜色空间转换函数
        result = detection(rgb)

        out.write(result)
        c = cv2.waitKey(10)
        if c == 27:
            break
    else:
        break
cv2.destroyAllWindows()     #关闭窗口
Over,下面可以跑起来进行测试了
先用两个人物测试。

真人测试。拒绝露脸

github源码地址: https://github.com/lixi5338619/camera_face_check
版权声明:本文为weixin_43582101原创文章,遵循 CC 4.0 BY-SA 版权协议,转载请附上原文出处链接和本声明。