实验一:LED灯程序
资源地址:https://github.com/Axzyro1
一、 实验环境
开发机环境
操作系统:ubuntu 12.04
交叉编译环境:arm-linux-gcc 4.3.2
6410板子内核源码:linux-3.0.1
目标板环境:OK6410-A linux-3.0.1
二、 实验原理
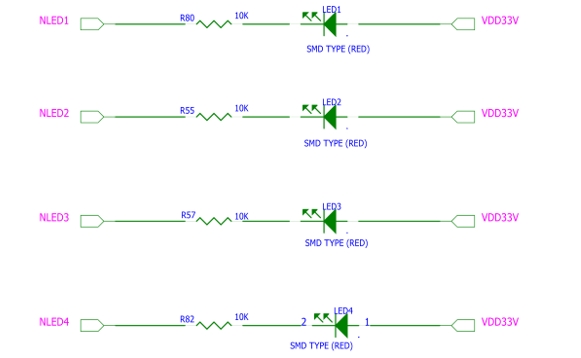
图1-OK6410LED原理图
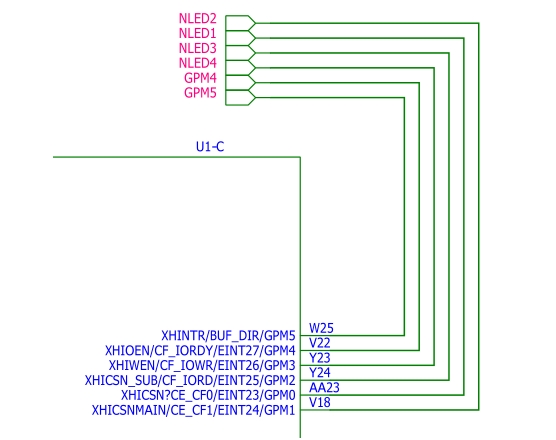
图2-LED原理图
从上面的原理图可以得知,LED与CPU引脚的连接方法如下,低电平点亮。
LED1 -GPM0
LED2 -GPM1
LED3 -GPM2
LED4 -GPM3
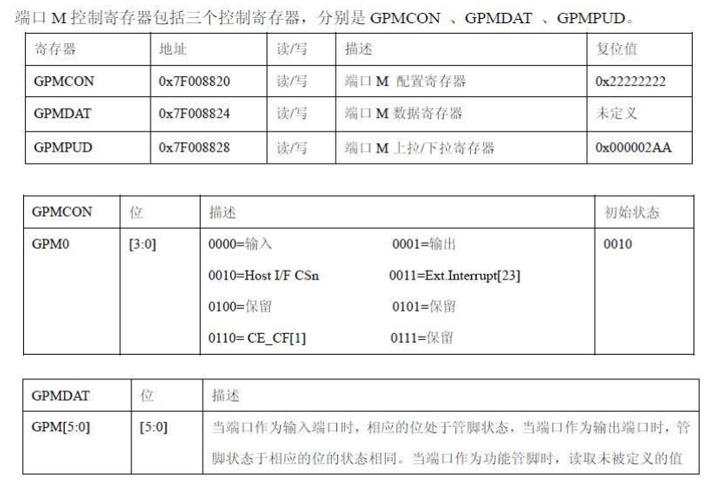
通过上面可以得知,需要先将GPM0设置为输出方式。将相应的寄存器进行配置。然后将GPMDAT寄存器的第0位置0灯亮,置1灯灭。
三、 实验代码
1.编写驱动程序
#include <linux/module.h>
#include <linux/kernel.h>
#include <linux/fs.h>
#include <asm/uaccess.h> /* copy_to_user,copy_from_user */
#include <linux/miscdevice.h>
#include <linux/pci.h>
#include <mach/map.h>
#include <mach/regs-gpio.h>
#include <mach/gpio-bank-m.h>
#include <plat/gpio-cfg.h>

#define LED_MAJOR 240

int led_open(struct inode *inode, struct file *filp)

{
	unsigned tmp;
	tmp = readl(S3C64XX_GPMCON);
	tmp = (tmp & ~(0x7U << 1)) | (0x1U);
	writel(tmp, S3C64XX_GPMCON);
	printk("#########open######\n");
	return 0;
}

ssize_t led_read(struct file *filp, char __user *buf, size_t count, loff_t *f_pos)
{
	printk("#########read######\n");
	return count;
}

ssize_t led_write(struct file *filp, const char __user *buf, size_t count, loff_t *f_pos)
{
	char wbuf[10];
	unsigned tmp;
	printk("#########write######\n");
	copy_from_user(wbuf, buf, count);
	switch (wbuf[0])
	{
	case 0: //off
		tmp = readl(S3C64XX_GPMDAT);
		tmp |= (0xfU);
		writel(tmp, S3C64XX_GPMDAT);
		break;
	case 1: //on
		tmp = readl(S3C64XX_GPMDAT);
		tmp &= ~(0xfU);
		writel(tmp, S3C64XX_GPMDAT);
		break;
	default:
		break;
	}
	return count;
}

int led_release(struct inode *inode, struct file *filp)
{
	printk("#########release######\n");
	return 0;
}

struct file_operations led_fops = {
	.owner = THIS_MODULE,
	.open = led_open,
	.read = led_read,
	.write = led_write,
	.release = led_release,
};

int __init led_init(void)
{
	int rc;
	printk("Test led dev\n");
	rc = register_chrdev(LED_MAJOR, "led", &led_fops);
	if (rc < 0)
	{
		printk("register %s char dev error\n", "led");
		return -1;
	}
	printk("ok!\n");
	return 0;
}

void __exit led_exit(void)
{
	unregister_chrdev(LED_MAJOR, "led");
	printk("module exit\n");
	return;
}

module_init(led_init);
module_exit(led_exit);
2.编写Makefile文件
ifneq ($(KERNELRELEASE),)
obj-m := driver_led.o
else
KDIR := /work/linux-3.0.1
all:
	make -C $(KDIR) M=$(PWD) modules ARCH=arm CROSS_COMPILE=arm-linux-
clean:
	rm -f *.ko *.o *.mod.o *.mod.c *.symvers
endif
3.编写测试文件
#include <stdio.h>
#include <sys/types.h>
#include <sys/stat.h>
#include <fcntl.h>
int main (void)
{
	int fd;
	char buf[10]={0,1,0,1};
	fd = open("/dev/my_led",O_RDWR);
	if (fd < 0)
	{
		printf ("Open /dev/my_led file error\n");
		return -1;
	}
	while(1)
	{
		write(fd,&buf[0],1);
		sleep(1);
		write(fd,&buf[1],1);
		sleep(1);

	}
	close (fd);
	return 0;

}
四、 实验步骤
1、编译驱动程序和测试程序
在终端中运行:
#make
命令,编译成功生生下列文件
在终端中运行:
#arm-linux-gcc test.c -o test
,编译成功生成文件
2、将文件拷贝到SD卡
3、将SD卡插入到OK6410开发板中
4、在OK6410终端中运行程序
加载驱动:
#insmod sdcard/driver_led.ko
创建设备文件:
# mknod /dev/my_led c 240 0
运行测试文件:
#./sdcard/test
卸载驱动程序:
#rmmod sdcard/driver_led.ko
5、运行结果
此时可以看到OK6410开发板的4个LED灯一直同时点亮,然后熄灭。
6、更改驱动程序里的代码可实现不同的功能
五、 实验总结
本次实验主要是熟悉交叉编译,测试的步骤,理解驱动程序和测试代码之间的关系,为后续更复杂的程序开发做准备。理解代码的实际意义,可以对代码进行二次开发。在实验过程中遇到的困难:Makefile文件命名要正确,文件内容格式要正确,注意Tab键的使用。