了解SpringBoot自动配置原理开发自己的Starter
1、前言
公司使用SpringBoot开发已经有些时日了,也写了不少公司内部的starter(公司业务处理核心模块),今天就和大家聊聊SpringBoot自动配置原理,最后我们通过一个样例来自己自定义一个简单的starter。
在进行讲解前附上SpringBoot2.2.6.RELEASE文档,大家也可以参考:(由于目前IDEA构建SpringBoot是2.2.6.RELEASE)
https://docs.spring.io/spring-boot/docs/2.2.6.RELEASE/reference/htmlsingle/
从启动到装配
我们都知道SpringBoot 项目,在启动类上都会默认有一个 @SpringBootApplication 组合注解;进入源码我们看一下:
@Target({ElementType.TYPE})
@Retention(RetentionPolicy.RUNTIME)
@Documented
@Inherited
@SpringBootConfiguration
@EnableAutoConfiguration
@ComponentScan(
    excludeFilters = {@Filter(
    type = FilterType.CUSTOM,
    classes = {TypeExcludeFilter.class}
), @Filter(
    type = FilterType.CUSTOM,
    classes = {AutoConfigurationExcludeFilter.class}
)}
)
public @interface SpringBootApplication {...}
通过源码我们得知 @SpringBootApplication 组合了三个注解:
@SpringBootConfiguration表示这是一个 SpringBoot 的配置类@ComponentScan这个大家一定不陌生,开启扫描@EnableAutoConfiguration开启自动配置,接下来这个类就是自动配置的核心
@EnableAutoConfiguration 注解
我们依旧点击注解进入源码查看,到底这个EnableAutoConfiguration做了哪些事情;
@Target({ElementType.TYPE})
@Retention(RetentionPolicy.RUNTIME)
@Documented
@Inherited
@AutoConfigurationPackage
@Import({AutoConfigurationImportSelector.class})
public @interface EnableAutoConfiguration {...}
@AutoConfigurationPackage:添加该注解的类所在的package 作为 自动配置package进行管理,感兴趣的朋友可以继续点击注解查看 会有一个@Import({Registrar.class})-> Registrar 查看@Import({AutoConfigurationImportSelector.class}):进入AutoConfigurationImportSelector.class 我们可以启动项目跟着断点走一遍
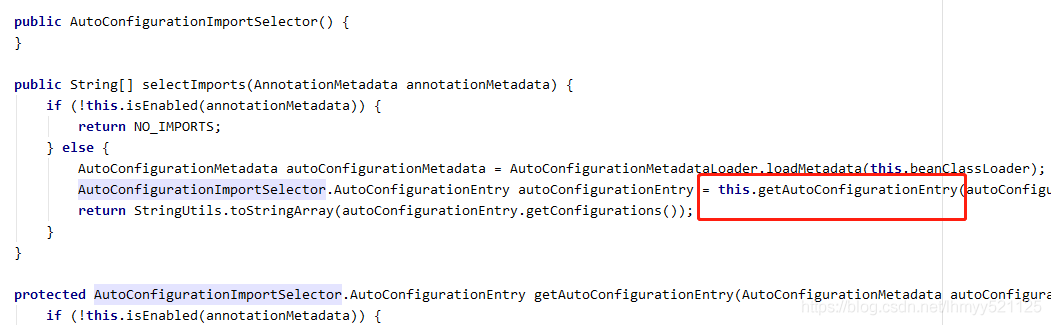
第一步首先调用getAutoConfigurationEntry()
 )
)
第二步调用getCandidateConfigurations()
 )
)
最后调用loadFactoryNames()
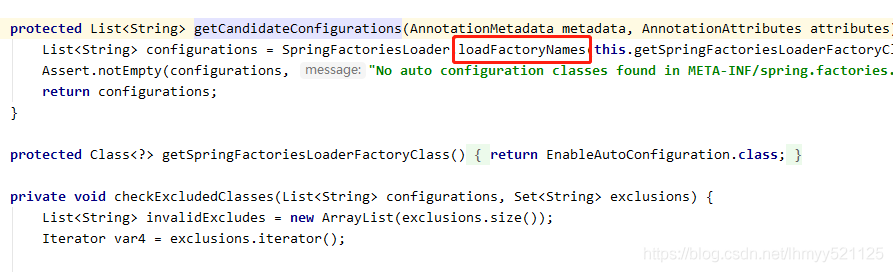
loadFactoryNames() 具体做了什么呢?它主要是扫描项目路径下META-INF/spring.factories 文件(spring.factories文件是Key=Value形式)以 Map 返回,并通过EnableAutoConfiguration.class 获取KEY值;
验证分析
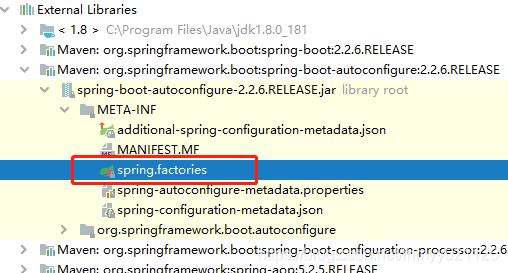
我们找到org.springframework.boot.autoconfigure 对应JAR包找到META-INF/spring.factories 查看一下
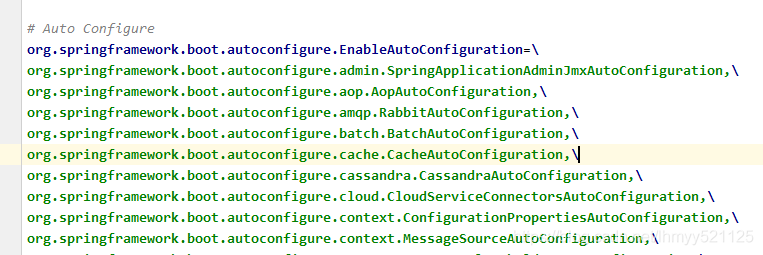
上面的EnableAutoConfiguration配置了多个类,这些都是Spring Boot中的自动配置相关类;在启动过程中会解析对应类配置信息。每个Configuation类都定义了相关bean的实例化配置。都说明了哪些bean可以被自动配置,什么条件下可以自动配置,并把这些bean实例化出来。如果我们自定义了一个starter的话,也要在该starter的jar包中提供 spring.factories文件,并且为其配置org.springframework.boot.autoconfigure.EnableAutoConfiguration对应的配置类。所有框架的自动配置流程基本都是一样的,判断是否引入框架,获取配置参数,根据配置参数初始化框架相应组件。
2、实践大于理论
分析了这么多,可能大家还是比较模糊,那么我们接下来通过一个简单DEMO来实现我们自定义Starter,实现自动配置;
SpringBoot starter机制
SpringBoot中的starter是一种非常重要的机制,能够抛弃以前繁杂的配置,将其统一集成进starter,应用者只需要在maven中引入starter依赖,SpringBoot就能自动扫描到要加载的信息并启动相应的默认配置。starter让我们摆脱了各种依赖库的处理,需要配置各种信息的困扰。SpringBoot会自动通过classpath路径下的类发现需要的Bean,并注册进IOC容器。SpringBoot提供了针对日常企业应用研发各种场景的spring-boot-starter依赖模块。所有这些依赖模块都遵循着约定成俗的默认配置,并允许我们调整这些配置,即遵循“约定大于配置”的理念。
自定义starter好处
我们的日常开发工作中,经常会有一些独立于业务之外的配置模块,我们经常将其放到一个特定的包下,然后如果另一个工程需要复用这块功能的时候,需要将代码硬拷贝到另一个工程,重新集成一遍,麻烦至极。如果我们将这些可独立于业务代码之外的功配置模块封装成一个个starter,复用的时候只需要将其在pom中引用依赖即可,通过SpringBoot为我们完成自动装配。
构建DEMO Starter
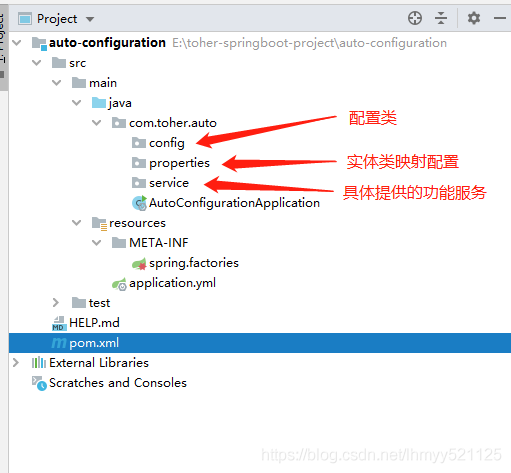
1、打开IDEA创建一个工程项目,目录结构如下:
2、pom.xml配置
<?xml version="1.0" encoding="UTF-8"?>
<project xmlns="http://maven.apache.org/POM/4.0.0" xmlns:xsi="http://www.w3.org/2001/XMLSchema-instance"
         xsi:schemaLocation="http://maven.apache.org/POM/4.0.0 https://maven.apache.org/xsd/maven-4.0.0.xsd">
    <modelVersion>4.0.0</modelVersion>
    <parent>
        <groupId>org.springframework.boot</groupId>
        <artifactId>spring-boot-starter-parent</artifactId>
        <version>2.2.6.RELEASE</version>
        <relativePath/> <!-- lookup parent from repository -->
    </parent>

    <groupId>com.toher</groupId>
    <artifactId>custom-spring-boot-starter</artifactId>
    <version>0.0.1-SNAPSHOT</version>
    <name>custom-spring-boot-starter</name>
    <description>了解SpringBoot自动配置原理开发自己的Starter</description>

    <properties>
        <java.version>1.8</java.version>
    </properties>

    <dependencies>
        <dependency>
            <groupId>org.springframework.boot</groupId>
            <artifactId>spring-boot-configuration-processor</artifactId>
            <optional>true</optional>
        </dependency>
        <dependency>
            <groupId>org.springframework.boot</groupId>
            <artifactId>spring-boot-autoconfigure</artifactId>
        </dependency>
    </dependencies>
</project>
3、配置实体类映射 PersonProperties
package com.toher.auto.properties;

import org.springframework.boot.context.properties.ConfigurationProperties;

import java.util.List;

/**
 * @Author: 同恒科技-李Micro
 * @Date: 2020/4/14 19:41
 */
@ConfigurationProperties(prefix = "person")
public class PersonProperties {
    //姓名
    private String name;
    //年龄
    private Integer age;
    //爱好
    private List<String> hobby;

    public String getName() {
        return name;
    }

    public void setName(String name) {
        this.name = name;
    }

    public Integer getAge() {
        return age;
    }

    public void setAge(Integer age) {
        this.age = age;
    }

    public List<String> getHobby() {
        return hobby;
    }

    public void setHobby(List<String> hobby) {
        this.hobby = hobby;
    }
}
4、编写功能服务类 GetPersonMsgService
package com.toher.auto.service;

import com.toher.auto.properties.PersonProperties;

import java.util.List;

/**
 * @Author: 同恒科技-李Micro
 * @Date: 2020/4/14 19:45
 */
public class GetPersonMsgService {

    //姓名
    private String name;
    //年龄
    private Integer age;
    //爱好
    private List<String> hobby;

    public GetPersonMsgService(PersonProperties personProperties){
        this.name = personProperties.getName();
        this.age = personProperties.getAge();
        this.hobby = personProperties.getHobby();
    }

    public void showName(){
        System.out.println("this Person name is :" + name);
    }

    public void showAge(){
        System.out.println("this Person age is :" + age);
    }

    public void showHobby(){
        hobby.forEach( s->System.out.println("this Person hobby is :" + s) );
    }
}
5、编写自动配置类 AutoConfigrutionClass
package com.toher.auto.config;

import com.toher.auto.properties.PersonProperties;
import com.toher.auto.service.GetPersonMsgService;
import org.springframework.beans.factory.annotation.Autowired;
import org.springframework.boot.autoconfigure.condition.ConditionalOnClass;
import org.springframework.boot.autoconfigure.condition.ConditionalOnMissingBean;
import org.springframework.boot.context.properties.EnableConfigurationProperties;
import org.springframework.context.annotation.Bean;
import org.springframework.context.annotation.Configuration;

/**
 * @Author: 同恒科技-李Micro
 * @Date: 2020/4/14 19:46
 */
@Configuration
@EnableConfigurationProperties(PersonProperties.class)
@ConditionalOnClass(GetPersonMsgService.class)
public class AutoConfigrutionClass {

    @Autowired
    private PersonProperties personProperties;

    @ConditionalOnMissingBean
    @Bean
    public GetPersonMsgService getPersonMsgService(){
        return new GetPersonMsgService(personProperties);
    }

}
6、配置spring.factories
org.springframework.boot.autoconfigure.EnableAutoConfiguration=\
com.toher.auto.config.AutoConfigrutionClass
7、maven install 发布到本地
测试
新建SpringBoot项目 pom引入
<dependency>
     <groupId>com.toher</groupId>
     <artifactId>custom-spring-boot-starter</artifactId>
     <version>0.0.1-SNAPSHOT</version>
</dependency>
并配置application.yml
person:
  age: 11
  name: micro
  hobby:
    - 111
    - 222
    - 333
编写测试类
package com.toher.testautoconfiguration;
import com.toher.auto.service.GetPersonMsgService;
import org.junit.jupiter.api.Test;
import org.springframework.beans.factory.annotation.Autowired;
import org.springframework.boot.test.context.SpringBootTest;
@SpringBootTest
class TestAutoConfigurationApplicationTests {
@Autowired
private GetPersonMsgService getPersonMsgService;
@Test
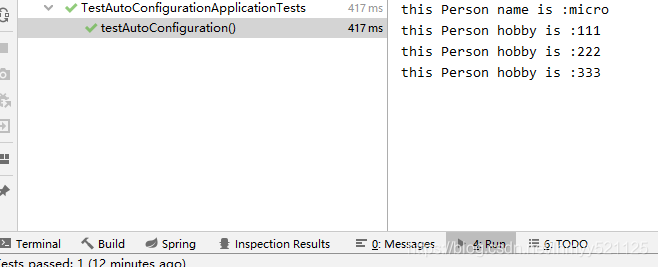
public void testAutoConfiguration(){
getPersonMsgService.showAge();
getPersonMsgService.showName();
getPersonMsgService.showHobby();
}
}
运行输出如下:
3、结语
本文通过讲解了SpringBoot 自动化配置原理,并通过实际的代码样例编写自定义Starter,大家可以参考样例代码自行编写自己的业务功能~