1. WXML 代码
- 公用 CustomBar 盒子,此处可以设置公用的背景/字体颜色和字体大小;
- CustomBar 具体内容,按照胶囊右边距设置 CustomBar 盒子的左右 margin,设置盒子的高度;
- 右侧胶囊占位,左侧动态根据 title 判断展示 slot 还是直接显示 title;
- 除去 CustomBar 的展示数据,其他的 slot !
<view class="rui-head-content" style="background: url({{bannerBgIcon}}) no-repeat center top/100% auto;min-height:{{sysInfo.CustomBar}}px;padding-top:{{sysInfo.StatusBar}}px;">
  <view class="rui-flex-ac" style="height:{{sysInfo.CustomBar - sysInfo.StatusBar}}px;margin:0 calc(750rpx - {{sysInfo.Custom.right}}px);">
    <view class="rui-fg rui-mr20 rui-flex-ac">
      <slot name="title" wx:if="{{!title}}"></slot>
      <image wx:if="{{title}}" src="{{returnIcon}}" style="width: 8px;height: 16px;" class="rui-return-icon rui-fa rui-mr20" bindtap="routeTo" data-delta="1"></image>
      <text wx:if="{{title}}" class="rui-line1 rui-color0">{{title}}</text>
    </view>
    <view class="rui-fa" style="height:{{sysInfo.Custom.height}}px;width:{{sysInfo.Custom.width}}px;"></view>
  </view>
  <view style="margin:0 calc(750rpx - {{sysInfo.Custom.right}}px);">
    <slot name="other"></slot>
  </view>
</view>
注意:flex 布局等使用的公用样式,返回的方法 routeTo 进行统一的封装!
2. JS 代码
- useNetIcons: [‘bannerBgIcon’, ‘returnIcon’] 获取公用 CustomBar 的图片;
- globalData 获取 CustomBar 的信息,只需要在 app.js 获取一次,其他组件或者页面直接使用;
- multipleSlots 开启插槽;
- routeTo 方法是点击跳转方法,封装在 Component 的拦截器中,最后详细解释 routeTo 方法!
const app = getApp()
Component({
  useNetIcons: ['bannerBgIcon', 'returnIcon'],
  options: {
    addGlobalClass: true,
    multipleSlots: true
  },
  properties: {
    title: String
  },
  data: {
    sysInfo: app.globalData
  },
  methods: {

  }
})
3. WXSS 代码
- 引入全局通用样式;
- 设置 CustomBar 的公用盒子样式!
@import '../../css/common.wxss';

.rui-head-content{
  box-sizing: border-box;
  color: #FBECC4;
  font-size: 14px;
  position: -webkit-sticky;
  position: sticky;
  top: 0;
  left: 0;
  z-index: 1024;
}
4. CustomBar 公用组件的使用
4.1 引入组件
{
  "component": true,
  "usingComponents": {
    "rui-customs": "../../components/rui-customs/rui-customs"
  }
}
4.2 使用组件
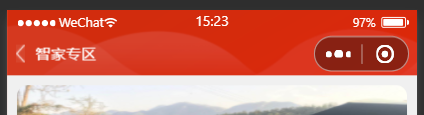
- 直接传入 title 使用
<rui-custom title="智家专区"/>
效果:
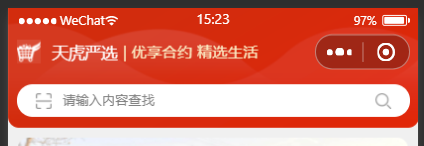
- 插槽的使用
<rui-customs>
    <view class="rui-fg rui-mr20 rui-flex-ac" slot="title">
       <image src="{{newlogoIcon}}" class="rui-fa rui-icon44 rui-mr20"></image>
       <text class="rui-color0 rui-mr10 rui-fa" style="font-size: 15px;">天虎严选</text>
       <text class="rui-fg"> | 优享合约 精选生活</text>
     </view>
     <view class="rui-search-content rui-flex-ac" slot="other">
       <view class="rui-fg rui-flex-ac rui-input-content">
         <image src="{{scansearchIcon}}" class="rui-icon30 rui-fa rui-mr20"></image>
         <view class="rui-fg"><input type="text" placeholder="请输入内容查找" class="rui-input rui-fs24"/></view>
         <image src="{{searchiconIcon}}" class="rui-icon30 rui-fa rui-ml20"></image>
       </view>
     </view>
</rui-customs>
效果:
5. routeTo 方法的封装和说明
-
引入公共提示方法 _toast ;
-
引入当前执行环境 env_config;
-
集合 wx 的跳转执行方法 types;
-
routeTo 方法元素点击跳转执行;
4.1 获取元素的属性 dataset 中的 type, url, appid, delta;
4.2 执行 $route 方法,此方法是 js 调用方法;
- $route 方法是 Page 对象或者 Component 直接执行js跳转的方法;
5.1 对传入参数 type, url, appid, delta 解构赋值;
5.2 判断 appid 是否有效,如果 appid 存在,执行 wx.navigateToMiniProgram(),小程序之间的跳转,注意:需要判断 env_config 是否是正式环境;
5.3 判断 url 的值是否有效,如果有效,判断 url 中是否存在 http,进行web-view打开对应的H5页面,注意:1. webView 页面是公用的打开 H5 的页面,需提前创建;2. H5 url可以存入缓存,也可以使用全局状态变量,此处采用缓存变量【urlAndParams】;
5.4 如果 url 有效,并且不是 H5 页面,直接使用跳转方法 route;
5.5 如果 url 无效,判断 delta 返回参数是否有效,有效执行返回 wx.navigateBack(),无效提示 【功能开发中,敬请关注!】!
- route 判断传入的 type 是否是wx的有效跳转,如果无效,使用navigateTo,有效使用传入type执行!
- 将页面点击跳转方法 routeTo,和js跳转方法 $route 暴露!在 Component 和 Page 拦截器添加 routeTo 和 $route!
import { _toast } from "../helper/utils"
import {env_config} from '../request/env'

const types = {
  navigateTo: 'navigateTo',
  switchTab: 'switchTab',
  reLaunch: 'reLaunch',
  redirectTo: 'redirectTo',
  navigateBack: 'navigateBack'
}

const routeTo = ({currentTarget}) => {
  let { type = 'navigateTo', url = '', appid = '', delta} = currentTarget.dataset
  $route({type, url, appid, delta})
}
const $route = (opts) => {
  let { type = 'navigateTo', url = '', appid = '', delta} = opts
  if(appid){
    wx.navigateToMiniProgram({
      appId: appid,
      path: url,
      envVersion: env_config.test ? 'trial' : 'release',
      success(){console.log('小程序跳转成功!')}
    })
    return
  }
  if(url){
    if(url.indexOf('http') > -1){
      wx.setStorageSync('urlAndParams', `${url}`)
      route({ url: '../../pages/webView/webView', type })
    } else {
      route(opts)
    }
  } else {
    delta ? wx.navigateBack(opts) : _toast('功能开发中,敬请关注!')
  }
}

const route = (opts) => {
  let { type = 'navigateTo', url = ''} = opts
  type = types[type] ? type : 'navigateTo'
  wx[type].call(wx, { url })
}

module.exports = {
  routeTo,
  $route
}
6. 对封装跳转方法的使用
- 页面返回上一页或者几页
<view bindtap="routeTo" data-delta="1">返回上一页</view>
- js返回上一页或者几页
this.$route({delta:1})
- 页面跳转其他小程序
<view bindtap="routeTo" data-appid="wx1b4587b5486c9856" data-url="pages/index/index">跳转其他小程序</view>
- js 跳转其他小程序
this.$route({appid:'wx1b4587b5486c9856',url: 'pages/index/index'})
- 页面内部普通跳转
<view bindtap="routeTo" data-url="../../pages/addressList/addressList">地址管理</view>
- js内部普通跳转
this.$route({url: '../../pages/addressList/addressList'})
- 页面tabbar页面跳转
<view bindtap="routeTo" data-url="../../pages/index/index" data-type="switchTab">首页</view>
- js tabbar页面跳转
this.$route({url: '../../pages/index/index',type:'switchTab'})
7. 总结
- 跳转方法等使用频繁的方法,尽量封装,这样后期如果需要埋点,直接在此方法,就能完成页面大部分操作行为的埋点;
- CustomBar 如果需要自定义,尽量封装全局组件!
版权声明:本文为m0_38082783原创文章,遵循 CC 4.0 BY-SA 版权协议,转载请附上原文出处链接和本声明。