In the previous post :
Continuous Integration with SSDT and TFS
I have described some techniques to allow continuous integration / deployment using SQL Server Data Tools and Team Foundation Server. The solution described works great for deploying to a single instance of a database.
在上
一篇
文章:
与SSDT和TFS的持续集成中,
我描述了一些使用SQL Server数据工具和Team Foundation Server进行持续集成/部署的技术。 所描述的解决方案非常适合部署到数据库的单个实例。
If you remember, I showed that you can adapt the Build template in Team Foundation Server to deploy automatically after every successful build and check-in.
如果您还记得的话,我表明您可以使Team Foundation Server中的Build模板适应于每次成功构建和签入后自动部署。
But sometimes it is not enough. There might be some cases where you might have several databases in your project that you want to deploy at the same time. Or may be you are interested in deploying the same databases to several servers. Or may be a combination of both. In this conditions you need to be able to specify several databases you wish to deploy to.
但是有时候这还不够。 在某些情况下,您的项目中可能要同时部署多个数据库。 或者,您可能有兴趣将相同的数据库部署到多个服务器。 或者可以是两者的组合。 在这种情况下,您需要能够指定要部署到的多个数据库。
So when you want this can be achieved in two ways: by using a batch file, or by using a Windows Workflow Foundation file. This blog post is a description of the first one of the way to do it.
因此,可以通过两种方式实现此目的:使用批处理文件,或使用Windows Workflow Foundation文件。 这篇博客文章描述了第一种方法。
使用批处理文件
(
Using A Batch File
)
With SQL Server Data Tools follows a command line utility called SQLPackage.exe. This utility can be called from the PostBuild line argument in the same way than you were able to specify arguments for msbuild in my previous blog post. The problem is that the PostBuild argument gives only the possibility to call sqlpackage.exe once, not twice or multiple times. In these cases you will need a batch file. If it is an option for you, please follow these simple steps:
使用SQL Server数据工具时,会遵循一个称为SQLPackage.exe的命令行实用程序。 可以从PostBuild行参数中调用此实用程序,其方式与在我先前的博客文章中为msbuild指定参数的方式相同。 问题是PostBuild参数仅允许一次调用sqlpackage.exe,而不是两次或多次。 在这些情况下,您将需要一个批处理文件。 如果您可以选择此选项,请按照以下简单步骤操作:
-
Verify that SQLPackage is available on your build server. By default the latest version of SQL Server Data Tools installs SQLPackage in this location :
验证您的构建服务器上是否有SQLPackage。 默认情况下,最新版本SQL Server数据工具会将SQLPackage安装在以下位置:
C:\Program Files (x86)\Microsoft Visual Studio 12.0\Common7\IDE\Extensions\Microsoft\SQLDB\DAC\120
C:\ Program Files(x86)\ Microsoft Visual Studio 12.0 \ Common7 \ IDE \ Extensions \ Microsoft \ SQLDB \ DAC \ 120
-
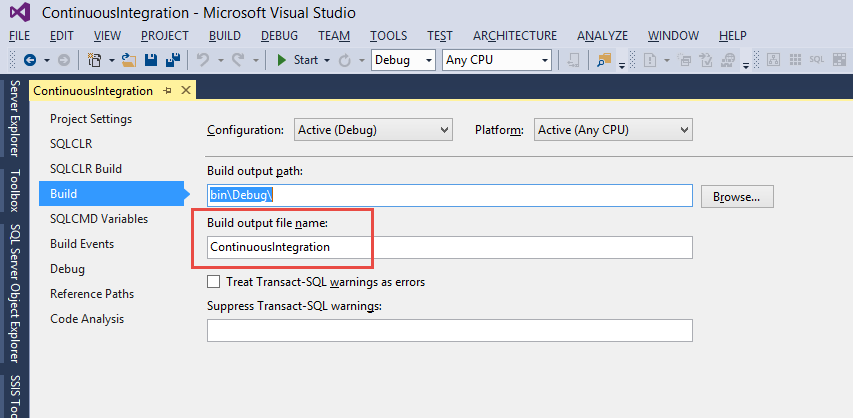
Identify the dacpac files that are produced by the build of your project. Usually they have the same name than your project and are created in the bin folder of the project. To find the file name, right click you project and choose
Properties
and on the
Build
tab take a look at the
Build Output File Name
,
this is the file you need标识由项目生成生成的dacpac文件。 通常,它们的名称与您的项目相同,并在项目的bin文件夹中创建。 要找到文件名,请右键单击您的项目,然后选择“
属性”。
在“
构建”
选项卡上,查看“
构建输出文件名”
,
这是您需要的文件 -
-
Now you need to create the command line for sqlpackage. The easiest way to do it is to use notepad, but every other editor will do it. There are two options there. Either you have a custom publish.xml file (like described in my previous post) or you don’t and in this case you need to specify the details in the command line call.
现在,您需要为sqlpackage创建命令行。 最简单的方法是使用记事本,但其他所有编辑器都可以使用。 有两个选项。 您有一个自定义的publish.xml文件(如我之前的文章中所述),或者没有,在这种情况下,您需要在命令行调用中指定详细信息。
-
Option 1
: With a publish.xml file. There again is 2 options depending on how you have configured the
Output Location
field to be
PerProject
or
SingleProject
in your custom build definition. I usually use a
SingleProject
option to avoid having this kind of problems.
选项1
:带有publish.xml文件。 根据您将“
输出位置”
字段配置为
PerProject的方式,
同样有2个选项
要么
单项目
在您的自定义版本定义中。 我通常使用
SingleProject
选项来避免出现此类问题。 -
-
If you have chosen PerProject your command line should look like that (on a single line):
如果选择了PerProject,则命令行应如下所示(单行):
“C:\Program Files (x86)\Microsoft Visual Studio 12.0\Common7\IDE\Extensions\Microsoft\SQLDB\DAC\120\SqlPackage.exe” /a:Publish /pr:%TF_BUILD_BINARIESDIRECTORY%\
<Project Name>
\<Publish profile file>.publish.xml /sf:%TF_BUILD_BINARIESDIRECTORY%\<Project Name>\<DACPAC file name>.dacpac
“ C:\ Program Files(x86)\ Microsoft Visual Studio 12.0 \ Common7 \ IDE \ Extensions \ Microsoft \ SQLDB \ DAC \ 120 \ SqlPackage.exe” / a:Publish / pr:%TF_BUILD_BINARIESDIRECTORY%\
<项目名称>
\ <发布配置文件> .publish.xml / sf:%TF_BUILD_BINARIESDIRECTORY%\ <项目名称> \ <DACPAC文件名> .dacpac
-
If you are using a SingleProject deployment then the command line will omit the project name:
如果使用的是SingleProject部署,则命令行将省略项目名称:
“C:\Program Files (x86)\Microsoft Visual Studio 12.0\Common7\IDE\Extensions\Microsoft\SQLDB\DAC\120\SqlPackage.exe” /a:Publish /pr:%TF_BUILD_BINARIESDIRECTORY%\
<Publish profile file.publish.xml>
/sf:%TF_BUILD_BINARIESDIRECTORY%\
<DACPAC file name>.dacpac
“ C:\ Program Files(x86)\ Microsoft Visual Studio 12.0 \ Common7 \ IDE \ Extensions \ Microsoft \ SQLDB \ DAC \ 120 \ SqlPackage.exe” / a:Publish / pr:%TF_BUILD_BINARIESDIRECTORY%\
<发布配置文件。 .xml>
/ sf:%TF_BUILD_BINARIESDIRECTORY%\
<DACPAC文件名> .dacpac
-
Option 2
: Without a Publish profile, you will need to specify the database details in the command line file:
选项2
:如果没有发布配置文件,则需要在命令行文件中指定数据库详细信息:
“C:\Program Files (x86)\Microsoft Visual Studio 12.0\Common7\IDE\Extensions\Microsoft\SQLDB\DAC\120\SqlPackage.exe” /a:Publish /tcs:”Data Source=
<SQL Server<
;Integrated Security=true;Initial Catalog=
<Database Name>
;Pooling=false” /sf:%TF_BUILD_BINARIESDIRECTORY% \<DACPAC file name<.dacpac
“ C:\ Program Files(x86)\ Microsoft Visual Studio 12.0 \ Common7 \ IDE \ Extensions \ Microsoft \ SQLDB \ DAC \ 120 \ SqlPackage.exe” / a:Publish / tcs:”数据源=
<SQL Server <
;集成安全性= true;初始目录=
<数据库名称>
;池=假” / sf:%TF_BUILD_BINARIESDIRECTORY%\ <DACPAC文件名<.dacpac
-
And the same command this time with a setting of
PerProject:
这次使用
PerProject
设置相同的命令
:
“C:\Program Files (x86)\Microsoft Visual Studio 12.0\Common7\IDE\Extensions\Microsoft\SQLDB\DAC\120\SqlPackage.exe” /a:Publish /tcs:”Data Source=
<SQL Server>
;Integrated Security=true;Initial Catalog=
<Database Name>
;Pooling=false” /sf:%TF_BUILD_BINARIESDIRECTORY% \
<Project Name>\<DACPAC file name>.dacpac
“ C:\ Program Files(x86)\ Microsoft Visual Studio 12.0 \ Common7 \ IDE \ Extensions \ Microsoft \ SQLDB \ DAC \ 120 \ SqlPackage.exe” / a:Publish / tcs:“数据源=
<SQL Server>
;集成安全性= true;初始目录=
<数据库名称>
;池=否” / sf:%TF_BUILD_BINARIESDIRECTORY%\
<项目名称> \ <DACPAC文件名> .dacpac
-
Another option that SQLPackage offers is the ability to generate a script instead of executing the deployment, in this case you will be able to run the script later or distribute it to another person in your organization. For generating a script you have to use the keyword /a:Script instead of /a:Publish and add the OutputPath for the script. Example:
SQLPackage提供的另一个选项是能够生成脚本而不是执行部署,在这种情况下,您将能够稍后运行脚本或将其分发给组织中的其他人。 为了生成脚本,您必须使用关键字/ a:Script而不是/ a:Publish并添加脚本的OutputPath。 例:
“C:\Program Files (x86)\Microsoft Visual Studio 12.0\Common7\IDE\Extensions\Microsoft\SQLDB\DAC\120\SqlPackage.exe”
/a:Script
/tcs:”Data Source=<SQL Server>;Integrated Security=true;Initial Catalog=<Database Name>;Pooling=false” /sf:%TF_BUILD_BINARIESDIRECTORY% \<Project Name>\<DACPAC file name>.dacpac
/OutputPath:%TF_BUILD_DROPLOCATION%\MyDeploymentscript.sql
“ C:\ Program Files(x86)\ Microsoft Visual Studio 12.0 \ Common7 \ IDE \ Extensions \ Microsoft \ SQLDB \ DAC \ 120 \ SqlPackage.exe”
/ a:Script
/ tcs:“数据源= <SQL Server>;已集成安全性= true;初始目录= <数据库名称>;池= false” / sf:%TF_BUILD_BINARIESDIRECTORY%\ <项目名称> \ <DACPAC文件名> .dacpac
/OutputPath:%TF_BUILD_DROPLOCATION%\MyDeploymentscript.sql
-
For each database deployment you need please add a single line to the .cmd file repeating steps 5, 6, 7 or 8 depending on the options you chose.
对于您需要的每个数据库部署,请根据选择的选项在.cmd文件中添加一行,重复步骤5、6、7或8。
Note : Each call need to be on a single line
注意:每个通话必须在同一条线上
-
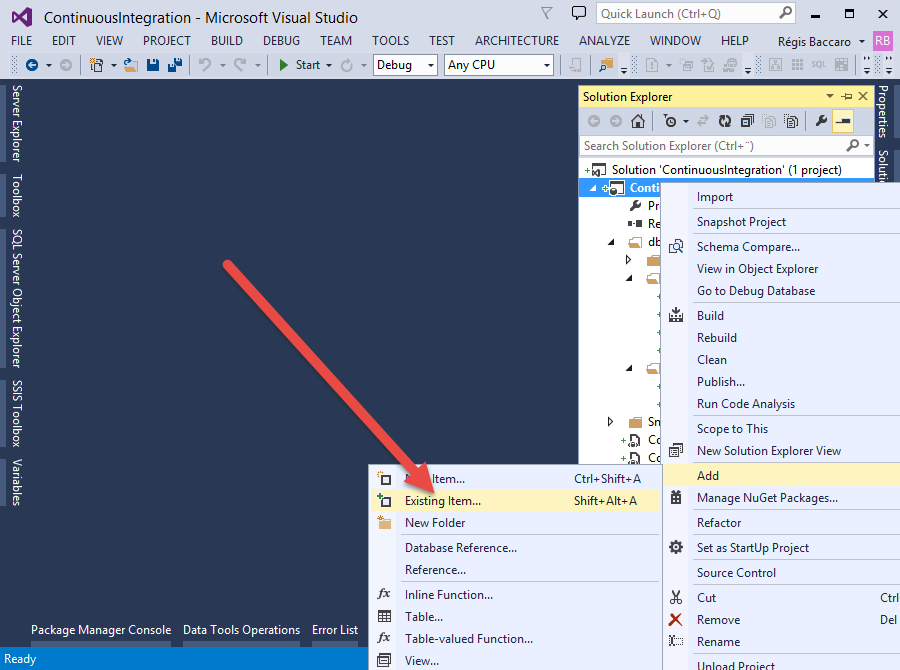
Save the script with the .cmd extension and add to you SQL Server Data Tools Solution by right-clicking the project select add existing item and in the dialog window add the .cmd file you just created.
保存带有.cmd扩展名的脚本,然后通过右键单击项目选择添加现有项,然后在对话框窗口中添加刚创建的.cmd文件,将其添加到SQL Server数据工具解决方案中。
-
-
Of course if you have multiple database projects in one solution it enough to add the batch file just once!
当然,如果您在一个解决方案中有多个数据库项目,则足以一次添加批处理文件!
-
Once the file is added it should appear in the Solution explorer and you will be able to modify its Copy to Output directory property to fit your needs. Either Do Not Copy or Copy always.
添加文件后,它应出现在“解决方案资源管理器”中,您将能够修改其“复制到输出”目录属性以适合您的需求。 不复制或始终复制。
-
So now you are ready to reference your file in the build template. Depending on your choice you will have to reference the file in different ways. If you have decided to
Copy Always
then the reference should be
TF_BUILD_BINARIESDIRECTORY
in the case of
Do Not Copy
the reference is
TF_BUILD_SOURCEDIRECTORY
因此,现在您可以在构建模板中引用文件了。 根据您的选择,您将不得不以不同的方式引用该文件。 如果您决定
“始终复制”,
那么在
“不复制
”的情况下,引用应为
TF_BUILD_BINARIESDIRECTORY
,而引用应为
TF_BUILD_SOURCEDIRECTORY
Copy Always = TF_BUILD_BINARIESDIRECTORY
Do Not Copy = TF_BUILD_SOURCEDIRECTORY始终复制= TF_BUILD_BINARIESDIRECTORY
不复制= TF_BUILD_SOURCEDIRECTORYSo now it is time to find your build template in the Source Control tab of your project find the Build menu and either add or edit an existing template. Choose the option for Continuous Integration in the
Trigger
tab因此,现在是时候在项目的“源代码管理”选项卡中找到构建模板了,找到“构建”菜单,然后添加或编辑现有模板。 在“
触发器”
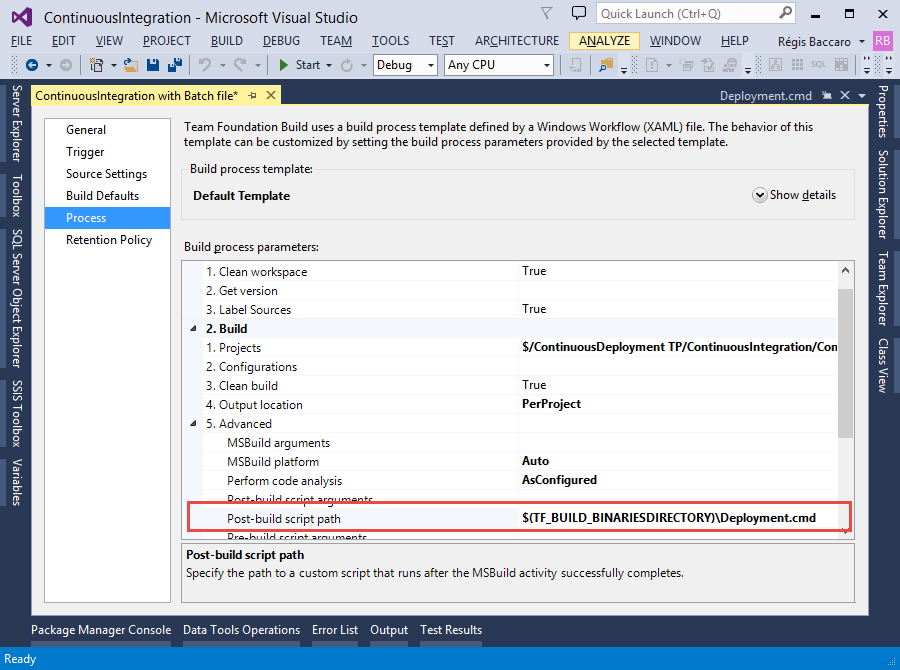
选项卡中选择“持续集成”选项On the
Process
tab make sure that the right project is selected and on the
Advanced
section find the Post-build script path to point to your batch file在“
处理”
选项卡上,确保选择了正确的项目,在“
高级”
部分中,找到指向您的批处理文件的构建后脚本路径。
Note:
If you have chosen a Per Project output you will need to add the project name to the path: $(TF_BUILD_BINARIESDIRECTORY)\
<Project Name>
\Deployment.cmd
注意:
如果选择了“按项目”输出,则需要将项目名称添加到路径:$(TF_BUILD_BINARIESDIRECTORY)\
<项目名称>
\ Deployment.cmdThere are many options to SQLPackage. You can find them there :
http://msdn.microsoft.com/en-us/library/hh550080%28v=vs.103%29.aspx
SQLPackage有很多选项。 您可以在此处找到它们:
http
:
//msdn.microsoft.com/zh-cn/library/hh550080%28v=vs.103%29.aspx
In the next blog post I will describe how to publish several databases using a Windows Workflow Foundation file, so stay tuned for more Team Foundation Server and SQL Server Data Tools tips.
在下一篇博客文章中,我将描述如何使用Windows Workflow Foundation文件发布多个数据库,所以请继续关注更多Team Foundation Server和SQL Server Data Tools技巧。
Happy deploying !!
部署愉快!
参考:
(
Reference:
)
http://blogs.msdn.com/b/ssdt/archive/2014/07/24/sql-server-database-projects-and-team-foundation-build.aspx
http://blogs.msdn.com/b/ssdt/archive/2014/07/24/sql-server-database-projects-and-team-foundation-build.aspx