需求:
1.位于inside设备能够使用ssh和telnet访问DMZ和所有outside设备
2.位于outside设备不能够使用ssh和telnet访问DMZ和所有inside设备
3.位于DMZ设备能够使用ssh和telnet访问所有outside设备,但是不能访问inside设备
4.使用飞塔系列的墙来满足上述需求。
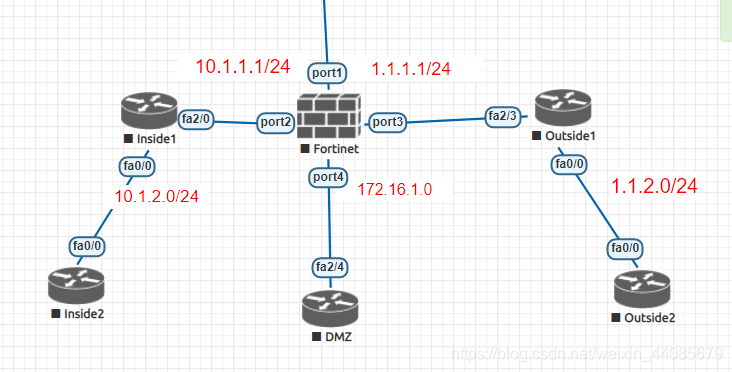
前提已在inside和dmz,outside区域的设备都做了基本的IP配置以及ssh和telnet服务。
飞塔防火墙对应的配置:
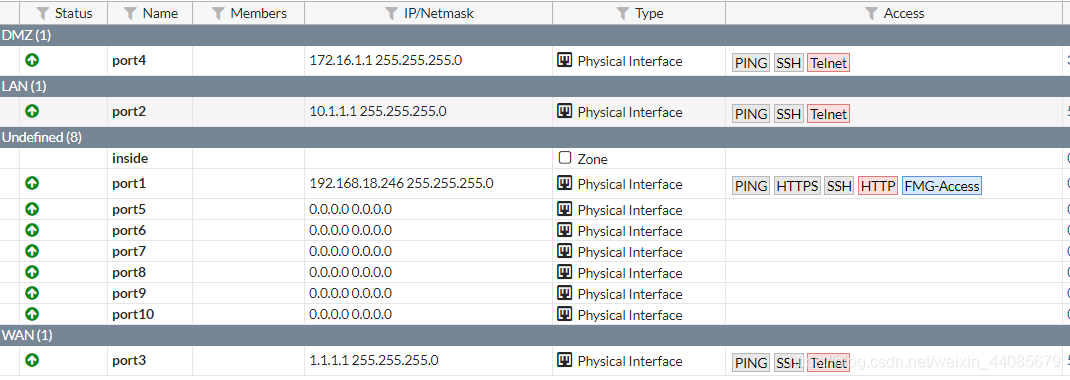
1.配置防火墙接口IP地址:
port1是连了一朵云桥接到本地,来设置web界面的,下面角色web界面的一部分,本次主要讲解在cli命令行下如何配置,web下如何配置就不写了。
FortiGate-VM64-KVM # config sys interface
FortiGate-VM64-KVM (interface) # edit port1
FortiGate-VM64-KVM (port1) # show
config system interface
edit “port1”
set vdom “root”
set ip 192.168.18.246 255.255.255.0
set allowaccess ping https ssh http fgfm
set type physical
set snmp-index 1
next
end
FortiGate-VM64-KVM (port1) # next
inside区域的接口配置:
FortiGate-VM64-KVM (interface) # edit port2 防火墙自带的接口
FortiGate-VM64-KVM (port2) # show
config system interface
edit “port2”
set vdom “root”
set ip 10.1.1.1 255.255.255.0 创建IP
set allowaccess ping ssh telnet 放行相应的服务
set type physical 接口类型为物理口
set role lan 端口角色为lan,主要便于区分
set snmp-index 2
next
end
FortiGate-VM64-KVM (port2) # next
outside区域的接口配置:
FortiGate-VM64-KVM (interface) # edit port3
FortiGate-VM64-KVM (port3) # show
config system interface
edit “port3”
set vdom “root”
set ip 1.1.1.1 255.255.255.0
set allowaccess ping ssh telnet
set type physical
set role wan
set snmp-index 3
next
end
FortiGate-VM64-KVM (port3) # next
DMZ区域的接口配置:
FortiGate-VM64-KVM (interface) # edit port4
FortiGate-VM64-KVM (port4) # show
config system interface
edit “port4”
set vdom “root”
set ip 172.16.1.1 255.255.255.0
set allowaccess ping ssh telnet
set type physical
set role dmz
set snmp-index 4
next
end
FortiGate-VM64-KVM (port4) # next
FortiGate-VM64-KVM (interface) # end
2.配置地址或者地址组:
FortiGate-VM64-KVM # config firewall address
配置地址lan1,
FortiGate-VM64-KVM (address) # edit lan1 地址名称lan1
FortiGate-VM64-KVM (lan1) # show
config firewall address
edit “lan1”
set uuid 5e1615b6-d620-51ea-4b29-c9b2873774a4
set associated-interface “port2” 关联对应的接口
set allow-routing enable 允许开启路由功能
set subnet 10.1.1.0 255.255.255.0 设置地址的范围可以具体的地址,可以是某一范围
next
end
FortiGate-VM64-KVM (lan1) # next
配置地址lan2
FortiGate-VM64-KVM (address) # edit lan2
FortiGate-VM64-KVM (lan2) # show
config firewall address
edit “lan2”
set uuid 697ee4a0-d620-51ea-7769-824022638e5a
set associated-interface “port2”
set allow-routing enable
set subnet 10.1.2.0 255.255.255.0
next
end
FortiGate-VM64-KVM (lan2) # next
配置地址dmz
FortiGate-VM64-KVM (address) # edit dmz
FortiGate-VM64-KVM (dmz) # show
config firewall address
edit “dmz”
set uuid 8a116a58-d620-51ea-dbb9-866a426f3939
set associated-interface “port4”
set allow-routing enable
set subnet 172.16.1.0 255.255.255.0
next
end
FortiGate-VM64-KVM (dmz) # next
配置地址wan1
FortiGate-VM64-KVM (address) # edit wan1
FortiGate-VM64-KVM (wan1) # show
config firewall address
edit “wan1”
set uuid ba9184c4-d620-51ea-cb66-ac03332963d9
set associated-interface “port3”
set allow-routing enable
set subnet 1.1.1.0 255.255.255.0
next
end
FortiGate-VM64-KVM (wan1) # next
配置地址wan2
FortiGate-VM64-KVM (address) # edit wan2
FortiGate-VM64-KVM (wan2) # show
config firewall address
edit “wan2”
set uuid c51c8d62-d620-51ea-335c-893e574ccfeb
set associated-interface “port3”
set allow-routing enable
set subnet 1.1.2.0 255.255.255.0
next
end
FortiGate-VM64-KVM (wan2) # next
FortiGate-VM64-KVM (address) # end
配置地址组lan,调用lan1和lan2
FortiGate-VM64-KVM # config firewall addrgrp
FortiGate-VM64-KVM (addrgrp) # edit lan 创建地址组lan
FortiGate-VM64-KVM (lan) # show
config firewall addrgrp
edit “lan”
set uuid 6cb6156c-d620-51ea-efa3-2cd0180fb967
set member “lan1” “lan2” 主要是把前面创建的lan1和lan2放进地址组lan中
set allow-routing enable
next
end
FortiGate-VM64-KVM (lan) # next
FortiGate-VM64-KVM (addrgrp) # end
3.飞塔防火墙ACL策略配置:
飞塔防火墙默认禁止各个区域通行的,所以配置了三个策略:
一条是允许inside到dmz的策略放行;
一条是允许inside到outside的策略放行;
一条是允许dmz到outside的策略放行;
实际上做两条就可以,把前两条归成一条策略里面,就是目的端口port3 port4,目的地址dmz,wan1,wan2.
FortiGate-VM64-KVM # config firewall policy
创建第一个策略
FortiGate-VM64-KVM (policy) # edit 1 (创建策略ID为1)
FortiGate-VM64-KVM (1) # show
config firewall policy
edit 1
set name “lan_dmz” (策略名称,便于区分)
set uuid 9e275836-d620-51ea-875b-04a9f923f37a 系统自动生成的唯一标识符
set srcintf “port2” (源端口)
set dstintf “port4” (目的端口)
set srcaddr “lan” (源地址,第二步创建的地址组)
set dstaddr “dmz” 目的地址,第二部创建的地址
set action accept (规则设置为允许)
set schedule “always” (时间表,一直都执行该策略)
set service “PING” “SSH” “TELNET” (允许的服务,ping,telnet ,ssh)
next
end
FortiGate-VM64-KVM (1) # next
创建第二个策略
FortiGate-VM64-KVM (policy) # edit 2
FortiGate-VM64-KVM (2) # show
config firewall policy
edit 2
set name “lan_wan”
set uuid d0513a0c-d620-51ea-454b-3601de5ccf17
set srcintf “port2”
set dstintf “port3”
set srcaddr “lan”
set dstaddr “wan1” “wan2”
set action accept
set schedule “always”
set service “PING” “SSH” “TELNET”
next
end
FortiGate-VM64-KVM (2) # next
创建第三个策略
FortiGate-VM64-KVM (policy) # edit 3
FortiGate-VM64-KVM (3) # show
config firewall policy
edit 3
set name “dmz_wan”
set uuid ecfef806-d620-51ea-f473-53acd11388f0
set srcintf “port4”
set dstintf “port3”
set srcaddr “dmz”
set dstaddr “wan1” “wan2”
set action accept
set schedule “always”
set service “PING” “SSH” “TELNET”
next
end
FortiGate-VM64-KVM (3) # next
FortiGate-VM64-KVM (policy) # end
4.配置到各个区域的静态路由
FortiGate-VM64-KVM # config router static
FortiGate-VM64-KVM (static) # edit
seq-num Entry number. (0-4294967295)
1
2
FortiGate-VM64-KVM (static) # edit 1 静态路由条目ID取值(0-4294967295)
FortiGate-VM64-KVM (1) # show
config router static
edit 1
set dst 10.1.2.0 255.255.255.0 目的网段
set gateway 10.1.1.2 下一跳地址
set device “port2” 出接口
next
end
FortiGate-VM64-KVM (1) # next
FortiGate-VM64-KVM (static) # edit 2
FortiGate-VM64-KVM (2) # show
config router static
edit 2
set dst 1.1.2.0 255.255.255.0 目的网段
set gateway 1.1.1.2 下一跳
set device “port3” 出接口
next
end
FortiGate-VM64-KVM (2) # next
FortiGate-VM64-KVM (static) # end
以上就是全部配置命令了,这里只是查看的配置文件.
具体的验证就不写了,做完之后可以用inside2 ssh 登录 outside2时,在防火墙下查看对应的会话信息:
查看系统会话信息
FortiGate-VM64-KVM # diagnose sys session full-stat
会话列表查看
FortiGate-VM64-KVM # get sys session list
详细会话转态查看
FortiGate-VM64-KVM # diagnose sys session list