一 前言
网页中有很多图片,我们经常需要对图片进行一些基本的加工和处理,常见操作的有裁剪、伸缩、旋转、加水印、格式转换等。
本文将使用开源的技术,主要使用 ImageMagick 和 OpenResty,通过编写少量的 Lua 代码和 Nginx 配置文件修改,来实现一个简单的图片处理服务,ImageMagick 处理图片会略耗资源,因此我们对已经处理过的图片用Redis做缓存,相同的URL请求再次过来时,目标图片会从 Redis 里获取并返回。
二 环境准备
本文所用的环境为滴滴云 Centos 7.4 版本,在搭建之前可以先准备一台云服务器。
三 开源软件安装
3.1 安装 OpenResty
进 OpenResty 的官网 http://openresty.org/cn/download.html 选择一个相对稳定的版本下载,我选择的版本是1.13.6.1。
1) 创建下载目录
mkdir -p /root/zhangjie/tools2)下载
cd /root/zhangjie/tools

wget https://openresty.org/download/openresty-1.13.6.1.tar.gz
3)解压
tar zxvf openresty-1.13.6.1.tar.gz4)安装依赖的包
yum -y install pcre-devel openssl-devel gcc gcc-c++ curl5)编译和安装
mkdir -p /opt/app/openresty

cd openresty-1.13.6.1

./configure --prefix=/opt/app/openresty --with-luajit
make -j2
make install
6) 确认安装成功
a) 启动和检查进程
cd /opt/app/openresty/nginx

sbin/nginx

ps -ef|grep nginx
root 11950 1  0 16:54 ?00:00:00 nginx: master process sbin/nginx
nobody   11951 11950  0 16:54 ?00:00:00 nginx: worker process
root 11955  2510  0 16:54 pts/000:00:00 grep --color=auto nginx
b) Windows下外网IP浏览
在浏览器里打开网址:
http://116.85.17.20显示如下图所示的页面,即表示安装成功

c) 检查Lua环境是否装成功
增加配置:
vi conf/nginx.conf

user nobody;

worker_processes 2;

…

http {
    ...
    server {

        ...

        location = /hello_lua {
            add_header Content-Type text/plain;
            content_by_lua '
            ngx.say("Hello, Lua!")
            ';
            }

        ...
    }

...
}
热加载配置:
sbin/nginx -s reload在浏览器里打开网址:
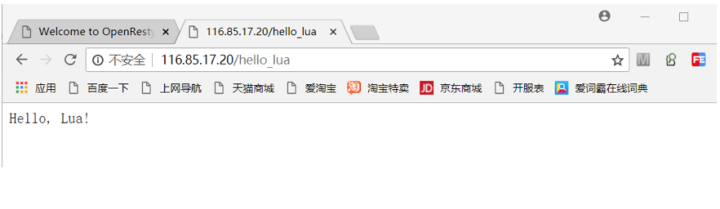
http://116.85.17.20/hello_lua显示如下图所示的页面,即表示 Lua 支持成功了
3.2 安装 ImageMagick
1) 安装 ImageMagick
yum -y install ImageMagick ImageMagick-devel2)确认安装成功
mkdir /opt/app/openresty/nginx/test

cd /opt/app/openresty/nginx/test

wget https://dicloud.didistatic.com/static/dicloudpub/webapp/img/login-banner.54c23bb.png

mv login-banner.54c23bb.png didiyun.png

convert -resize 100x100 didiyun.png didiyun_dest.png
最后一行 “convert” 命令执行成功,即表示安装成功。
3.3 获取 Lua 的 Magick 库
1)下载 Lua 的 Magick 库
选用开源的 leafo/magick, github 地址:https://github.com/leafo/magick.git 。
cd /root/zhangjie/tools

git clone https://github.com/leafo/magick.git
2) 确认库功能正常
cd /root/zhangjie/tools/magick

cp /opt/app/openresty/nginx/test/didiyun.png .
编写测试用的 Lua 程序 image_convert_test.lua:
[root@10-255-0-25 magick]# cat image_convert_test.lua

local magick = require("magick")
magick.thumb("didiyun.png", "100x100", "didiyun_dest.png")
执行命令
/opt/app/openresty/luajit/bin/luajit image_convert_test.lua 无报错并且有 “didiyun_dest.png” 文件生成,则证明库功能正常。
注意:
这里必须用 “/opt/app/openresty/luajit/bin” 目录下的检测 luajit,因为后面步骤中 Nginx 用的是此路径下的 luajit。
3)拷贝程序到 OpenResty Lua 库目录下
cp -r /root/zhangjie/tools/magick/magick /opt/app/openresty/lualib 这样 OpenResty 查找依赖的 Lua 程序会找到。
3.4 安装 Redis
1)安装 Redis
yum -y install redis2) 修改 Redis 配置文件
安装完后,如果要修改 Redis 配置文件,可以编辑 redis.conf,redis.conf:
/etc/redis.conf这里用默认的配置就行了,不需要修改。
3) 启动 Redis Server
systemctl start redis.service4) 启动 Redis Client
[root@10-255-0-25 dc2-user]# redis-cli
127.0.0.1:6379>
127.0.0.1:6379> keys *
(empty list or set)
127.0.0.1:6379>
127.0.0.1:6379> set mykey didiyun
OK
127.0.0.1:6379> get mykey
"didiyun"
127.0.0.1:6379>
出现以上输出,即表示 Redis 安装成功了。
5)设置 Redis 为开机自动启动
执行:
systemctl enable redis.service 四 编写代码
4.1 准备工作
1)修改 Nginx 日志等级
为了方便 Lua 调试输出看日志,修改 Nginx 中的日志等级,在 “nginx.conf” 中,去掉以下行配置前的注释符 “#”,去掉后为:
error_log logs/error.log info;2)创建图片源数据目录
图片源数据目录:
mkdir -p /opt/app/openresty/nginx/image拷贝图片:
cp /opt/app/openresty/nginx/test/didiyun.png /opt/app/openresty/nginx/image3)创建 Lua 逻辑代码目录
Lua 处理逻辑代码目录:
mkdir -p /opt/app/openresty/nginx/image_processor4)增加 Nginx 图片后缀识别及 Lua 程序调用配置
在 nginx.conf 的 server 域增加配置(以 png 和 jpg 两种格式为例):
    location ~ .*\.(png|jpg)?$ {
        add_header Content-Type text/plain;
        content_by_lua_file image_processor/image_convert.lua;
    }
4.2 编码
1)image_convert.lua 编写
实现了图片的裁剪,拉伸缩放和旋转三种功能。
local redis = require "resty.redis"
local magick = require("magick")

local redis_client = redis:new()
local args = ngx.req.get_uri_args()
local image_service = args['s']

ngx.log(ngx.INFO, "uri:", ngx.var.uri)
ngx.log(ngx.INFO, "image service:", image_service)

redis_client:set_timeout(1000)
local ok,err = redis_client:connect('127.0.0.1',6379)
if not ok then
    ngx.log(ngx.ERR, "connect redis failed!")
    ngx.say("connect redis failed!")
    ngx.exit(0)
end

local source = '/opt/app/openresty/nginx/image'..ngx.var.uri
ngx.log(ngx.INFO, "source:", source)
if image_service == nil then
    -- 获取原图
    local file = io.open(source);
    local source_image = file:read("*all")
    file:close()
    ngx.log(ngx.INFO, "get source image!")
    ngx.say(source_image)

elseif image_service == "thumb" then
    -- thumb 裁切(缩放)
    local img = assert(magick.load_image(source))

    -- args
    local image_action = args['a']

    -- get from cache
    local cache_key = image_service..ngx.var.uri..image_action
    local res, err = redis_client:get(cache_key)
    if getmetatable(res) ~= nil then
        -- cache hit
        ngx.log(ngx.INFO, image_service, ", cache hit! cache key: ", cache_key)
        ngx.say(res)
        ngx.exit(0)
    end

    -- cache miss
    local output = nil
    ngx.log(ngx.INFO, image_service, ", source: ", source, ", args, image action: ", image_action)
    -- ngx.say("start thumb...")
    imageblob = magick.thumb(source, image_action, output)

    -- set to cache
    redis_client:set(cache_key, imageblob)
    if not ok then
        ngx.log(ngx.ERR, "cache set failed! err:", err)
    else
        ngx.log(ngx.INFO, "cache set OK!")
    end

    -- response
    ngx.say(imageblob)

elseif image_service == "resize" then
    -- 图片拉伸
    -- args, 目标宽和高
    local width = tonumber(args['w'])
    local height = tonumber(args['h'])

    -- source info
    local img = assert(magick.load_image(source))
    ngx.log(ngx.INFO, "source width:", img:get_width(), "source height:", img:get_height());
    ngx.log(ngx.INFO, image_service, ", arg, width:", width, ", height:", height)
    -- ngx.say("start resize...")

    img:resize(width, height)
    ngx.say(img:get_blob())

elseif image_service == "rotate" then
    -- 图片旋转
    -- args, 旋转度数
    local degrees = tonumber(args['d'])

    local img = assert(magick.load_image(source))
    img:rotate(degrees)
    ngx.say(img:get_blob())

else
    ngx.say("unknow image service!")
end
注意:
a) 代码仅为演示版,并未考虑参数注入等安全性问题,真实环境需要检查URI和Query String传入每个参数合法性及一些异常处理;
b)例子中仅做了”thumb”处理图片的缓存,”resize”和”rotate”缓存开发思路一样;
c)为了代码简洁Redis并未采用连接池的方式;
d)leafo/magick库中还有很多功能,可以添加更多代码,支持更丰富的图片处理功能。
2)检查配置和重启 Nginx
检查 Nginx 配置文件,输出 “syntax is ok” 表示配置文件正确:
[root@10-255-0-25 nginx]# /opt/app/openresty/nginx/sbin/nginx -t

nginx: the configuration file /opt/app/openresty/nginx/conf/nginx.conf syntax is ok
nginx: configuration file /opt/app/openresty/nginx/conf/nginx.conf test is successful
重启 Nginx:
sbin/nginx -s reload4.3 Url 中 Query 参数说明
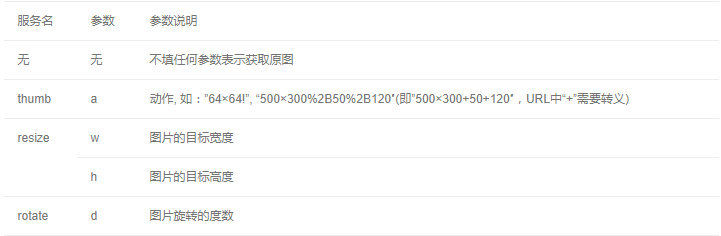
五 例子
5.1 测试并使用
在浏览器先后打开网址:
http://116.85.17.20/didiyun.png
http://116.85.17.20/didiyun.png?s=thumb&a=64x64!
http://116.85.17.20/didiyun.png?s=thumb&a=500x300%2B50%2B120
http://116.85.17.20/didiyun.png?s=resize&w=800&h=800
http://116.85.17.20/didiyun.png?s=rotate&d=90
即能看到原图、裁切、缩放和旋转的效果。
注意:
若页面出现报错,可以看 Nginx 的 error.log 日志排查和解决。
六 参考资料
参考网址:
https://github.com/leafo/magick
本文作者:张杰
文章看完啦,不如来官网看看?滴滴云3-5折活动聚惠来袭!
与其看教程,不如实际操作下?