一、通过yum方式进行安装
官网参考地址:https://nginx.org/en/linux_packages.html#RHEL
1.1 安装好依赖
执行下面的命令安装
sudo yum install yum-utils
1.2、 先配置好yum源
新建文件/etc/yum.repos.d/nginx.repo,文件内容:
[nginx-stable]
name=nginx stable repo
baseurl=http://nginx.org/packages/centos/$releasever/$basearch/
gpgcheck=1
enabled=1
gpgkey=https://nginx.org/keys/nginx_signing.key
module_hotfixes=true

[nginx-mainline]
name=nginx mainline repo
baseurl=http://nginx.org/packages/mainline/centos/$releasever/$basearch/
gpgcheck=1
enabled=0
gpgkey=https://nginx.org/keys/nginx_signing.key
module_hotfixes=true
1.3、启动nginx的yum源,一般可以不操作
sudo yum-config-manager --enable nginx-mainline
1.4、执行安装操作
[root@min ~]# yum install -y nginx
Loaded plugins: fastestmirror
Loading mirror speeds from cached hostfile
 * base: mirrors.huaweicloud.com
 * extras: mirrors.cqu.edu.cn
...
Retrieving key from https://nginx.org/keys/nginx_signing.key
Importing GPG key 0x7BD9BF62:
 Userid     : "nginx signing key <signing-key@nginx.com>"
 Fingerprint: 573b fd6b 3d8f bc64 1079 a6ab abf5 bd82 7bd9 bf62
 From       : https://nginx.org/keys/nginx_signing.key
1.5、启动nginx
输入如下命令启动nginx
systemctl start nginx
1.6、设置开机自启动
通过如下指令来进行开机自启动
[root@min ~]# systemctl enable nginx
Created symlink from /etc/systemd/system/multi-user.target.wants/nginx.service to /usr/lib/systemd/system/nginx.service.
1.7、测试是否部署成功
http://192.168.19.51/

看到上上面的这个界面,我们可以确定nginx安装成功了
二、nginx常用命令介绍
我们可以通过nginx -h命令来获取使用帮助
[root@min ~]# nginx -h
nginx version: nginx/1.25.1
Usage: nginx [-?hvVtTq] [-s signal] [-p prefix]
             [-e filename] [-c filename] [-g directives]

Options:
  -?,-h         : this help
  -v            : show version and exit
  -V            : show version and configure options then exit
  -t            : test configuration and exit
  -T            : test configuration, dump it and exit
  -q            : suppress non-error messages during configuration testing
  -s signal     : send signal to a master process: stop, quit, reopen, reload
  -p prefix     : set prefix path (default: /etc/nginx/)
  -e filename   : set error log file (default: /var/log/nginx/error.log)
  -c filename   : set configuration file (default: /etc/nginx/nginx.conf)
  -g directives : set global directives out of configuration file
从上面的输出我们可以看出打那个前我们按照的nginx版本是1.25.1版本,然后我们可以使用nginx -V打印出版本信息及配置选项信息; nginx -s 可以分别对nginx进行关闭,重新加载配置文件
三、nginx程序的结构说明
使用rpm -ql nginx 来获取到nginx安装的相关文件
[root@min ~]# rpm -ql nginx
# 日志切割(默认以天为单位)
/etc/logrotate.d/nginx
# nginx主程序存放路径
/etc/nginx
# Nginx的自配置文件目录
/etc/nginx/conf.d
# Nginx默认配置文件
/etc/nginx/conf.d/default.conf
# Nginx与PHP交互的内置变量
/etc/nginx/fastcgi_params
# 存放响应报文中回传的文件类型
/etc/nginx/mime.types
# 存放Nginx程序模块路径
/etc/nginx/modules
# Nginx主配置文件
/etc/nginx/nginx.conf
/etc/nginx/scgi_params
# 存放uwsgi交互的内置变量
/etc/nginx/uwsgi_params
/usr/lib/systemd/system/nginx-debug.service
# nginx 自启动服务文件
/usr/lib/systemd/system/nginx.service
/usr/lib64/nginx
/usr/lib64/nginx/modules
/usr/libexec/initscripts/legacy-actions/nginx
/usr/libexec/initscripts/legacy-actions/nginx/check-reload
/usr/libexec/initscripts/legacy-actions/nginx/upgrade
# nginx启动入口文件
/usr/sbin/nginx
/usr/sbin/nginx-debug
/usr/share/doc/nginx-1.25.1
/usr/share/doc/nginx-1.25.1/COPYRIGHT
/usr/share/man/man8/nginx.8.gz
/usr/share/nginx
# nginx默认存放网站源码的位置
/usr/share/nginx/html
/usr/share/nginx/html/50x.html
/usr/share/nginx/html/index.html
/var/cache/nginx
/var/log/nginx
四、nginx主配置文件
[root@min logrotate.d]# cat /etc/nginx/nginx.conf
# 指定我们Nginx服务的运行用户
user  nginx;
# 定义Nginx的worker进程数量的 根据服务器的内核来自动设定
worker_processes  auto;
# 指定Nginx错误日志
error_log  /var/log/nginx/error.log notice;
# 指定Nginx PID进程号文件
pid        /var/run/nginx.pid;


events {
# 指定Nginx当前一个worker进程同时可以处理的最大连接数量
    worker_connections  1024;
}


http {
    # 应用文件媒体类型,如text/html、application/json
    include       /etc/nginx/mime.types;
    # 当Nginx无法识别当前访问页面内容时,出发下载动作
    default_type  application/octet-stream;
   # 指定Nginx访问日志格式的
    log_format  main  '$remote_addr - $remote_user [$time_local] "$request" '
                      '$status $body_bytes_sent "$http_referer" '
                      '"$http_user_agent" "$http_x_forwarded_for"';
  # 定义Nginx访问日志的位置
    access_log  /var/log/nginx/access.log  main;

    sendfile        on;
    #tcp_nopush     on;
   # 当Nginx建立TCP连接之后,多长时间没有动作,自动断开
    keepalive_timeout  65;

    #gzip  on;
    # 包含自配置文件路径下的所有以.conf结尾的文件
    include /etc/nginx/conf.d/*.conf;
}
五、使用子配置来配置nginx对应的web服务器
5.1 编写配置文件
切换目录到/etc/nginx/conf.d目录中,然后创建一个myweb.conf文件并使用nginx -t 对刚刚配置的文件进行测试
[root@min logrotate.d]# cd /etc/nginx/conf.d
[root@min conf.d]# vi myweb.conf
server {
	listen 8080;
        server_name www.myweb.com;
        location / {
           root /html/myweb;
           index index.html;
  }
}
[root@min conf.d]# nginx -t
nginx: the configuration file /etc/nginx/nginx.conf syntax is ok
nginx: configuration file /etc/nginx/nginx.conf test is successful
5.2 创建myweb的主页文件
创建文件夹/html/myweb,并在其中创建文件index.html,文件内容如下:
Hello,this my web page!
[root@min conf.d]# mkdir -p /html/myweb
[root@min conf.d]# vi /html/myweb/index.html
Hello,this my web page!
5.3 重新加载配置文件设置host 文件
重新加载nginx的配置文件
[root@min conf.d]# nginx -s reload
[root@min conf.d]#
修改hosts文件
[root@min conf.d]# cat /etc/hosts
127.0.0.1   localhost localhost.localdomain localhost4 localhost4.localdomain4
::1         localhost localhost.localdomain localhost6 localhost6.localdomain6
192.168.19.51 www.myweb.com
5.4 测试刚刚配置是否生效
使用curl访问http://www.myweb.com
[root@min conf.d]# curl http://www.myweb.com:8080
Hello,this is my web page!
可以看出刚刚配置的是有效的!
6、使用nginx进行多站点部署
6.1 部署myweb2页面
- 编辑配置文件
[root@min conf.d]# cat /etc/nginx/conf.d/myweb2.conf
server {
	   listen 80;
        server_name www.myweb2.com;
        location / {
           root /html/myweb2;
           index index.html;
      }
}
[root@min conf.d]# nginx -t
nginx: the configuration file /etc/nginx/nginx.conf syntax is ok
nginx: configuration file /etc/nginx/nginx.conf test is successful
[root@min conf.d]# nginx -s reload
- 编写myweb2的主页面
[root@min conf.d]# vi /html/myweb2/index.html
[root@min conf.d]# cat /html/myweb2/index.html
Hello,this is my web2 page!
- 配置hosts文件
[root@min conf.d]# vi /etc/hosts
[root@min conf.d]# cat /etc/hosts
127.0.0.1   localhost localhost.localdomain localhost4 localhost4.localdomain4
::1         localhost localhost.localdomain localhost6 localhost6.localdomain6
192.168.19.51 www.myweb.com www.myweb2.com
[root@min conf.d]# systemctl restart network
6.2 修改myweb项目对应的配置项
[root@min conf.d]# vi myweb.conf
[root@min conf.d]# cat /etc/nginx/conf.d/myweb.conf
server {
	listen 80;
        server_name www.myweb.com;
        location / {
           root /html/myweb;
           index index.html;
  }
}
[root@min conf.d]# nginx -t
nginx: the configuration file /etc/nginx/nginx.conf syntax is ok
nginx: configuration file /etc/nginx/nginx.conf test is successful
[root@min conf.d]# nginx -s reload
6.3 测试多站点部署的效果
- 使用curl分别访问:http://www.myweb.com、http://www.myweb2.com,预期访问http://www.myweb.com的是,将会响应Hello,this is my web page!。但是当访问http://www.myweb2.com时,返回Hello,this is my web2 page!
[root@min conf.d]# curl http://www.myweb.com
Hello,this is my web page!
[root@min conf.d]# curl http://www.myweb2.com
Hello,this is my web2 page!
从上面的结果我们可以发现我们实现了多站点部署
7、nginx安全访问控制
官方地址:http://nginx.org/en/docs/http/ngx_http_access
_module.html#allow
nginx的ngx_http_access_module 模块可以通过客户端的地址来进行访问控制,语法的格式如下:
 location / {
    deny  192.168.1.1;
    allow 192.168.1.0/24;
    allow 10.1.1.0/16;
    allow 2001:0db8::/32;
    deny  all;
}
allow代表的是允许通过,deny 拒绝。
这里我们将会以myweb项目进行演示,禁用192.168.19.50这个ip对www.myweb.com的访问
server {
	listen 80;
        server_name www.myweb.com;
        location / {
           root /html/myweb;
           index index.html;
           deny  192.168.19.50;
           allow 192.168.19.51;
  }
}
测试配置文件正确并且重新加载配置文件
[root@min conf.d]# nginx -t
nginx: the configuration file /etc/nginx/nginx.conf syntax is ok
nginx: configuration file /etc/nginx/nginx.conf test is successful
[root@min conf.d]# nginx -s reload
[root@min conf.d]#
重新加载nginx的配置后,在192.168.19.50服务器上访问http://www.myweb.com
[root@min ~]# curl http://www.myweb.com
<html>
<head><title>403 Forbidden</title></head>
<body>
<center><h1>403 Forbidden</h1></center>
<hr><center>nginx/1.25.1</center>
</body>
</html>
在其他的服务器上可以正常访问
[root@k8s-master1 ~]# curl http://www.myweb.com
Hello,this is my web page!
8、nginx的反向代理设置
-
场景一:本机代理到本机
1、访问www.test.com 80端口 –>代理到后端1314端口的站点
2、本机部署www.test.com 1314端口站点
配置如下:
配置监听1314端口
server {
      listen 1314;
      server_name www.test.com;
      location / {
     root    /html/test;
     index  index.html;
     }
}
配置反向代理
     server {
           listen 80;
           server_name www.test.com;
            location  / {
                 proxy_pass http://127.0.0.1:1314;
                 proxy_set_header HOST $host;
                 proxy_http_version 1.1;
        }
    }
重新加载配置项:
[root@min conf.d]# nginx -s reload
[root@min conf.d]#
创建test.com的主页
[root@min conf.d]# mkdir -p /html/test
[root@min conf.d]# vi /html/test/index.html
[root@min conf.d]# cat /html/test/index.html
Hello, this is test page!
测试代理的效果:
[root@min conf.d]# curl http://www.test.com:1314
Hello, this is test page!
[root@min conf.d]# cat /html/test/index.html
Hello, this is test page!
通过上面的测试,我们发现可以直接通过访问http://www.test.com来达到访问http://www.test.com:1314一样的效果
-
场景二:本机代理到其他机器
前置条件说明:已经在192.168.19.50服务通过8080端口启动了一个web服务,开发的端口有/hello 和/hello/sub两个接口
配置:
     server {
           listen 81;
           server_name www.test.com;
            location  / {
                 proxy_pass http://192.168.19.50:8080;
                 proxy_set_header HOST $host;
                 proxy_http_version 1.1;
        }
   }
[root@min conf.d]# nginx -t
nginx: the configuration file /etc/nginx/nginx.conf syntax is ok
nginx: configuration file /etc/nginx/nginx.conf test is successful
[root@min conf.d]# nginx -s reload
[root@min conf.d]#

 [root@min conf.d]# curl http://www.test.com:81/hello
    hello : 8080;range:CN
[root@min conf.d]#
9、负载均衡配置
什么是负载均衡?
Load Balance(lb),指将工作任务进行分流,减轻单点压力,实
现工作任务均摊到过个节点的操作。(实现集群化)
负载均衡常见的实现方式:
硬件:F5
软件:
Nginx
LVS
HAproxy
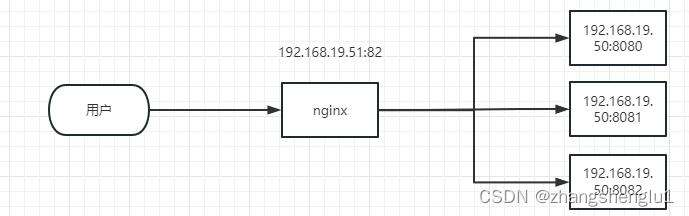
这里我们将在192.168.19.50的8081,8082,8083三个端口上运行web服务,然后在192.168.19.51通过监听82端口对192.168.19.50三个web服务进行负载均衡,如下图所示
nginx提供负载均衡功能的模块ngx_stream_upstream_module,官网地址为:http://nginx.org/en/docs/http/ngx_http_upstream_module.html
配置的语法为:
upstream backend {
    server backend1.example.com       weight=5;
    server backend2.example.com:8080;
    server unix:/tmp/backend3;

    server backup1.example.com:8080   backup;
    server backup2.example.com:8080   backup;
}

server {
    location / {
        proxy_pass http://backend;
    }
}
配置文件:
upstream backend {
    server 192.168.19.50:8080;
    server 192.168.19.50:8081;
    server 192.168.19.50:8082;
}
server {
   listen 82;
   server_name www.upstream.com;
   location / {
      proxy_pass http://backend;
   }
}
重新加载配置文件,然后进行测试:
[root@min conf.d]# curl www.upstream.com:82/hello
hello : 8082;range:CN
[root@min conf.d]# curl www.upstream.com:82/hello
hello : 8081;range:CN
[root@min conf.d]# curl www.upstream.com:82/hello
hello : 8081;range:CN
[root@min conf.d]# curl www.upstream.com:82/hello
hello : 8080;range:CN
[root@min conf.d]# curl www.upstream.com:82/hello
hello : 8082;range:CN
[root@min conf.d]# curl www.upstream.com:82/hello
从上面测试我们可以看出,我们达到负载均衡的效果