SpringBoot_3
一、Spring Initializer快速创建Spring Boot项目

src/main/java—-保存java源代码
src/main/resources
application.properties——-Spring Boot应用的配置文件
[static]—需要自己手动创建【保存web应用程序所需的静态资源{hrml、css、js、img}】
[templates]–需要自己手动创建【保存模板页面】
Spring Boot默认jar包使用嵌入式的Tomcat,默认不支持JSP页面; 可以使用模板引擎freemarker、thymeleaf;
在不同环境下SpringBoot项目所使用的自动配置的默认数据值就需要随着环境的变化而被修改,我们在修改的时候不能修改源码,而且源码页无法修改,基于这个情况,SpringBoot项目对外提供了一个可以用来修改自动配置的默认数据值的文件,这个文件就是
src/main/resources/application.properties文件。
application.properties文件SpringBoot的核心配置文件
作用:修改自动配置的默认数据值的文件
名称:application.properties / application.yml
application.properties /application.yml就是同一个配置文件,后缀名的不同,表示这个文件中内容的书写风格不同。
例如:配置数据库驱动名称
application.properties文件
spring.datasource.driver-class-name=com.mysql.jdbc.Driver
application.yml文件
spring:
  datasource:
    driver-class-name: com.mysql.jdbc.Driver
二、YAML(YAML Ain’t Markup Language)
Html【超文本标记语言】—- 默认提供好了标记 例如:< table>
Xml【可扩展的标记语言】– 自己手动创建标记 例如:< student>
例如
Xml:配置例子
<server>
<port>8081</port>
</server>
YAML:配置例子
server:
Port:8081
YAML isn’t Markup Language:不是一个标记语言;是因为它以数据为中心的
1、基本语法
键:(空格)值:表示一对键值对(空格必须有);
以空格的缩进来控制层级关系;只要是左对齐的一列数据,都是同一个层级的。
例如:
spring:
  datasource:
    driver-class-name: com.mysql.jdbc.Driver
    url: jdbc:mysql://127.0.0.1:3306/test
  jdbc:
    template:
      query-timeout: 1000
server:
  port: 9090
2.属性值的写法
属性值—键值对的键所对应的值
在上面的例子中url/port都是属性,实际都是xxxxxProperties类的成员变量。“jdbc:mysql://127.0.0.1:3306/test 、9090”就是属性值。
由于yml文件的属性,实际都是xxxxxProperties类的成员变量,成员变量都是有固定的数据类型,所以属性的值不能随便写,得符合成员变量对应的数据类型。
1.普通的值(数字,字符串,布尔)
2.数字–数字值
3.布尔–true/false
4.字符串
默认不用加上单引号或者双引号;
如果有””[双引号],字符串中的转义字符会执行【\n—换行】
例如:
name: “zhangsan\nlisi”
结果:
zhangsan \n—换行
lisi
如果有’’[单引号],字符串中的转义字符不会执行,会作为一个字符直接使用【\n–\n】
例如:
name: ‘zhangsan\nlisi’
结果:
zhangsan\nlisi
3.对象
例如:
student:
  		stuid: 1001
  		stuname: zhangsan
  		stuage: 23
  		stuaddress: 西安
student—-对象名称
stuid、stuname、stuage、stuaddress—-对象中的属性
1001、zhangsan、23、西安—-属性的数据值
行内写法:
对象名称: {属性名称:属性值,属性名称:属性值}
例如:
person: {perid:1002,pername: lisi,perage: 24,peraddress: 北京}
4.集合
数组类型的集合(List、Set)
1.-[空格]数组集合中的元素值”
例如:
javas:
  		- javase
  		- javaee
 		- javame
javas—-数组名称
javase、javaee、javame—数组集合中的数据值
2.数组名称: [数据值1,数据值2]
例如:行内写法
names: [zhangsan,lisi,wangwu]
3.Map(键值对)
Map集合的名称: {key1:value1,key2:value2}
例如:maps: {name: zhangsan,age: 23,address: 西安}
三、将YAML文件、properties文件中的数据值绑定到javabean上
通过@ConfigurationProperties将核心配置文件中的数据值与javabean类中的成员变量绑定
@ConfigurationProperties有一个属性prefix
prefix = “YAML文件中的对象名称”
具体步骤:
1.导入依赖
<dependency>
    <groupId>org.springframework.boot</groupId>
    <artifactId>spring-boot-configuration-processor</artifactId>
    <optional>true</optional>
</dependency>
2.创建javabean
package com.wangxing.springboot.bean;
import org.springframework.boot.context.properties.ConfigurationProperties;
import org.springframework.stereotype.Component;
import java.util.List;
import java.util.Map;
@Component
@ConfigurationProperties(prefix = "student")
public class StudentBean {
    private Integer stuid;
    private String stuname;
    private boolean stusex;
    private List<String> likes;
    private Map<String,String> maps;
    private Myaddress myaddress;

    public Integer getStuid() {
        return stuid;
    }

    public void setStuid(Integer stuid) {
        this.stuid = stuid;
    }

    public String getStuname() {
        return stuname;
    }

    public void setStuname(String stuname) {
        this.stuname = stuname;
    }

    public boolean isStusex() {
        return stusex;
    }

    public void setStusex(boolean stusex) {
        this.stusex = stusex;
    }

    public List<String> getLikes() {
        return likes;
    }

    public void setLikes(List<String> likes) {
        this.likes = likes;
    }

    public Map<String, String> getMaps() {
        return maps;
    }

    public void setMaps(Map<String, String> maps) {
        this.maps = maps;
    }

    public Myaddress getMyaddress() {
        return myaddress;
    }

    public void setMyaddress(Myaddress myaddress) {
        this.myaddress = myaddress;
    }
}
3.Javabean上添加注解
@Component
@ConfigurationProperties(prefix = “student”)
4.在resources的application.properties配置属性
student.stuid=1001
student.stuname=张三
student.stusex=true
student.likes=play,game,bork
student.maps.xiaoxue=长安小学
student.maps.zhongxue=新华中学
student.maps.gaozhong=古城高中
student.myaddress.addressid=1
student.myaddress.addressname=home
在resources的application.xml配置属性
student:
  stuid: 1002
  stuname: 李四
  likes:
    - play
    - bork
    - game
  maps: {xiaoxue: 长安小学,zhongxue: 新华中学,gaozhong: 古城高中}
  stusex: false
  myaddress: {addressid: 2,addressname: home}
由于properties配置文件在idea中默认utf-8可能会有中文乱码,所以需要设置修改转码;

测试代码
package com.wangxing.springboot.controller;
import com.wangxing.springboot.bean.Myaddress;
import com.wangxing.springboot.bean.StudentBean;
import org.springframework.beans.factory.annotation.Autowired;
import org.springframework.stereotype.Controller;
import org.springframework.web.bind.annotation.RequestMapping;
import org.springframework.web.bind.annotation.ResponseBody;
import java.util.List;
import java.util.Map;
@Controller
public class StudentController {
    @Autowired
    private StudentBean studentBean;
    @RequestMapping(value = "/student")
    @ResponseBody
    public String testController(){
        Integer stuid = studentBean.getStuid();
        String stuname = studentBean.getStuname();
        System.out.println("stuid=="+stuid);
        System.out.println("stuname=="+stuname);
        List<String> likes = studentBean.getLikes();
        for(String like:likes){
            System.out.println("like=="+like);
        }
        Map<String,String> maps = studentBean.getMaps();
        for (Map.Entry<String,String> entry:maps.entrySet()){
            System.out.println("map=="+entry.getKey()+"\t"+entry.getValue());
        }
        Myaddress myaddress = studentBean.getMyaddress();
        System.out.println("addressid=="+myaddress.getAddressid());
        System.out.println("addressnanme=="+myaddress.getAddressname());
        return "你好";
    }
}
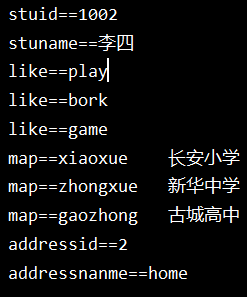
加载application.properties文件运行结果:

加载application.xml文件运行结果

使用@value注解赋值
package com.wangxing.springboot.bean;

import org.springframework.beans.factory.annotation.Value;
import org.springframework.boot.context.properties.ConfigurationProperties;
import org.springframework.stereotype.Component;

import java.util.List;
import java.util.Map;
@Component
public class StudentBean {
    @Value("1200")
    private Integer stuid;
    @Value("王五")
    private String stuname;
    @Value("true")
    private boolean stusex;
    @Value("play,game,bork")
    private List<String> likes;

    public Integer getStuid() {
        return stuid;
    }

    public void setStuid(Integer stuid) {
        this.stuid = stuid;
    }

    public String getStuname() {
        return stuname;
    }

    public void setStuname(String stuname) {
        this.stuname = stuname;
    }

    public boolean isStusex() {
        return stusex;
    }

    public void setStusex(boolean stusex) {
        this.stusex = stusex;
    }

    public List<String> getLikes() {
        return likes;
    }

    public void setLikes(List<String> likes) {
        this.likes = likes;
    }

}
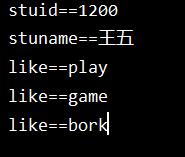
运行结果:

@Value获取值和@ConfifigurationProperties获取值比较

配置文件yml还是properties他们都能获取到值;
用途:
在某个业务逻辑中需要获取一下配置文件中的某项值,使用@Value;
编写了一个javaBean来和配置文件进行映射,我们就直接使用@ConfifigurationProperties;