Android 应用的自动升级、更新模块的实现

  • Post author:
  • Post category:其他


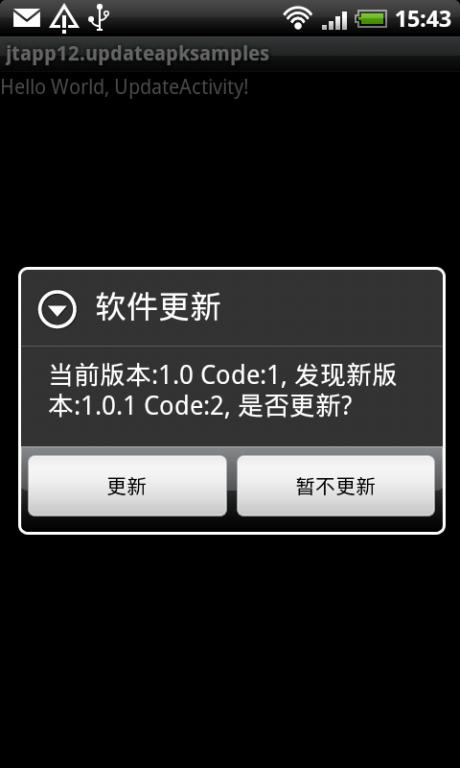
我们看到很多Android应用都具有自动更新功能,用户一键就可以完成软件的升级更新。得益于Android系统的软件包管理和安装机制,这一功能实现起来相当简单,下面我们就来实践一下。首先给出界面效果:


1. 准备知识


在AndroidManifest.xml里定义了每个Android apk的版本标识:


1

<


manifest


xmlns:android


=


"http://schemas.android.com/apk/res/android"

2


package


=


"com.myapp"

3


android:versionCode


=


"1"

4


android:versionName


=


"1.0.0"


>

5

<


application


></


application


>

6

</


manifest


>

其中,android:versionCode和android:versionName两个字段分别表示版本代码,版本名称。versionCode是 整型数字,versionName是字符串。由于version是给用户看的,不太容易比较大小,升级检查时,可以以检查versionCode为主,方 便比较出版本的前后大小。

那么,在应用中如何读取AndroidManifest.xml中的versionCode和versionName呢?可以使用PackageManager的API,参考以下代码:


01

public


static


int


getVerCode(Context context) {


02


int


verCode = -


1


;

03


try


{


04


verCode = context.getPackageManager().getPackageInfo(

05


"com.myapp"


,


0


).versionCode;

06


}


catch


(NameNotFoundException e) {


07


Log.e(TAG, e.getMessage());

08


}

09


return


verCode;

10


}

11


12


public


static


String getVerName(Context context) {


13


String verName =


""


;

14


try


{


15


verName = context.getPackageManager().getPackageInfo(

16


"com.myapp"


,


0


).versionName;

17


}


catch


(NameNotFoundException e) {


18


Log.e(TAG, e.getMessage());

19


}

20


return


verName;

21

}

或者在AndroidManifest中将android:versionName=”1.2.0″写成 android:versionName=”@string/app_versionName”,然后在values/strings.xml中添加对应 字符串,这样实现之后,就可以使用如下代码获得版本名称:


1

public


static


String getVerName(Context context) {


2


String verName = context.getResources()

3


.getText(R.string.app_versionName).toString();

4


return


verName;

5

}

同理,apk的应用名称可以这样获得:


1

public


static


String getAppName(Context context) {


2


String verName = context.getResources()

3


.getText(R.string.app_name).toString();

4


return


verName;

5

}


2. 流程框架


3. 版本检查


在服务端放置最新版本的apk文件,如:http://localhost/myapp/myapp.apk

同时,在服务端放置对应此apk的版本信息调用接口或者文件,如:http://localhost/myapp/ver.json

ver.json中的内容为:

[{“appname”:”jtapp12″,”apkname”:”jtapp-12-updateapksamples.apk”,”verName”:1.0.1,”verCode”:2}]

然后,在手机客户端上进行版本读取和检查:


01

private


boolean


getServerVer () {


02


try


{


03


String verjson = NetworkTool.getContent(Config.UPDATE_SERVER

04


+ Config.UPDATE_VERJSON);

05


JSONArray array =


new


JSONArray(verjson);

06


if


(array.length() >


0


) {


07


JSONObject obj = array.getJSONObject(


0


);

08


try


{


09


newVerCode = Integer.parseInt(obj.getString(


"verCode"


));

10


newVerName = obj.getString(


"verName"


);

11


}


catch


(Exception e) {


12


newVerCode = -


1


;

13


newVerName =


""


;

14


return


false


;

15


}

16


}

17


}


catch


(Exception e) {


18


Log.e(TAG, e.getMessage());

19


return


false


;

20


}

21


return


true


;

22


}

比较服务器和客户端的版本,并进行更新操作。


1

if


(getServerVerCode()) {


2


int


vercode = Config.getVerCode(


this


);


// 用到前面第一节写的方法

3


if


(newVerCode > vercode) {


4


doNewVersionUpdate();


// 更新新版本

5


}


else


{


6


notNewVersionShow();


// 提示当前为最新版本

7


}

8


}

详细方法:


01

private


void


notNewVersionShow() {


02


int


verCode = Config.getVerCode(


this


);

03


String verName = Config.getVerName(


this


);

04


StringBuffer sb =


new


StringBuffer();

05


sb.append(


"当前版本:"


);

06


sb.append(verName);

07


sb.append(


" Code:"


);

08


sb.append(verCode);

09


sb.append(


",/n已是最新版,无需更新!"


);

10


Dialog dialog =


new


AlertDialog.Builder(Update.


this


).setTitle(


"软件更新"


)

11


.setMessage(sb.toString())


// 设置内容

12


.setPositiveButton(


"确定"


,


// 设置确定按钮

13


new


DialogInterface.OnClickListener() {


14


@Override

15


public


void


onClick(DialogInterface dialog,

16


int


which) {


17


finish();

18


}

19


}).create();


// 创建

20


// 显示对话框

21


dialog.show();

22

}

23

private


void


doNewVersionUpdate() {


24


int


verCode = Config.getVerCode(


this


);

25


String verName = Config.getVerName(


this


);

26


StringBuffer sb =


new


StringBuffer();

27


sb.append(


"当前版本:"


);

28


sb.append(verName);

29


sb.append(


" Code:"


);

30


sb.append(verCode);

31


sb.append(


", 发现新版本:"


);

32


sb.append(newVerName);

33


sb.append(


" Code:"


);

34


sb.append(newVerCode);

35


sb.append(


", 是否更新?"


);

36


Dialog dialog =


new


AlertDialog.Builder(Update.


this


)

37


.setTitle(


"软件更新"


)

38


.setMessage(sb.toString())

39


// 设置内容

40


.setPositiveButton(


"更新"


,


// 设置确定按钮

41


new


DialogInterface.OnClickListener() {


42


@Override

43


public


void


onClick(DialogInterface dialog,

44


int


which) {


45


pBar =


new


ProgressDialog(Update.


this


);

46


pBar.setTitle(


"正在下载"


);

47


pBar.setMessage(


"请稍候..."


);

48


pBar.setProgressStyle(ProgressDialog.STYLE_SPINNER);

49


downFile(Config.UPDATE_SERVER + Config.UPDATE_APKNAME);

50


}

51


})

52


.setNegativeButton(


"暂不更新"


,

53


new


DialogInterface.OnClickListener() {


54


public


void


onClick(DialogInterface dialog,

55


int


whichButton) {


56


// 点击"取消"按钮之后退出程序

57


finish();

58


}

59


}).create();


// 创建

60


// 显示对话框

61


dialog.show();

62

}


4. 下载模块

注,本部分参考了前人的相关实现,见 http://apps.hi.baidu.com/share/detail/24172508


01

void


downFile(


final


String url) {


02

pBar.show();

03

new


Thread() {


04


public


void


run() {


05


HttpClient client =


new


DefaultHttpClient();

06


HttpGet get =


new


HttpGet(url);

07


HttpResponse response;

08


try


{


09


response = client.execute(get);

10


HttpEntity entity = response.getEntity();

11


long


length = entity.getContentLength();

12


InputStream is = entity.getContent();

13


FileOutputStream fileOutputStream =


null


;

14


if


(is !=


null


) {


15


File file =


new


File(

16


Environment.getExternalStorageDirectory(),

17


Config.UPDATE_SAVENAME);

18


fileOutputStream =


new


FileOutputStream(file);

19


byte


[] buf =


new


byte


[


1024


];

20


int


ch = -


1


;

21


int


count =


0


;

22


while


((ch = is.read(buf)) != -


1


) {


23


fileOutputStream.write(buf,


0


, ch);

24


count += ch;

25


if


(length >


0


) {


26


}

27


}

28


}

29


fileOutputStream.flush();

30


if


(fileOutputStream !=


null


) {


31


fileOutputStream.close();

32


}

33


down();

34


}


catch


(ClientProtocolException e) {


35


e.printStackTrace();

36


}


catch


(IOException e) {


37


e.printStackTrace();

38


}

39


}

40

}.start();

41

}

下载完成,通过handler通知主ui线程将下载对话框取消。


1

void


down() {


2


handler.post(


new


Runnable() {


3


public


void


run() {


4


pBar.cancel();

5


update();

6


}

7


});

8

}


5. 安装应用


1

<strong>


void


update() {


2


Intent intent =


new


Intent(Intent.ACTION_VIEW);

3


intent.setDataAndType(Uri.fromFile(


new


File(Environment

4


.getExternalStorageDirectory(), Config.UPDATE_SAVENAME)),

5


"application/vnd.android.package-archive"


);

6


startActivity(intent);

7


}</strong>

如果你将apk应用发布到market上,那么,你会发现market内建了类似的模块,可以自动更新或者提醒你是否更新应用。那么,对于你自己的 应用需要自动更新的话,自己内建一个是不是更加方便了呢?本文提到的代码大多是在UpdateActivity.java中实现,为了能够使更新过程更加 友好,可以在最初launcher的Activity中建立一个线程,用来检查服务端是否有更新。有更新的时候就启动UpdateActivity,这样 的使用体验更加平滑。

本文例程源码查看/下载:


http://code.google.com/p/androidex/source/browse/trunk/jtapp-12-updateapksamples

版权归个人所有,转载请注明出处

http://blog.csdn.net/xjanker2/archive/2011/04/06/6303937.aspx