Sign In with Apple是iOS 13的新增功能
所以现在苹果的app有第三方登录的功能需要加上苹果的登录(不然审核时会被拒掉)
一、证书文件配置
登录开发者账号,创建Bundle ID时 勾选 Sign In With Apple ,开启登录功能(勾选或取消服务,会导致之前的 profile 描述文件失效,不需要新建,只要点击 Edit 重新编辑对应的 profile文件,然后保存下载使用新的profile文件即可)

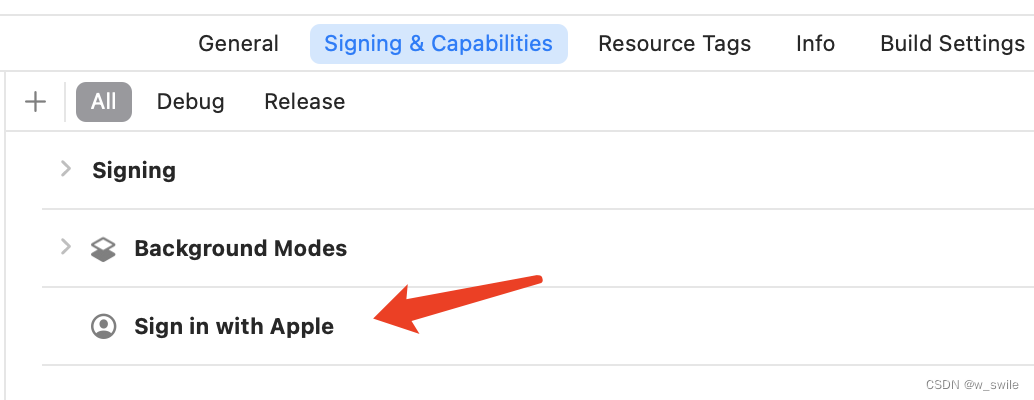
二、xcode配置
在xcode中去添加Sign In with Apple
三、代码集成
1.导入头文件,添加代理
![]()
ASAuthorizationControllerDelegate, ASAuthorizationControllerPresentationContextProviding
2.添加苹果登录的按钮
如果不用苹果提供的样式,可以让UI自定义一个样式 (注意样式不能太随便,不然也会被拒掉)

3.点击登录
#pragma mark
– 授权苹果ID
– (
void
)authorizationAppleID {
if
(
@available
(iOS 13.0, *)) {
// 基于用户的Apple ID授权用户,生成用户授权请求的一种机制
ASAuthorizationAppleIDProvider * appleIDProvider = [[ASAuthorizationAppleIDProvider alloc] init];
// 创建新的AppleID 授权请求
ASAuthorizationAppleIDRequest * authAppleIDRequest = [appleIDProvider createRequest];
NSMutableArray <ASAuthorizationRequest *> * array = [NSMutableArray arrayWithCapacity:2];
if
(authAppleIDRequest) {
[array addObject:authAppleIDRequest];
}
NSArray <ASAuthorizationRequest *> * requests = [array copy];
// 由ASAuthorizationAppleIDProvider创建的授权请求 管理授权请求的控制器
ASAuthorizationController * authorizationController = [[ASAuthorizationController alloc] initWithAuthorizationRequests:requests];
// 设置授权控制器通知授权请求的成功与失败的代理
authorizationController.delegate =
self
;
// 设置提供 展示上下文的代理,在这个上下文中 系统可以展示授权界面给用户
authorizationController.presentationContextProvider =
self
;
// 在控制器初始化期间启动授权流
[authorizationController performRequests];
}
else
{
// 处理不支持系统版本
NSLog(@”系统不支持Apple登录”);
}
}
4.代理回调方法
#pragma mark
– ASAuthorizationControllerDelegate
// 授权成功
– (
void
)authorizationController:(ASAuthorizationController *)controller didCompleteWithAuthorization:(ASAuthorization *)authorization API_AVAILABLE(ios(13.0)) {
if
([authorization.credential isKindOfClass:[ASAuthorizationAppleIDCredential class]]) {
ASAuthorizationAppleIDCredential * credential = (ASAuthorizationAppleIDCredential *)authorization.credential;
// 苹果用户唯一标识符,该值在同一个开发者账号下的所有 App下是一样的,开发者可以用该唯一标识符与自己后台系统的账号体系绑定起来。
NSString * userID = credential.user;
// // 苹果用户信息 如果授权过,可能无法再次获取该信息
// NSPersonNameComponents * fullName = credential.fullName;
NSString * email = credential.email;
// // 服务器验证需要使用的参数
// NSString * authorizationCode = [[NSString alloc] initWithData:credential.authorizationCode encoding:NSUTF8StringEncoding];
// NSString * identityToken = [[NSString alloc] initWithData:credential.identityToken encoding:NSUTF8StringEncoding];
NSString *tokenStr = [@”ios” stringByAppendingString:userID];
[
self
rquestThirdLogin:tokenStr withEmail:email];
}
else
if
([authorization.credential isKindOfClass:[ASPasswordCredential class]]) {
// 这个获取的是iCloud记录的账号密码,需要输入框支持iOS 12 记录账号密码的新特性,如果不支持,可以忽略
// 用户登录使用现有的密码凭证
ASPasswordCredential * passwordCredential = (ASPasswordCredential *)authorization.credential;
// 密码凭证对象的用户标识 用户的唯一标识
NSString * user = passwordCredential.user;
//把用户的唯一标识 传给后台 判断该用户是否绑定手机号,如果绑定了直接登录,如果没绑定跳绑定手机号页面
// 密码凭证对象的密码
NSString * password = passwordCredential.password;
NSLog(@”userID: %@”, user);
NSLog(@”password: %@”, password);
}
else
{
}
}
// 授权失败
– (
void
)authorizationController:(ASAuthorizationController *)controller didCompleteWithError:(NSError *)error API_AVAILABLE(ios(13.0)) {
NSString *errorMsg =
nil
;
switch
(error.code) {
case
ASAuthorizationErrorCanceled:
errorMsg = @”用户取消了授权请求”;
break
;
case
ASAuthorizationErrorFailed:
errorMsg = @”授权请求失败”;
break
;
case
ASAuthorizationErrorInvalidResponse:
errorMsg = @”授权请求响应无效”;
break
;
case
ASAuthorizationErrorNotHandled:
errorMsg = @”未能处理授权请求”;
break
;
case
ASAuthorizationErrorUnknown:
errorMsg = @”授权请求失败未知原因”;
break
;
}
NSLog(@”%@”, errorMsg);
}
#pragma mark
– ASAuthorizationControllerPresentationContextProviding
– (ASPresentationAnchor)presentationAnchorForAuthorizationController:(ASAuthorizationController *)controller API_AVAILABLE(ios(13.0)) {
return
self
.view.window;
}
在授权成功的回调中拿到服务器所需要的参数传给后台
至此我们所需要做的已经完成了,看后台的验证就行了。
注意:模拟器中没有效果,需要用真机去调试