文章目录
这是我Spring Frame 专栏的第八篇文章,在
Spring注解驱动开发(七):利用FactoryBean向容器中注入组件
这篇文章中,我向你详细介绍了FactoryBean 接口的使用方式以及它在Spring中的应用场景,如果你未读过那篇文章,但是对内容感兴趣的话,我建议你去阅读一下
1. 背景介绍
我们在正常向容器中注入Bean的时候,Bean会经历实例化,初始化以及一系列后置处理器的处理,那么我们能不能在Bean初始化和销毁的时候注册一些像
生命钩子(Hook)
的东西,在此处做一些定制化操作呢?
答案肯定是可以的,作为具有高定制化和扩展性的Spring为我们提供了三种常见的初始化和销毁的回调功能:
-
利用 Spring Framework 提供的
InitializingBean, DisposableBean
接口 -
利用 Java 内置的注解
@PostConstruct , @PreDestroy
-
利用 @Bean 的
initMethod,destroyMethod
在我讲解这三种方法前,为了更好的演示效果,我先将示例代码写在此处
- 定义一个普通的优惠券类
/**
 * @author NanCheng
 * @version 1.0
 * @date 2022/9/6 17:59
 */
public class Coupon {
    private Integer id;
    private String couponType;
    private Integer profit;

    public Coupon(Integer id, String couponType, Integer profit) {
        this.id = id;
        this.couponType = couponType;
        this.profit = profit;
        System.out.println("Coupon 实例化完成");
    }

	// 省略 setter,getter,toString 方法
}
- 定制一个配置类,用于向容器中注入 Coupon 对象
@Configuration
public class CouponConfig {

    @Bean
    public Coupon coupon() {
        return new Coupon(1,"满减",90);
    }
}
- 编写测试类
public class CouponMain {
    public static void main(String[] args) {
        try (AnnotationConfigApplicationContext context = new AnnotationConfigApplicationContext(CouponConfig.class)){
            System.out.println("------------容器初始化完成---------------");
            System.out.println("第一次获取: "+context.getBean(Coupon.class));
            System.out.println("第二次获取: "+context.getBean(Coupon.class));
        } catch (BeansException e) {
            e.printStackTrace();
        }
    }
}
好啦,接下来该进入我们今天的主题了
2. 利用接口实现回调
Spring Framework 为我们提供了两个接口:
- InitializingBean:在属性赋值之后回调其中的方法
-
DisposableBean:在Bean销毁前回调其中的方法
接下来我就依次介绍一下这两个接口的使用方式以及源码
2.1 InitializingBean
按照惯例,我们还是先从源码入手,看一眼注释和对应的方法信息:
/**
 * Interface to be implemented by beans that need to react once all their properties
 * have been set by a {@link BeanFactory}: e.g. to perform custom initialization,
 * or merely to check that all mandatory properties have been set.
 *
 * <p>An alternative to implementing {@code InitializingBean} is specifying a custom
 * init method, for example in an XML bean definition. For a list of all bean
 * lifecycle methods, see the {@link BeanFactory BeanFactory javadocs}.
 *
 * @author Rod Johnson
 * @author Juergen Hoeller
 * @see DisposableBean
 * @see org.springframework.beans.factory.config.BeanDefinition#getPropertyValues()
 * @see org.springframework.beans.factory.support.AbstractBeanDefinition#getInitMethodName()
 */
public interface InitializingBean {

	/**
	 * Invoked by the containing {@code BeanFactory} after it has set all bean properties
	 * and satisfied {@link BeanFactoryAware}, {@code ApplicationContextAware} etc.
	 * <p>This method allows the bean instance to perform validation of its overall
	 * configuration and final initialization when all bean properties have been set.
	 * @throws Exception in the event of misconfiguration (such as failure to set an
	 * essential property) or if initialization fails for any other reason
	 */
	void afterPropertiesSet() throws Exception;

}
由于源码内容并不是很多,我就全部粘在这里了,从注释中我们可以得知:
这个 afterPropertiesSet 方法只会在Bean的所有属性赋值完毕后调用一次
我们利用 Coupon 实现这个接口并调用测试类演示一下效果:
public class Coupon implements InitializingBean {
    private Integer id;
    private String couponType;
    private Integer profit;

    public Coupon(Integer id, String couponType, Integer profit) {
        this.id = id;
        this.couponType = couponType;
        this.profit = profit;
        System.out.println("Coupon 实例化完成");
    }

    @Override
    public void afterPropertiesSet() throws Exception {
        System.out.println("调用Coupon的afterPropertiesSet方法");
    }
}

从结果可以看到,我们从容器中获得了两次 Coupon 对象,但是只执行了一次
afterPropertiesSet
方法
⭐️ 为了更好的证实它是在Bean属性赋值结束后执行一次的,这次我们在配置类的
coupon()
方法加上
@Scope
注解,来看一下执行后的效果
@Configuration
public class CouponConfig {
    @Scope("prototype")
    @Bean
    public Coupon coupon() {
        return new Coupon(1,"满减",90);
    }
}
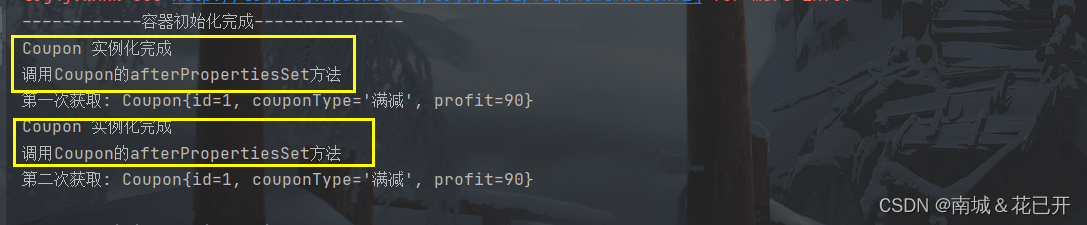
这次我们发现
afterPropertiesSet
方法执行了两次,这是由于
prorotype
对象每次从容器获取都会创建新对象,导致该方法只醒了两次
到这里,我相信你已经基本了解 InitializingBean 的用法以及对应方法的执行时机了
2.2 DisposableBean
与
InitializingBean
对应的就是
DisposableBean
接口,它是Bean销毁前的回调,我们还是先看一下源码:
/**
 * Interface to be implemented by beans that want to release resources on destruction.
 * A {@link BeanFactory} will invoke the destroy method on individual destruction of a
 * scoped bean. An {@link org.springframework.context.ApplicationContext} is supposed
 * to dispose all of its singletons on shutdown, driven by the application lifecycle.
 *
 * <p>A Spring-managed bean may also implement Java's {@link AutoCloseable} interface
 * for the same purpose. An alternative to implementing an interface is specifying a
 * custom destroy method, for example in an XML bean definition. For a list of all
 * bean lifecycle methods, see the {@link BeanFactory BeanFactory javadocs}.
 *
 * @author Juergen Hoeller
 * @since 12.08.2003
 * @see InitializingBean
 * @see org.springframework.beans.factory.support.RootBeanDefinition#getDestroyMethodName()
 * @see org.springframework.beans.factory.config.ConfigurableBeanFactory#destroySingletons()
 * @see org.springframework.context.ConfigurableApplicationContext#close()
 */
public interface DisposableBean {

	/**
	 * Invoked by the containing {@code BeanFactory} on destruction of a bean.
	 * @throws Exception in case of shutdown errors. Exceptions will get logged
	 * but not rethrown to allow other beans to release their resources as well.
	 */
	void destroy() throws Exception;

}
注释对于该接口的作用写的很明白,但这里我还是要强调一点:
destroy 方法可以用于Bean销毁前释放资源 , 但是 !!!destroy 只适用于 Spring IoC 容器中的单例 Bean,因为这样的Bean的生命周期完整性受 Spring 管辖
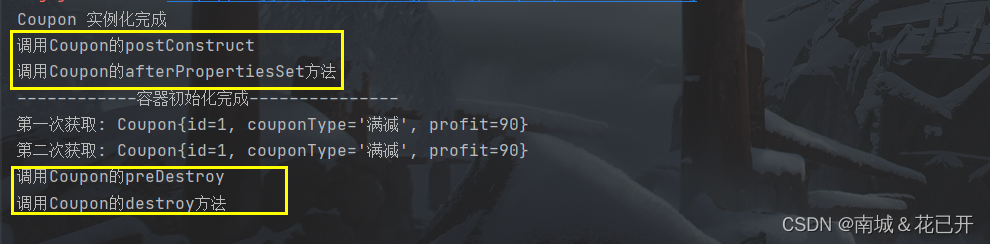
为了更好的理解我上面说的那句话,我们先让 Coupon 实现
DisposableBean
接口,之后分别在配置类的
coupon
方法上面不添加和添加
@Scope("protorype")
,两者调用的对比如下图所示:
public class Coupon implements InitializingBean, DisposableBean {
private Integer id;
private String couponType;
private Integer profit;
public Coupon(Integer id, String couponType, Integer profit) {
this.id = id;
this.couponType = couponType;
this.profit = profit;
System.out.println("Coupon 实例化完成");
}
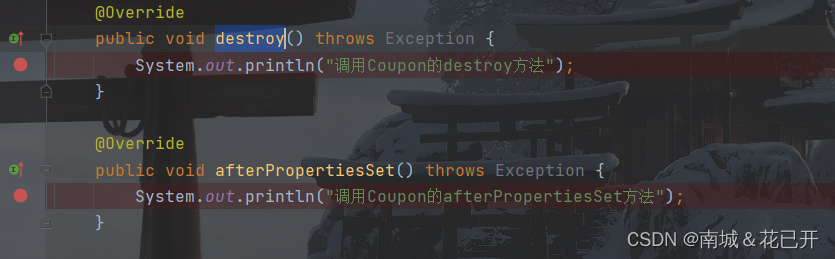
@Override
public void destroy() throws Exception {
System.out.println("调用Coupon的destroy方法");
}
@Override
public void afterPropertiesSet() throws Exception {
System.out.println("调用Coupon的afterPropertiesSet方法");
}
}

未添加 @Scope 注解

添加 @Scope(“prototype”) 注解
通过对比,我相信你能理解我上面说的那句话了,只有受到 Spring IoC 完整生命周期管辖的Bean,在销毁之前才会调用 destroy 方法
到这里我相信你能基本理解
DisposableBean
接口的使用以及
destroy
方法的调用时机了
2.3 扩展阅读
说实话,经过上面两节的介绍,我相信你还是不能直观的理解这两个回调到底在 Spring 中又什么应用,这里我给你举一个 Spring MVC 内部使用的例子,方便你来理解这两个接口的用处:
你可以看一下
org.springframework.web.servlet.mvc.method.annotation.RequestMappingHandlerMapping
类的继承图:
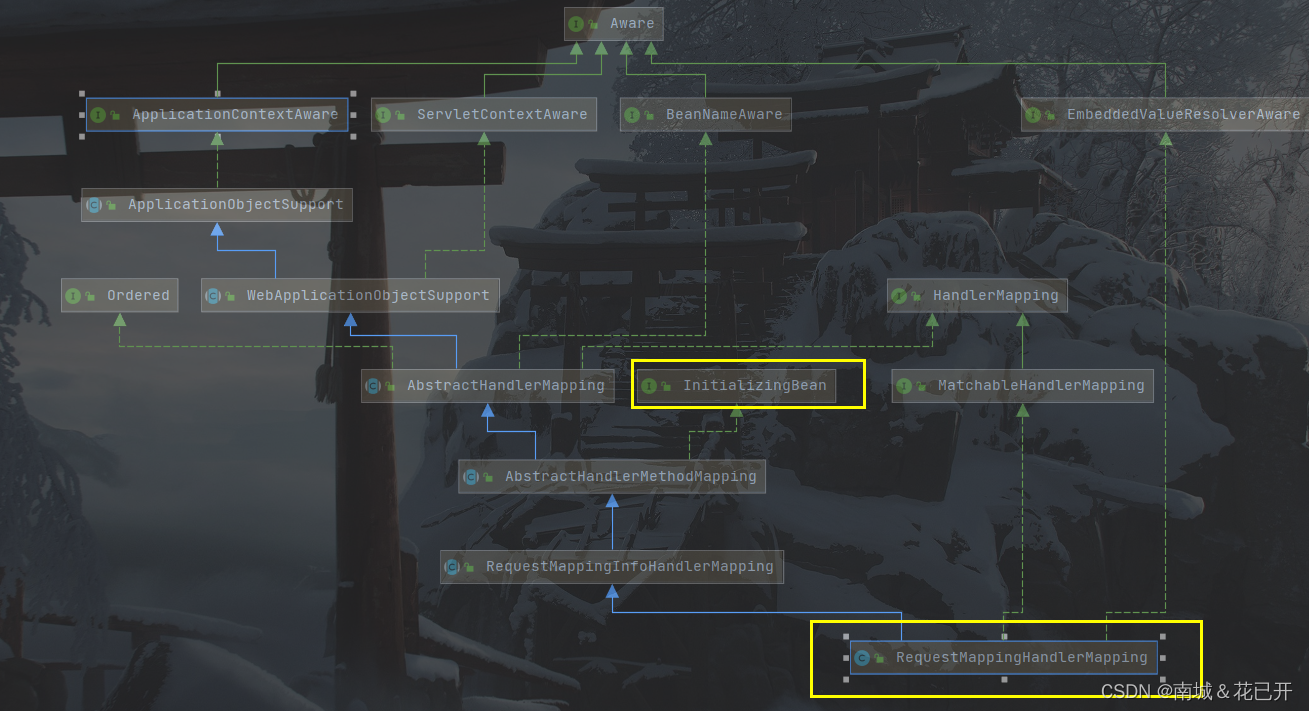
你就应该看到这个类其实间接实现了
InitializingBean
接口
接着我们看一下它在
afterPropertiesSet
方法干了什么:
	@Override
	public void afterPropertiesSet() {
		this.config = new RequestMappingInfo.BuilderConfiguration();
		this.config.setUrlPathHelper(getUrlPathHelper());
		this.config.setPathMatcher(getPathMatcher());
		this.config.setSuffixPatternMatch(this.useSuffixPatternMatch);
		this.config.setTrailingSlashMatch(this.useTrailingSlashMatch);
		this.config.setRegisteredSuffixPatternMatch(this.useRegisteredSuffixPatternMatch);
		this.config.setContentNegotiationManager(getContentNegotiationManager());

		super.afterPropertiesSet();
	}
它调用了父类的
afterPropertiesSet
方法:
public abstract class AbstractHandlerMethodMapping<T> extends AbstractHandlerMapping implements InitializingBean {
	@Override
	public void afterPropertiesSet() {
		initHandlerMethods();
	}
}

protected void initHandlerMethods() {
	for (String beanName : getCandidateBeanNames()) {
		if (!beanName.startsWith(SCOPED_TARGET_NAME_PREFIX)) {
			processCandidateBean(beanName);
		}
	}
	handlerMethodsInitialized(getHandlerMethods());
}
如果你有兴趣们可以继续追踪,看看到底做了什么
⭐️
这里面我告诉你其实就是将对应Controllerl类里的方法和对应的映射地址形成映射关系,方便之后的请求处理
这里我相信你能更加理解这两个接口回调的用处了
3. 利用注解实现回调
其实除了 Spring Framework 提供的两个接口,Spring 还支持 Java 原生的两个注解:
-
@PostConstruct
: 在实例化之后调用 -
@PreDestroy
: 在销毁前调用
见名知意,这里我只是通过一个简单的案例演示一下这两个接口的用法:
public class Coupon implements InitializingBean, DisposableBean {
private Integer id;
private String couponType;
private Integer profit;
public Coupon(Integer id, String couponType, Integer profit) {
this.id = id;
this.couponType = couponType;
this.profit = profit;
System.out.println("Coupon 实例化完成");
}
@Override
public void destroy() throws Exception {
System.out.println("调用Coupon的destroy方法");
}
@Override
public void afterPropertiesSet() throws Exception {
System.out.println("调用Coupon的afterPropertiesSet方法");
}
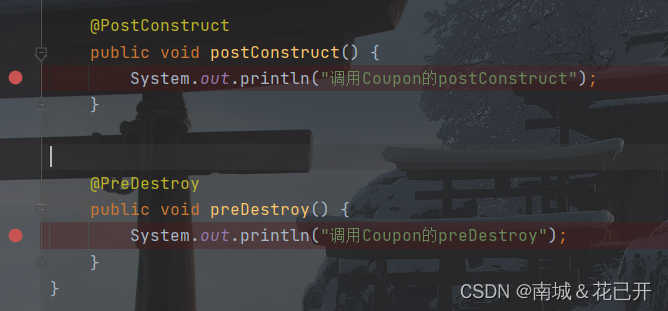
@PostConstruct
public void postConstruct() {
System.out.println("调用Coupon的postConstruct");
}
@PreDestroy
public void preDestroy() {
System.out.println("调用Coupon的preDestroy");
}
}
这里我只是简单的向你介绍了它的用法,实际上它的作用和Spring Framework 提供的接口相似,知识它是原生 JDK 支持的,可以脱离 Spring 这个环境使用
❓ 你是否对我上面图中标注的两个注解和接口的执行顺序很感兴趣,我会在第五小结给你介绍它们的执行顺序的本质
4. 利用@Bean的属性实现回调
这种方式我就不在这里介绍了,在
Spring注解驱动开发(四):@Bean属性详解(指定Bean初始化和销毁方法)
专栏中,我已经详细介绍过那两个属性了,如果你感兴趣可以去看一看,这里我只是用来占位告诉你可以用这种方式来声明初始化和销毁的回调函数
5. 源码分析回调执行
上面三小结我只是告诉了你如何来声明回调函数,你是否好奇他们是在
哪里执行的
以及它们的
执行顺序
是怎样的,这里我就通过源码来帮助你更深层次的了解它们的执行时机和执行顺序
这里我在反复和你提一下我分析源码的一种方式:
在自己写的感兴趣的代码处打上断点,之后通过观察
函数调用栈
来找到真正关心的底层代码就好了
-
我们先在
afterPropertiesSet
和
destroy
方法内打上断点:
-
Debug 测试类,查看函数调用栈
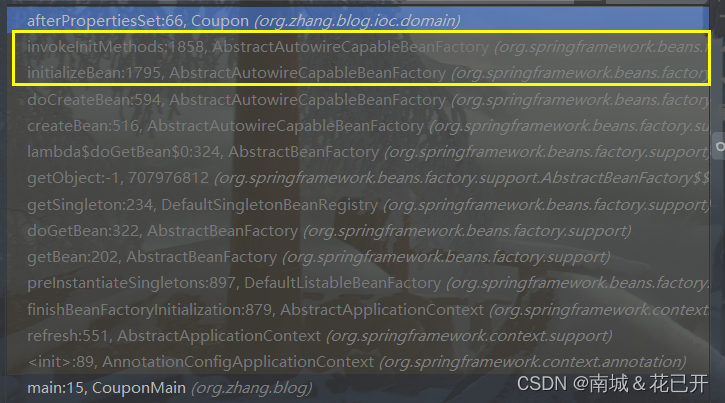
你可以按着调用栈返回找,但是你会发现核心逻辑都集中在
AbstractAutowireCapableBeanFactory
内部
我们看一眼
org.springframework.beans.factory.support.AbstractAutowireCapableBeanFactory#invokeInitMethods
protected void invokeInitMethods(String beanName, Object bean, @Nullable RootBeanDefinition mbd)
			throws Throwable {

		boolean isInitializingBean = (bean instanceof InitializingBean);
		if (isInitializingBean && (mbd == null || !mbd.isExternallyManagedInitMethod("afterPropertiesSet"))) {
			// 省略了部分和安全管理器相关的代码
			// 调用了 afterPropertiesSet
			((InitializingBean) bean).afterPropertiesSet();
		}

		if (mbd != null && bean.getClass() != NullBean.class) {
			String initMethodName = mbd.getInitMethodName();
			if (StringUtils.hasLength(initMethodName) &&
					!(isInitializingBean && "afterPropertiesSet".equals(initMethodName)) &&
					!mbd.isExternallyManagedInitMethod(initMethodName)) {
				// 执行自定义的 init 方法---> 实际上是Bean 的 init 属性
				invokeCustomInitMethod(beanName, bean, mbd);
			}
		}
	}
	protected void invokeInitMethods(String beanName, Object bean, @Nullable RootBeanDefinition mbd)
			throws Throwable {

		boolean isInitializingBean = (bean instanceof InitializingBean);
		if (isInitializingBean && (mbd == null || !mbd.isExternallyManagedInitMethod("afterPropertiesSet"))) {
			if (logger.isTraceEnabled()) {
				logger.trace("Invoking afterPropertiesSet() on bean with name '" + beanName + "'");
			}
			if (System.getSecurityManager() != null) {
				try {
					AccessController.doPrivileged((PrivilegedExceptionAction<Object>) () -> {
						((InitializingBean) bean).afterPropertiesSet();
						return null;
					}, getAccessControlContext());
				}
				catch (PrivilegedActionException pae) {
					throw pae.getException();
				}
			}
			else {
				((InitializingBean) bean).afterPropertiesSet();
			}
		}

		if (mbd != null && bean.getClass() != NullBean.class) {
			String initMethodName = mbd.getInitMethodName();
			if (StringUtils.hasLength(initMethodName) &&
					!(isInitializingBean && "afterPropertiesSet".equals(initMethodName)) &&
					!mbd.isExternallyManagedInitMethod(initMethodName)) {
				invokeCustomInitMethod(beanName, bean, mbd);
			}
		}
	}
protected void invokeCustomInitMethod(String beanName, Object bean, RootBeanDefinition mbd) throws Throwable {

	// 获取 Bean 注解的 initMethod 属性对应的方法
	String initMethodName = mbd.getInitMethodName();
	Assert.state(initMethodName != null, "No init method set");
	Method initMethod = (mbd.isNonPublicAccessAllowed() ?
			BeanUtils.findMethod(bean.getClass(), initMethodName) :
			ClassUtils.getMethodIfAvailable(bean.getClass(), initMethodName));

	Method methodToInvoke = ClassUtils.getInterfaceMethodIfPossible(initMethod);

	if (System.getSecurityManager() != null) {
		AccessController.doPrivileged((PrivilegedAction<Object>) () -> {
			ReflectionUtils.makeAccessible(methodToInvoke);
			return null;
		});
		try {
			// 反射执行对应的方法
			AccessController.doPrivileged((PrivilegedExceptionAction<Object>)
					() -> methodToInvoke.invoke(bean), getAccessControlContext());
		}
	}
	else {
		try {
			ReflectionUtils.makeAccessible(methodToInvoke);
			methodToInvoke.invoke(bean);
		}
		catch (InvocationTargetException ex) {
			throw ex.getTargetException();
		}
	}
}
org.springframework.beans.factory.support.DisposableBeanAdapter#destroy
销毁回调:
	@Override
	public void destroy() {
		if (!CollectionUtils.isEmpty(this.beanPostProcessors)) {
			// 1. 这里面包括对 @PreDestroy 的处理
			for (DestructionAwareBeanPostProcessor processor : this.beanPostProcessors) {
				processor.postProcessBeforeDestruction(this.bean, this.beanName);
			}
		}

		if (this.invokeDisposableBean) {
			if (logger.isTraceEnabled()) {
				logger.trace("Invoking destroy() on bean with name '" + this.beanName + "'");
			}
			try {
				if (System.getSecurityManager() != null) {
					AccessController.doPrivileged((PrivilegedExceptionAction<Object>) () -> {
						((DisposableBean) this.bean).destroy();
						return null;
					}, this.acc);
				}
				else {
				    // 3. 执行 DisposableBean#destroy
					((DisposableBean) this.bean).destroy();
				}
			}
			catch (Throwable ex) {
				String msg = "Invocation of destroy method failed on bean with name '" + this.beanName + "'";
				if (logger.isDebugEnabled()) {
					logger.warn(msg, ex);
				}
				else {
					logger.warn(msg + ": " + ex);
				}
			}
		}

		if (this.destroyMethod != null) {
			// 3. 执行 Bean 注解的 destroyMethod
			invokeCustomDestroyMethod(this.destroyMethod);
		}
		else if (this.destroyMethodName != null) {
			Method methodToInvoke = determineDestroyMethod(this.destroyMethodName);
			if (methodToInvoke != null) {
				invokeCustomDestroyMethod(ClassUtils.getInterfaceMethodIfPossible(methodToInvoke));
			}
		}
	}
从上面我们可以得到:
InitializingBean
接口方法调用会比Bean 的 initMethod 属性对应的方法先执行
DisposableBean
接口方法调用会比 Bean 的
destroyMethod
属性对应的方法先执行
❓ 那么那两个 JDK 注解标注的方法是什么时候执行的呢
其实Spring 是利用
Bean后置处理器
来处理这两个 JDK 注解的
-
对应注解的方法上加上断点
-
Debug 运行查看一下执行时机:
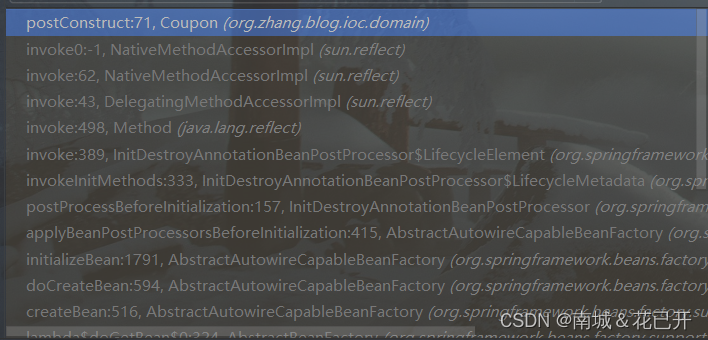
这里你会看到熟悉的
AbstractAutowireCapableBeanFactory#initializeBean)
方法:
protected Object initializeBean(String beanName, Object bean, @Nullable RootBeanDefinition mbd) {
		Object wrappedBean = bean;
		if (mbd == null || !mbd.isSynthetic()) {
			// 1. 此处利用后置处理器执行 JDK 注解对应的方法
			wrappedBean = applyBeanPostProcessorsBeforeInitialization(wrappedBean, beanName);
		}

		try {
			// 执行 InitializingBean 接口的方法和Bean 的 initMehod 方法
			invokeInitMethods(beanName, wrappedBean, mbd);
		}
		catch (Throwable ex) {
			throw new BeanCreationException(
					(mbd != null ? mbd.getResourceDescription() : null),
					beanName, "Invocation of init method failed", ex);
		}
		if (mbd == null || !mbd.isSynthetic()) {
			wrappedBean = applyBeanPostProcessorsAfterInitialization(wrappedBean, beanName);
		}

		return wrappedBean;
	}
好啦,到现在我们可以得出这三种方式的执行顺序:
@PostConstruct —> InitializingBean#afterPropertiesSet —> Bean的initMethod —> @PreDestroy —> DisposableBean#postConstruct —-> Bean的destroyMethod 方法
6. 总结
这篇文章,我主要向你介绍了:
- 初始化和销毁回调的用处
- 定义初始化和销毁回调的三种方式
- 源码分析三种回调的执行时机和顺序
最后,我希望你看完本篇文章后,我希望你掌握如何使用Bean初始化和销毁的回调,也希望你指出我在文章中的错误点,希望我们一起进步,也希望你能给我的文章点个赞,原创不易!