开发小程序除了大家能看到的客户端,前端小程序是如何与后端服务器进行数据交互的呢?
本文将通俗易懂的讲一下。这里以nodejs为例来进行讲解
1.首先要在服务器上安装nodejs服务器:
wget https://nodejs.org/dist/v12.18.1/node-v12.18.1-linux-x64.tar.xz // 下载
tar xf node-v12.18.1-linux-x64.tar.xz // 解压
cd node-v12.18.1-linux-x64 // 进入解压目录
解压文件的 bin 目录底下包含了 node、npm 等命令,我们可以修改linux系统的环境变量(profile)来设置直接运行命令:
老规矩先备份,养成修改重要文件之前先备份的好习惯。
cp /etc/profile /etc/profile.bak
然后 vim /etc/profile,在最下面添加 export PATH=$PATH: 后面跟上 node 下 bin 目录的路径
export PATH=$PATH:/root/node-v12.18.1-linux-x64/bin
立即生效
source /etc/profile
[root@localhost ~]# node -v
v12.18.1
接下来在服务器文件中找到域名目录
cd /wwwroot //进入wwwroot目录下
mkdir index //新建文件夹
在此目录下新建一个目录,把index.js放在这个目录下。(并且记住这个文件路径)
//nodejs源代码
const express=require(‘express’)
const bodyParser=require(‘body-parser’)
const app=express()
app.use(bodyParser.json())
app.post(‘/’,(req,res)=>{
console.log(req.body)
res.json(req.body)
})
app.listen(3000,()=>{
console.log(‘server running at http:域名:3000’)
})
进入服务器命令行窗口,并且进入到刚才记住的index目录下
初始化项目:
npm init -y
安装Express框架,用于快速搭建HTTP服务器:
npm install express –save
安装npm install nodemon监控文件修改:
npm install express –save
接下来就是小程序客户端的编码,源代码如下:
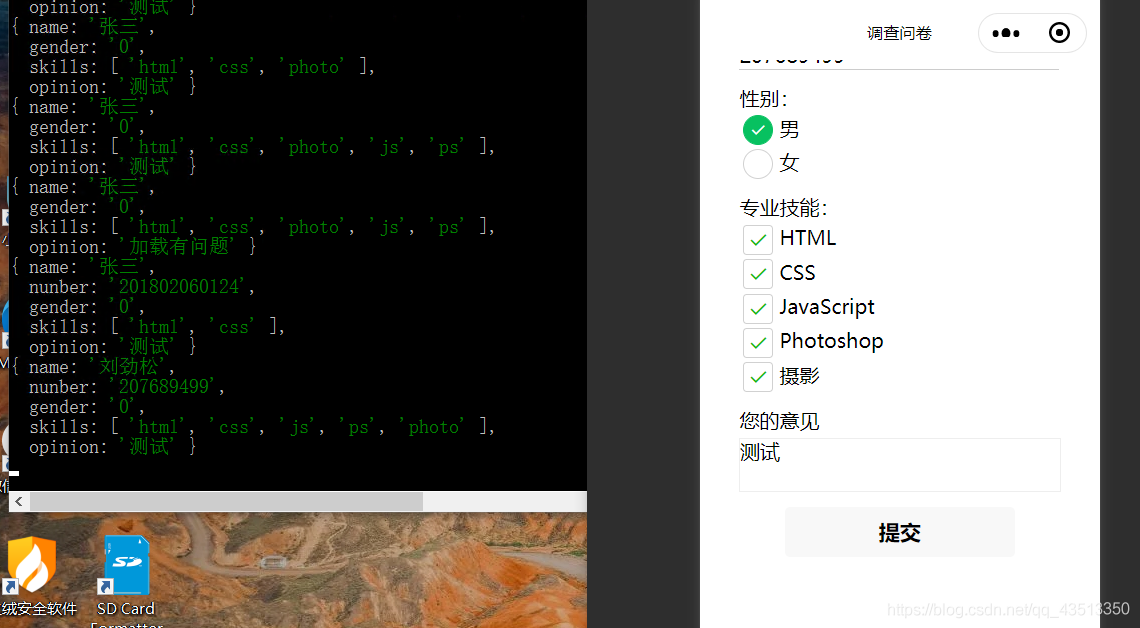
姓名:
学号:
性别:
男
女
专业技能:
HTML
CSS
JavaScript
Photoshop
摄影
您的意见
提交
//index.js
//获取应用实例
const app = getApp()
Page({
data: {
motto: ‘Hello World’,
userInfo: {},
hasUserInfo: false,
canIUse: wx.canIUse(‘button.open-type.getUserInfo’)
},
//事件处理函数
bindViewTap: function() {
wx.navigateTo({
url: ‘../logs/logs’
})
},
onLoad: function () {
if (app.globalData.userInfo) {
this.setData({
userInfo: app.globalData.userInfo,
hasUserInfo: true
})
} else if (this.data.canIUse){
// 由于 getUserInfo 是网络请求,可能会在 Page.onLoad 之后才返回
// 所以此处加入 callback 以防止这种情况
app.userInfoReadyCallback = res => {
this.setData({
userInfo: res.userInfo,
hasUserInfo: true
})
}
} else {
// 在没有 open-type=getUserInfo 版本的兼容处理
wx.getUserInfo({
success: res => {
app.globalData.userInfo = res.userInfo
this.setData({
userInfo: res.userInfo,
hasUserInfo: true
})
}
})
}
},
getUserInfo: function(e) {
console.log(e)
app.globalData.userInfo = e.detail.userInfo
this.setData({
userInfo: e.detail.userInfo,
hasUserInfo: true
})
},
submit: function(e){
wx.request({
method:’POST’,
url: ‘http://域名’,
data:e.detail.value,
success:function(res){
console.log(res)
}
})
},
})
/**index.wxss**/
.container{margin: 50rpx;}
view{margin-bottom: 30rpx;}
input{width: 600rpx;margin-top: 10rpx;border-bottom:2rpx solid #ccc;}
label{display: block;margin: 8rpx;}
textarea{width: 600rpx;height: 100rpx;margin-top: 10rpx;border: 2rpx solid #eee}
安装好这些模块后,启动服务器:
nodemon index.js
如果看到server running at http://域名,表示启动成功
成功测试截图