前言
这是作者第一次写文章,可能会有一些不好的地方。 有要环境+QQ:3464531613
任务一:登录安全加固
任务环境说明:
✓ 服务器场景:LOG:(开放链接)
✓ 用户名:root密码:root
✓ 服务器场景:Web:(开放链接)
✓ 用户名:administrator密码:P@ssw0rd
1.密码策略(Web)
a.最小密码长度不少于 8 个字符,将密码长度最小值的属性配置界面截图;
![](https://img-blog.csdnimg.cn/img_convert/fcef0ee51077253045a993b73dab2975.png)
b.密码策略必须同时满足大小写字母、数字、特殊字符,将密码必须符合复 杂性要求的属性配置界面截图。
![](https://img-blog.csdnimg.cn/img_convert/40a7654ebfc8d8bc8c6cbcb9bb056f78.png)
c.设置密码策略必须同时满足大小写字母、数字、特殊字符,最小密码长度 不少于 8 个字符,密码最长使用期限为 15 天。将服务器上密码策略配置信息截图;
![](https://img-blog.csdnimg.cn/img_convert/bf5e9a4240a73de4870f1c57971ad1f0.png)
2.登录策略(Web)
a.在用户登录系统时,应该有“For authorized users only”提示信息,将 登录系统时系统弹出警告信息窗口截图;
![](https://img-blog.csdnimg.cn/img_convert/37fe0255f4b43aa7b440958034e2b72b.png)
b.一分钟内仅允许 5 次登录失败的尝试,超过 5 次,登录帐号锁定 1 分钟, 将账户锁定策略配置界面截图;
![](https://img-blog.csdnimg.cn/img_convert/4b2e6edca1e076db24c87f63822fd09a.png)
c.设置 user1 用户只能在上班时间(周一至周五的 9:00~18:00)可以登录。 将 user1 的登录时间配置界面截图。
![](https://img-blog.csdnimg.cn/img_convert/650e7f1130fc650cf78a89842830e7ad.png)
d.远程用户非活动会话连接超时应小于等于5分钟。
![](https://img-blog.csdnimg.cn/img_convert/b07048a757b11e657f096f9158c8dc61.png)
3.用户安全管理(Web)
a.对服务器进行远程管理安全性 SSL 加固,防止敏感信息泄露被监听,将 RDP-Tcp 属性对应的配置界面截图;
![](https://img-blog.csdnimg.cn/img_convert/66f8bde425d3edc16cfb738ea85be57b.png)
b.仅允许超级管理员账号关闭系统,将关闭系统属性的配置界面截图。
![](https://img-blog.csdnimg.cn/img_convert/029fff574e24ec89f638da1d948c1d43.png)
c.禁止普通用户使用注册表编辑工具以及Ctrl+Alt+Del;
![](https://img-blog.csdnimg.cn/img_convert/5e5ebbebfd2f4aef82f7709cef383a84.png)
![](https://img-blog.csdnimg.cn/img_convert/dd6f5235429eab50a30fb65bf4df2095.png)
d.交互式登录时不显示用户名;
![](https://img-blog.csdnimg.cn/img_convert/03b1c3e326b84701bb11c6a82a834873.png)
e.设置取得文件或其他对象的所有权,将该权限只指派给administrators组;
![](https://img-blog.csdnimg.cn/img_convert/b6e8aadebe01aa2648eb7b088bfbe2d8.png)
f.禁止普通用户使用命令提示符;
方法一:
![](https://img-blog.csdnimg.cn/img_convert/97baba4fb57dfbf48a696eed2f51f9f8.png)
方法2:
![](https://img-blog.csdnimg.cn/img_convert/9f455810c8961a974e2863a11f95238a.png)
任务二:Web 安全加固(Web)
任务环境说明:
✓ 服务器场景:LOG:(开放链接)
✓ 用户名:root密码:root
✓ 服务器场景:Web:(开放链接)
✓ 用户名:administrator密码:P@ssw0rd
1.为了防止 web 中.mdb 数据库文件非法下载,请对 Web 配置文件进行安全加 固,将 C:\Windows\System32\inetsrv\config\applicationHost 配置文件中对应 的部分截图;
![](https://img-blog.csdnimg.cn/img_convert/d8e00bf73e4e7ba94578b46e56c7f36f.png)
2.限制目录执行权限,对 picture 和 upload 目录设置执行权限为无,将编辑 功能权限的配置界面截图;
picture目录设置:
![](https://img-blog.csdnimg.cn/img_convert/24dfe8197cff454f4bdb334bfc5eaa43.png)
upload目录设置:
![](https://img-blog.csdnimg.cn/img_convert/de102d76bc5606967dba4af430575da9.png)
方法2:
picture目录设置:
![](https://img-blog.csdnimg.cn/img_convert/6ae328d3d2ec73649048aa45f97092cb.png)
upload目录设置:
![](https://img-blog.csdnimg.cn/img_convert/c6bdcf962650d6d036d21b54b4cd87bf.png)
3.开启 IIS 的日志审计记录(日志文件保存格式为 W3C,只记录日期、时间、客 户端 IP 地址、用户名、方法),将 W3C 日志记录字段的配置界面截图;
![](https://img-blog.csdnimg.cn/img_convert/0bb1aaf98b3e5e5d6880ca047cf76cec.png)
4.为了减轻网站负载,设置网站最大并发连接数为 1000,将编辑网站限制的 配置界面截图;
![](https://img-blog.csdnimg.cn/img_convert/e765c5c0a657a0b1e7e6bed6ae303e2e.png)
5.防止文件枚举漏洞枚举网络服务器根目录文件,禁止 IIS 短文件名泄露, 将配置命令截图。
![](https://img-blog.csdnimg.cn/img_convert/6f34cbbc48abda85607222fc2c883c29.png)
6.关闭 IIS 的 WebDAV 功能增强网站的安全性,将警报提示信息截图。
![](https://img-blog.csdnimg.cn/img_convert/e969eed45a87d8aa2a499766854e68a1.png)
7.设置网站的最大并发连接数为 1000,网站连接超时为 60s,将编辑网站限制的配置界面截图;
![](https://img-blog.csdnimg.cn/img_convert/cf19b815ea92d6624536efb60a89b4ab.png)
8. 禁用 IIS 内核缓存,避免对方利用 ms15_034 漏洞进行 DOS 攻击,出现蓝屏 的现象,将编辑输出缓存设置的配置界面截图;
![](https://img-blog.csdnimg.cn/img_convert/3f6edaaf230273cd0f9202a26a338c0e.png)
任务三:流量完整性保护与事件监控(Web,Log)
任务环境说明:
✓ 服务器场景:LOG:(开放链接)
✓ 用户名:root密码:root
✓ 服务器场景:Web:(开放链接)
✓ 用户名:administrator密码:P@ssw0rd
1.为了防止密码在登录或者传输信息时被窃取,仅使用证书登录 SSH(Log), 将/etc/ssh/sshd_config 配置文件中对应的部分截图;
![](https://img-blog.csdnimg.cn/img_convert/af76e78bc0b58d694a0403106f1f1986.png)
2.将 Web 服务器开启审核策略
登录事件成功/失败;
特权使用成功;
策略更改成功/失败;
进程跟踪成功/失败;
将审核策略的配置界面截图;
![](https://img-blog.csdnimg.cn/img_convert/a7d960d7a957e6ae68ea0de0f28b13cb.png)
3.配置 Splunk 接收 Web 服务器,安全日志,系统日志,CPU 负载,内存,磁
盘空间,网络状态。将转发器:部署成功的页面截图。
![](https://img-blog.csdnimg.cn/img_convert/e13ca2a5c0d0f17a22feaf8ef9e4c347.png)
任务四: 防火墙策略-1
任务环境说明:
✓ 服务器场景:LOG:(开放链接)
✓ 用户名:root密码:root
✓ 服务器场景:Web:(开放链接)
✓ 用户名:administrator密码:P@ssw0rd
所有服务器开启防火墙,为防止勒索病毒攻击对防火墙进行加固策略:
1.Windows 系统禁用 445 端口,将防火墙入站规则截图;
![](https://img-blog.csdnimg.cn/img_convert/c49583ab871821a6743fe4faddfacdae.png)
2.Linux 系统禁用 23 端口,将 iptables 配置命令截图;
![](https://img-blog.csdnimg.cn/img_convert/9f02220499792b6c3a296394dd0ac9f7.png)
3.Linux 系统禁止别人 ping 通,将 iptables 配置命令截图;
![](https://img-blog.csdnimg.cn/img_convert/d8546169a6f5b36d1b30de4b0402d7c6.png)
4.Linux 系统为确保安全禁止所有人连接 SSH 除了 172.16.1.1 这个 ip,将 iptables 配置命令截图。
![](https://img-blog.csdnimg.cn/img_convert/149153d8af7995801562fed7987f84ad.png)
任务五:Linux 操作系统安全配置-1
任务环境说明:
✓ 服务器场景:LinuxServer:(开放链接)
✓ 用户名:root,密码:123456
✓ 数据库用户名:root,密码:123456
请对服务器 LinuxServer 按要求进行相应的设置,提高服务器的安全性。
1.设置最小密码长度不少于 8 个字符,密码最长使用期限为 15 天。将
/etc/login.defs 配置文件中对应的部分截图;
![](https://img-blog.csdnimg.cn/img_convert/e0608dfa92f80721f3b06f633c96afe5.png)
2.设置在用户登录系统时,会有“For authorized users only”提示信息,
将登录系统时系统弹出提示信息界面截图;
![](https://img-blog.csdnimg.cn/img_convert/e8a326c88ba7e0901f4ecc722bd98a11.png)
3.设置 root 用户的计划任务。每天早上 7:50 自动开启 vsftpd 服务,22 点 50 时关闭;每周六的 7:30 时,重新启动 vsftpd 服务。使用 crontab –l 查看计 划任务,将回显结果截图;
![](https://img-blog.csdnimg.cn/img_convert/297a87d21592965cc80ee4ab48c88315.png)
4.禁止匿名用户登录 vsftpd 服务,将/etc/vsftpd/vsftpd.conf 配置文件中 对应的部分截图;
![](https://img-blog.csdnimg.cn/img_convert/08c1e7598dd05a02a60f32fe614086cb.png)
5.限制客户端连接 vsftpd 服务时,同一个 IP 最多只能打开两个连接,将 /etc/vsftpd/vsftpd.conf 配置文件中对应的部分截图;
![](https://img-blog.csdnimg.cn/img_convert/793e34dffc07363a4093837974ccc4d1.png)
6.将 SSH 服务的端口号修改为 2222 ,使用命令 netstat -anltp | grep sshd 查看 SSH 服务端口信息,将回显结果截图;
![](https://img-blog.csdnimg.cn/img_convert/2c921b2af5a5c0de74e95c53c04fcc5e.png)
7.禁止 root 用户通过 SSH 远程登录,将/etc/ssh/sshd_config 配置文件中 对应的部分截图;
![](https://img-blog.csdnimg.cn/img_convert/84b5a524b6a354b268b70dbd0d838985.png)
8.禁止 mysql 服务以管理员权限的账号运行,将/etc/my.cnf 配置文件中对应的部分截图;
![](https://img-blog.csdnimg.cn/img_convert/b255bd2a2e8e3adb5b92e47b14d6fd90.png)
9.删除默认数据库 test, 然后使用 show databases;命令查看当前的数据库信息,将回显结果截图;
![](https://img-blog.csdnimg.cn/img_convert/a1560c6226462ff94547b10bc9c5c14e.png)
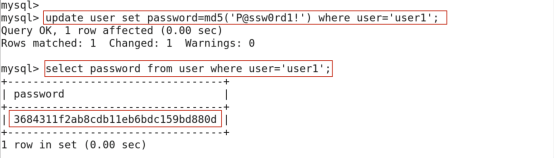
10.将数据库用户 user1 的密码使用 MD5 加密,然后在数据库中使用 select password from user where user=’user1’;命令查看 user1 的密码,将回显结 果截图。
![](https://img-blog.csdnimg.cn/img_convert/0323934f7df645d0c688f42f53e7d4c2.png)
任务六:数据库加固
任务环境说明:
-
(Linux)系统:用户名root,密码123456 mysql 8版本
1.删除默认数据库(test);
![](https://img-blog.csdnimg.cn/img_convert/158cbf9cd8af661baa5bb075372bb0ac.png)
2.改变默认MySql管理员用户为:SuperRoot;
![](https://img-blog.csdnimg.cn/img_convert/247341dc52c8805f8b5160c3b8be9ed6.png)
3.使用MySql内置MD5加密函数加密用户user1的密码为(P@ssw0rd1!)
![](https://img-blog.csdnimg.cn/img_convert/310d35b25f2c8cda34a7fc54a09deaee.png)
4.赋予user1用户对数据库所有表只有select、insert、delete、update权限;
![](https://img-blog.csdnimg.cn/img_convert/bcfc429f8ab77b6da1abc952ca9d544a.png)
5.对忘记mysql数据库SuperRoot管理员密码进行重置操作;
![](https://img-blog.csdnimg.cn/img_convert/6511d6f9040ed98c7e35db3e227b9f7b.png)
任务七:服务加固 SSH\VSFTPD
任务环境说明:
-
(Linux)系统:用户名root,密码123456
1.SSH服务加固
(1)SSH 禁止 root 用户远程登录。
![](https://img-blog.csdnimg.cn/img_convert/78ea8c71413904e4c6254f68f11cab69.png)
(2)设置 root 用户的计划任务。每天早上 7:50 自动开启 SSH 服务,22:50 关闭;每周六的 7:30 重新启动 SSH 服务。
![](https://img-blog.csdnimg.cn/img_convert/2dcbd993bab777cbf59b9130660a7713.png)
(3)修改 SSH 服务端口为 2222。
![](https://img-blog.csdnimg.cn/img_convert/38fda64a955522dbec8a6cff9c292b72.png)
![](https://img-blog.csdnimg.cn/img_convert/8e30125b9f92b7759ad9d6cf316133bd.png)
(4) 修改SSHD的PID档案存放地。
![](https://img-blog.csdnimg.cn/img_convert/f27419290f3e45783f0df5b5e986395a.png)
2.VSFTPD 服务加固
(1)设置数据连接的超时时间为 2 分钟、无任何操作的超时时间为5分钟。
![](https://img-blog.csdnimg.cn/img_convert/4b1529535a9161d018062e5ab9b0eed3.png)
(2)设置站点本地用户访问的最大传输速率为1M。
![](https://img-blog.csdnimg.cn/img_convert/c2e5fb27a5a0f399356cb000539ba8b2.png)
(3)禁止匿名用户登录。
![](https://img-blog.csdnimg.cn/img_convert/55ba3e69135ce439fcd2c1d83bb0ffb0.png)
(4)关闭ascii模式下载,防止被用于DoS攻击。
![](https://img-blog.csdnimg.cn/img_convert/d482b8509195564d982a6b6a1fc81895.png)
(5)设置运行vsftpd的非特权系统用户为pyftp;
![](https://img-blog.csdnimg.cn/img_convert/ace792917e0771da5b8ebee0ada34a14.png)
(6)限制客户端连接的端口范围在50000-60000;
![](https://img-blog.csdnimg.cn/img_convert/28d64bcba01870e1b331248ae27dade2.png)
(7)限制本地用户登陆活动范围限制在home目录。
![](https://img-blog.csdnimg.cn/img_convert/59a433f4d3773c319e36dc449b0d7c0d.png)
任务八:防火墙策略-2
任务环境说明:
-
(Linux)系统:用户名root,密码123456
1.只允许转发来自172.16.0.0/24 局域网的DNS解析请求数据包;
![](https://img-blog.csdnimg.cn/img_convert/a8c68a5092b5e908ba2dc5fde04af9fc.png)
2.为确保安全,仅允许 172.16.10.0/24 网段内的主机通过 SSH 连接本机。
![](https://img-blog.csdnimg.cn/img_convert/4ceb148a94eb2960cb11d5caacd716fd.png)
3.为防止Nmap扫描软件探测到关键信息,设置iptables防火墙策略对80、3306号端口进行流量处理;
![](https://img-blog.csdnimg.cn/img_convert/cedc06e2b7dd82d14ae45492188f1c79.png)
4. 为防御 IP 碎片攻击,设置 iptables 防火墙策略限制 IP 碎片 的数量,仅允许每秒处理 1000 个,将 iptables 配置命令截图:
![](https://img-blog.csdnimg.cn/img_convert/ab38d76efa5f37e1084569542993ae60.png)
5. 为防御拒绝服务攻击,设置iptables防火墙策略对传入的流量进行过滤,限制每分钟允许三个包传入,并将瞬间流量设置为一次最多处理6个数据包,(超过上限的网络数据包将丢弃不予处理)。
![](https://img-blog.csdnimg.cn/img_convert/755f347f9411591b28f257ecfaade141.png)
6. 禁止转发来自 MAC 地址为 29:0E:29:27:65:EF 主机的数据包, 将 iptables 配置命令截图:
![](https://img-blog.csdnimg.cn/img_convert/ca95bae2e1b87ef0614dad51546691df.png)
任务九:Linux操作系统安全配置-2
任务环境说明:
(Linux Centos7)系统:用户名root,密码123456
1. 设置禁止使用最近用过的6个旧密码,将配置文件中对应的部分截图;
![](https://img-blog.csdnimg.cn/img_convert/45fd0c7a5265e56b2dcf4fe1db8553b0.png)
2. 设置密码复杂程度,允许重试3次,新密码必须与旧密码有4位不同,密码最小长度为6位,大写字母至少包含2位,小写字母至少包含3位,特殊字符个数至少含1位,将配置文件中对应的部分截图;
![](https://img-blog.csdnimg.cn/img_convert/d9743d0ded6959f594ac06d05a4be9a9.png)
3.禁止匿名用户登录vsftpd服务,将配置文件中的对应部分截图;
![](https://img-blog.csdnimg.cn/img_convert/5de0dc25f460504596e4350cb347e404.png)
4.设置关闭ftp-data端口不使用主动模式,使用ipv4进行监听,将配置文件对应的部分截图;
![](https://img-blog.csdnimg.cn/img_convert/82f2de477d8566b9f28ff7179a11ffeb.png)
![](https://img-blog.csdnimg.cn/img_convert/4bf6c5dcd75d305727273140b466817c.png)
5. 将telnet服务的端口修改为2323,查看telnet服务端口信息,将回显结果截图;
![](https://img-blog.csdnimg.cn/img_convert/159929258d3416b21fe0952f74b1cc72.png)
6.限制Telnet用户连接,单个IP允许的最大连接数为1,总的最大连接数为10,将配置文件中对应的部分截图。
![](https://img-blog.csdnimg.cn/img_convert/c3ceaca6a6e5a7bf9b8da37a7fe082f9.png)
7.允许root用户通过ssh远程登录,将配置文件中对应的部分截图。
![](https://img-blog.csdnimg.cn/img_convert/3e33c05769da9486d0c728b71725d413.png)
8.配置SSH服务,设置RSA证书登录,将配置文件中对应的部分截图。
![](https://img-blog.csdnimg.cn/img_convert/18beaadea0bc5adc9d76463b3b42eef7.png)
9.修改网站的http服务为root权限,将配置文件中对应的部分截图。
![](https://img-blog.csdnimg.cn/img_convert/d08577f8845a95c4cb69429386e957a3.png)
10.设置http服务,修改网站的配置文件,配置滚动日志分割按天记录网站的访问日志和错误日志,将配置文件中的部分截图。
![](https://img-blog.csdnimg.cn/img_convert/d437ed74ba581109fd939496c96cbeea.png)
![](https://img-blog.csdnimg.cn/img_convert/416c817d52412e61df9694565790233e.png)
任务十:Linux操作系统安全配置-3
任务环境说明:
(Linux Centos7)系统:用户名root,密码123456
1.设置账户密码有效期,密码最大有效期为30,可修改密码最小天数为5,密码长度为6,密码失效前4天通知,将配置文件login.defs中对应的部分截图;
![](https://img-blog.csdnimg.cn/img_convert/9a7f12bb197e576efe24a21a02de191e.png)
2.设置root的密码策略,密码过期时间为10天,密码失效时间为2天,在密码过期之前警告的天数为3天,两次改变密码之间相距的最大天数为8天,使用chage查看root结果并截图;
![](https://img-blog.csdnimg.cn/img_convert/ab8429f21141dc1bba74d0119ce9b7d5.png)
3.允许匿名用户登录vsftpd服务,禁止匿名用户上传文件,将配置文件中对应的部分截图;
![](https://img-blog.csdnimg.cn/img_convert/288b8cc9c8de53066f53cbe5ed147a6a.png)
![](https://img-blog.csdnimg.cn/img_convert/ad2ae9d8a65965d87e170492d43e512c.png)
4.限制FTP客户端连接,最大连接数为4,将配置文件中对应的部分截图;
![](https://img-blog.csdnimg.cn/img_convert/d97d85043a8d95fd7dbe262ded75b893.png)
5.配置samba服务,允许匿名用户访问share文件目录下,将配置文件中对应的部分截图;
![](https://img-blog.csdnimg.cn/img_convert/4bf59bca302893b4f6a722dbd6dbc93f.png)
6.配置Samba服务,允许访问public文件目录,只可以上传不可以删除,且只有创建者和root可以删除,将配置文件中对应的部分截图;
![](https://img-blog.csdnimg.cn/img_convert/1c171f104d06654db2dcfedb2f59a673.png)
7.设置访问网站时需要账户认证访问,将配置文件中对应的部分截图;
![](https://img-blog.csdnimg.cn/img_convert/5845198c8631c349cda646877f821b9f.png)
8.配置证书,以HTTTPS协议访问网页,将网页访问结果截图;
![](https://img-blog.csdnimg.cn/img_convert/7b29ab74db9542c153ad6867a63f9f97.png)
9.为网站设置DNS地址,网站域名为
www.test.com
,使用nslookup将正向解析的内容截图;
![](https://img-blog.csdnimg.cn/img_convert/b21b7ac41a91f9400a66c2f9bb5f4404.png)
10.设置DNS服务,只允许192.168.1.1解析查询,将配置文件中对应的部分截图。
![](https://img-blog.csdnimg.cn/img_convert/3a77db9fe81a51d727d4af60cc276711.png)
任务十一:IP安全协议配置
任务环境说明:
(Windows 2008)系统:用户名Administrator,密码P@ssw0rd
1.指定触发SYN洪水攻击保护所必须超过的TCP连接请求数阈值为5;
![](https://img-blog.csdnimg.cn/img_convert/f7ed9b44e8e540770b667cf12acf5038.png)
![](https://img-blog.csdnimg.cn/img_convert/817f97f14b78115f57e2e90ac946bedf.png)
2.指定处于SYN_RCVD状态的TCP连接数的阈值为500;
![](https://img-blog.csdnimg.cn/img_convert/4801e2cf60cdee11b6118501425da4f3.png)
3.指定处于至少已发送一次重传的SYN_RVCD状态中的TCP连接数的阈值为400。
![](https://img-blog.csdnimg.cn/img_convert/53fe3ee18f4d8bada3a2d018dbc48fbb.png)
任务十二:中间件服务安全加固VSFTPD/HTTPD/BIND(Linux)
任务环境说明:
(Linux)系统:用户名root,密码123456
1.VSFTPD
a.vsftpd禁止匿名用户上传;
![](https://img-blog.csdnimg.cn/img_convert/96dee6da1a0e427de4c53e05eb1e96c8.png)
b.设置无任何操作的超时时间为5分钟。
![](https://img-blog.csdnimg.cn/img_convert/77c3700091e0386e9d7f59735b31ca18.png)
c.匿名用户访问的最大传输速率为512KB/s。
![](https://img-blog.csdnimg.cn/img_convert/9fa4a94d7fab865f9e058efc2aece409.png)
d.用户访问的最大传输速率为1M。
![](https://img-blog.csdnimg.cn/img_convert/e91fde075be600c88854d5fbd90d37c2.png)
2.HTTPD
a.更改默认监听端口为6666;
![](https://img-blog.csdnimg.cn/img_convert/810da95248545506b0a14e2a37892f85.png)
b.设置禁止目录浏览;
![](https://img-blog.csdnimg.cn/img_convert/da0b39c5f310be9add61c06df155dd1a.png)
c.隐藏Apache版本号;
![](https://img-blog.csdnimg.cn/img_convert/2c6dd1a9dbc8dae38442c4f0f71f3604.png)
d.将apache用户降权为apache用户,组为www;
![](https://img-blog.csdnimg.cn/img_convert/0ba3be14514fccf4c005c6ea4383218a.png)
3.BIND
a.隐藏bind版本号;
![](https://img-blog.csdnimg.cn/img_convert/366e229181be851c04f9d765f28985e3.png)
b.设置不提供递归服务。
![](https://img-blog.csdnimg.cn/img_convert/3891b374b2b6caa3f3fa24cdb8d5f133.png)
任务十三:流量完整性保护(Windows)
任务环境说明:
(Windows 2008)系统:用户名Administrator,密码P@ssw0rd
1.对Web网站进行HTTP重定向HTTPS设置,仅使用HTTPS协议访问网站(Windows)(注:证书颁发给
test.com
并通过
https://www.test.com
访问Web网站)。
![](https://img-blog.csdnimg.cn/img_convert/43ac1d6bcbc7d29ce957d8dadd2b70be.png)
![](https://img-blog.csdnimg.cn/img_convert/963a1044ff33b7e9477d1d881fe47697.png)
任务十四:防火墙策略-3(Linux)
任务环境说明:
(Linux)系统:用户名root,密码123456
1.为防止Nmap扫描软件探测到关键信息,设置iptables防火墙策略对3306号端口进行流量处理;
![](https://img-blog.csdnimg.cn/img_convert/a9ce402bd062ebacf445b3e22959b07f.png)
2.为防止SSH服务被暴力枚举,设置iptables防火墙策略仅允许172.16.10.0/24网段内的主机通过SSH连接本机;
![](https://img-blog.csdnimg.cn/img_convert/7bb49400474b9af98c1cd4d6d088e8bc.png)
3.为防御IP碎片攻击,设置iptables防火墙策略限制IP碎片的数量,仅允许每秒处理1000个。
![](https://img-blog.csdnimg.cn/img_convert/388b8514ea695543950e5c8d4c1b3fbb.png)
任务十五:Nginx安全策略(Linux)
任务环境说明:
(Linux)系统:用户名root,密码123456
1.
禁止目录浏览和隐藏服务器版本和信息显示;
![](https://img-blog.csdnimg.cn/img_convert/9aea1d249ad40c65d4624f240317c268.png)
2.限制HTTP请求方式,只允许GET、HEAD、POST;
![](https://img-blog.csdnimg.cn/img_convert/78b6cf41bfbb997cfdb9f4c6ab69b011.png)
3.设置客户端请求主体读取超时时间为10;
![](https://img-blog.csdnimg.cn/img_convert/b25c6f08986d428bdfd04b44bd4c088b.png)
4.设置客户端请求头读取超时时间为10;
![](https://img-blog.csdnimg.cn/img_convert/e83a8589fa087140a16ffc9efe989410.png)
5. 将Nginx服务降权,使用www用户启动服务。
![](https://img-blog.csdnimg.cn/img_convert/15eb783a7515b360d4d3414bf6b0f1d4.png)
任务十六:日志监控
任务环境说明:
(windows 2003)系统:用户名Administrator,密码123456
1.安全日志文件大小至少为128MB,设置当达到最大的日志大小上限时,覆盖早于30天的日志;
![](https://img-blog.csdnimg.cn/img_convert/95949f72cba04f2371090026149282de.png)
2. 应用日志文件大小至少为64MB,设置当达到最大的日志大小上限时,覆盖早于15天的日志;
![](https://img-blog.csdnimg.cn/img_convert/b9c3d0b1e21e88315161e3a1eed9d3b6.png)
3.系统日志大小至少为32MB,设置当达到最大的日志大小上限时,按需要覆盖事件。
![](https://img-blog.csdnimg.cn/img_convert/3712b8f12fa41f3d3506cd545a185949.png)
任务十七:本地安全策略
任务环境说明:
(windows 2008)系统:用户名Administrator,密码P@ssw0rd
1.禁止匿名枚举SAM帐户;
![](https://img-blog.csdnimg.cn/img_convert/8894ebf513fbffb3aa31f8d68237ae0a.png)
2.禁止系统在未登录的情况下关闭;
![](https://img-blog.csdnimg.cn/img_convert/6b36f47b57e66fc8b6fa9a535698d6e5.png)
3.禁止存储网络身份验证的密码和凭据;
![](https://img-blog.csdnimg.cn/img_convert/192668601e78fe26ba9abb1e10a0d16d.png)
4.禁止将Everyone权限应用于匿名用户;
![](https://img-blog.csdnimg.cn/img_convert/66803a591f7714ef7f718ccac5f3f801.png)
5.在超过登录时间后强制注销。
![](https://img-blog.csdnimg.cn/img_convert/dc71e4e6c15dc8026629d100563611f8.png)
任务十八:服务安全配置(Windows)
任务环境说明:
(windows 2008)系统:用户名Administrator,密码P@ssw0rd
1.禁用TCP/IP上的NetBIOS协议,关闭监听的 UDP 137(netbios-ns)、UDP 138(netbios-dgm)以及 TCP 139(netbios-ssn)端口;
![](https://img-blog.csdnimg.cn/img_convert/f72cd3e6458319e6dd7f0e9d3ad28b41.png)
![](https://img-blog.csdnimg.cn/img_convert/f3f4dec266ab933c28654808e649cbbd.png)
2.在本地策略里配置禁用未登陆前关机;
![](https://img-blog.csdnimg.cn/img_convert/cdc2655d42fefbaca1296be0f387b833.png)
3.设置从屏幕保护恢复时需要输入密码,并将屏幕保护自动开启时间设定为五分钟;
![](https://img-blog.csdnimg.cn/img_convert/84717c67704d36db64204cefb769891f.png)
4.对于远程登录的帐户,设置不活动超过时间5分钟自动断开连接。
![](https://img-blog.csdnimg.cn/img_convert/2635197e6e4913cbef3b19a57f73b26c.png)
任务十九:中间件安全加固SSHD\VSFTPD\IIS(Windows, Linux)
任务环境说明:
(windows 2008)系统:用户名Administrator,密码P@ssw0rd
(Linux) 系统:用户名 root 密码123456
1.SSHD服务加固
a.修改SSH连接界面静置时间;
![](https://img-blog.csdnimg.cn/img_convert/ab3ec59feca6fd4a4a8f6bace3bf4ed3.png)
b.修改登录记录的等级为INFO;
![](https://img-blog.csdnimg.cn/img_convert/d9a2fc38cfb4d2dc0bce21597987eb5a.png)
c.禁止登陆后显示信息。
![](https://img-blog.csdnimg.cn/img_convert/87e81bd838a0be6e6d13a68547800da1.png)
2.VSFTPD服务加固
a.同一客户机IP地址允许最大客户端连接数10;
![](https://img-blog.csdnimg.cn/img_convert/50bc02148705b4b8806293e94f4f6a77.png)
b.最大客户端连接数为100;
![](https://img-blog.csdnimg.cn/img_convert/61fd2a3950de09e0585ddb8ee276d121.png)
c.设置数据连接的超时时间为2分钟;
![](https://img-blog.csdnimg.cn/img_convert/cb9c23519d6f8aaa76ce3a96375b5367.png)
d.设置本地用户创建文件的权限为022。
![](https://img-blog.csdnimg.cn/img_convert/a51a7af8c9ee54dd6e58dbf57f7da30d.png)
3. IIS服务加固
a.关闭FTP匿名访问;
![](https://img-blog.csdnimg.cn/img_convert/01c7bb5ded41ecc59e7e2aba529d418e.png)
b.为了解决IIS短文件名漏洞,设置URL序列为~;
![](https://img-blog.csdnimg.cn/img_convert/8e16e91d532273bfe84288ee525ad3ca.png)
c.设置网站最大并发连接数为10。
![](https://img-blog.csdnimg.cn/img_convert/72fb281738d2f7040fb47ec50bee16aa.png)
任务二十:防火墙策略-4(Linux)
任务环境说明:
(Linux) 系统:用户名 root 密码123456
1.
禁止任何机器ping本机;
![](https://img-blog.csdnimg.cn/img_convert/ccdf15447f40c141b881fb2d34a1c5f4.png)
2.禁止本机ping任何机器;
![](https://img-blog.csdnimg.cn/img_convert/0ce5b7fd7c231b49648e4af3b29fed2a.png)
3.拒绝 TCP 标志位全部为 1 及全部为 0 的报文访问本机;
![](https://img-blog.csdnimg.cn/img_convert/288b7406a822327eb5eb69a1b1f8ef9f.png)
4.禁止转发来自MAC地址为29:0E:29:27:65:EF主机的数据包。
![](https://img-blog.csdnimg.cn/img_convert/c44f0cf6f5709b6570976d0502356488.png)
5.配置iptables防火墙过滤规则,以封堵目标网段(172.16.1.0/24),并在两小时后解除封锁。
![](https://img-blog.csdnimg.cn/img_convert/5b74e6e98dc9093ae395704361c342b7.png)
或
![](https://img-blog.csdnimg.cn/img_convert/2045cb403f6ae37ddd10c0b05af55b23.png)
6.在工作时间,即周一到周五的8:30-18:00,开放本机的ftp服务给 192.168.1.0网络中的主机访问;
![](https://img-blog.csdnimg.cn/img_convert/a0881659c52b00c9bb92f7c197e8a212.png)
任务二十一:本地安全策略设置(Windows)
任务环境说明:
(Windows 2008) 系统:用户名 Administrator密码 P@ssw0rd
1.关闭系统时清除虚拟内存页面文件;
![](https://img-blog.csdnimg.cn/img_convert/44e72135f8fd1f38bebe7aeeb2e14399.png)
2.禁止软盘复制并访问所有驱动器和所有文件夹;
![](https://img-blog.csdnimg.cn/img_convert/bf97dd0432a8ebbc489f9700c4ae6382.png)
3.禁止自动管理登录;
![](https://img-blog.csdnimg.cn/img_convert/780a63e7bf930714ddd83b375078bc7a.png)
4.禁止显示上次登录的用户名。
![](https://img-blog.csdnimg.cn/img_convert/ea49c4e6c1a9258e076c1865b98d5cef.png)
任务二十二:Windows操作系统安全配置(Windows)
任务环境说明:
(Windows server2012) 系统:用户名 Administrator密码 P@ssw0rd
1.在系统中查看软件授权服务器版本,提高服务器的安全性;
![](https://img-blog.csdnimg.cn/img_convert/49e3b98d1484a6e20de74cda27b9d336.png)
2.在系统中设置telnet,设置telnet最大连接数不超过3,将登录超出的信息窗口即过程截图;
![](https://img-blog.csdnimg.cn/img_convert/db2c463f5e7539e5964b1e39109249f7.png)
![](https://img-blog.csdnimg.cn/img_convert/53e0fc9978925a4528400eac6ea54269.png)
3.在系统中设置telnet,设置telnet登录尝试的最大失败数不超过5,将登录错误的信息窗口及过程截图;
![](https://img-blog.csdnimg.cn/img_convert/7f34c5c332bd9112aa56e8472154d226.png)
![](https://img-blog.csdnimg.cn/img_convert/979b25778e8c90440c53340e7a736074.png)
4,在系统中设置用户的登录脚本,用户登录后弹出信息框为”Welcome 登录脚本”将登录界面全屏及过程截图;
![](https://img-blog.csdnimg.cn/img_convert/fef5252daef27f24a7de6aa65db0a52d.png)
![](https://img-blog.csdnimg.cn/img_convert/a59d5f03d41424e174624ad4833b0334.png)
![](https://img-blog.csdnimg.cn/img_convert/4625bb7af4690306c59af6b2eaee8c3e.png)
5.在系统策略中锁定.vbs不可执行,并将执行结果截图;
![](https://img-blog.csdnimg.cn/img_convert/c5421ab886c88f0207af65c0ad3c80b3.png)
6.在系统中将本地磁盘(C:)里面的sharefile文件用管理员用户映射,将映射后的这台电脑窗口界面截图;
![](https://img-blog.csdnimg.cn/img_convert/fb99b940d58ca18361984a0808e2b12c.png)
7.在系统中设置bitLocker,使操作系统磁盘加密,将输入密码以解锁此驱动器窗口截图;
![](https://img-blog.csdnimg.cn/img_convert/50ba76bb231a36a4521a83cef52b2821.png)
8.设置用户只能在工作日登录,将用户的登录时间配置界面截图;
![](https://img-blog.csdnimg.cn/img_convert/924bd683eefeccffcc09973a3959abf7.png)
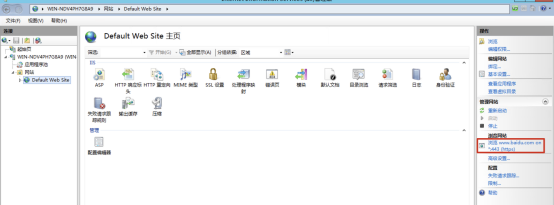
9.在系统中设置网站首页只能用证书以域名的方式访问,将域名设置成
www.baidu.com
,将访问网站后的浏览器全屏及过程截图;
![](https://img-blog.csdnimg.cn/img_convert/e03abb0deb9092c6c57785a681d24aa4.png)
![](https://img-blog.csdnimg.cn/img_convert/845080f3c24e228da0c6d2e6fc61c48a.png)
10.在系统中设置用户登录审核,将审核成功与失败的结果即过程分别截图;
![](https://img-blog.csdnimg.cn/img_convert/e46cbd5ff5eb4e6d2bac042e5676fab5.png)
![](https://img-blog.csdnimg.cn/img_convert/9e615538b141b529a088447a4c07be1c.png)
![](https://img-blog.csdnimg.cn/img_convert/6b4f53356fc66a557b1a5902c96a6fff.png)