1 前言
本文将介绍如何在 Centos 上安装 Nginx,其中包含了以下两个内容:
- 如何通过编译方式安装 Nginx
- 安装 Nginx 后,如何把 Nginx 服务配置为在 Systemd 监管下的服务
2 安装 Nginx
2.1 安装 Nginx 的依赖
Nginx 的编译及运行时,需要依赖一些库,执行下面命令安装相关的库
yum -y install gcc zlib zlib-devel pcre-devel openssl openssl-devel
2.2 下载 Nginx 的安装包
我们可以到
http://nginx.org/download
下载 Nginx 的安装包,本文将安装版本为
1.23.3
的 Nginx。
-
到
/opt
下新建
nginx
文件夹
[root@localhost ~]# cd /opt
[root@localhost opt]# mkdir nginx
- 下载安装包 nginx-1.23.3.tar.gz
[root@localhost opt]# cd nginx
[root@localhost nginx]# wget http://nginx.org/download/nginx-1.23.3.tar.gz
2.3 编译并安装 Nginx
- 解压安装包
[root@localhost nginx]# tar -xvf nginx-1.23.3.tar.gz
[root@localhost nginx]# mv nginx-1.23.3 nginx
[root@localhost nginx]# cd nginx
- 进行编译前配置
在编译前,我们先要执行
configure
命令生成
Makefile
,
Makefile
中将包含整个编译过程的命令。另外,考虑以后需要配置 tls 证书,我们为Nginx 添加两个模块,
with-http_stub_status_module
和
with-http_ssl_module
。
默认情况下,安装目录是不包含
Makefile
的:
[root@localhost nginx]# ls -alt
total 808
drwxr-xr-x 3 root root     46 Jan 13 22:12 ..
drwxr-xr-x 6 1001 1001    326 Jan 13 22:11 auto
drwxr-xr-x 2 1001 1001    168 Jan 13 22:11 conf
drwxr-xr-x 4 1001 1001     72 Jan 13 22:11 contrib
drwxr-xr-x 2 1001 1001     40 Jan 13 22:11 html
drwxr-xr-x 2 1001 1001     21 Jan 13 22:11 man
drwxr-xr-x 9 1001 1001     91 Jan 13 22:11 src
drwxr-xr-x 8 1001 1001    158 Dec 13 23:53 .
-rw-r--r-- 1 1001 1001 321271 Dec 13 23:53 CHANGES
-rw-r--r-- 1 1001 1001 491163 Dec 13 23:53 CHANGES.ru
-rwxr-xr-x 1 1001 1001   2590 Dec 13 23:53 configure
-rw-r--r-- 1 1001 1001   1397 Dec 13 23:53 LICENSE
-rw-r--r-- 1 1001 1001     49 Dec 13 23:53 README
执行
configure
命令:
[root@localhost nginx]# ./configure --with-http_stub_status_module --with-http_ssl_module
checking for OS
 + Linux 4.18.0-348.7.1.el8_5.x86_64 x86_64
checking for C compiler ... found
 + using GNU C compiler
 + gcc version: 8.5.0 20210514 (Red Hat 8.5.0-4) (GCC)
checking for gcc -pipe switch ... found
checking for -Wl,-E switch ... found
...
checking for OpenSSL library ... found
checking for zlib library ... found
creating objs/Makefile

Configuration summary
  + using system PCRE2 library
  + using system OpenSSL library
  + using system zlib library

  nginx path prefix: "/usr/local/nginx"
  nginx binary file: "/usr/local/nginx/sbin/nginx"
  nginx modules path: "/usr/local/nginx/modules"
  nginx configuration prefix: "/usr/local/nginx/conf"
  nginx configuration file: "/usr/local/nginx/conf/nginx.conf"
  nginx pid file: "/usr/local/nginx/logs/nginx.pid"
  nginx error log file: "/usr/local/nginx/logs/error.log"
  nginx http access log file: "/usr/local/nginx/logs/access.log"
  nginx http client request body temporary files: "client_body_temp"
  nginx http proxy temporary files: "proxy_temp"
  nginx http fastcgi temporary files: "fastcgi_temp"
  nginx http uwsgi temporary files: "uwsgi_temp"
  nginx http scgi temporary files: "scgi_temp"
2.4 编译 Nginx 代码
Nginx 的代码在安装目录的
src
目录里。在运行
configure
命令后,
Makefile
生成了,内容如下:
default:        build

clean:
        rm -rf Makefile objs

.PHONY: default clean

build:
        $(MAKE) -f objs/Makefile

install:
        $(MAKE) -f objs/Makefile install

modules:
        $(MAKE) -f objs/Makefile modules

upgrade:
        /usr/local/nginx/sbin/nginx -t

        kill -USR2 `cat /usr/local/nginx/logs/nginx.pid`
        sleep 1
        test -f /usr/local/nginx/logs/nginx.pid.oldbin

        kill -QUIT `cat /usr/local/nginx/logs/nginx.pid.oldbin`

.PHONY: build install modules upgrade
从
Makefile
的内容,我们可以知道:
(1)
make
命令的参数可以是:
clean
、
build
、
install
、
modules
、
upgrade
(2) 真正实现编译、安装的文件是
objs/Makefile
,有兴趣的同学可以自己去研究一下这个文件,这里不展开了。
- 编译 Nginx 源码
[root@localhost nginx]# make build
make -f objs/Makefile
make[1]: Entering directory '/opt/nginx/nginx'
cc -c -pipe  -O -W -Wall -Wpointer-arith -Wno-unused-parameter -Werror -g  -I src/core -I src/event -I src/event/modules -I src/os/unix -I objs \
        -o objs/src/core/nginx.o \
        src/core/nginx.c
cc -c -pipe  -O -W -Wall -Wpointer-arith -Wno-unused-parameter -Werror -g  -I src/core -I src/event -I src/event/modules -I src/os/unix -I objs \
        -o objs/src/core/ngx_log.o \
        src/core/ngx_log.c
...
cc -c -pipe  -O -W -Wall -Wpointer-arith -Wno-unused-parameter -Werror -g  -I src/core -I src/event -I src/event/modules -I src/os/unix -I objs \
        -o objs/ngx_modules.o \
        objs/ngx_modules.c
cc -o objs/nginx \
objs/src/core/nginx.o \
objs/src/core/ngx_log.o \
...
objs/src/http/modules/ngx_http_stub_status_module.o \
objs/ngx_modules.o \
-ldl -lpthread -lcrypt -lpcre2-8 -lssl -lcrypto -ldl -lpthread -lz \
-Wl,-E
sed -e "s|%%PREFIX%%|/usr/local/nginx|" \
        -e "s|%%PID_PATH%%|/usr/local/nginx/logs/nginx.pid|" \
        -e "s|%%CONF_PATH%%|/usr/local/nginx/conf/nginx.conf|" \
        -e "s|%%ERROR_LOG_PATH%%|/usr/local/nginx/logs/error.log|" \
        < man/nginx.8 > objs/nginx.8
make[1]: Leaving directory '/opt/nginx/nginx'
编译后的文件在
objs/src
下。
2.5 部署 Nginx
- 运行 Make Install 命令进行安装
[root@localhost nginx]# make install
make -f objs/Makefile install
make[1]: Entering directory '/opt/nginx/nginx'
test -d '/usr/local/nginx' || mkdir -p '/usr/local/nginx'
test -d '/usr/local/nginx/sbin' \
        || mkdir -p '/usr/local/nginx/sbin'
test ! -f '/usr/local/nginx/sbin/nginx' \
        || mv '/usr/local/nginx/sbin/nginx' \
                '/usr/local/nginx/sbin/nginx.old'
cp objs/nginx '/usr/local/nginx/sbin/nginx'
test -d '/usr/local/nginx/conf' \
        || mkdir -p '/usr/local/nginx/conf'
cp conf/koi-win '/usr/local/nginx/conf'
...
test -d '/usr/local/nginx/logs' \
        || mkdir -p '/usr/local/nginx/logs'
make[1]: Leaving directory '/opt/nginx/nginx'
从上面安装过程的输出,我们可以知道,其实安装过程,就是把 Nginx 的相关文件拷贝到
/usr/local/nginx
:
[root@localhost nginx]# cd /usr/local/nginx/
[root@localhost nginx]# ls -alt
total 0
drwxr-xr-x   6 root root  54 Jan 13 22:43 .
drwxr-xr-x   2 root root  40 Jan 13 22:43 html
drwxr-xr-x   2 root root   6 Jan 13 22:43 logs
drwxr-xr-x   2 root root 333 Jan 13 22:43 conf
drwxr-xr-x   2 root root  19 Jan 13 22:43 sbin
2.6 创建 nginx 的软连接
[root@localhost sbin]# ln -s /usr/local/nginx/sbin/nginx /sbin/nginx
2.7 测试
运行 nginx 命令启动,然后使用 curl 命令测试一下 nginx 服务是否已经启动:
[root@localhost sbin]# nginx
[root@localhost sbin]# curl localhost
<!DOCTYPE html>
<html>
<head>
<title>Welcome to nginx!</title>
<style>
html { color-scheme: light dark; }
body { width: 35em; margin: 0 auto;
font-family: Tahoma, Verdana, Arial, sans-serif; }
</style>
</head>
<body>
<h1>Welcome to nginx!</h1>
<p>If you see this page, the nginx web server is successfully installed and
working. Further configuration is required.</p>

<p>For online documentation and support please refer to
<a href="http://nginx.org/">nginx.org</a>.<br/>
Commercial support is available at
<a href="http://nginx.com/">nginx.com</a>.</p>

<p><em>Thank you for using nginx.</em></p>
</body>
</html>
3 配置 systemd 服务
众所周知,
systemd
是 centos 的
1号进程
,它提供了管理服务的功能。把 Nginx 配置为
systemd 服务
有两个好处:
(1) 可使用
systemctl
命令启动、重启、停止服务等。
(2) 可把 Nginx 配置成开机启动。
3.1 编写 service 文件
systemd
服务的
.service
被保存到
/usr/lib/systemd/system
下,因此,我们到
/usr/lib/systemd/system
下创建
nginx.service
文件。文件内容如下:
[Unit]
# 服务描述
Description=The nginx service that provide http and reverse proxy service
# 配置 Nginx 服务在 network.target remote-fs.target 及 nss-lookup.target 都启动过后才会启动
# network.target remote-fs.target 及 nss-lookup.target 即使启动失败,也不影响 Nginx 服务启动
After=network.target remote-fs.target nss-lookup.target

[Service]
# Fork 模式启动进程
Type=forking
# 提供一个进程ID文件供 systemd 确定要监管的 Nginx 服务进程的 ID
# 根据规范,pid文件应该保存在 /run 文件夹下
PIDFile=/run/nginx.pid
# 启动前必须清理之前生成的 PID 文件
ExecStartPre=/usr/bin/rm -f /run/nginx.pid
# 启动前先检查 nginx 的 conf 文件语法是否正确
ExecStartPre=/usr/local/nginx/sbin/nginx -t
# 执行启动 nginx 的脚本
ExecStart=/usr/local/nginx/sbin/nginx
# 执行启动脚本后,要留一定的时间让 nginx 进程生成 PID 文件,因此挂起 0.5 秒
ExecStartPost=/usr/bin/sleep 0.5
# restart 服务的命令
ExecReload=/bin/kill -s HUP $MAINPID
# stop 服务时候,向进程发送的信号
KillSignal=SIGQUIT
KillMode=process
PrivateTmp=true

[Install]
# 被 multi-user.target 依赖
WantedBy=multi-user.target
其中
[Install]
部分的
WantedBy=multi-user.target
表示,nginx 服务被
multi-user.target
单元依赖。
multi-user.target
用于设置多用户系统,本人也没有深入了解,这里就不展开了。
为什么要把 nginx 服务被
multi-user.target
单元依赖?这与要设置 nginx 服务开机启动有关。centos 启动时,
multi-user.target
单元相关是必定会启动的,又由于 nginx 服务被它依赖,因此,nginx 服务必须在它前面启动,从而实现了开机启动功能。
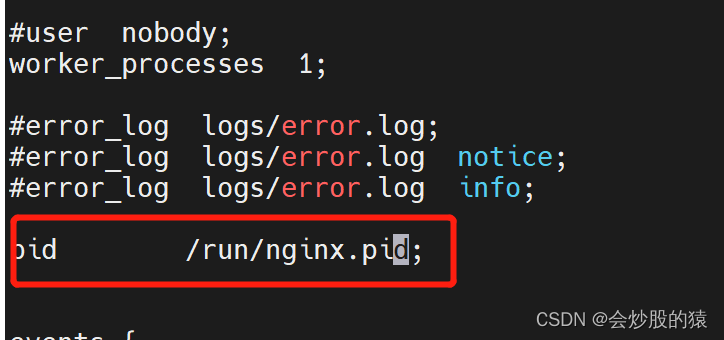
3.2 设置 Nginx PID文件生成路径
现在,我们还未能通过
systemctl
命令启动 nginx 的服务,因为,我们在 nginx.service 指定了 PID 文件路径为
/run/nginx.pid
。因此,我们要修改
/usr/local/nginx/conf/nginx.conf
中的
pid
项的指为
/run/nginx.pid
3.3 测试systemctl命令
- 启动 nginx
[root@localhost conf]# systemctl start nginx
[root@localhost conf]# curl localhost
<!DOCTYPE html>
<html>
<head>
<title>Welcome to nginx!</title>
<style>
html { color-scheme: light dark; }
body { width: 35em; margin: 0 auto;
font-family: Tahoma, Verdana, Arial, sans-serif; }
</style>
</head>
<body>
<h1>Welcome to nginx!</h1>
<p>If you see this page, the nginx web server is successfully installed and
working. Further configuration is required.</p>

<p>For online documentation and support please refer to
<a href="http://nginx.org/">nginx.org</a>.<br/>
Commercial support is available at
<a href="http://nginx.com/">nginx.com</a>.</p>

<p><em>Thank you for using nginx.</em></p>
</body>
</html>
- 查看 nginx 服务状态
[root@localhost conf]# systemctl status nginx
● nginx.service - The nginx service that provide http and reverse proxy service
   Loaded: loaded (/usr/lib/systemd/system/nginx.service; disabled; vendor preset: disabled)
   Active: active (running) since Fri 2023-01-13 23:39:40 CST; 48s ago
  Process: 2585237 ExecStartPost=/usr/bin/sleep 0.5 (code=exited, status=0/SUCCESS)
  Process: 2585234 ExecStart=/usr/local/nginx/sbin/nginx (code=exited, status=0/SUCCESS)
  Process: 2585232 ExecStartPre=/usr/local/nginx/sbin/nginx -t (code=exited, status=0/SUCCESS)
  Process: 2585230 ExecStartPre=/usr/bin/rm -f /run/nginx.pid (code=exited, status=0/SUCCESS)
 Main PID: 2585235 (nginx)
    Tasks: 2 (limit: 47776)
   Memory: 1.8M
   CGroup: /system.slice/nginx.service
           ├─2585235 nginx: master process /usr/local/nginx/sbin/nginx
           └─2585236 nginx: worker process

Jan 13 23:39:39 iZbp12095rc31nu810jpwjZ systemd[1]: Starting The nginx service that provide http and reverse proxy service...
Jan 13 23:39:39 iZbp12095rc31nu810jpwjZ nginx[2585232]: nginx: the configuration file /usr/local/nginx/conf/nginx.conf syntax is ok
Jan 13 23:39:39 iZbp12095rc31nu810jpwjZ nginx[2585232]: nginx: configuration file /usr/local/nginx/conf/nginx.conf test is successful
Jan 13 23:39:40 iZbp12095rc31nu810jpwjZ systemd[1]: Started The nginx service that provide http and reverse proxy service.
- 重启 nginx 服务
[root@localhost conf]# systemctl restart nginx
- 停止 nginx 服务
[root@localhost conf]# systemctl stop nginx
# 查看进程是否还存在
[root@localhost conf]# ps -ef|grep nginx|grep -v grep
3.4 设置开机启动
运行下面命令使 nginx 服务开机启动:
[root@localhost conf]# systemctl enable nginx
Created symlink /etc/systemd/system/multi-user.target.wants/nginx.service → /usr/lib/systemd/system/nginx.service.
从上面控制台输出,我们可以知道,其实开机启动,就是在
/etc/systemd/system/multi-user.target.wants/
下创建了软连接
nginx.service
指向
/usr/lib/systemd/system/nginx.service
,这样,开机时,
multi-user.target
单元启动前会先启动
nginx.service
,从而实现了 nginx 服务的开机启动。
4 总结
本文描述了如何编译、安装 nginx,并说明了怎么把 nginx 服务配置为 systemd 服务及一些相关的原理。之后,希望有时间再整理下 nginx 的配置文章。希望对有缘阅读本文的同学有帮助。