学习内容主要基于B站UP主,青空の霞光的视频,加上自己的理解。
多路复用网络通信
NIO框架的三大核心:Buffer、
Channel
、
Selector
传统阻塞IO网络通信
使用socket家里TCP连接进行网络通信
public class Server {
    public static void main(String[] args) {
        try(ServerSocket server = new ServerSocket(8080);) {
            System.out.println("等待客户端连接");
            //通过此socket获取客户端连接
            //当没有客户端连接,线程会阻塞,直到有客户端连接为止
            Socket socket = server.accept();
            System.out.println("客户端已连接,IP为:" + socket.getInetAddress().getHostAddress());
            System.out.println("读取客户端数据:");
            //通过socket获取输入流
            BufferedReader reader = new BufferedReader(new InputStreamReader(socket.getInputStream()));
            System.out.println(reader.readLine());

            socket.close();

        } catch (IOException e) {
            e.printStackTrace();
        }
    }
}
public class Client {
    public static void main(String[] args) {
        try(Socket socket = new Socket("localhost", 8080)) {
            System.out.println("已连接到服务器");
            //通过socket获取输出流
            OutputStreamWriter writer = new OutputStreamWriter(socket.getOutputStream());
            writer.write("haha\n");
            writer.flush();

            System.out.println("数据已发送");
        } catch (Exception e) {
            System.out.println("服务器连接失败");
            e.printStackTrace();
        }
    }
}
也可以通过
Channel
来进行通信
public class Server {

    public static void main(String[] args) {
        try(ServerSocketChannel serverChannel = ServerSocketChannel.open()) {
            //绑定到8080端口
            serverChannel.bind(new InetSocketAddress(8080));
            //阻塞等待新的连接
            SocketChannel socket = serverChannel.accept();
            //由于通道,两端信息明确,可获取远端地址和本地地址
            System.out.println("客户端已连接,IP地址为:" + socket.getRemoteAddress());

            //使用缓冲区进行数据接收
            ByteBuffer buffer = ByteBuffer.allocate(128);
            socket.read(buffer); //SocketChannel同时实现了读写通道接口,可以直接双向操作
            buffer.flip();
            System.out.println("接收客户端数据:" + new String(buffer.array(), 0, buffer.remaining()));

            //向通道中写入数据
            socket.write(ByteBuffer.wrap("已收到".getBytes()));

            //关闭
            socket.close();
        } catch (IOException e) {
            throw new RuntimeException(e);
        }
    }
}
对于传统的Socket进行网络通信,如果有多个客户端,服务器需要同时处理,则需要为每个客户端单独创建一个线程来进行处理。
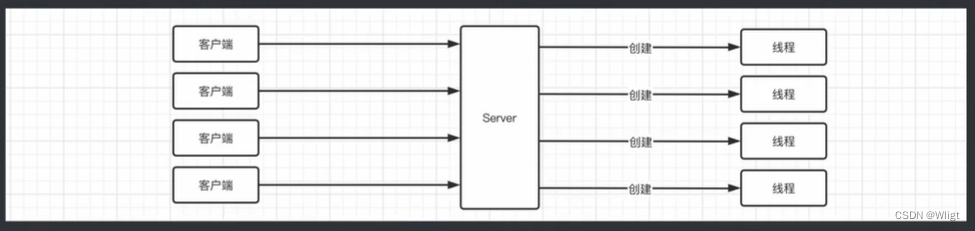
随着客户端的增加,如果要保持持续通信,就不能摧毁这些线程(很多时候只是保持连接,阻塞等待读写操作,IO频率很低,白白占用一条线程)。但是线程不能无限制的进行创建,这样,可以利用JavaNIO提供的多路复用编程模型。

服务器不是单纯通过
accept()
方法来创建连接的机制,而是根据客户的状态,
Selector
进行不断轮询,只有客户端在对应的状态时(开始读写操作),才会创建线程或进行处理,而不是创建之后一直保持连接,即使没有任何读写操作。
选择器Selector
选择器是当具体有某一个状态(比如读、写、请求)已经就绪时,才会进行处理,而不是让程序主动的进行等待。
Selector
的实现方案,比如很多个用户连接到服务器:
常见的IO多路复用模型:
-
select
:当这些连接出现具体的某个状态时,只知道已经就绪,但不知道是哪个连接已经就绪,每次调用都进行线性遍历所有连接,时间复杂度为
O(n)
,并存在最大连接数限制 -
poll
:同上,但底层采用链表,故没有最大连接数限制 -
epoll
:采用事件通知方式,当某个连接就绪,能直接进行精准通知,时间复杂度
O(1)
,Java在Linux环境下采用这种模式实现-
epoll是根据每个fd上的
callback
函数实现的,只要就绪就会直接回调
callback
函数,实现精准通知,只有Linux支持这种方式
-
epoll是根据每个fd上的
如何让网络实现多路复用?
需要监听的事件:
-
SelectionKey.OP_CONNECT
:连接就绪,表示客户端与服务器的连接已经建立成功 -
SelectionKey.OP_ACCEPT
:接收连接事件,表示服务器监听到了客户连接,可以接收此连接 -
SelectionKey.OP_READ
:读就绪事件,表示通道中已经有了可读的数据,可以执行读操作了 -
SelectionKey.OP_WRITE
:写就绪事件,表示已经可以向通道写数据了
Server端
public static void main(String[] args) {
try(ServerSocketChannel serverChannel = ServerSocketChannel.open();
Selector selector = Selector.open()) { //开启一个新的selector
serverChannel.bind(new InetSocketAddress(8080));
//要使用选择器进行操作,必须使用非阻塞方式,阻塞方式会直接卡在accept()
serverChannel.configureBlocking(false);
//将选择器注册到serverSocketChannel中,后边是选择需要监听的事件,只有发生对应事件时才会进行选择,多个事件用 | 连接
serverChannel.register(selector, SelectionKey.OP_ACCEPT);
//无限循环等待新的用户网络操作
while (true) {
//每次先择都可能会选出多个已经就绪的网络操作,没有操作时回暂时阻塞
int count = selector.select();
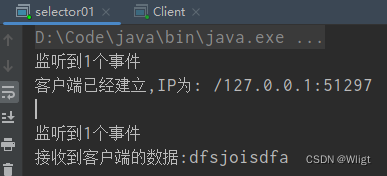
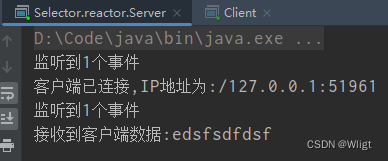
System.out.println("监听到" + count + "个事件");
Set<SelectionKey> selectionKeys = selector.selectedKeys();
Iterator<SelectionKey> iterator = selectionKeys.iterator();
while (iterator.hasNext()) {
SelectionKey key = iterator.next();
//根据不同的事件类型,执行不同的操作
if (key.isAcceptable()) { //当前serverSocketChannel已经做好准备处理Accept
SocketChannel channel = serverChannel.accept();
System.out.println("客户端已经建立,IP为: " + channel.getRemoteAddress());
//连接建立后,需要将连接也注册选择器. 当这个连接有内容读时进行处理
channel.configureBlocking(false);
channel.register(selector, SelectionKey.OP_READ);
//在建立时完成了注册
} else if (key.isReadable()) { //当前连接有可读的数据并可以写,就开始处理
SocketChannel channel = (SocketChannel) key.channel();
ByteBuffer buffer = ByteBuffer.allocate(128);
channel.read(buffer);
buffer.flip();
System.out.println("接收到客户端的数据:" + new String(buffer.array(), 0, buffer.remaining()));
//直接向通道中写入数据
channel.write(ByteBuffer.wrap("已收到".getBytes()));
}
//处理完成后,移出迭代器,不然下次还有
iterator.remove();
}
}
} catch (IOException e) {
throw new RuntimeException(e);
}
}
Client
端
public static void main(String[] args) {
//创建一个新的SocketChannel,通过通道进行通信
try(SocketChannel channel = SocketChannel.open(new InetSocketAddress("localhost", 8080))) {
Scanner scanner = new Scanner(System.in);
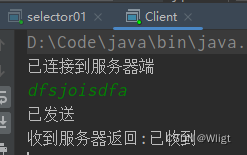
System.out.println("已连接到服务器端");
while (true) { //一直发消息
String text = scanner.nextLine();
//直接向通道写数据
channel.write(ByteBuffer.wrap(text.getBytes()));
System.out.println("已发送");
//接收服务器消息
ByteBuffer buffer = ByteBuffer.allocate(128);
channel.read(buffer);
buffer.flip();
System.out.println("收到服务器返回:" + new String(buffer.array(), 0, buffer.remaining()));
}
} catch (IOException e) {
throw new RuntimeException(e);
}
}
使用多路复用,可以只用一条线程,就能同时处理多个请求
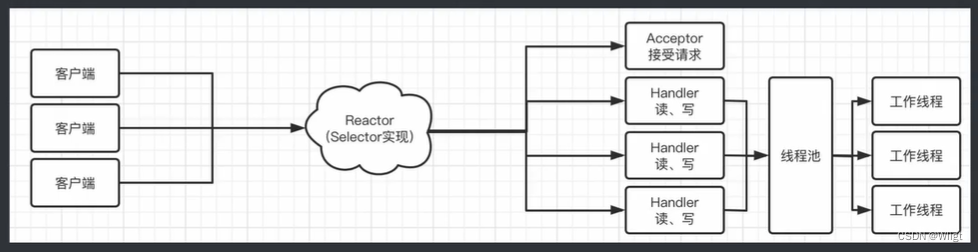
实现Reactor模式
Reactor模式可以对服务端进行优化。
首先抽象出两个组件,
Reactor
线程和
Handler
处理器
-
Reacotr
线程:负责响应IO事件,并分发到
Handler
处理器。新的事件包含连接就绪、读就绪、写就绪等 -
Handler
处理器:执行非阻塞操作
上面的例子就是单线程
Reactor
的朴素模型(面向过程的写法)
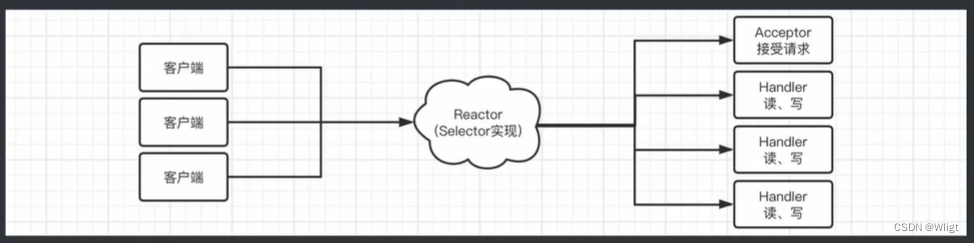
标准的写法:
客户端连接到
Reactor
,并通过
Selector
走到
Acceptor
或是
Handler
,
Acceptor
住院号负责客户端连接的建立,
Handler
负责读写操作
 * @description 具体实现操作
 */
public class Handler implements Runnable{

    private final SocketChannel channel;

    public Handler(SocketChannel channel) {
        this.channel = channel;
    }

    @Override
    public void run() {
        try {
            ByteBuffer buffer = ByteBuffer.allocate(128);
            channel.read(buffer);
            buffer.flip();
            System.out.println("接收到客户端数据:" + new String(buffer.array(), 0, buffer.remaining()));
            channel.write(ByteBuffer.wrap("已收到".getBytes()));
        } catch (IOException e) {
            throw new RuntimeException(e);
        }
    }
}
 * @description 用于处理接收请求,连接操作
 */
public class Acceptor implements Runnable{

    private final ServerSocketChannel serverChannel;

    private final Selector selector;

    public Acceptor(ServerSocketChannel serverChannel, Selector selector) {
        this.serverChannel = serverChannel;
        this.selector = selector;
    }

    @Override
    public void run() {
        try {
            SocketChannel channel = serverChannel.accept();
            System.out.println("客户端已连接,IP地址为:" + channel.getRemoteAddress());
            channel.configureBlocking(false);
            //注册时,创建好对应的Handler,这样在Reactor中分发的时候就可以直接调用Handler
            channel.register(selector, SelectionKey.OP_READ, new Handler(channel));
        } catch (IOException e) {
            throw new RuntimeException(e);
        }
    }
}
在注册时,放进去了一个附加对象
new Handler(channel)
,这个附加对象会在选择器选择到此通道上时,通过
attachment()
方法进行获取,可以简化代码
public class Reactor implements Closeable, Runnable {

    private final ServerSocketChannel serverChannel;
    private final Selector selector;

    public Reactor() throws IOException {
        serverChannel = ServerSocketChannel.open();
        selector = Selector.open();
    }

    @Override
    public void run() {
        try {
            serverChannel.bind(new InetSocketAddress(8080));
            serverChannel.configureBlocking(false);

            //注册时,将Acceptor作为附加对象存放,当选择器选择后也可获取到
            serverChannel.register(selector, SelectionKey.OP_ACCEPT,
                    new Acceptor(serverChannel, selector));
            while (true) {
                int count = selector.select();
                System.out.println("监听到" + count + "个事件");
                Set<SelectionKey> selectionKeys = selector.selectedKeys();
                Iterator<SelectionKey> iterator = selectionKeys.iterator();
                while (iterator.hasNext()) {
                    //通过dispatch()进行分发
                    this.dispatch(iterator.next());
                    iterator.remove(); //分发后移出
                }
            }
        } catch (IOException e) {
            throw new RuntimeException(e);
        }
    }

    /**
     * 通过此方法进行分发
     * @param key
     */
    private void dispatch(SelectionKey key) {
        //获取attachment传入的对象,ServerSocketChannel和对应的客户端Channel都添加了
        Object att = key.attachment();
        if (att instanceof Runnable) {
            ((Runnable) att).run();
        } //这样就实现了对应的时候调用对应的Handler或Acceptor
    }

    @Override
    public void close() throws IOException {
        serverChannel.close();
        selector.close();
    }
}
启动服务器
public class Server {
    public static void main(String[] args) {
        //创建Reactor对象,启动
        try(Reactor reactor = new Reactor()) {
            reactor.run();
        } catch (IOException e) {
            e.printStackTrace();
        }
    }
}

这样实现了单线程
Reactor
模式。但是单线程无法应对大量的请求。
多线程
Reactor
模式:
创建了多个线程处理,可以将数据读取完成之后的操作交给线程池来执行。
只需要修改
Handler
即可。
在数据读出后,将数据处理交给线程池执行
public class Handler implements Runnable{

    //使用线程池
    private static final ExecutorService POOL = Executors.newFixedThreadPool(10);

    private final SocketChannel channel;

    public Handler(SocketChannel channel) {
        this.channel = channel;
    }

    @Override
    public void run() {
        try {
            ByteBuffer buffer = ByteBuffer.allocate(1024);
            channel.read(buffer);
            buffer.flip();
            POOL.submit(() -> {
                try {
                    System.out.println("接收到客户端数据:" + new String(buffer.array(), 0, buffer.remaining()));
                    channel.write(ByteBuffer.wrap("已收到".getBytes()));
                } catch (IOException e) {
                    throw new RuntimeException(e);
                }
            });

        } catch (IOException e) {
            throw new RuntimeException(e);
        }
    }
}
这样会导致一个
Reactor
同时处理来自客户端的所有请求操作,有些乏力。
将
Reactor
做成一主多从的模式,让主
Reactor
只负责
Accept
操作,而其他的
Reactor
进行各自的其他操作。
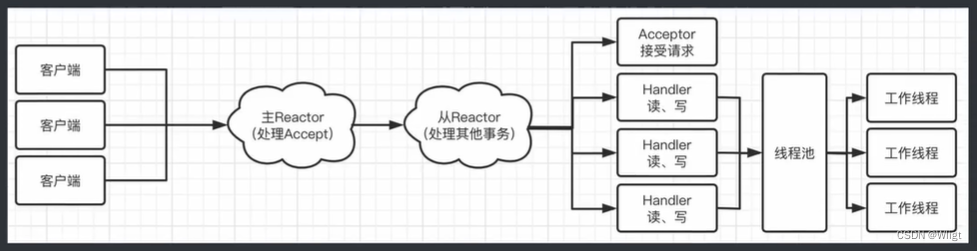
使用轮询机制
public class SubReactor implements Closeable, Runnable {

    //每个从Reactor也有一个Selector
    private final Selector selector;

    //创建一个4线程的线程池,即4个从Reactor工作
    public static final ExecutorService Pool = Executors.newFixedThreadPool(4);
    public static final SubReactor[] reactors = new SubReactor[4];
    //采用轮询机制,每接收一个新的连接,就轮询分配给四个SubReactor
    public static int selectedIndex = 0;

    //一开始就让4个从Reactor跑起来
    static {
        for (int i = 0; i < 4; i++) {
            try {
                reactors[i] = new SubReactor();
                Pool.submit(reactors[i]);
            } catch (Exception e) {
                e.printStackTrace();
            }
        }
    }

    //轮询获取下一个Selector(Acceptor用)
    public static Selector nextSelector() {
	    //从4个SubReactor中拿出一个,获得里面的selector
        Selector selector = reactors[selectedIndex].selector;
        selectedIndex = (selectedIndex + 1) % 4;
        return selector;
    }

    private SubReactor() throws IOException {
        selector = Selector.open();
    }

    @Override
    public void run() {
        //启动后直接等待selector监听到对应的事件即可,其他操作逻辑和Reactor一直
        try {
            while (true) {
                int count = selector.select();
                System.out.println(Thread.currentThread().getName() + ">>监听到" + count + "个事件");
                Set<SelectionKey> selectionKeys = selector.selectedKeys();
                Iterator<SelectionKey> iterator = selectionKeys.iterator();
                while (iterator.hasNext()) {
                    this.dispatch(iterator.next());
                    iterator.remove();
                }
            }
        } catch (IOException e) {
            throw new RuntimeException(e);
        }
    }
	//执行对应的Handler
    private void dispatch(SelectionKey key) {
        Object att = key.attachment();
        if (att instanceof Runnable) {
            ((Runnable) att).run();
        }
    }

    @Override
    public void close() throws IOException {
        selector.close();
    }

}
接着修改Acceptor,现在的Acceptor只执行accept
public class Acceptor implements Runnable{

    private final ServerSocketChannel serverChannel;

    public Acceptor(ServerSocketChannel serverChannel) {
        this.serverChannel = serverChannel;
    }

    @Override
    public void run() {
        try {
            //通过Accept操作得到SocketChannel
            SocketChannel channel = serverChannel.accept();
            System.out.println("客户端已连接,IP地址为:" + channel.getRemoteAddress());
            channel.configureBlocking(false);
            //选取下一个Reactor的Selector
            Selector selector = SubReactor.nextSelector();
            //注册之前唤醒一次防止卡死
            selector.wakeup();
            //注册从Reactor的Selector
            channel.register(selector, SelectionKey.OP_READ, new Handler(channel));
        } catch (IOException e) {
            throw new RuntimeException(e);
        }
    }
}
之后,SocketChannel相关的操作就由
SubReactor
进行处理了,而不是一律交给
Reactor
进行操作