在树莓派上创建python的虚拟环境
文章目录
前言
python建议在安装后创建虚拟的环境,这样主系统的干净的,不会将所有的包都装到主系统中。如果错误了只需要充建虚拟环境。
一、新的系统需要更新apt list
1 . 更新apt 源
sudo apt update

2 进行系统的更新
更新源和更新是不一样的
sudo apt upgrade

二 更新完成后重启系统
三 检查并升级python和设置虚拟环境
由于3.10版本目前支持的并不是很好。 很多的开源模块目前没有跟上,所以建议等一段时间在升级
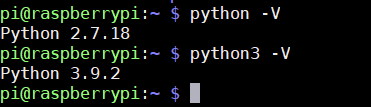
1. 检查系统
python -V
2. 创建目录
mkdir -p Code/Python
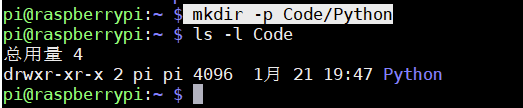
3. 在代码目录里创建项目目录然后创建虚拟换件
cd Code/Python
mkdir 4B Pico
4. 创建虚拟环境
python3 -m venv /home/pi/Code/Python/4B/Stus
看到pyvenv.cfg 文件创建,就证明虚拟环境创建完成了.
具体的内容可以参考python的官方手册:https://docs.python.org/zh-cn/3/library/venv.html

5. 激活并进入虚拟环境
参考:https://docs.python.org/zh-cn/3/tutorial/venv.html?highlight=activate
pi@raspberrypi:~/Code/Python/4B/Stus $ source bin/activate

6 退出虚拟环境
参考:https://docs.python.org/zh-cn/3/library/venv.html?highlight=deactivate
(Stus) pi@raspberrypi:~/Code/Python/4B/Stus $ deactivate

版权声明:本文为tt212原创文章,遵循 CC 4.0 BY-SA 版权协议,转载请附上原文出处链接和本声明。