一、准备工作
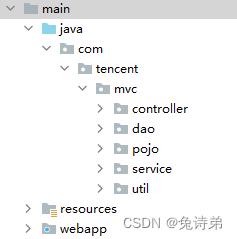
1、兴建一个maven项目,不使用骨架,并创建好目录
在main目录下新建directory,命名为webapp,在java文件夹下建立如图所示的目录结构
2、在pom.xml文件中导入依赖、并设置打包方式、安装tomcat插件
<!-- 关键一步,web项目都得打包成war,webapp目录会自动变化图标-->
<packaging>war</packaging>
<dependencies>
<!-- SpringMVC -->
<dependency>
<groupId>org.springframework</groupId>
<artifactId>spring-webmvc</artifactId>
<version>5.2.10.RELEASE</version>
</dependency>
<!-- springjdbc -->
<dependency>
<groupId>org.springframework</groupId>
<artifactId>spring-jdbc</artifactId>
<version>5.2.10.RELEASE</version>
</dependency>
<!-- logback日志 -->
<dependency>
<groupId>ch.qos.logback</groupId>
<artifactId>logback-classic</artifactId>
<version>1.2.3</version>
</dependency>
<!-- ServletAPI -->
<dependency>
<groupId>javax.servlet</groupId>
<artifactId>javax.servlet-api</artifactId>
<version>3.0.1</version>
<scope>provided</scope>
</dependency>
<!-- Spring5和Thymeleaf整合包 -->
<dependency>
<groupId>org.thymeleaf</groupId>
<artifactId>thymeleaf-spring5</artifactId>
<version>3.0.12.RELEASE</version>
</dependency>
<!-- mysql依赖 -->
<dependency>
<groupId>mysql</groupId>
<artifactId>mysql-connector-java</artifactId>
<version>5.1.47</version>
<scope>runtime</scope>
</dependency>
<!-- Druid连接池 -->
<dependency>
<groupId>com.alibaba</groupId>
<artifactId>druid</artifactId>
<version>1.1.12</version>
</dependency>
</dependencies>
<!--插件定义在build标签中-->
<build>
<plugins>
<plugin>
<groupId>org.apache.tomcat.maven</groupId>
<artifactId>tomcat7-maven-plugin</artifactId>
<version>2.2</version>
<!-- 部署相关的配置,用configuration-->
<configuration>
<!-- 项目访问路径,web项目的访问路径 -->
<path>/</path>
<!-- 访问项目的端口号 -->
<port>8081</port>
</configuration>
</plugin>
</plugins>
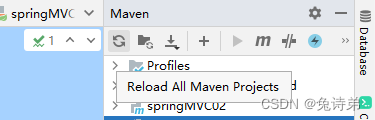
</build>然后点击IDEA右上角的刷新,IDEA会自动下载依赖、完成配置
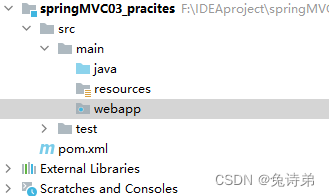
完成上面的操作后webapp图标会变为下图所示的样式
3、在util文件夹下导入需要用到的工具类PageBean和WebRequestUtil

PageBean中的内容
package com.tencent.mvc.util;

import java.util.List;

public class PageBean<T> {
    //页号的默认值
    public static final Integer DEFAULT_PAGENO=1;
    //每页显示的记录数的默认值
    public static final Integer DEFAULT_PAGESIZE=5;
    //当前页码
    private Integer pageNo;
    //每页的记录数
    private Integer pageSize;
    //总页数
    private Integer totalPage;
   //总记录数
   private Integer totalCount;
   //当前页的数据集合
    private List<T> data;

    public Integer getPageNo() {
        return pageNo;
    }

    public void setPageNo(Integer pageNo) {
        this.pageNo = pageNo;
    }

    public Integer getPageSize() {
        return pageSize;
    }

    public void setPageSize(Integer pageSize) {
        this.pageSize = pageSize;
    }

    //返回总页数
    public Integer getTotalPage() {
        if (this.totalCount % this.pageSize == 0) {
            return this.totalCount / this.pageSize;
        }
        return this.totalCount / this.pageSize + 1;
    }

    public Integer getTotalCount() {
        return totalCount;
    }

    public void setTotalCount(Integer totalCount) {
        this.totalCount = totalCount;
    }

    public List<T> getData() {
        return data;
    }

    public void setData(List<T> data) {
        this.data = data;
    }

}
WebRequestUtil中的内容
package com.tencent.mvc.util;

import javax.servlet.http.HttpServletRequest;

/**
 * web请求的工具类,封装请求处理过程的重复代码
 */
public class WebRequestUtil {
    /**
     *通用的根据请求参数名获取其值的方法
     * @param paramName    请求参数名
     * @param defaultValue  默认值
     * @param request       请求对象
     * @return 返回参数的整型
     */
    public static Integer getParamValue(String paramName, Integer defaultValue, HttpServletRequest request){
        String str = request.getParameter(paramName);
        Integer value=defaultValue;
        if(null!=str){
            value=Integer.parseInt(str);
        }
        return value;
    }
}
二、配置springMVC的编码过滤器、监听器、前端控制器
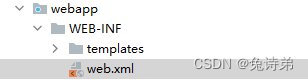
templates目录用来存放我们的前端html页面
web.xml文件中的内容
<?xml version="1.0" encoding="UTF-8"?>
<web-app xmlns="http://xmlns.jcp.org/xml/ns/javaee"
         xmlns:xsi="http://www.w3.org/2001/XMLSchema-instance"
         xsi:schemaLocation="http://xmlns.jcp.org/xml/ns/javaee http://xmlns.jcp.org/xml/ns/javaee/web-app_3_1.xsd"
         version="3.1">

    <!--配置springMVC的编码过滤器-->
    <filter>
        <filter-name>CharacterEncodingFilter</filter-name>
        <filter-class>org.springframework.web.filter.CharacterEncodingFilter</filter-class>
        <init-param>
            <param-name>encoding</param-name>
            <param-value>UTF-8</param-value>
        </init-param>
        <init-param>
            <param-name>forceResponseEncoding</param-name>
            <param-value>true</param-value>
        </init-param>
    </filter>
    <filter-mapping>
        <filter-name>CharacterEncodingFilter</filter-name>
        <url-pattern>/*</url-pattern>
    </filter-mapping>


    <!-- 全局上下文参数 -->
    <context-param>
        <param-name>contextConfigLocation</param-name>
        <param-value>classpath:beans.xml</param-value>
<!-- classpath路径即resources路径-->
    </context-param>


    <!-- 监听器 -->
    <listener>
<!--        使用spring-web中的监听器-->
        <listener-class>org.springframework.web.context.ContextLoaderListener</listener-class>
    </listener>


    <!-- 配置SpringMVC的前端控制器,对浏览器发送的请求统一进行处理 -->
    <servlet>
        <servlet-name>springMVC</servlet-name>
        <servlet-class>org.springframework.web.servlet.DispatcherServlet</servlet-class>
        <!-- 初始化参数 -->
        <init-param>
            <param-name>contextConfigLocation</param-name>
            <!-- springMVC配置文件的路径 -->
            <param-value>classpath:springMVC.xml</param-value>
        </init-param>
        <!-- 让DispatcherServlet在容器启动时创建 -->
        <load-on-startup>1</load-on-startup>
    </servlet>
    <servlet-mapping>
        <servlet-name>springMVC</servlet-name>
        <!--
            设置springMVC的核心控制器所能处理的请求的请求路径
            /所匹配的请求可以是/login或.html或.js或.css方式的请求路径
            但是/不能匹配.jsp请求路径的请求
        -->
        <url-pattern>/</url-pattern>
    </servlet-mapping>


</web-app>
根据web.xml文件的配置,可以发现需要在resources目录下创建beans.xml和springMVC.xml文件
beans.xml文件内容如下:
<?xml version="1.0" encoding="UTF-8"?>
<beans xmlns="http://www.springframework.org/schema/beans"
       xmlns:xsi="http://www.w3.org/2001/XMLSchema-instance"
       xmlns:aop="http://www.springframework.org/schema/aop"
       xmlns:context="http://www.springframework.org/schema/context"
       xsi:schemaLocation="http://www.springframework.org/schema/beans
        http://www.springframework.org/schema/beans/spring-beans.xsd

        http://www.springframework.org/schema/aop
      http://www.springframework.org/schema/aop/spring-aop.xsd
       http://www.springframework.org/schema/context
      http://www.springframework.org/schema/context/spring-context.xsd
">
  <context:component-scan base-package="com.tencent.mvc.dao,com.tencent.mvc.service"></context:component-scan>
  <context:property-placeholder location="classpath:druid.properties"></context:property-placeholder>
  <!--  创建一个bean,id是druidDataSource -->
  <bean id="druidDataSource" class="com.alibaba.druid.pool.DruidDataSource">

    <property name="driverClassName" value="${jdbc.driver}"></property>
    <property name="url" value="${jdbc.url}"></property>
    <property name="username" value="${jdbc.username}"></property>
    <property name="password" value="${jdbc.password}"></property>
  </bean>

  <bean id="jdbcTemplate" class="org.springframework.jdbc.core.JdbcTemplate">
    <property name="dataSource"  ref="druidDataSource"></property>
  </bean>


</beans>
在beans.xml文件中需要读取与数据库连接相关的配置文件druid.properties
druid.properties文件的内容:
# key=value
jdbc.driver=com.mysql.jdbc.Driver
jdbc.url=jdbc:mysql://localhost:3306/test?useSSL=false&useServerPrepStmts=true
jdbc.username=root
jdbc.password=mysql数据库密码
springMVC.xml文件的内容
<?xml version="1.0" encoding="UTF-8"?>
<beans xmlns="http://www.springframework.org/schema/beans"
       xmlns:xsi="http://www.w3.org/2001/XMLSchema-instance"
       xmlns:context="http://www.springframework.org/schema/context"
       xmlns:mvc="http://www.springframework.org/schema/mvc"
       xsi:schemaLocation="http://www.springframework.org/schema/beans
        http://www.springframework.org/schema/beans/spring-beans.xsd
       http://www.springframework.org/schema/context
      http://www.springframework.org/schema/context/spring-context.xsd
       http://www.springframework.org/schema/mvc
      http://www.springframework.org/schema/mvc/spring-mvc.xsd
">
   <!-- 组件扫描 -->
    <context:component-scan base-package="com.tencent.mvc.controller"></context:component-scan>

    <!-- 配置Thymeleaf视图解析器 -->
    <bean id="viewResolver" class="org.thymeleaf.spring5.view.ThymeleafViewResolver">
        <property name="order" value="1"/>
        <property name="characterEncoding" value="UTF-8"/>
        <property name="templateEngine">
            <bean class="org.thymeleaf.spring5.SpringTemplateEngine">
                <property name="templateResolver">
                    <bean class="org.thymeleaf.spring5.templateresolver.SpringResourceTemplateResolver">

                        <!-- 视图前缀 -->
                        <property name="prefix" value="/WEB-INF/templates/"/>

                        <!-- 视图后缀 -->
                        <property name="suffix" value=".html"/>
                        <property name="templateMode" value="HTML"/>
                        <property name="characterEncoding" value="UTF-8" />
                    </bean>
                </property>
            </bean>
        </property>
    </bean>
</beans>
三、完成相应的业务功能
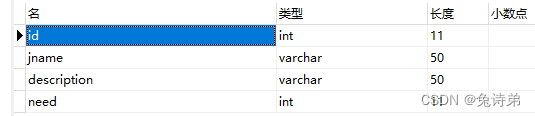
数据库中的表结构
在pojo文件夹中新建Job.java内容如下
public class Job {
   private  Integer id;
    private  String janem;
    private   String  description;
    private  Integer need;

    @Override
    public String toString() {
        return "Job{" +
                "id=" + id +
                ", janem='" + janem + '\'' +
                ", description='" + description + '\'' +
                ", need=" + need +
                '}';
    }

    public Integer getId() {
        return id;
    }

    public void setId(Integer id) {
        this.id = id;
    }

    public String getJanem() {
        return janem;
    }

    public void setJanem(String janem) {
        this.janem = janem;
    }

    public String getDescription() {
        return description;
    }

    public void setDescription(String description) {
        this.description = description;
    }

    public Integer getNeed() {
        return need;
    }

    public void setNeed(Integer need) {
        this.need = need;
    }

    public Job() {
    }

    public Job(Integer id, String janem, String description, Integer need) {
        this.id = id;
        this.janem = janem;
        this.description = description;
        this.need = need;
    }
}
版权声明:本文为Airplane2020原创文章,遵循 CC 4.0 BY-SA 版权协议,转载请附上原文出处链接和本声明。