Spring学习(一)—Spring Framwork入门/IoC思想和DI/基于注解的注入方式
1. Spring Framwork入门
2002年
,
Rod Johnson
首次推出了Spring Framwork的前身
Interface21
。
2003年
,Spring Framwork公司以Interface21为基础,进行重新设计并发布了
Spring Framwork
的1.0正式版。
值得一提的是
Rod Johnson
不仅是软件开发领域的大牛,他在悉尼大学还获得了
音乐学的博士学位
。
我们来看看Spring的官网https://spring.io/,这画风可以说是非常大艺术家了。I like it~
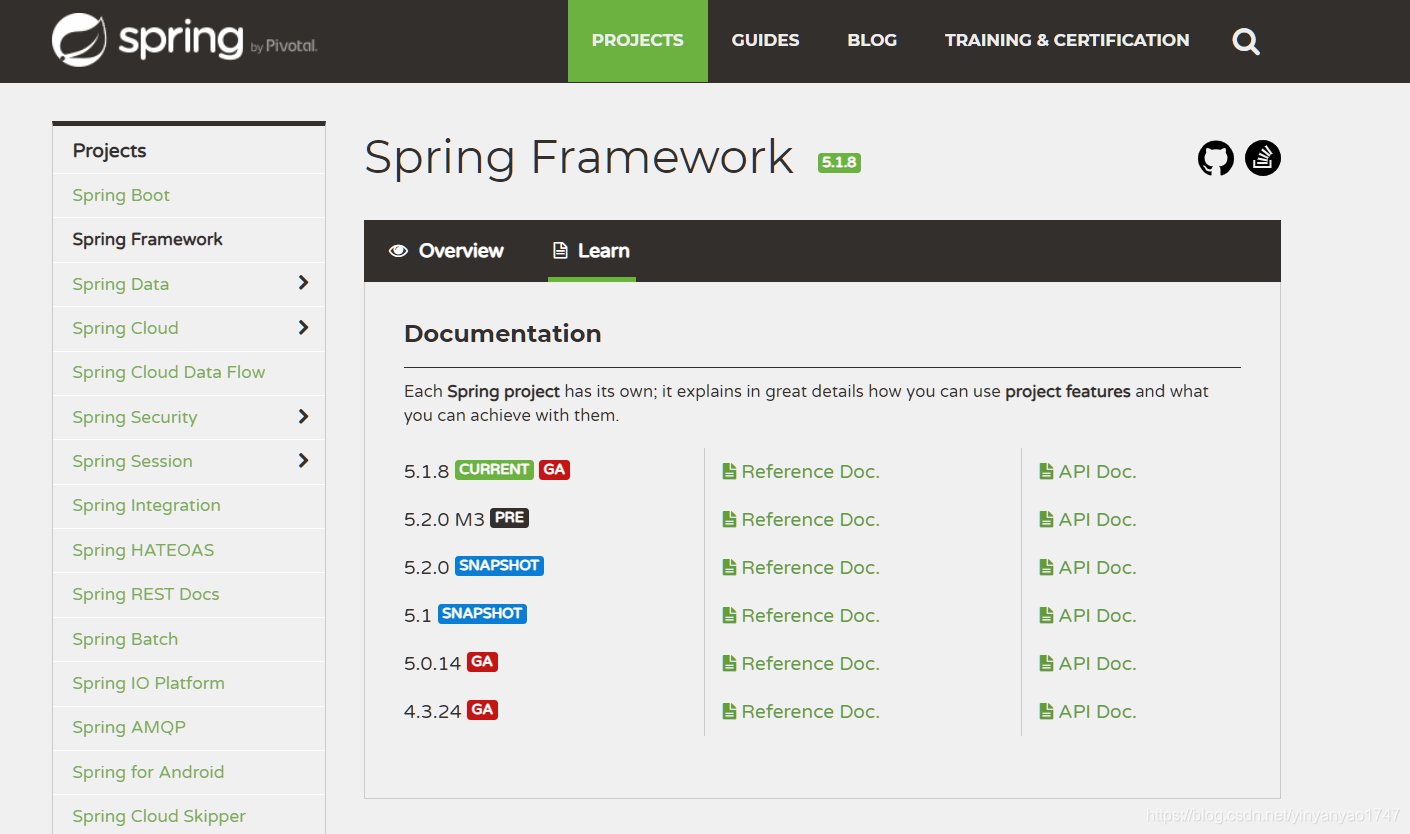
在官网的Projects中可以找到Spring Framework,点击进入,可以看到目前Spring Framework已经更新到了5.1.8版本,考虑到新版本一般都不咋稳定,这里选择4.3.9版本进行学习(emmmm…其实是老师推荐使用这个版本,大概是由于目前这个版本在企业中应用的比较广泛)。
附官方参考文档
https://docs.spring.io/spring/docs/4.3.9.RELEASE/spring-framework-reference/htmlsingle/
Git托管地址:
https://github.com/spring-projects/spring-framework
现在,正式开始学习~
首先,先来研究一下,Spring Framwork到底是什么?官方文档是这么说的,Spring Framework是一个Java平台,为开发Java应用程序提供全面的基础架构支持。
Spring Framework是一个分层架构,由7个定义良好的模块组成。组成 Spring 框架的每个模块(或组件)都可以单独存在,或者与其他一个或多个模块联合实现。
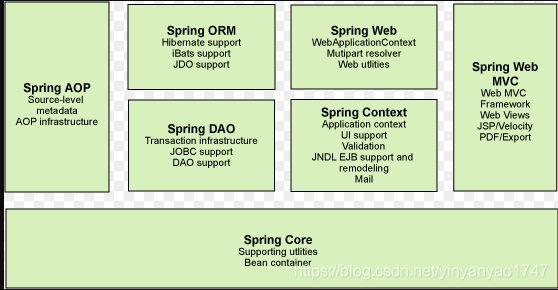
每个模块的功能如下:
-
Spring模块构建在核心容器
Spring Core
之上,核心容器定义了创建、配置和管理bean的方式。核心容器的主要组件是
BeanFactory
,它是工厂模式的实现。
BeanFactory
使用
控制反转 (IOC) 模式
将应用程序的配置和依赖性规范与实际的应用程序代码分开。 -
Spring Context
是一个配置文件,向 Spring 框架提供上下文信息。Spring 上下文包括企业服务,例如 JNDI、EJB、电子邮件、国际化、校验和调度功能。 -
Spring AOP
:通过配置管理特性,Spring AOP 模块直接将面向切面的编程功能集成到了 Spring 框架中。所以,可以很容易地使 Spring 框架管理的任何对象支持 AOP。Spring AOP 模块为基于 Spring 的应用程序中的对象提供了事务管理服务。通过使用 Spring AOP,不用依赖 EJB 组件,就可以将声明性事务管理集成到应用程序中。 -
Spring DAO
:JDBC DAO 抽象层提供了有意义的
异常层次结构
,可用该结构来
管理异常处理和不同数据库供应商抛出的错误消息
。异常层次结构
简化了错误处理
,并且极大地降低了需要编写的异常代码数量(例如打开和关闭连接)。Spring DAO 的面向 JDBC 的异常遵从通用的 DAO 异常层次结构。 -
Spring ORM
:Spring 框架插入了若干个 ORM 框架,从而提供了 ORM 的对象关系工具,其中包括 JDO、Hibernate 和 iBatis SQL Map。所有这些都遵从 Spring 的通用事务和 DAO 异常层次结构。 -
Spring Web 模块
:Web 上下文模块建立在应用程序上下文模块之上,为基于 Web 的应用程序提供了上下文。所以,Spring 框架支持与 Jakarta Struts 的集成。Web 模块还简化了处理多部分请求以及将请求参数绑定到域对象的工作。 -
Spring MVC 框架
:Spring MVC (Model View Controller)框架是一个全功能的构建 Web 应用程序的 MVC 实现。通过策略接口,MVC 框架变成为高度可配置的,MVC 容纳了大量视图技术,其中包括 JSP、Velocity、Tiles、iText 和 POI。
大多数人在学习Spring之前,应该都已经学习了Mybatis,回顾一下Mybatis为我们做了些什么事情?简单总结一下,MyBatis通过简单的xml配置
避免了
几乎所有的
JDBC 代码
和
手动设置参数
,可以让Dao层专注于处理数据库的操作,专注于SQL语句的编写,获得SQL的查询结果。那么接下来,我们看看Spring可以为我们做什么?
官方文档写道,作为应用程序开发人员,您可以从Spring平台中受益的示例如下:1.使Java方法在数据库事务中执行,而不必处理事务API。2. 使本地Java方法成为HTTP端点,而无需处理Servlet API。3. 使本地Java方法成为消息处理程序,而无需处理JMS API。4. 使本地Java方法成为管理操作,而无需处理JMX API。
简而言之,Spring是一个轻量级的实现控制反转IoC和面向切面AOP的框架。
那么,什么是IoC和AOP呢?
由最原始的开发方式
单体式应用
说起:这里以操作数据库的user表单为背景,我们得从pojo层开始开发之路。
pojo层:编写与数据库对应的实体类User
package com.hooi.pojo;
public class User {
    private String userName;

    public User() {
    }

    public User(String userName) {
        this.userName = userName;
    }

    public String getUserName() {
        return userName;
    }

    public void setUserName(String userName) {
        this.userName = userName;
    }
}
dao层:编写UserDao接口(增删改查的抽象方法)和UserDaoImpl实现类(增删改查的具体实现)
package com.hooi.dao;

public interface UserDao {
    //获取用户信息
    public abstract void getUserInfo();
}
package com.hooi.dao.Impl;

import com.hooi.dao.UserDao;

public class UserDaoMysqlImpl implements UserDao {

    public void getUserInfo() {
        System.out.println("获取MySQL用户信息");
    }
}
Service层:编写UserService业务接口(与dao层的方法相呼应)和UserServiceImpl 实现类(实现业务接口),
实现类需要持有与dao层相对应的实现类的引用
,才可以使Service层通过Dao层的实现类调用业务需要的相应的操作数据库的方法。
package com.hooi.service;

public interface UserService {
    //获取用户信息
    public abstract void getUserInfo();
}
package com.hooi.service;

import com.hooi.dao.UserDao;

public class UserServiceImpl implements UserService {

    private UserDao userDao = new UserDaoMySqlImpl();//Dao层实现类的引用

	//获取用户信息
    public void getUserInfo() {
        userDao.getUserInfo();//通过Dao层实现类的实例调用相应方法
    }
}
Servlet层:通过业务层实现类的方法处理前端传来的用户请求。
UserServiceImpl service = new UserServiceImpl();
service.getUserInfo();
如果dao层想拓展一个新的UserDao实现类,比如说
UserDaoOracleImpl
。那么对应的就要修改Service层实现类中持有的Dao实现类的引用
private UserDao userDao = new UserDaoOracleImpl();
。如果dao层拓展的实现类有很多个呢?虽然对于Servlet层来说,要做的事情(相应的参数传递和调用)并不会改变,但是在Service层面,程序员将需要进行大量的代码修改和维护的工作。客户端的需求是由前端传回的,servlet层在处理请求时就可以判别需要什么样的UserDao实现类,但是却将一大堆工作交由Service层去处理,这样会导致Service层不能只专注于对业务的处理,有悖于解耦的思想。我们不妨思考一下,如何让前端去选择到底使用dao层的哪个实现类,让Service层不再管理相关对象的创建?借助于封装和面向接口编程的思想,我们可以在Service层给Servlet层留出一个接口,Service层在使用某个实现类的时候,并不去创建它,而是引用该实现类实现的接口。UserServiceImpl类中的代码可以修改为:
package com.hooi.service;

import com.hooi.dao.UserDao;

public class UserServiceImpl implements UserService {

    private UserDao userDao;//将实现类用接口封装

    public UserServiceImpl() {
    }

    public UserServiceImpl(UserDao userDao) {
        this.userDao = userDao;
    }

    public void setUserDao(UserDao userDao) {
        this.userDao = userDao;
    }

    public void getUserInfo() {
        userDao.getUserInfo();
    }
}
接口的具体实现类由Servlet层通过相应的set方法进行设置,这样不管前端的需求如何变化,Service层都不需要再进行大量的代码修改,只专注于处理相关业务即可。而Servlet层的操作也仅仅是增加了创建相关对象的步骤。
package com.hooi.service;

import com.hooi.dao.Impl.UserDaoMysqlImpl;
import com.hooi.dao.Impl.UserDaoOracleImpl;
import org.junit.Test;
import org.springframework.context.ApplicationContext;
import org.springframework.context.support.ClassPathXmlApplicationContext;

public class ServiceTest {

    @Test
    public void getUserInfo(){
        UserServiceImpl service = new UserServiceImpl();
        //如果前端需要Oracle的用户数据,在servlet层为UserServiceImpl设置相应的实现类属性
        service.setUserDao(new UserDaoOracleImpl());
        service.getUserInfo();

        //如果前端需要Mysql的用户数据,在servlet层为UserServiceImpl设置相应的实现类属性
        service.setUserDao(new UserDaoMysqlImpl());
        service.getUserInfo();
    }
}
但是,即便如此,当我们在一个对象里需要使用另一个对象时,我们仍然需要得到它,使用完之后还需要将它销毁(比如Connection等),这些对象始终会和其他的接口或类耦合在一起。设想,如果有一个容器可以
专门负责管理对象的生命周期和对象间的关系
,当我们想要使用一个对象时,整个过程不再由我们自己控制,而是由这个容器来完成,如果容器给我们的对象不符合我们的需求,我们只要抛出异常即可。而Spring所倡导的开发方式也是如此,
所有的类的创建、销毁都由Spring来控制,控制对象生存周期的不再是引用它的对象,而是Spring。
对于某个具体的对象而言,以前是它控制其他对象的创建,而现在所有的对象都被Spring控制,我们的程序变得更加具有
高度配置性
和
动态性
,这就是
Spring的核心思想IoC(Inversion of Control),控制反转。
02 IoC和DI
IoC依靠于DI(Dependency Injection,依赖注入)实现。
首先,我们使用Spring框架改造一下上面的案例。使用Spring框架先要导入jar包。
<dependency>
    <groupId>org.springframework</groupId>
    <artifactId>spring-webmvc</artifactId>
    <version>4.3.9.RELEASE</version>
</dependency>
这里pojo层仍然使用上面的User实体类,Dao和Service层的代码依然不变。接下来我们需要编写Spring的配置文件。在resources目录下创建applicationContext.xml
<?xml version="1.0" encoding="UTF-8"?>
<beans xmlns="http://www.springframework.org/schema/beans"
       xmlns:xsi="http://www.w3.org/2001/XMLSchema-instance"
       xsi:schemaLocation="http://www.springframework.org/schema/beans http://www.springframework.org/schema/beans/spring-beans.xsd">

    <!--User对象-->
    <bean id="user" class="com.hooi.pojo.User">
        <property name="userName" value="hooi"/>
    </bean>

    <!--UserDaoMysqlImpl对象-->
    <bean id="userDaoMysqlImpl" class="com.hooi.dao.Impl.UserDaoMysqlImpl"/>
    <!--UserDaoOracleImpl对象-->
    <bean id="userDaoOracleImpl" class="com.hooi.dao.Impl.UserDaoOracleImpl"/>

    <!--MysqlService-->
    <bean id="userServiceMysqlImpl" class="com.hooi.service.UserServiceImpl">
        <property name="userDao" ref="userDaoMysqlImpl"/>
    </bean>
    <!--OracleService-->
    <bean id="userServiceOracleImpl" class="com.hooi.service.UserServiceImpl">
        <property name="userDao" ref="userDaoOracleImpl"/>
    </bean>

</beans>
使用junit进行测试:
@Test
public void _getUserInfo(){
    //通过ClassPathXmlApplicationContext传入相应的xml文件获取想要的对象
    ApplicationContext context = new ClassPathXmlApplicationContext("applicationContext.xml");
    UserServiceImpl userServiceMysqlImpl = (UserServiceImpl) context.getBean("userServiceMysqlImpl");
    userServiceMysqlImpl.getUserInfo();

    UserServiceImpl userServiceOracleImpl = (UserServiceImpl) context.getBean("userServiceOracleImpl");
    userServiceOracleImpl.getUserInfo();

}
测试结果:
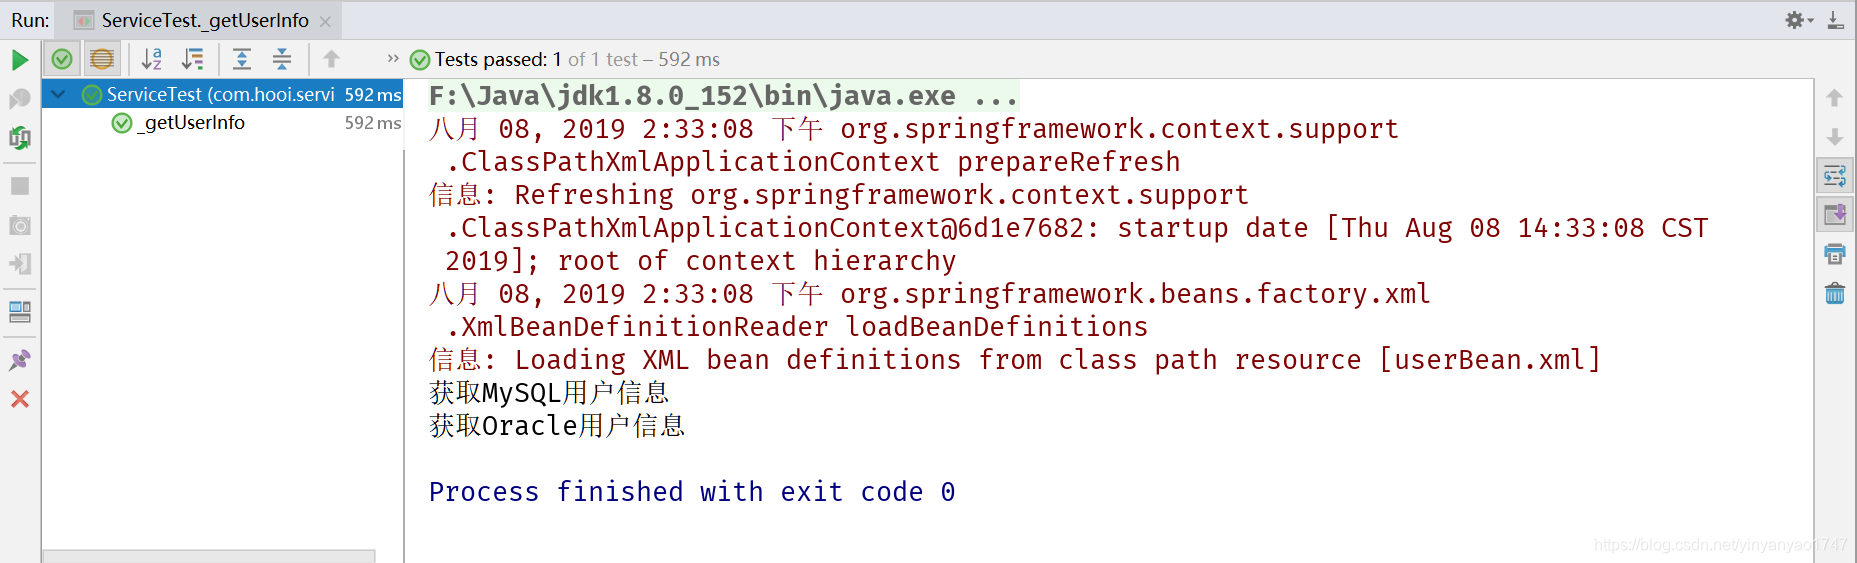
使用Spring之后,我们就不需要再去Servlet层或是Service层改动大量代码,当我们想要实现不同的操作时,只需要在相应的xml配置文件中进行修改或重新注册新的Bean。以上使用的那些对象都由Spring创建,管理,装配。那么,这些对象的属性到底是如何设置值的?
接下来,我们来探究一下DI(Dependency Injection,依赖注入)。
往常我们创建对象的方式无非就两种:有参构造或无参构造。那么,我们来测试一下Spring是如何通过构造器实现依赖注入的。
首先,改造一下User实体类,以便测试。
package com.hooi.pojo;

public class User {
    private String userName;
    private String gender;
    private int age;

    public User() {
        System.out.println("无参构造");
    }

    public User(String userName) {
        System.out.println("有参构造(一)");
        this.userName = userName;
    }

    public User(String userName,String gender) {
        System.out.println("有参构造(二)");
        this.userName = userName;
        this.gender = gender;
    }

    public User(String userName,String gender,int age) {
        System.out.println("有参构造(三)");
        this.userName = userName;
        this.gender = gender;
        this.age = age;
    }

    public String getUserName() {
        return userName;
    }

    public void setUserName(String userName) {
        System.out.println("setUserName:"+userName);
        this.userName = userName;
    }

    public String getGender() {
        return gender;
    }

    public void setGender(String gender) {
        System.out.println("setGender:"+gender);
        this.gender = gender;
    }

    public int getAge() {
        return age;
    }

    public void setAge(int age) {
        System.out.println("setAge:"+age);
        this.age = age;
    }

    @Override
    public String toString() {
        return "User{" +
                "userName='" + userName + '\'' +
                ", gender='" + gender + '\'' +
                ", age=" + age +
                '}';
    }
}
测试代码:
package com.hooi.pojo;

import org.junit.Test;
import org.springframework.context.ApplicationContext;
import org.springframework.context.support.ClassPathXmlApplicationContext;

public class UserTest {

    @Test
    public void userTest(){

        System.out.println("----------->获取上下文");

        ApplicationContext context = new ClassPathXmlApplicationContext("userBean.xml");

        User user = (User) context.getBean("user");

        System.out.println("----------->获取对象"+user);

    }
}
Spring的相关配置文件userBean.xml
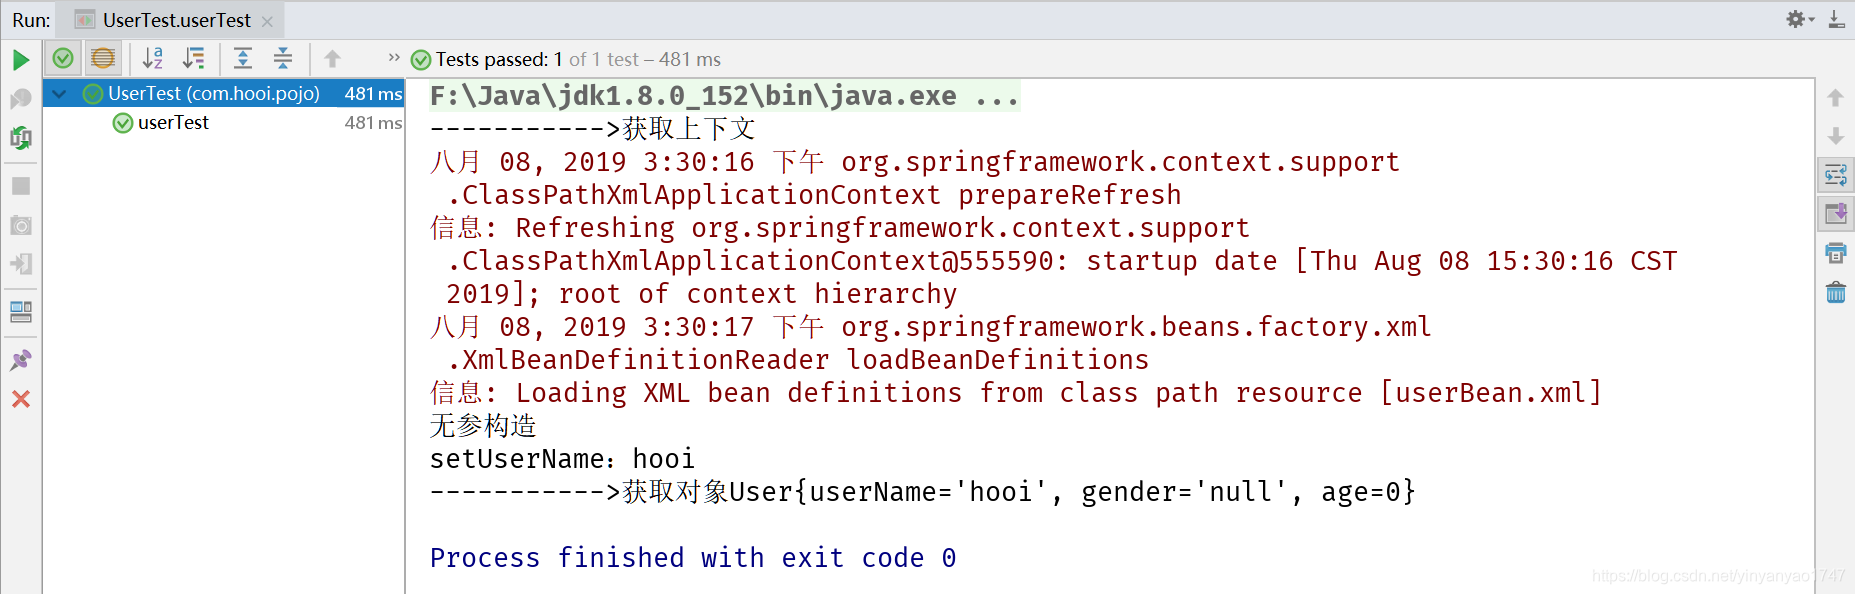
配置1:
<!--使用property对成员变量进行赋值-->
<bean id="user" class="com.hooi.pojo.User">
        <property name="userName" value="hooi"/>
</bean>
测试结果1:由测试结果可以看出property属性依赖无参构造和set方法
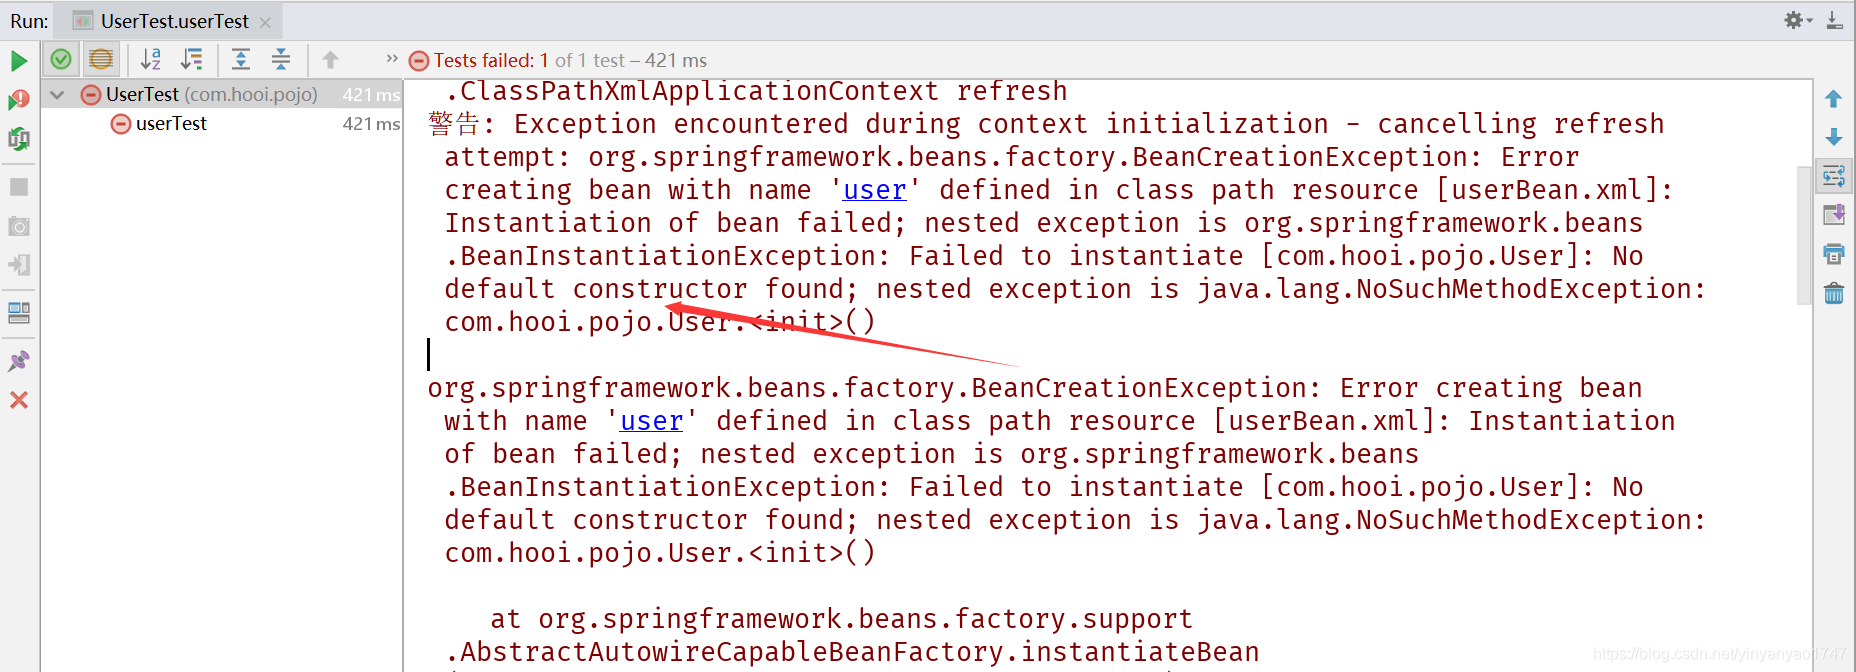
我们将User类中的无参构造方法注掉,再次测试,测试结果如下:会提示没有发现默认构造器
配置2:
<!--使用构造器的参数下标进行属性赋值-->
<bean id="user" class="com.hooi.pojo.User">
    <constructor-arg index="0" value="hooi2"/>
    <constructor-arg index="1" value="female"/>
</bean>
测试结果2:

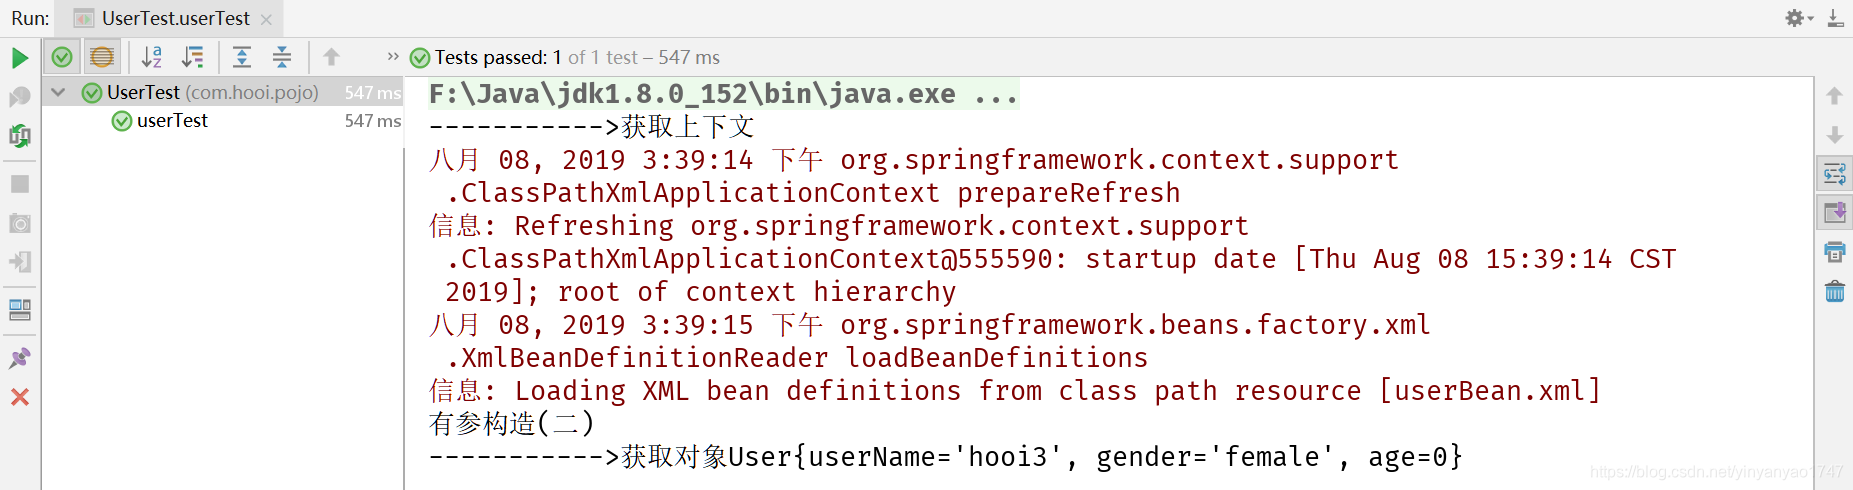
配置3:
<!--使用构造器的参数具体名字进行赋值-->
<bean id="user" class="com.hooi.pojo.User">
    <constructor-arg name="userName" value="hooi3"/>
    <constructor-arg name="gender" value="female"/>
</bean>
测试结果3:
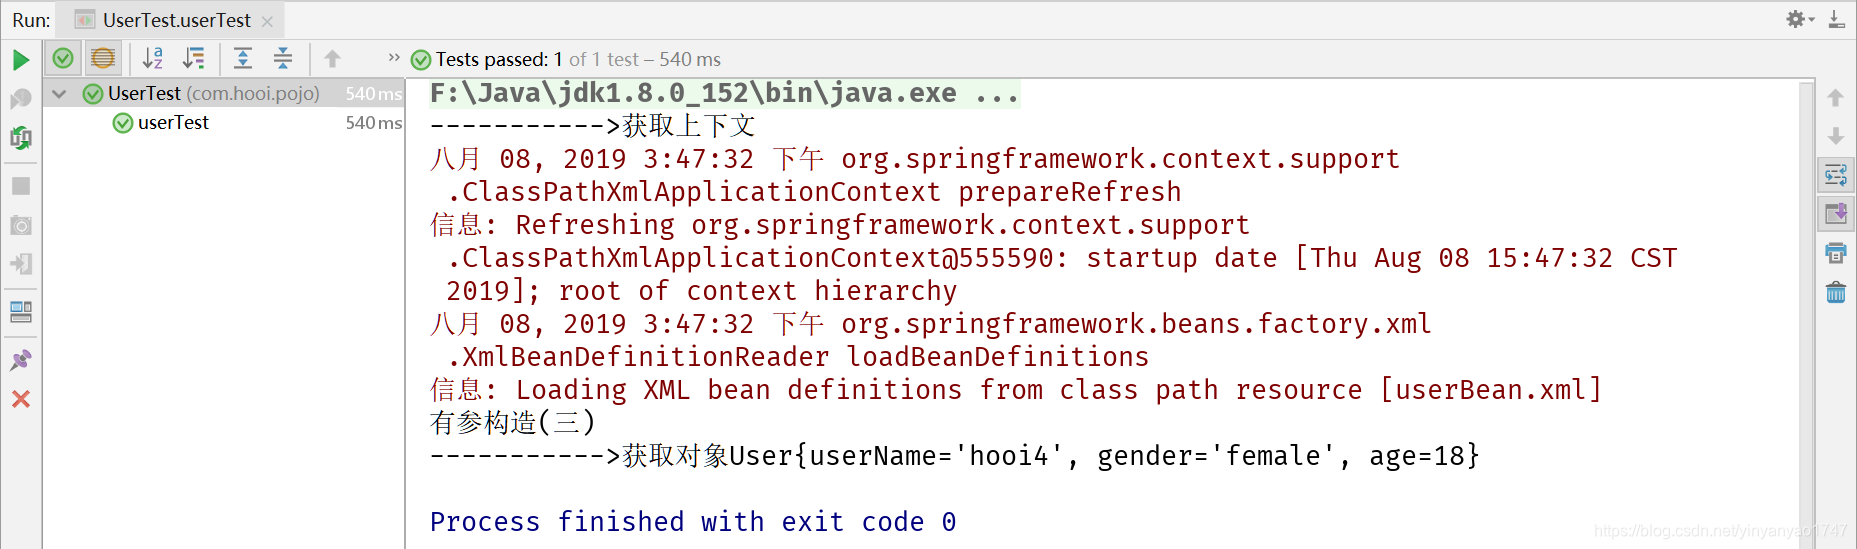
配置4:
<!--通过参数类型进行赋值-->
    <bean id="user" class="com.hooi.pojo.User">
        <constructor-arg type="java.lang.String" value="hooi4"/>
        <constructor-arg type="java.lang.String" value="female"/>
        <constructor-arg type="int" value="18"/>
    </bean>
测试结果4:在测试中遇到一些小问题,如果User类中的age的数据类型为int,千万不要在配置文件中将type属性填为Interger类型,会出现异常UnsatisfiedDependencyException。
以上是分开测试的结果,如果在userBean.xml中同时注册了以上所有的user对象,在获取上下文时,spring会按注册顺序将配置文件中所有的user创建出来。
测试代码:
package com.hooi.pojo;

import org.junit.Test;
import org.springframework.context.ApplicationContext;
import org.springframework.context.support.ClassPathXmlApplicationContext;

public class UserTest {

    @Test
    public void userTest(){


        ApplicationContext context = new ClassPathXmlApplicationContext("userBean.xml");
        System.out.println("----------->获取上下文");

        User user = (User) context.getBean("user");
        User user2 = (User) context.getBean("user2");
        User user3 = (User) context.getBean("user3");
        User user4 = (User) context.getBean("user4");

        System.out.println("----------->获取对象:"+user);
        System.out.println("----------->获取对象:"+user2);
        System.out.println("----------->获取对象:"+user3);
        System.out.println("----------->获取对象:"+user4);

    }
}
测试结果:
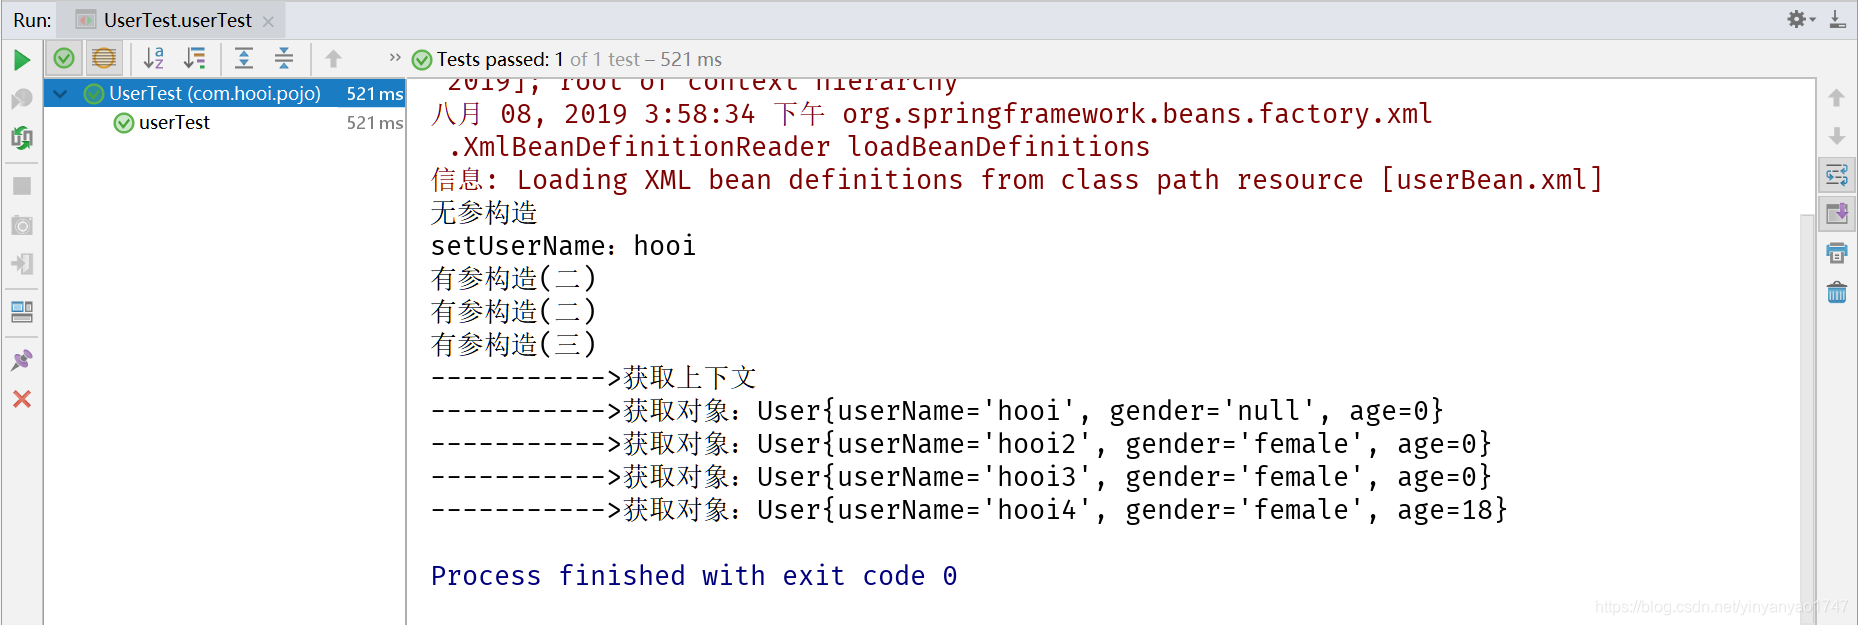
以上,我们简单的测试了通过构造器【有参构造(3种方式)和无参构造】进行依赖注入的方式。下面继续探究其他注入方式。
setter注入:
本质就是在xml文件中使用property属性,通过无参构造器和
set方法
进行注入。setter注入要求被注入的属性,必须拥有set方法,且set方法的名字必须规范(set+属性名),在测试中,属性名使用全小写并不会报错,但是,为了代码的规范性,可读性以及美观性,属性名首字母最好还是使用大写。
p命名空间注入
:实质上是使用了setter注入,但是简化了代码量,一行代码就可以搞定
c命名空间注入
实质上是使用了构造器注入。
在构造器注入的测试中,我们只测试了基本数据类型的注入,下面测试引用数据类型的注入。为了方便测试,我们重新创建一个实体类。
package com.hooi.pojo;

import java.util.*;

public class Student {
    private String name;//姓名
    private int age;//年龄
    private Address address;//地址
    private String[] books;//喜欢的书籍
    private List<String> hobbies;//爱好
    private Set<String> skills;//特长
    private String motto;//座右铭
    private Map<String,String> otherInfo;//其他信息

    public Student() {
    }

    public Student(String name, int age, Address address, String[] books, List<String> hobbies, Set<String> skills, String motto, Map<String, String> otherInfo) {
        this.name = name;
        this.age = age;
        this.address = address;
        this.books = books;
        this.hobbies = hobbies;
        this.skills = skills;
        this.motto = motto;
        this.otherInfo = otherInfo;
    }

    public void setName(String name) {
        this.name = name;
    }

    public Student(String name, int age, Address address) {
        this.name = name;
        this.age = age;
        this.address = address;
    }

    public void setAge(int age) {
        this.age = age;
    }

    public void setAddress(Address address) {
        this.address = address;
    }

    public void setBooks(String[] books) {
        this.books = books;
    }

    public void setHobbies(List<String> hobbies) {
        this.hobbies = hobbies;
    }

    public void setSkills(Set<String> skills) {
        this.skills = skills;
    }

    public void setMotto(String motto) {
        this.motto = motto;
    }

    public void setOtherInfo(Map<String, String> otherInfo) {
        this.otherInfo = otherInfo;
    }

    @Override
    public String toString() {
        return "Student{" +
                "name='" + name + '\'' +
                ", age=" + age +
                ", address=" + address +
                ", books=" + Arrays.toString(books) +
                ", hobbies=" + hobbies +
                ", skills=" + skills +
                ", motto='" + motto + '\'' +
                ", otherInfo=" + otherInfo +
                '}';
    }
}
Spring配置文件
<?xml version="1.0" encoding="UTF-8"?>
<beans xmlns="http://www.springframework.org/schema/beans"
       xmlns:xsi="http://www.w3.org/2001/XMLSchema-instance"
       xmlns:p="http://www.springframework.org/schema/p"
       xmlns:c="http://www.springframework.org/schema/c"
       xsi:schemaLocation="http://www.springframework.org/schema/beans http://www.springframework.org/schema/beans/spring-beans.xsd">

    <!--1. 构造器注入-->
    <!--1.1 有参构造-->
    <bean id="address1" class="com.hooi.pojo.Address">
        <constructor-arg name="address" value="陕西省西安市西安邮电大学长安校区"/>
    </bean>

    <!--1.2 无参构造-->
    <bean id="address2" class="com.hooi.pojo.Address">
        <property name="address" value="陕西省西安市西安邮电大学雁塔校区"/>
    </bean>

    <!--2. setter注入-->
    <bean id="student" class="com.hooi.pojo.Student">
        <!--2.1 基本类型注入-->
        <property name="name" value="Hooi"/>
        <property name="age" value="18"/>
        <!--2.2 Bean类型注入-->
        <property name="address" ref="address1"/>
        <!--2.3 数组类型注入-->
        <property name="books">
            <array>
                <value>小王子</value>
                <value>人间失格</value>
                <value>金阁寺</value>
                <value>白夜行</value>
            </array>
        </property>
        <!--2.4 list类型注入-->
        <property name="hobbies">
            <list>
                <value>撸猫</value>
                <value>遛狗</value>
                <value>打游戏</value>
            </list>
        </property>
        <!--2.5 set类型注入-->
        <property name="skills">
            <set>
                <value>Java编程</value>
                <value>文档撰写</value>
            </set>
        </property>
        <!--2.6 null注入-->
        <property name="motto">
            <null/>
        </property>
        <!--2.7 Map类型注入-->
        <property name="otherInfo">
            <map>
                <entry key="邮箱地址" value="xxxxxxxxxx@qq.com"/>
                <entry key="联系电话" value="18888888888"/>
            </map>
        </property>
    </bean>
    <!--3. P空间命名 需要导入约束xmlns:p="http://www.springframework.org/schema/p"-->
    <bean id="student2" class="com.hooi.pojo.Student" p:name="Hooi2" p:address-ref="address1"/>
    <!--4. C空间命名 需要导入约束xmlns:c="http://www.springframework.org/schema/c"-->
    <bean id="student3" class="com.hooi.pojo.Student" c:_0="Hooi3" c:_1="3" c:_2-ref="address2"/>
</beans>
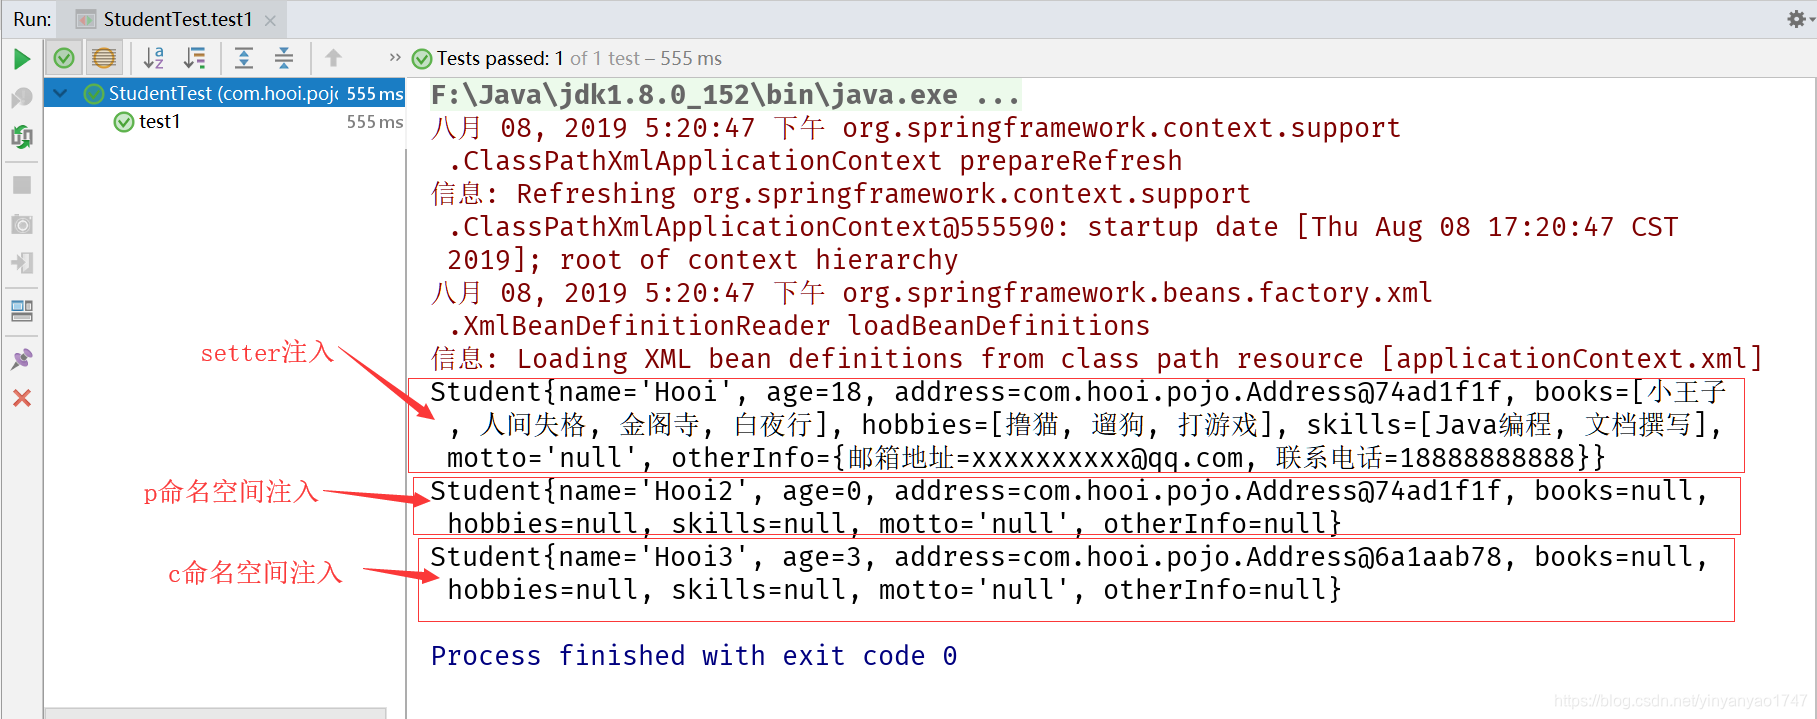
测试代码:
package com.hooi.pojo;

import org.junit.Test;
import org.springframework.context.ApplicationContext;
import org.springframework.context.support.ClassPathXmlApplicationContext;

public class StudentTest {

    @Test
    public void test1(){
        ApplicationContext context = new ClassPathXmlApplicationContext("applicationContext.xml");
        Student student = (Student) context.getBean("student");
        Student student2 = (Student) context.getBean("student2");
        Student student3 = (Student) context.getBean("student3");
        System.out.println(student);
        System.out.println(student2);
        System.out.println(student3);
    }
}
测试结果:在测试c命名空间注入方式时,必须根据有参构造方法的传入参数进行相应的注入,注入属性的个数要与相应的有参构造方法需要传入的参数个数一致。
03 基于注解的注入方式
除了以上那些注入方式,Spring还提供了更为方便的注入方式—
基于注解的注入
。一共有四个注解可以用于注册bean,每种注解可以任意使用,效果是一样的,但是语义有所差异,为了保证代码的可读性,建议按照如下方式使用:
- @Component:可以用于注册所有bean
- @Repository:主要用于注册dao层的bean
- @Service:主要用于注册service层的bean
- @Controller:主要用于注册控制层的bean
描述依赖关系
的注解主要有两种:分别是@Autowired和@Resource
Spring 2.5起引入了注解@Autowired,它可以对类成员变量、方法及构造函数进行标注,完成自动装配的工作。通过@Autowired的使用来消除set,get方法。但是spring的reference并不提倡这种方式,因为这种方式会
破坏模块关系的可读性
。
@Autowired的属性有以下六种:
- No:不启用自动装配。这也是Autowired的默认值,引用关系显示声明。
- byName:通过属性的名字在IoC容器中查找相应的JavaBean依赖的对象并为其注入。这种方式的本质是为setter注入。如,UserServiceImpl类中有个属性为userDao,那么指定其Autowire属性为byName后,Spring的IoC容器会在配置文件中查找id/name属性为userDao的bean,然后使用相应的setter为其注入。
-
byType:通过属性的类型查找JavaBean依赖的对象并为其注入。这也是Autowired
默认
的方式。同例,比如UserController类中有个属性为userServiceImpl,类型为UserServiceImpl,那么,指定其autowire属性为byType后,Spring IoC容器会查找Class属性为UserServiceImpl的bean,使用Seter方法为其注入。如果存在多个该类型bean,那就会由
DefaultListableBeanFactory
的
determineAutowireCandidate
方法来决定具体注入哪个bean,该方法会先去找被@Primary 注解的bean,再找被@Order,@PriorityOrder注解的bean,最后再以byName的方式去匹配。如果在@Autowored()下使用了@Qualifier (“{beanName}”)注解,当匹配到多个符合该类型的bean时,不会调用
determineAutowireCandidate
方法,而是直接寻找@Qualifier指定的beanName去查找并注入,如果找不到会抛出异常。@Qualifier与byName方式的区别在于byName需要遍历,而前者会直接定位到相应的bean,因此使用@Qualifier的处理效率会更高。例:
public class UserController {

    @Autowired//自动装配
    @Qualifier("userServiceImpl")//注入
    private UserServiceImpl userServiceImpl;
}
-
constructor:同byType一样,也是通过类型查找依赖对象。与byType的区别在于它不是使用Seter方式注入,而是使用构造器注入。如果容器中没有找到与构造器参数类型一致的bean,那么抛出异常。
-
autodetect:在byType和constructor之间自动的选择注入方式。通过bean类的自省机制(introspection)来决定是使用constructor还是byType方式进行自动装配。如果发现默认的构造器,那么将使用byType方式,否则采用constructor。
-
default:由上级标签的default-autowire属性确定。注意:在配置bean时,标签中Autowire属性的优先级比其上级标签高,即是说,如果在上级标签中定义default-autowire属性为byName,而在中定义为byType时,Spring IoC容器会优先使用标签的配置。
<beans beans default-autowire="byType"
       xmlns="http://www.springframework.org/schema/beans"
       xmlns:xsi="http://www.w3.org/2001/XMLSchema-instance"
       xsi:schemaLocation="http://www.springframework.org/schema/beans
       http://www.springframework.org/schema/beans/spring-beans.xsd">

    <bean id="userDaoMysqlImpl" class="com.hooi.dao.Impl.UserDaoMysqlImpl"/>
	<bean id="userServiceImpl" class="com.hooi.service.UserServiceImpl" p:userDao-ref="userDaoMysqlImpl"/>
	<bean id="userController" class="com.hooi.controller.UserController" autowire="byName"/>

</beans>
@Resource是Java的注解,默认以byName的方式进行匹配注入,如果byType方式查找找多个符合的bean时,需要使用@Qualifier注解指定bean的具体名字。
Type"
       xmlns="http://www.springframework.org/schema/beans"
       xmlns:xsi="http://www.w3.org/2001/XMLSchema-instance"
       xsi:schemaLocation="http://www.springframework.org/schema/beans
       http://www.springframework.org/schema/beans/spring-beans.xsd">

    <bean id="userDaoMysqlImpl" class="com.hooi.dao.Impl.UserDaoMysqlImpl"/>
	<bean id="userServiceImpl" class="com.hooi.service.UserServiceImpl" p:userDao-ref="userDaoMysqlImpl"/>
	<bean id="userController" class="com.hooi.controller.UserController" autowire="byName"/>

</beans>
@Resource是Java的注解,默认以byName的方式进行匹配注入,如果byType方式查找找多个符合的bean时,需要使用@Qualifier注解指定bean的具体名字。