文章目录
前言
利用windows10系统搭建PaddleDetection2.0环境,并制作自己的VOC数据集,利用PPYOLOv2进行训练及测试
1、必要环境
本文使用 python3.7、cuda10.1、cudnn7.6.5
2、安装
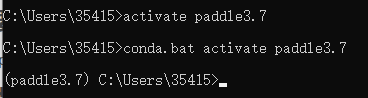
2.1、创建python3.7虚拟环境
- conda create -n paddle3.7 python=3.7
-
activate paddle3.7
2.2、 安装PaddlePaddle2.1
gpu版本:
- python -m pip install paddlepaddle-gpu==2.1.0.post101 -f https://paddlepaddle.org.cn/whl/mkl/stable.html
cpu版本:
- python -m pip install paddlepaddle -i https://mirror.baidu.com/pypi/simple

测试是否安装成功
python
import paddle.fluid as fluid
fluid.install_check.run_check()

出现如上界面则证明安装成功,如果报错请先执行nvcc -V查看cuda版本是否与paddlepaddle对应
想使用旧版本的话可以自行去官网安装
地址:
飞桨官网
2.3、安装PaddleDetection
-
进入github官网
PaddlePaddle/PaddleDetection
下载release2.1分支到本地 - 执行pip install pycocotools,pip install cython
- cd到PaddleDetection-release-2.1文件夹内执行pip install -r requirements.txt
-
执行 python setup.py install

如出现如上界面则证明下载成功
2.4、测试是否安装成功
python ppdet/modeling/tests/test_architectures.py
出现如下界面则证明下载成功

路径报错的话进入test_architectures.py 将所有相对路径改为绝对路径
3、测试
3.1、测试图片效果
-
去官网下载模型权重,本文采用ppyolov2_r50vd权重,下载地址:
ResNet50vd
-
执行如下命令测试图片效果 weights=后面换成
自己的权重路径
python tools/infer.py -c configs/ppyolo/ppyolov2_r50vd_dcn_365e_coco.yml -o use_gpu=true weights=C:\Users\35415\.cache\paddle\weights\ppyolov2_r50vd_dcn_365e_coco.pdparams --infer_img=demo/000000014439_640x640.jpg
效果图

3.2、测试视频效果
- 导出预测模型
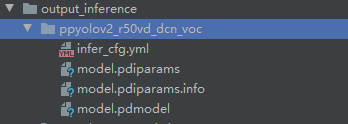
python tools/export_model.py -c configs/ppyolo/ppyolov2_r50vd_dcn_voc.yml -o weights=C:\Users\35415\.cache\paddle\weights\ppyolov2_r50vd_dcn_365e_coco.pdparams
导出模型后,会在output_inference路径下生成如下文件
执行如下代码,测试视频效果
python deploy/python/infer.py --video_file=demo/forest4.avi --model_dir=output_inference\ppyolov2_r50vd_dcn_voc --use_gpu=True --thresh=0.1

ps :之前测试视频的时候源码是有bug的,作为小白,我和朋友调试了一下午…正准备放弃的时候去官网上瞅了一下,发现作者于3小时前更新了代码…
4、准备数据集
4.1准备自己的VOC数据集
	voc数据集格式
   ├── VOCdevkit
   │   ├── VOC2007
   │   │   ├── Annotations  #存放所有xml文件
   │   │   ├── JPEGImages   #存放所有图片
   │   │   ├── ImageSets
   │   │   │   ├── Main
   │   │   │   │   ├── test.txt
   │   │   │   │   ├── trainval.txt
   │   │   │   │   ├── train.txt
   │   │   │   │   ├── val.txt
4.2将数据集划分为训练集和测试集
1.进入
VOC2007
文件夹内,运行create_txt.py将会在Main文件夹内生成trainval.txt、train.txt、val.txt、test.txt四个txt文件。
create_txt.py
import os
import random
#需要根据自己的目录进行修改
trainval_percent = 0.95  # 训练集验证集总占比
train_percent = 0.9  # 训练集在trainval_percent里的train占比
xmlfilepath = r'Annotations'
txtsavepath = r'ImageSets/Main'
total_xml = os.listdir(xmlfilepath)

num = len(total_xml)
list = range(num)
tv = int(num * trainval_percent)
tr = int(tv * train_percent)
trainval = random.sample(list, tv)
train = random.sample(trainval, tr)

ftrainval = open(r'ImageSets\Main\trainval.txt', 'w')
ftest = open(r'ImageSets\Main\test.txt', 'w')
ftrain = open(r'ImageSets\Main\train.txt', 'w')
fval = open(r'ImageSets\Main\val.txt', 'w')

for i in list:
    name = total_xml[i][:-4] + '\n'
    if i in trainval:
        ftrainval.write(name)
        if i in train:
            ftrain.write(name)
        else:
            fval.write(name)
    else:
        ftest.write(name)

ftrainval.close()
ftrain.close()
fval.close()
ftest.close()
2.在
VOC2007
文件夹内继续运行txt_write.py,生成包含jpg和xml信息的txt文件
txt_write.py
import os
import re
import random

devkit_dir = './'
output_dir = './'

def get_dir(devkit_dir,  type):
    return os.path.join(devkit_dir, type)

def walk_dir(devkit_dir):
    filelist_dir = get_dir(devkit_dir, 'ImageSets/Main')
    annotation_dir = get_dir(devkit_dir, 'Annotations')
    img_dir = get_dir(devkit_dir, 'JPEGImages')
    trainval_list = []
    train_list = []
    val_list = []
    test_list = []

    added = set()

    for _, _, files in os.walk(filelist_dir):
        for fname in files:
            print(fname)
            img_ann_list = []
            if re.match('trainval.txt', fname):
                img_ann_list = trainval_list
            elif re.match('train.txt', fname):
                img_ann_list = train_list
            elif re.match('val.txt', fname):
                img_ann_list = val_list
            elif re.match('test.txt', fname):
                img_ann_list = test_list
            else:
                continue
            fpath = os.path.join(filelist_dir, fname)
            for line in open(fpath):
                name_prefix = line.strip().split()[0]
                print(name_prefix)

                added.add(name_prefix)
                #ann_path = os.path.join(annotation_dir, name_prefix + '.xml')
                ann_path = annotation_dir + '/' + name_prefix + '.xml'
                print(ann_path)
                #img_path = os.path.join(img_dir, name_prefix + '.jpg')
                img_path = img_dir + '/' + name_prefix + '.jpg'
                assert os.path.isfile(ann_path), 'file %s not found.' % ann_path
                assert os.path.isfile(img_path), 'file %s not found.' % img_path
                img_ann_list.append((img_path, ann_path))
            print(img_ann_list)

    return trainval_list, train_list, val_list, test_list


def prepare_filelist(devkit_dir, output_dir):
    trainval_list = []
    train_list = []
    val_list = []
    test_list = []

    trainval, train, val, test = walk_dir(devkit_dir)

    trainval_list.extend(trainval)
    train_list.extend(train)
    val_list.extend(val)
    test_list.extend(test)
    #print(trainval)
    with open(os.path.join(output_dir, 'trainval.txt'), 'w') as ftrainval:
        for item in trainval_list:
            ftrainval.write(item[0] + ' ' + item[1] + '\n')

    with open(os.path.join(output_dir, 'train.txt'), 'w') as ftrain:
        for item in train_list:
            ftrain.write(item[0] + ' ' + item[1] + '\n')

    with open(os.path.join(output_dir, 'val.txt'), 'w') as fval:
        for item in val_list:
            fval.write(item[0] + ' ' + item[1] + '\n')

    with open(os.path.join(output_dir, 'test.txt'), 'w') as ftest:
        for item in test_list:
            ftest.write(item[0] + ' ' + item[1] + '\n')


if __name__ == '__main__':
    prepare_filelist(devkit_dir, output_dir)
如果写入的txt文件为空,请仔细检查路径是否有问题
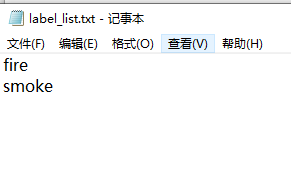
3.
创建label_list
新建一个txt文件,命名为label_list,里面存放类别名称
5、训练自己的数据集
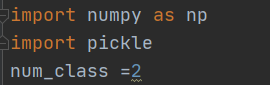
\PaddleDetection-release-2.1目录下创建changeppyolov2.py,用于更新anchor
changeppyolov2.py
import numpy as np
import pickle
num_class =2
with open(r'C:\Users\35415\.cache\paddle\weights\ppyolov2_r50vd_dcn_365e_coco.pdparams','rb') as f:
    obj = f.read()
weights = pickle. loads(obj, encoding= 'latin1')

weights['yolo_head.yolo_output.0.weight']=np.zeros([num_class*3+18,1024,1,1],dtype= 'float32')
weights[ 'yolo_head.yolo_output.0.bias' ]=np.zeros( [ num_class*3+18],dtype='float32')
weights['yolo_head.yolo_output.1.weight']=np.zeros([num_class*3+18,512,1,1],dtype='float32')
weights[ 'yolo_head.yolo_output.1.bias ' ]=np. zeros( [ num_class*3+18],dtype='float32')
weights['yolo_head.yolo_output.2.weight']=np.zeros([num_class*3+18,256,1,1],dtype='float32')
weights[ 'yolo_head.yolo_output.2.bias ' ]=np.zeros( [ num_class*3+18],dtype= 'float32')

f = open('model_final.pdparams','wb')
pickle.dump(weights,f)
f.close()
-
选择模型 本文使用的是(ppyolov2_r50vd_dcn_voc.yml)
-
修改configs\ppyolo\ppyolov2_r50vd_dcn_voc.yml内的参数snapshot_epoch(训练几次保存一次)本文这里写的是1

-
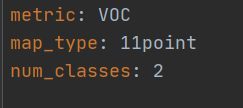
修改 configs\datasets\voc.yml 内 num_classes (分类数) 有几个类别这里就写多少
-
修改configs\datasets\voc.yml中的存放数据集的路径


-
修改configs\ppyolo\_base_\optimizer_365e.yml 内的 epoch(训练次数) base_lr(学习率)=0.01/8*GPU_num

-
可以修改 configs\ppyolo\_base_\ppyolov2_reader.ymll 内的 batck_size和worker_num,worker_num本文改为0

-
修改 changeppyolov2.py 内的 num_classes,改为自己的类别数
-
运行 changeppyolov2.py 更新权重文件中的类别 获取新权重文件

-
修改 configs\ppyolo\_base_\ppyolov2_r50vd_dcn.yml 内的pretrain_weights指向刚更新的权重文件

-
运行如下代码获取anchor:
python tools/anchor_cluster.py -c configs/ppyolo/ppyolov2_r50vd_dcn_voc.yml -n 9 -s 640 -m v2 -i 1000

-
把anchor复制到
configs\ppyolo\_base_\ppyolov2_r50vd_dcn.yml
和
configs\ppyolo_base_\ppyolov2_reader.yml


以上内容根据自己的输出结果着实修改 -
开始训练:
python tools/train.py -c configs/ppyolo/ppyolov2_r50vd_dcn_voc.yml
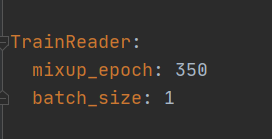
此时可能会报如下内存溢出的错误

此时我们需要进入configs\ppyolo\ppyolov2_r50vd_dcn_voc.yml 将batch_size修改为1
,然后重新训练

- 测试代码如下
python tools/infer.py -c configs/ppyolo/ppyolov2_r50vd_dcn_voc.yml -o use_gpu=True weights=D:\dmdm\Paddle
Detection-release-2.1\output\ppyolov2_r50vd_dcn_voc\48.pdparams --infer_img=demo/fire.jpg
如果想在某一批次下继续训练模型可在路径后面加上 -r checkpoint_path
python tools/train.py -c configs/ppyolo/ppyolov2_r50vd_dcn_voc.yml -r output/ppyolov2_r50vd_dcn_voc/146.pdparams
效果图

好啦,大功告成!
参考博客:https://blog.csdn.net/zhonglongshen/article/details/114652177
参考视频:https://www.bilibili.com/video/BV1uN411Z7fT?t=391
可选参数列表:https://github.com/PaddlePaddle/PaddleDetection/blob/release/0.2/docs/tutorials/GETTING_STARTED_cn.md#%E5%8F%AF%E9%80%89%E5%8F%82%E6%95%B0%E5%88%97%E8%A1%A8
如有问题,欢迎评论区交流!!

学习交流群:995760755