Network
Docker容器之间访问
通过docker0 网卡实现相同网段进行通信

6.1 同一个Pod中的容器通信-pause container
接下来就要说到跟Kubernetes网络通信相关的内容咯
我们都知道K8S最小的操作单位是Pod,先思考一下同一个Pod中多个容器要进行通信
由官网的这段话可以看出,同一个pod中的容器是共享网络ip地址和端口号的,通信显然没问题
Each Pod is assigned a unique IP address. Every container in a Pod shares the network namespace, including the IP address and network ports.
那如果是通过容器的名称进行通信呢?就需要将所有pod中的容器加入到同一个容器的网络中,我们把该容器称作为pod中的pause container。

6.2 集群内Pod之间的通信-Calico
接下来就聊聊K8S最小的操作单元,Pod之间的通信
我们都之间Pod会有独立的IP地址,这个IP地址是被Pod中所有的Container共享的
那多个Pod之间的通信能通过这个IP地址吗?
我认为需要分两个维度:一是集群中同一台机器中的Pod,二是集群中不同机器中的Pod
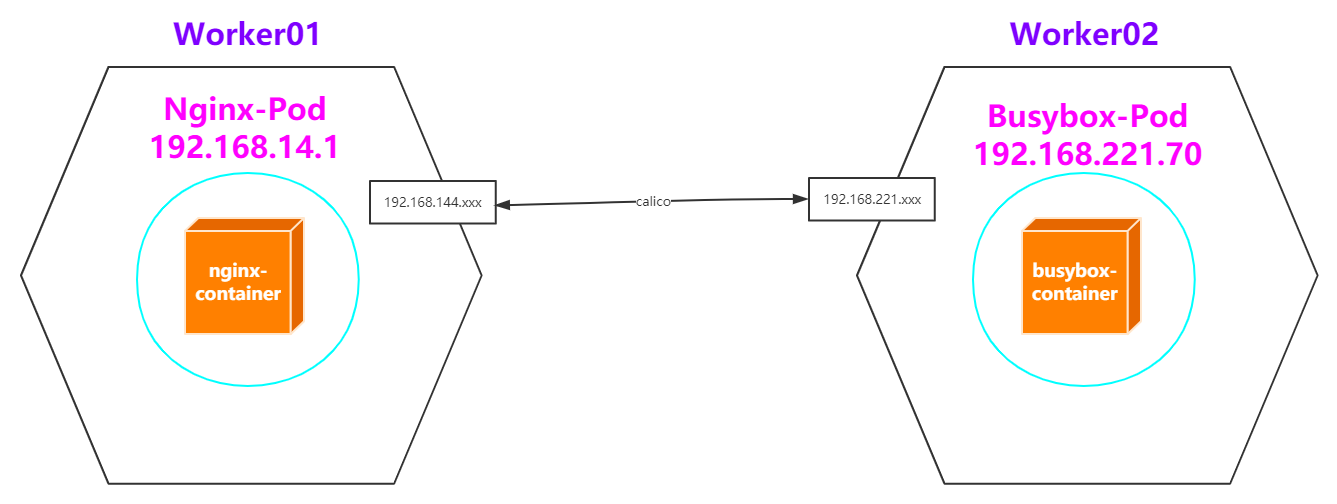
准备两个pod,一个nginx,一个busybox
nginx_pod.yaml
apiVersion: v1
kind: Pod
metadata:
name: nginx-pod
labels:
app: nginx
spec:
containers:
  - name: nginx-container
    image: nginx
    ports:
    - containerPort: 80
busybox_pod.yaml
apiVersion: v1
kind: Pod
metadata:
name: busybox
labels:
app: busybox
spec:
containers:
  - name: busybox
    image: busybox
    command: ['sh', '-c', 'echo The app is running! && sleep 3600']
将两个pod运行起来,并且查看运行情况
kubectl apply -f nginx_pod.yaml
kubectl apply -f busy_pod.yaml
kubectl get pods -o wide
NAME      READY  STATUS    RESTARTS   AGE         IP                NODE
busybox    1/1   Running      0       49s    192.168.221.70   worker02-kubeadm-k8s
nginx-pod  1/1   Running      0      7m46s   192.168.14.1     worker01-kubeadm-k8s
发现
:nginx-pod的ip为192.168.14.1 busybox-pod的ip为192.168.221.70
同一个集群中同一台机器
(1)来到worker01:ping 192.168.14.1
PING 192.168.14.1 (192.168.14.1) 56(84) bytes of data.
64 bytes from 192.168.14.1: icmp_seq=1 ttl=64 time=0.063 ms
64 bytes from 192.168.14.1: icmp_seq=2 ttl=64 time=0.048 ms
(2)来到worker01:curl 192.168.14.1
<!DOCTYPE html>
<html>
<head>
<title>Welcome to nginx!</title>
<style>
    body {
        width: 35em;
        margin: 0 auto;
        font-family: Tahoma, Verdana, Arial, sans-serif;
    }
</style>
同一个集群中不同机器
(1)来到worker02:ping 192.168.14.1
[root@worker02-kubeadm-k8s ~]# ping 192.168.14.1
PING 192.168.14.1 (192.168.14.1) 56(84) bytes of data.
64 bytes from 192.168.14.1: icmp_seq=1 ttl=63 time=0.680 ms
64 bytes from 192.168.14.1: icmp_seq=2 ttl=63 time=0.306 ms
64 bytes from 192.168.14.1: icmp_seq=3 ttl=63 time=0.688 ms
(2)来到worker02:curl 192.168.14.1,同样可以访问nginx
(3)来到master:
ping/curl 192.168.14.1 访问的是worker01上的nginx-pod
ping 192.168.221.70 访问的是worker02上的busybox-pod
(4)来到worker01:ping 192.168.221.70 访问的是worker02上的busybox-pod
How to implement the Kubernetes Cluster networking model–Calico
官网
:
https://kubernetes.io/docs/concepts/cluster-administration/networking/#the-kubernetes-network-model
- pods on a node can communicate with all pods on all nodes without NAT
- agents on a node (e.g. system daemons, kubelet) can communicate with all pods on that node
- pods in the host network of a node can communicate with all pods on all nodes without NAT
6.3 访问集群内Service-kube-proxy
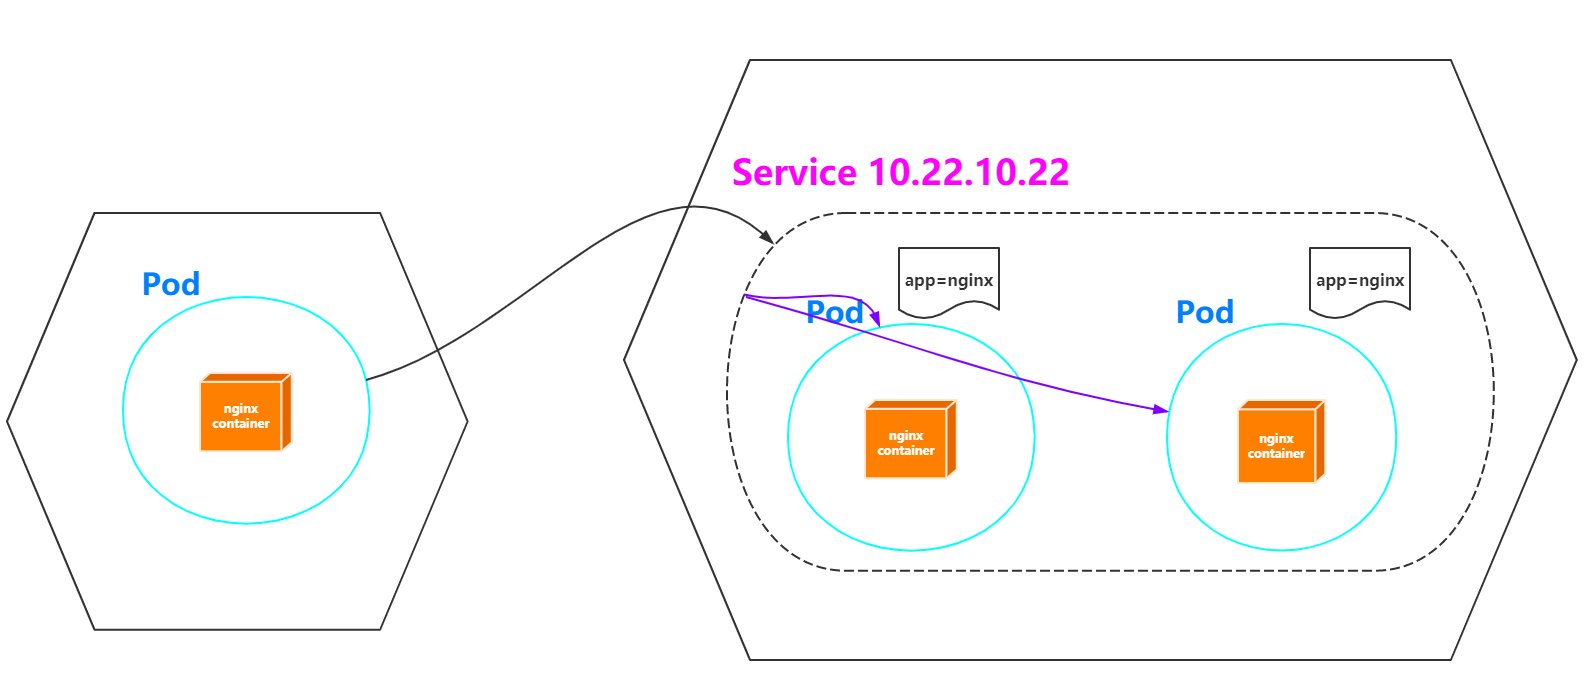
对于上述的Pod虽然实现了集群内部互相通信,但是Pod是不稳定的,比如通过Deployment管理Pod,随时可能对Pod进行扩缩容,这时候Pod的IP地址是变化的。能够有一个固定的IP,使得集群内能够访问。也就是之前在架构描述的时候所提到的,能够把相同或者具有关联的Pod,打上Label,组成Service。而Service有固定的IP,不管Pod怎么创建和销毁,都可以通过Service的IP进行访问
Service官网
:
https://kubernetes.io/docs/concepts/services-networking/service/
An abstract way to expose an application running on a set of Pods as a network service.
With Kubernetes you don’t need to modify your application to use an unfamiliar service discovery mechanism. Kubernetes gives Pods their own IP addresses and a single DNS name for a set of Pods, and can load-balance across them.
[外链图片转存失败,源站可能有防盗链机制,建议将图片保存下来直接上传(img-6QmJifrm-1624149255351)(https://gitee.com/onlycreator/draw/raw/master/img/services-userspace-overview.svg)]
图解场景
(1)创建whoami-deployment.yaml文件,并且apply
apiVersion: apps/v1
kind: Deployment
metadata:
  name: whoami-deployment
  labels:
    app: whoami
spec:
  replicas: 3
  selector:
    matchLabels:
      app: whoami
  template:
    metadata:
      labels:
        app: whoami
    spec:
      containers:
      - name: whoami
        image: jwilder/whoami
        ports:
        - containerPort: 8000
(2)查看pod以及service
whoami-deployment-5dd9ff5fd8-22k9n   192.168.221.80   worker02-kubeadm-k8s
whoami-deployment-5dd9ff5fd8-vbwzp   192.168.14.6     worker01-kubeadm-k8s
whoami-deployment-5dd9ff5fd8-zzf4d   192.168.14.7     worker01-kubeadm-k8s
kubectl get svc:可以发现目前并没有关于whoami的service
NAME         TYPE        CLUSTER-IP   EXTERNAL-IP   PORT(S)   AGE
kubernetes   ClusterIP   10.96.0.1    <none>        443/TCP   19h
(3)在集群内正常访问
curl 192.168.221.80:8000/192.168.14.6:8000/192.168.14.7:8000
(4)创建whoami的service
注意
:该地址只能在集群内部访问
# 创建一个service
kubectl expose deployment whoami-deployment
kubectl get svc
[root@master-kubeadm-k8s ~]# kubectl get svc
NAME                TYPE        CLUSTER-IP       EXTERNAL-IP   PORT(S)    AGE
kubernetes          ClusterIP   10.96.0.1        <none>        443/TCP    19h
whoami-deployment   ClusterIP   10.105.147.59   <none>        8000/TCP   23s

# 删除svc
# kubectl delete service whoami-deployment
可以发现有一个Cluster IP类型的service,名称为whoami-deployment,IP地址为10.101.201.192
(5)通过Service的Cluster IP访问
[root@master-kubeadm-k8s ~]# curl 10.105.147.59:8000
I'm whoami-deployment-678b64444d-b2695
[root@master-kubeadm-k8s ~]# curl 10.105.147.59:8000
I'm whoami-deployment-678b64444d-hgdrk
[root@master-kubeadm-k8s ~]# curl 10.105.147.59:8000
I'm whoami-deployment-678b64444d-65t88
(6)具体查看一下whoami-deployment的详情信息,发现有一个Endpoints连接了具体3个Pod
[root@master-kubeadm-k8s ~]# kubectl describe svc whoami-deployment
Name:              whoami-deployment
Namespace:         default
Labels:            app=whoami
Annotations:       <none>
Selector:          app=whoami
Type:              ClusterIP
IP:                10.105.147.59
Port:              <unset>  8000/TCP
TargetPort:        8000/TCP
Endpoints:         192.168.14.8:8000,192.168.221.81:8000,192.168.221.82:8000
Session Affinity:  None
Events:            <none>
(7)不妨对whoami扩容成5个
kubectl scale deployment whoami-deployment --replicas=5
(8)再次访问:curl 10.105.147.59:8000
(9)再次查看service具体信息:kubectl describe svc whoami-deployment
(10)其实对于Service的创建,不仅仅可以使用kubectl expose,也可以定义一个yaml文件
apiVersion: v1
kind: Service
metadata:
  name: my-service
spec:
  selector:
    app: MyApp
  ports:
    - protocol: TCP
      port: 80
      targetPort: 9376
  type: Cluster
conclusion
:其实Service存在的意义就是为了Pod的不稳定性,而上述探讨的就是关于Service的一种类型Cluster IP,只能供集群内访问
以Pod为中心,已经讨论了关于集群内的通信方式,接下来就是探讨集群中的Pod访问外部服务,以及外部服务访问集群中的Pod
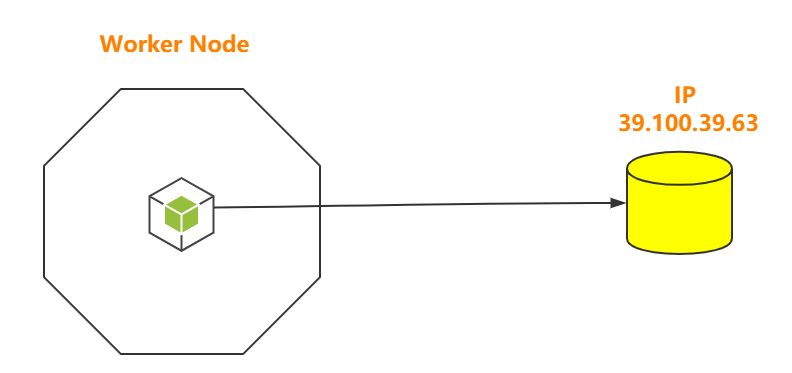
6.4 Pod访问外部服务
比较简单,没太多好说的内容,直接访问即可
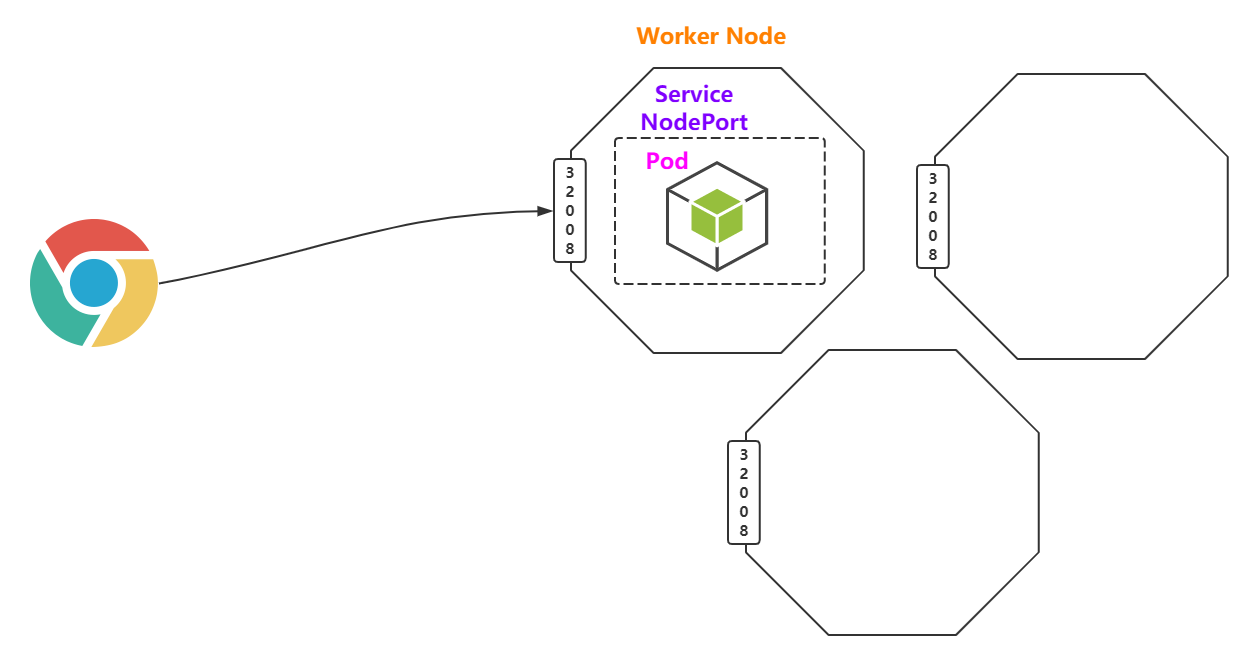
6.5 外部服务访问集群中的Pod
Service-NodePort
也是Service的一种类型,可以通过NodePort的方式
说白了,因为外部能够访问到集群的物理机器IP,所以就是在集群中每台物理机器上暴露一个相同的IP,比如32008
(1)根据whoami-deployment.yaml创建pod
apiVersion: apps/v1
kind: Deployment
metadata:
  name: whoami-deployment
  labels:
    app: whoami
spec:
  replicas: 3
  selector:
    matchLabels:
      app: whoami
  template:
    metadata:
      labels:
        app: whoami
    spec:
      containers:
      - name: whoami
        image: jwilder/whoami
        ports:
        - containerPort: 8000
(2)创建NodePort类型的service,名称为whoami-deployment
kubectl delete svc whoami-deployment

kubectl expose deployment whoami-deployment --type=NodePort

[root@master-kubeadm-k8s ~]# kubectl get svc
NAME                TYPE        CLUSTER-IP     EXTERNAL-IP   PORT(S)          AGE
kubernetes          ClusterIP   10.96.0.1      <none>        443/TCP          21h
whoami-deployment   NodePort    10.99.108.82   <none>        8000:32041/TCP   7s
(3)注意上述的端口32041,实际上就是暴露在集群中物理机器上的端口
lsof -i tcp:32041
netstat -ntlp|grep 32041
(4)浏览器通过物理机器的IP访问
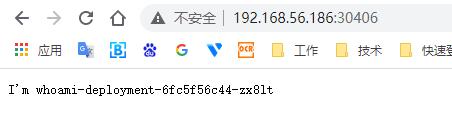
http://192.168.0.51:32041
curl 192.168.0.61:32041
conclusion
:NodePort虽然能够实现外部访问Pod的需求,但是真的好吗?其实不好,占用了各个物理主机上的端口
Service-LoadBalance
通常需要第三方云提供商支持,有约束性
Ingress
官网
:
https://kubernetes.io/docs/concepts/services-networking/ingress/
An API object that manages external access to the services in a cluster, typically HTTP.
Ingress can provide load balancing, SSL termination and name-based virtual hosting.
What is Ingress?
Ingress
exposes HTTP and HTTPS routes from outside the cluster to
services
within the cluster. Traffic routing is controlled by rules defined on the Ingress resource.
Here is a simple example where an Ingress sends all its traffic to one Service:
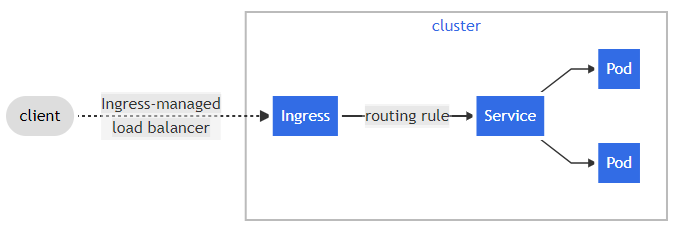
可以发现,Ingress就是帮助我们访问集群内的服务的。不过在看Ingress之前,我们还是先以一个案例出发。
显然,Service-NodePort的方式生产环境不推荐使用,那接下来就基于上述需求,在K8S集群中部署whoami,可以被外部主机进行访问。
官网Ingress
:
https://kubernetes.io/docs/concepts/services-networking/ingress/
GitHub Ingress Nginx
:
https://github.com/kubernetes/ingress-nginx
Nginx Ingress Controller
:<https://kubernetes.github.io/ingress-nginx/下载官方提供的deploy.yaml 需要科学上网
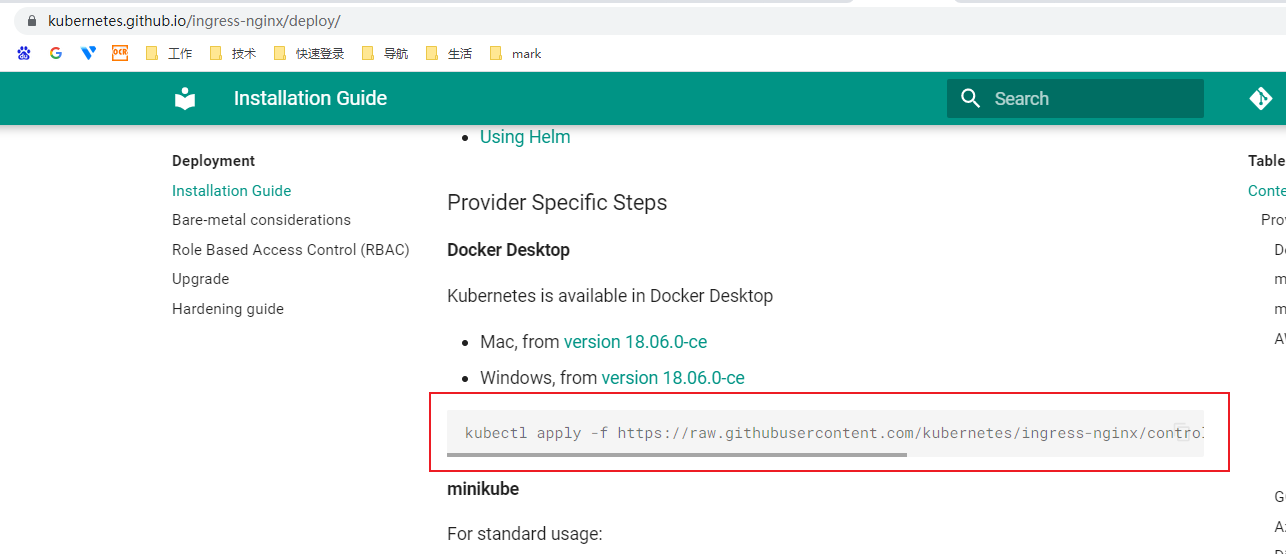
我提供一个本地版本 保存为mandatory.yaml
apiVersion: v1
kind: Namespace
metadata:
  name: ingress-nginx
  labels:
    app.kubernetes.io/name: ingress-nginx
    app.kubernetes.io/part-of: ingress-nginx

---

kind: ConfigMap
apiVersion: v1
metadata:
  name: nginx-configuration
  namespace: ingress-nginx
  labels:
    app.kubernetes.io/name: ingress-nginx
    app.kubernetes.io/part-of: ingress-nginx

---
kind: ConfigMap
apiVersion: v1
metadata:
  name: tcp-services
  namespace: ingress-nginx
  labels:
    app.kubernetes.io/name: ingress-nginx
    app.kubernetes.io/part-of: ingress-nginx

---
kind: ConfigMap
apiVersion: v1
metadata:
  name: udp-services
  namespace: ingress-nginx
  labels:
    app.kubernetes.io/name: ingress-nginx
    app.kubernetes.io/part-of: ingress-nginx

---
apiVersion: v1
kind: ServiceAccount
metadata:
  name: nginx-ingress-serviceaccount
  namespace: ingress-nginx
  labels:
    app.kubernetes.io/name: ingress-nginx
    app.kubernetes.io/part-of: ingress-nginx

---
apiVersion: rbac.authorization.k8s.io/v1beta1
kind: ClusterRole
metadata:
  name: nginx-ingress-clusterrole
  labels:
    app.kubernetes.io/name: ingress-nginx
    app.kubernetes.io/part-of: ingress-nginx
rules:
  - apiGroups:
      - ""
    resources:
      - configmaps
      - endpoints
      - nodes
      - pods
      - secrets
    verbs:
      - list
      - watch
  - apiGroups:
      - ""
    resources:
      - nodes
    verbs:
      - get
  - apiGroups:
      - ""
    resources:
      - services
    verbs:
      - get
      - list
      - watch
  - apiGroups:
      - ""
    resources:
      - events
    verbs:
      - create
      - patch
  - apiGroups:
      - "extensions"
      - "networking.k8s.io"
    resources:
      - ingresses
    verbs:
      - get
      - list
      - watch
  - apiGroups:
      - "extensions"
      - "networking.k8s.io"
    resources:
      - ingresses/status
    verbs:
      - update

---
apiVersion: rbac.authorization.k8s.io/v1beta1
kind: Role
metadata:
  name: nginx-ingress-role
  namespace: ingress-nginx
  labels:
    app.kubernetes.io/name: ingress-nginx
    app.kubernetes.io/part-of: ingress-nginx
rules:
  - apiGroups:
      - ""
    resources:
      - configmaps
      - pods
      - secrets
      - namespaces
    verbs:
      - get
  - apiGroups:
      - ""
    resources:
      - configmaps
    resourceNames:
      # Defaults to "<election-id>-<ingress-class>"
      # Here: "<ingress-controller-leader>-<nginx>"
      # This has to be adapted if you change either parameter
      # when launching the nginx-ingress-controller.
      - "ingress-controller-leader-nginx"
    verbs:
      - get
      - update
  - apiGroups:
      - ""
    resources:
      - configmaps
    verbs:
      - create
  - apiGroups:
      - ""
    resources:
      - endpoints
    verbs:
      - get

---
apiVersion: rbac.authorization.k8s.io/v1beta1
kind: RoleBinding
metadata:
  name: nginx-ingress-role-nisa-binding
  namespace: ingress-nginx
  labels:
    app.kubernetes.io/name: ingress-nginx
    app.kubernetes.io/part-of: ingress-nginx
roleRef:
  apiGroup: rbac.authorization.k8s.io
  kind: Role
  name: nginx-ingress-role
subjects:
  - kind: ServiceAccount
    name: nginx-ingress-serviceaccount
    namespace: ingress-nginx

---
apiVersion: rbac.authorization.k8s.io/v1beta1
kind: ClusterRoleBinding
metadata:
  name: nginx-ingress-clusterrole-nisa-binding
  labels:
    app.kubernetes.io/name: ingress-nginx
    app.kubernetes.io/part-of: ingress-nginx
roleRef:
  apiGroup: rbac.authorization.k8s.io
  kind: ClusterRole
  name: nginx-ingress-clusterrole
subjects:
  - kind: ServiceAccount
    name: nginx-ingress-serviceaccount
    namespace: ingress-nginx

---

apiVersion: apps/v1
kind: Deployment
metadata:
  name: nginx-ingress-controller
  namespace: ingress-nginx
  labels:
    app.kubernetes.io/name: ingress-nginx
    app.kubernetes.io/part-of: ingress-nginx
spec:
  replicas: 1
  selector:
    matchLabels:
      app.kubernetes.io/name: ingress-nginx
      app.kubernetes.io/part-of: ingress-nginx
  template:
    metadata:
      labels:
        app.kubernetes.io/name: ingress-nginx
        app.kubernetes.io/part-of: ingress-nginx
      annotations:
        prometheus.io/port: "10254"
        prometheus.io/scrape: "true"
    spec:
      # wait up to five minutes for the drain of connections
      terminationGracePeriodSeconds: 300
      serviceAccountName: nginx-ingress-serviceaccount
      hostNetwork: true
      nodeSelector:
        name: ingress
        kubernetes.io/os: linux
      containers:
        - name: nginx-ingress-controller
          image: quay.io/kubernetes-ingress-controller/nginx-ingress-controller:0.26.1
          args:
            - /nginx-ingress-controller
            - --configmap=$(POD_NAMESPACE)/nginx-configuration
            - --tcp-services-configmap=$(POD_NAMESPACE)/tcp-services
            - --udp-services-configmap=$(POD_NAMESPACE)/udp-services
            - --publish-service=$(POD_NAMESPACE)/ingress-nginx
            - --annotations-prefix=nginx.ingress.kubernetes.io
          securityContext:
            allowPrivilegeEscalation: true
            capabilities:
              drop:
                - ALL
              add:
                - NET_BIND_SERVICE
            # www-data -> 33
            runAsUser: 33
          env:
            - name: POD_NAME
              valueFrom:
                fieldRef:
                  fieldPath: metadata.name
            - name: POD_NAMESPACE
              valueFrom:
                fieldRef:
                  fieldPath: metadata.namespace
          ports:
            - name: http
              containerPort: 80
            - name: https
              containerPort: 443
          livenessProbe:
            failureThreshold: 3
            httpGet:
              path: /healthz
              port: 10254
              scheme: HTTP
            initialDelaySeconds: 10
            periodSeconds: 10
            successThreshold: 1
            timeoutSeconds: 10
          readinessProbe:
            failureThreshold: 3
            httpGet:
              path: /healthz
              port: 10254
              scheme: HTTP
            periodSeconds: 10
            successThreshold: 1
            timeoutSeconds: 10
          lifecycle:
            preStop:
              exec:
                command:
                  - /wait-shutdown

---
(1)以Deployment方式创建Pod,该Pod为Ingress Nginx Controller,要想让外界访问,可以通过Service的NodePort或者HostPort方式,这里选择HostPort,比如指定worker01运行
#1. 确保nginx-controller运行到w1节点上
kubectl label node w1 name=ingress

#2. 使用HostPort方式运行,需要增加配置
# 提供的yaml中我已经做了如下修改,回头看看就行
      hostNetwork: true   # 使用本机的网络
      nodeSelector:
        name: ingress	  #node选择为步骤1 的 w1节点

# 搜索nodeSelector,并且要确保w1节点上的80和443端口没有被占用,镜像拉取需要较长的时间,这块注意一下哦
# 通过cat mandatory.yaml |grep image 可以查看需要拉取哪些镜像

# mandatory.yaml在
kubectl apply -f mandatory.yaml

kubectl get all -n ingress-nginx
 kubectl get all -n ingress-nginx -o wide
(2)查看
w1
的80和443端口
lsof -i tcp:80
lsof -i tcp:443
(3)创建whoami-deployment的pod和service
记得将之前的whoami-deployment 删除:kubectl delete -f whoami-deployment.yaml
vi whoami-deployment.yaml
kubectl apply -f whoami-deployment.yaml
kubectl get svc
kubectl get pods
apiVersion: apps/v1
kind: Deployment
metadata:
  name: whoami-deployment
  labels:
    app: whoami
spec:
  replicas: 3
  selector:
    matchLabels:
      app: whoami
  template:
    metadata:
      labels:
        app: whoami
    spec:
      containers:
      - name: whoami
        image: jwilder/whoami
        ports:
        - containerPort: 8000
---
apiVersion: v1
kind: Service
metadata:
  name: whoami-service
spec:
  ports:
  - port: 80
    protocol: TCP
    targetPort: 8000
  selector:
    app: whoami
(4)创建Ingress以及定义转发规则
kubectl apply -f nginx-ingress.yaml
kubectl get ingress
kubectl describe ingress nginx-ingress
apiVersion: extensions/v1beta1
kind: Ingress
metadata:
  name: nginx-ingress
spec:
  rules:
  - host: whoami.com
    http:
      paths:
      - path: /
        backend:
          serviceName: whoami-service
          servicePort: 80
(5)修改win的hosts文件,添加dns解析
192.168.56.187 whoami.com
(6)打开浏览器,访问whoami.com
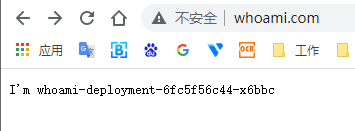
总结
:如果以后想要使用Ingress网络,其实只要定义ingress,service和pod即可,前提是要保证nginx ingress controller已经配置好了。
Ingress运行原理图

所有文章都是以专栏系列编写,建议系统性学习,更容易成为架构师!
博主每天早晚坚持写博客给与读者价值提升,为了让更多人受益,请多多关照,如果觉得文章质量有帮助到你,请关注我的博客,收藏此文,持续提升,奥利给!
另外我不打算靠运营方式拿到博客专家的认证,纯纯的科技与狠活来征服读者,就看读者的感恩之心了,祝你好运连连。