【前言】
了解一个组件的最好方式是先使用该组件,今天我们就来聊聊如何通过java api对iceberg进行操作。
为什么是选择api进行介绍,而不是更通用的flink、spark、hive等。一方面是觉得flink、spark使用iceberg的介绍网上已经有很多,官网的介绍也比较清晰,而java api的介绍则相对少些;另一方面,不管是flink,spark最终都还是调用这些基本的api完成相关的操作的,因此先从api入手,后续对flink,spark,trino等组件对iceberg的操作原理理解起来也会更容易些。所以就有了本文的内容。
【catalog的创建】
在创建数据库,表之前需要先创建catalog,这里主要介绍hive类型的catalog。
import org.apache.iceberg.hive.HiveCatalog;

HiveCatalog catalog = new HiveCatalog();
catalog.setConf(conf);

Map <String, String> properties = new HashMap<String, String>();
properties.put(CatalogProperties.WAREHOUSE_LOCATION, "/user/hive/warehouse")
properties.put(CatalogProperties.URI, "thrift://172.16.55.21:9083");
properties.put(CatalogProperties.CATALOG_IMPL, "org.apache.iceberg.hive.HiveCatalog");

// 初始化catalog
catalog.initialize("hive",properties);
对于hive类型的catalog,主要指定数据库存储位置,以及hive metastore server的URI。
【创建表】
对于iceberg表,可以理解由四部分组成,表结构定义(schema)、分区定义(partitionSpec)、表的属性(properties),以及表的唯一识别信息(identity)即表所属的数据库与表名。创建表时只需要分别制定这些内容即可。
// 定义表结构schema
Schema schema = new Schema(
Types.NestedField.required(1, "id", Types.IntegerType.get()),
Types.NestedField.required(2, "name", Types.StringType.get()),
Types.NestedField.required(3, "birth", Types.StringType.get()));
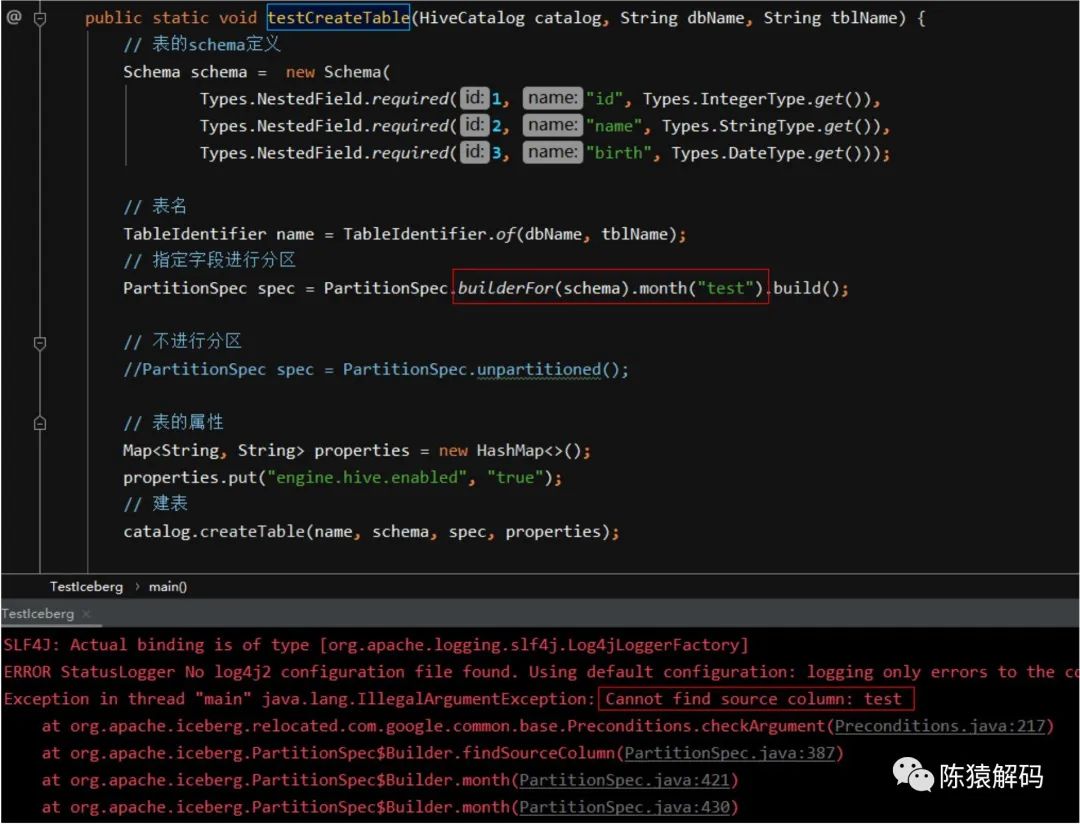
// 分区定义(以birth字段按月进行分区)
PartitionSpec spec = PartitionSpec.builderFor(schema).month("birth").build();
// 数据库名,表名
TableIdentifier name = TableIdentifier.of("iceberg_db", "developer");
// 表的属性
Map<String, String> properties = new HashMap<>();
properties.put("engine.hive.enabled", "true");
// 建表
Table table = catalog.createTable(name, schema, spec, properties);这里需要注意的是:分区定义中的字段必须是schema中已有的字段,如果在schema中找不到对应的字段,会报错抛异常。
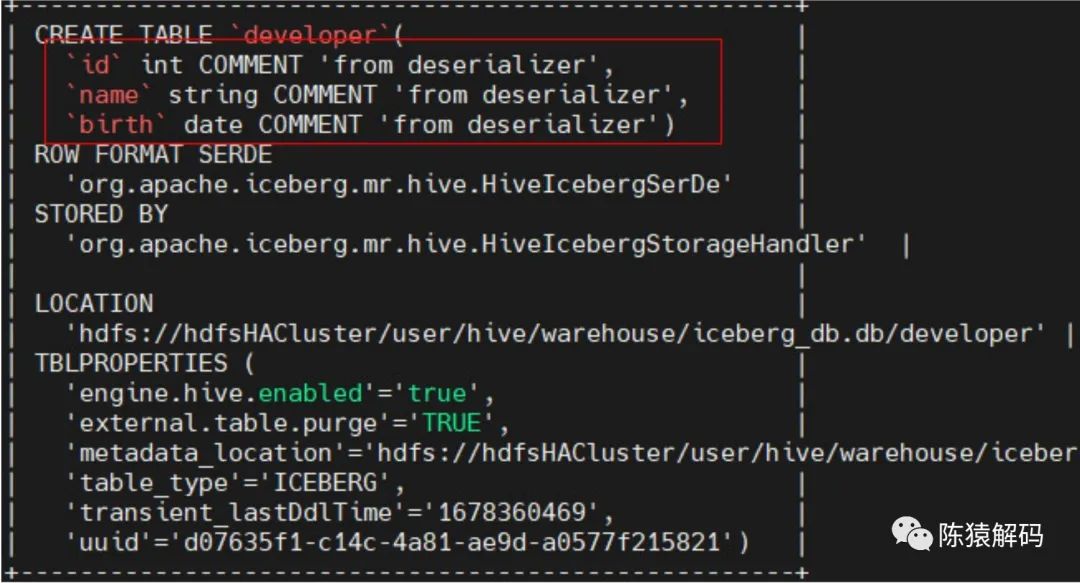
但是,通过sql方式建表时,分区字段会隐式地加入到表字段定义中,即不用强制写到schema的字段定义。例如通过如下hivesql语句建表:
create table developer(
id int,
name string
)
partitioned by (birth Date)
stored by 'org.apache.iceberg.mr.hive.HiveIcebergStorageHandler'
tblproperties('engine.hive.enabled'='true');
建表后的情况如下所示:
【插入数据】
插入数据可以分为3个步骤,首先根据表格式构造对应的数据记录,然后将记录写入到指定格式(parquet、orc等)的文件中,最后将文件列表写入到表中。
// 1. 构建记录
GenericRecord record = GenericRecord.create(schema);
ImmutableList.Builder<GenericRecord> builder = ImmutableList.builder();
builder.add(ImmutableMap.of("id", 1, "name", "chen", "birth", "2020-03-08"));
builder.add(ImmutableMap.of("id", 2, "name", "yuan", "birth", "2021-03-09"));
builder.add(ImmutableMap.of("id", 3, "name", "jie", "birth", "2023-03-10"));
builder.add(ImmutableMap.of("id", 4, "name", "ma", "birth", "2023-03-11"));
ImmutableList<GenericRecord> records = builder.build();

// 2. 将记录写入parquet文件
String filepath = table.location() + "/" + UUID.randomUUID().toString();
OutputFile file = table.io().newOutputFile(filepath);
DataWriter<GenericRecord> dataWriter =
    Parquet.writeData(file)
    .schema(schema)
    .createWriterFunc(GenericParquetWriter::buildWriter)
    .overwrite()
    .withSpec(PartitionSpec.unpartitioned())
    .build();
try {
    for (GenericRecord record : builder.build()) {
        dataWriter.write(record);
    }
} finally {
    dataWriter.close();
}

// 3. 将文件写入table中
DataFile dataFile = dataWriter.toDataFile();
table.newAppend().appendFile(dataFile).commit();
这里,对于数据文件的存储位置是有一定规范的,如果没有在指定路径下存放,那么对于其他组件来说(比如表同步到hive后),会出现数据不完整或者查不到的情况。
【行级别的查询数据】
查询是通过构造ScanBuilder,并配合IcebergGenerics.read来完成的。ScanBuilder还可以进行select选择列,以及通过where指定查询条件。
Table table = catalog.loadTable(TableIdentifier.of("iceberg_db", "developer"));
IcebergGenerics.ScanBuilder scanBuilder = IcebergGenerics.read(table);
// 查询全部
CloseableIterable<Record> records = scanBuilder.build();
for (Record record : records) {
}
// 指定select列与where条件的查询
//CloseableIterable<Record> records = scanBuilder.select("id", "name").where(Expressions.lessThan("id", Integer.valueOf(10))).build();
【表结构变更】
iceberg所具备的一项特点就是可以对表结构进行变更,例如新增,删除已有字段,字段名或类型的变更,新增分区等。
1)新增列字段
Table table = catalog.loadTable(TableIdentifier.of("iceberg_db", "developer"));
UpdateSchema newSchema = table.updateSchema();
// 字段名, 字段类型
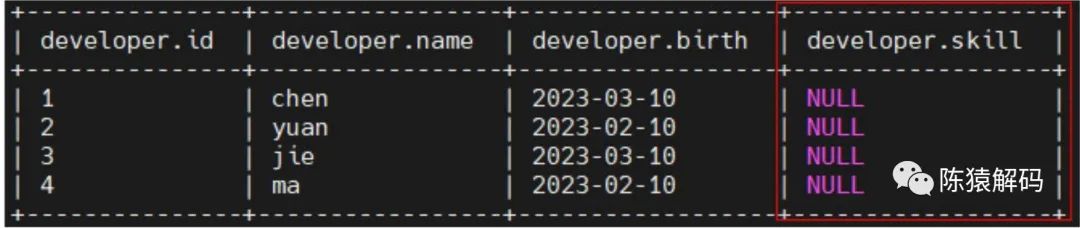
newSchema.addColumn("skill", Type.StringType.get());
updateSchema.commit();对于已经写入的记录数据,其新增字段的值为NULL。
当然还可以UpdateSchema进行删除字段、重命名字段、更新字段(类型),调整字段位置等操作。
2)新增分区
通过UpdatePartitionSpec可以进行分区的相关操作。
Table table = catalog.loadTable(TableIdentifier.of(dbName, tblName));
UpdatePartitionSpec updatePartitionSpec = table.updateSpec();
updatePartitionSpec.addField("skill");
updatePartitionSpec.commit();
【snapshot的操作】
完成表的加载后,可以得到表的所有snapshot信息,也可以删除指定的snapshot,或指定时间之前的snapshot。
Table table = catalog.loadTable(TableIdentifier.of(dbName, tblName));
for (Snapshot snapshot : table.snapshots()) {
    System.out.println(snapshot.sequenceNumber() + " " + snapshot.snapshotId() + " " + snapshot.parentId() + " " + snapshot.timestampMillis());
}

ExpireSnapshots expireSnapshot = table.expireSnapshots();
expireSnapshot.expireOlderThan(table.currentSnapshot().timestampMillis());
expireSnapshot.commit();
【删除表】
删除表的操作则很简单,通过catalog对表进行删除。
TableIdentifier name = TableIdentifier.of("iceberg_db", "developer");
catalog.dropTable(name, true);
【总结】
本文主要介绍iceberg api的一些基本操作,这里未涉及数据的更新与删除,因为这是一个比较大的知识点。另外,分区的新增,添加新的列这些操作的背后逻辑和iceberg的文件存储格式都有一定的关系,我们后续会逐一介绍。
好了,这就是本文的全部内容,如果觉得本文对您有帮助,请点赞+转发,如果觉得有不正确的地方,也可以拍砖指点,最后,欢迎加我微信交流~