【Lua】LDoc生成Lua文档工具的使用

  • Post author:
  • Post category:其他


参考资料:
http://my.oschina.net/wangxuanyihaha/blog/188909
LDoc介绍:
LDoc是一个Lua的文档生成工具,过去,比较常用的Lua生成文档的工具是LuaDoc,可惜作者自从2008年之后就再也没有发布过新的版本了,说明作者基本上已经放弃维护了。而LDoc则是一直在更新中,所以现在选择LDoc来给Lua生成文档是更好的选择,

LDoc的Github主页

LDoc的一个优点就是,它的目的是为了和LuaDoc兼容并且拓展LuaDoc的功能而制作的,所以LuaDoc能够使用的标签LDoc也都可以使用。

LDoc还有一些其他的LuaDoc不具备的优点,比如

  • LDoc可以生成Markdown格式的文档.
  • LDoc生成的文档也也更加美观等等。

LDoc虽然可以针对某个lua文件生成文档,但是更加推荐的方式是通过config.ld来对需要生成文档的项目进行配置,之后,只要在config.ld所在的文档使用

ldoc .

即可对配置好的文件夹生成文档。

1、安装

从github主页:

https://github.com/stevedonovan/ldoc

上下载LDoc

2、使用方法

2.1 配置config.ld,创建一个config.ld配置信息如下:

选项含义说明:

1、file —— 需要生成文档的源文件位置,需要是一个文件目录,当添加了这个目录之后,它的所有子目录默认也会被扫描,比如下图中的

sub.submodule就是处于子目录下的模块,也会一并显示在文档中。

添加了项目名称后,它生成的文档样式如下:


在此输入图片描述

2.2、注释说明

在项目中,我们的每一个lua文件可以看做是一个模块,模块的文档标注如下:


样例:


注意到上文中的

---

了吗?这里是有深意的。

LDoc遵循JavaDoc等文档生成工具的传统,

即只有

doc comment

可以被解析,这种

doc comment

必须以三个

-

开头

如下:

 --- summary.
     -- Description; this can extend over
     -- several lines

     -----------------
     -- This will also do. 

在Lua中,一个module通常包括导出函数(exported functions),私有函数(local fucntions),表(tables)和变量(fields)。我们将依次讲解这四种东西怎么写出可被解析的注释。
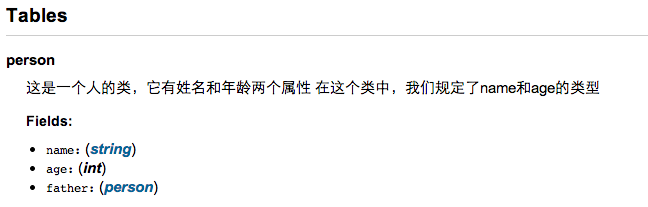
1. 对table的注释:

如果,我们想添加一个table的时候,需要这么写注释:

 ---
    -- 这是一个人的类,它有姓名和年龄两个属性
    -- 在这个类中,我们规定了name和age的类型
    -- @string name
    -- @int age
    -- @tparam person father
    person = {
        name = "",
        age = 0,
        father = nil
    } 

这段注释代码,生成的文档样例如下:


在此输入图片描述

2、对exported function的注释

如果我们添加了一个exported function时,我们需要对这个函数进行解释,比如这种:

 --- 通过这个方法可以得到该Person的父亲
    -- @treturn person father
    function person:getFather(  )
        return self.father
    end 

或者这种更加复杂的导出函数:

 --- 解决一个平方根问题
     -- @number a first coeff
     -- @number b second coeff
     -- @number c third coeff
     -- @return first root, or nil
     -- @return second root, or imaginary root error
     -- @usage local r1, r2 = solve(1, 2, 3)
    function solve (a,b,c)
         local disc = b^2 - 4*a*c
         if disc < 0 then
             return nil,"imaginary roots"
         else
            disc = math.sqrt(disc)
            return (-b + disc)/2*a,
                   (-b - disc)/2*a
         end
     end 

可以看到在这段代码中,实际上函数是有两个返回值的,我们可以对这两个返回值分别解释,并且可以通过usage标签来进行用法实例

上面函数的文档样式为:


在此输入图片描述


3、local function和fields

如果我们添加了一个local function时,我们通常是不需要写注释的,因为这种函数是私有的不应当放在文档中。

如果想要添加fields,fields一般是常量,可以将一组相关的常量放在一个表里,这种写法和table的写法相似,就不再赘述。

4、类型标签

上文中有两种特殊的参数和返回值,即tparam和treturn,这两种类型都是可以自定义的,其语法如下:

 tparam <typename> <comment> 

比如,我需要一个Person的参数时,我就会这样声明

tparam Person need a Person

,其中Person就是typename,need a Person就是comment

3、LDoc中的标签

通过上述的讲解,我们发现LDoc中十分好用的一点就是可以标识某个参数的类型,那么LDoc到底支持哪些类型呢?

可以通过一个列表来说明:

  • string
  • number
  • int
  • bool
  • func 标识

    ‘function’
  • tab 标识

    ‘table’
  • thread 标识

    ’coroutine‘

二、使用实例

在文件夹中新建一个文件usage.lua

Lua, pasted 3 seconds ago:

1 2 3 4 5 6 7 8 9 10 11 12 13 14 15 16 17 18 19 20 21 22 23 24 25 26 27 28 29 30 31 32 33 34 35 36 37 38 39 40 41 42 43 44 45 46 47 48 49 50 51 52 53 54 55 56 57 58 59 60 61 62 63 64 65 66 67 68 69 70 71 72 73 74 75 76 77 78 79 80 81 82 83 84 85 

--[[-------- A simple module with examples. Even without markdown formatting, blank lines are respected. @module usage ]] local usage = {} local helper --- a local helper function. -- @local function helper () end ---------- -- A simple vector class. -- -- Supports arithmetic operations. -- @usage -- v = Vector.new {10,20,30} -- assert (v == Vector{10,20,30}) -- @type Vector local Vector = {}
usage.Vector = {} ---------- -- Create a vector from an array `t`. -- `Vector` is also callable! function Vector.new (t) end -- note that @function may have modifiers. Currently -- we aren't doing anything with them, but LDoc no longer -- complains (issue #45). Note also that one needs -- explicit @param tags with explicit @function; 'static' -- methods must have a @constructor or a @static tag. ---------- -- Create a vector from a string. -- @usage --  v = Vector.parse '[1,2,3]' --  assert (v == Vector.new {1,2,3}) -- @function[kind=ctor] parse -- @static -- @param s function Vector.parse (s) end -------- -- Compare two vectors for equality. function Vector:__eq (v) end ---------- -- Add another vector, array or scalar `v` to this vector. -- Returns new `Vector` -- @usage assert(Vector.new{1,2,3}:add(1) == Vector{2,3,4}) function Vector:add (v) end ---------- -- set vector options. `opts` is a `Vector.Opts` table. function Vector:options (opts) end --[[----------------- @table Vector.Opts Options table format for `Vector:options`  * `autoconvert`:  try to convert strings to numbers  * `adder`: function used to perform addition and subtraction  * `multiplier`: function used to perform multiplication and division @usage  v = Vector {{1},{2}}  v:options {adder = function(x,y) return {x[1]+y[1]} end}  assert(v:add(1) == Vector{{2},{3}}) ]] return usage

2、创建config.ld文件

3、生成doc

在config.ld所在的目录执行lua ldoc.lua . 即可以生成doc文件夹,或者在其他目录执行

lua ldoc.lua -c  config_path 即可在config.ld指定的file路径中生成doc

注:

如上是在其他目录执行 E:\Workspace\Cocos2dxProject\ldoc_test 目录下的config.ld文件,因此使用如下命令即可:

4、生成的doc文件如下:

转载于:https://www.cnblogs.com/luosongchao/p/4339056.html