第三十节 Scala脚本编程与结束语

  • Post author:
  • Post category:其他


本节主要内容

  1. REPL命令行高级使用
  2. 使用Scala进行Linux脚本编程
  3. 结束语


1. REPL命令行高级使用

在使用REPL命令行时,有时候我们需要粘贴的代码比较大,而普通的粘贴可能会些一些问题,比如中文粘贴会出现乱码、多行代码粘贴时会出错,此时需要用到REPL的高级功能。在日常开发过程中,我们粘贴多行代码的时候会遇到下列问题:

//本意是要粘贴下面两行代码
class Person(val name:String,val age:Int)
val p=new Person("摇摆少年梦",27)

//直接在REPL命令行粘贴的话,会出现下面情况
//1 不会一次性粘入,而是分作两行
//2 中文出现乱码
scala> class Person(val name:String,val age:Int)
defined class Person

scala> val p=new Person("??????????",27)
p: Person = Person@cf528
 
 
  • 1
  • 2
  • 3
  • 4
  • 5
  • 6
  • 7
  • 8
  • 9
  • 10
  • 11
  • 12
  • 1
  • 2
  • 3
  • 4
  • 5
  • 6
  • 7
  • 8
  • 9
  • 10
  • 11
  • 12

而对于一些长串跨行的代码,可能会出现报错,例如:

//本意是要粘贴下面的代码
if(p.age>10) 
    true
  else
    false

//但实际情况是这样的   
scala> if(p.age>10)
     |     true
res0: AnyVal = true

scala>   else
<console>:1: error: illegal start of definition
         else
         ^

scala>     false
 
 
  • 1
  • 2
  • 3
  • 4
  • 5
  • 6
  • 7
  • 8
  • 9
  • 10
  • 11
  • 12
  • 13
  • 14
  • 15
  • 16
  • 17
  • 1
  • 2
  • 3
  • 4
  • 5
  • 6
  • 7
  • 8
  • 9
  • 10
  • 11
  • 12
  • 13
  • 14
  • 15
  • 16
  • 17

那要怎么办呢?在REPL命令行中执行下列命令:

scala> :paste
// Entering paste mode (ctrl-D to finish)

if(p.age>10)
    true
  else
    false

// Exiting paste mode, now interpreting.

res3: Boolean = true
 
 
  • 1
  • 2
  • 3
  • 4
  • 5
  • 6
  • 7
  • 8
  • 9
  • 10
  • 11
  • 1
  • 2
  • 3
  • 4
  • 5
  • 6
  • 7
  • 8
  • 9
  • 10
  • 11

先输入:paste,然后按ctr+v键,可以正常粘贴内容,中文也不会出现乱码了:

scala> :paste
// Entering paste mode (ctrl-D to finish)

class Person(val name:String,val age:Int)
val p=new Person("摇摆少年梦",27)

// Exiting paste mode, now interpreting.

defined class Person
p: Person = Person@1924b38
 
 
  • 1
  • 2
  • 3
  • 4
  • 5
  • 6
  • 7
  • 8
  • 9
  • 10
  • 1
  • 2
  • 3
  • 4
  • 5
  • 6
  • 7
  • 8
  • 9
  • 10

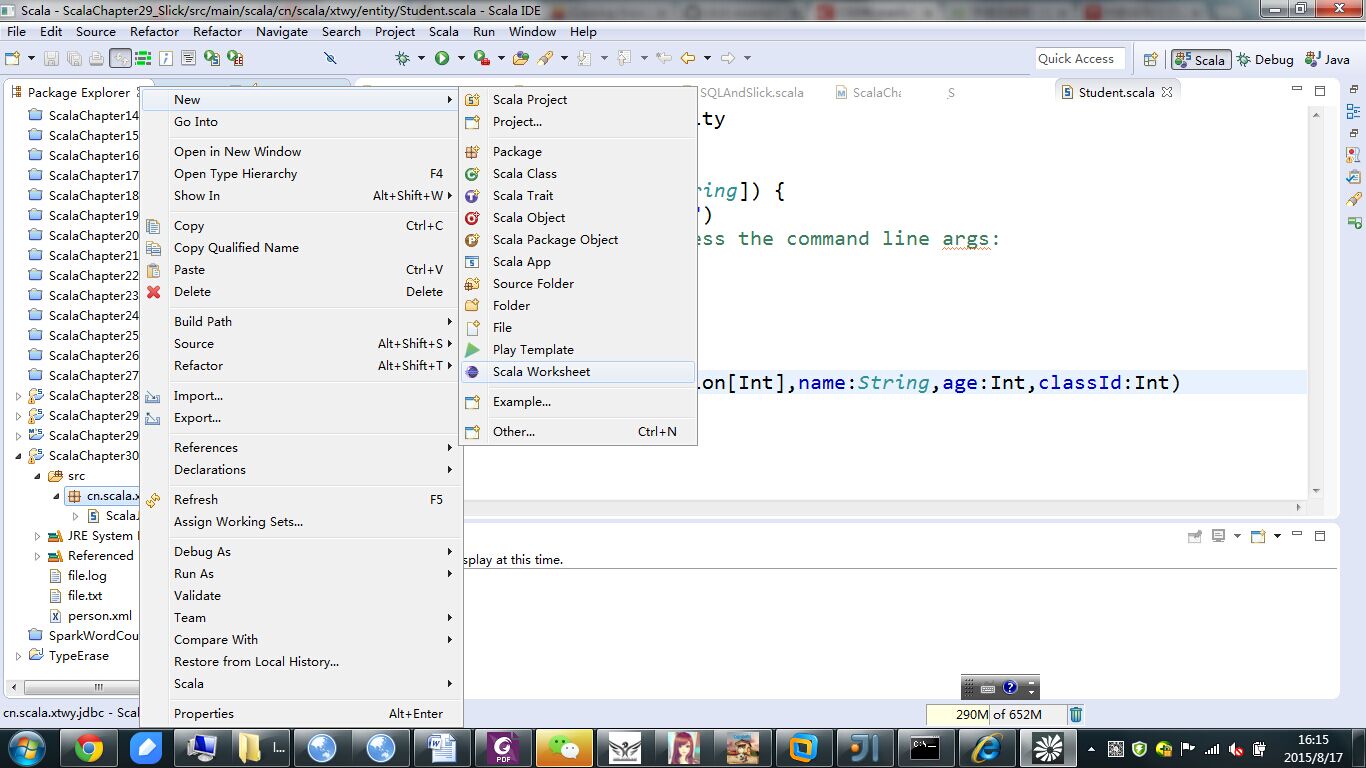
另外,在实际开发过程中,有些人会认为这种处理方式非常繁琐,

Scala

的创建者也为我们考虑过这个问题了,我们也可以在scala IDE for eclipse (在Intellij IDEA 中也有这个功能) 里面利用REPL命令行,使用方式是创建scala worksheet,创建方式如下:


1 点击相应的包,然后右键,在new菜单中选择 scala worksheet


这里写图片描述

2 在文件中输入相应的scala语句,worksheet会自动打印出相应的结果


这里写图片描述

但是worksheet对中文的支持很不友好,例如下面的代码:

case class Person(val name:String,val age:Int)

object ScalaREPL {
  println("Scala worksheet")                      //> Scala worksheet
  val p=new Person("摇摆少年梦",27)                    //> p  : cn.scala.xtwy.jdbc.Person = Person(鎽囨憜灏戝勾姊�27)
}
 
 
  • 1
  • 2
  • 3
  • 4
  • 5
  • 6
  • 1
  • 2
  • 3
  • 4
  • 5
  • 6

worksheet最终得到的中文是乱码,因此在实际进行语言特性

测试

的时候尽量避免中文

scala中还有很多我们实际中没有接触过的命令,可以用 :help命令查看REPL现在支持的所有命令:

scala> :help
All commands can be abbreviated, e.g. :he instead of :help.
Those marked with a * have more detailed help, e.g. :help imports.

:cp <path>                 add a jar or directory to the classpath
:help [command]            print this summary or command-specific help
:history [num]             show the history (optional num is commands to show)
:h? <string>               search the history
:imports [name name ...]   show import history, identifying sources of names
:implicits [-v]            show the implicits in scope
:javap <path|class>        disassemble a file or class name
:load <path>               load and interpret a Scala file
:paste                     enter paste mode: all input up to ctrl-D compiled tog
ether
:power                     enable power user mode
:quit                      exit the interpreter
:replay                    reset execution and replay all previous commands
:reset                     reset the repl to its initial state, forgetting all s
ession entries
:sh <command line>         run a shell command (result is implicitly => List[Str
ing])
:silent                    disable/enable automatic printing of results
:type [-v] <expr>          display the type of an expression without evaluating
it
:warnings                  show the suppressed warnings from the most recent lin
e which had any
 
 
  • 1
  • 2
  • 3
  • 4
  • 5
  • 6
  • 7
  • 8
  • 9
  • 10
  • 11
  • 12
  • 13
  • 14
  • 15
  • 16
  • 17
  • 18
  • 19
  • 20
  • 21
  • 22
  • 23
  • 24
  • 25
  • 26
  • 1
  • 2
  • 3
  • 4
  • 5
  • 6
  • 7
  • 8
  • 9
  • 10
  • 11
  • 12
  • 13
  • 14
  • 15
  • 16
  • 17
  • 18
  • 19
  • 20
  • 21
  • 22
  • 23
  • 24
  • 25
  • 26


2. 使用Scala进行Linux脚本编程

本节

Linux

脚本内容大部分来源于scala cookbook,部分经过本人修改以在Ubuntu Linux上进行演示。

我们在第一节中提到,Scala不仅仅可以进行大规模分布式应用程序开发(例如

Spark

内存计算框架),也可以进行服务器端脚本编程即它可以替代Linux中的shell (Bourne Shell, Bash)或其它如 Perl,

PHP

, Ruby等可用于服务器端脚本编程的语言。下面给出的是一个简单示例(前提是要有linux

操作系统

,本节所有示例都是在ubuntu Linux下运行的):

#!/bin/sh
exec scala "$0" "$@"
!#
println("HellO,Linux World")
 
 
  • 1
  • 2
  • 3
  • 4
  • 1
  • 2
  • 3
  • 4

将上面的内容保存为hello.sh文件,然后用下列命令增加其执行权限:

root@sparkmaster:/home/zhouzhihu/scalaLearning# chmod +x hello.sh 
root@sparkmaster:/home/zhouzhihu/scalaLearning# ./hello.sh 
HellO,Linux World
 
 
  • 1
  • 2
  • 3
  • 1
  • 2
  • 3

可以看到我们第一个服务器脚本已经运行成功。前面的代码中,#!符号表示的是Unix shell脚本的开始,它会调用Unix Bourne shell。exce命令是内置的shell,表示需要执行scala 命令,其中


0


h


e


l


l


o


.


s


h


@ 绑定的是我们输入的参数。!#表示脚本声明头部的结束。在脚本中可以使用任何的scala语法,例如:

#!/bin/sh
exec scala "$0" "$@"
!#

class Person(val firstName:String,val secondName:String){
  override toString()="firstName:"+firstName+",secondName:"+secondName
}

println(new Person("john","Barake"))


  • 1
  • 2
  • 3
  • 4
  • 5
  • 6
  • 7
  • 8
  • 9
  • 10
  • 1
  • 2
  • 3
  • 4
  • 5
  • 6
  • 7
  • 8
  • 9
  • 10

上述代码执行结果:

root@sparkmaster:/home/zhouzhihu/scalaLearning# ./person.sh 
firstName:john,secondName:Barake


  • 1
  • 2
  • 3
  • 1
  • 2
  • 3

除此之外,我们还可以定义应用程序对象,可以扩展自App,也可以实现自己的Main方法,例如:

#!/bin/sh
exec scala "$0" "$@"
!#
object Hello extends App {
println("Hello Ubuntu Linux 10.04")
//如果后面带参数的话,可以捕获所有的参数
args.foreach(println)
}
Hello.main(args)
 
 
  • 1
  • 2
  • 3
  • 4
  • 5
  • 6
  • 7
  • 8
  • 9
  • 1
  • 2
  • 3
  • 4
  • 5
  • 6
  • 7
  • 8
  • 9

下面给出的是不带参数的执行结果:

root@sparkmaster:/home/zhouzhihu/scalaLearning# ./HelloApp.sh
Hello Ubuntu Linux 10.04


  • 1
  • 2
  • 3
  • 1
  • 2
  • 3

下面给出的是带参数的执行结果,如:

root@sparkmaster:/home/zhouzhihu/scalaLearning# ./HelloApp.sh hello xuetuwuyou

Hello Ubuntu Linux 10.04
hello
xuetuwuyou


  • 1
  • 2
  • 3
  • 4
  • 5
  • 6
  • 1
  • 2
  • 3
  • 4
  • 5
  • 6

当然,还可以实现自己的main方法,如:

#!/bin/sh
exec scala "$0" "$@"
!#
object Hello {
  def main(args: Array[String]) {
    println("Hello, world")
    args.foreach(println)
  }
}
Hello.main(args)
 
 
  • 1
  • 2
  • 3
  • 4
  • 5
  • 6
  • 7
  • 8
  • 9
  • 10
  • 1
  • 2
  • 3
  • 4
  • 5
  • 6
  • 7
  • 8
  • 9
  • 10

同extends App是一样的。

如果脚本中需要应用到第三方库的话,可以采用下列方式进行包引入:

#!/bin/sh
exec scala -classpath "lib/slick_2.11_2.1.0.jar:lib/mysql-connector-java-5.1.18-bin.jar" "$0" "$@"
!#

import scala.slick.driver.MySQLDriver.simple._

object CoffeeExample extends App {

  class Suppliers(tag: Tag) extends Table[(Int, String, String, String, String, String)](tag, "SUPPLIERS") {
    def id = column[Int]("SUP_ID", O.PrimaryKey) // This is the primary key column
    def name = column[String]("SUP_NAME")
    def street = column[String]("STREET")
    def city = column[String]("CITY")
    def state = column[String]("STATE")
    def zip = column[String]("ZIP")
    // Every table needs a * projection with the same type as the table's type parameter
    def * = (id, name, street, city, state, zip)
  }
  val suppliers = TableQuery[Suppliers]

  // Definition of the COFFEES table
  class Coffees(tag: Tag) extends Table[(String, Int, Double, Int, Int)](tag, "COFFEES") {
    def name = column[String]("COF_NAME", O.PrimaryKey)
    def supID = column[Int]("SUP_ID")
    def price = column[Double]("PRICE")
    def sales = column[Int]("SALES")
    def total = column[Int]("TOTAL")
    def * = (name, supID, price, sales, total)
    // A reified foreign key relation that can be navigated to create a join
    def supplier = foreignKey("SUP_FK", supID, suppliers)(_.id)
  }
  val coffees = TableQuery[Coffees]

  Database.forURL("jdbc:mysql://localhost:3306/slick", "root", "123",
    driver = "com.mysql.jdbc.Driver") withSession {

      implicit session =>
        // Create the tables, including primary and foreign keys
        (suppliers.ddl ++ coffees.ddl).create

        // Insert some suppliers
        suppliers += (101, "Acme, Inc.", "99 Market Street", "Groundsville", "CA", "95199")
        suppliers += (49, "Superior Coffee", "1 Party Place", "Mendocino", "CA", "95460")
        suppliers += (150, "The High Ground", "100 Coffee Lane", "Meadows", "CA", "93966")

        // Insert some coffees (using JDBC's batch insert feature, if supported by the DB)
        coffees ++= Seq(
          ("Colombian", 101, 7.99, 0, 0),
          ("French_Roast", 49, 8.99, 0, 0),
          ("Espresso", 150, 9.99, 0, 0),
          ("Colombian_Decaf", 101, 8.99, 0, 0),
          ("French_Roast_Decaf", 49, 9.99, 0, 0))

        coffees foreach {
          case (name, supID, price, sales, total) =>
            println("  " + name + "\t" + supID + "\t" + price + "\t" + sales + "\t" + total)

        }
        val q1 = for (c <- coffees)
          yield LiteralColumn("  ") ++ c.name ++ "\t" ++ c.supID.asColumnOf[String] ++
          "\t" ++ c.price.asColumnOf[String] ++ "\t" ++ c.sales.asColumnOf[String] ++
          "\t" ++ c.total.asColumnOf[String]
        // The first string constant needs to be lifted manually to a LiteralColumn
        // so that the proper ++ operator is found
        q1 foreach println

        // Perform a join to retrieve coffee names and supplier names for
        // all coffees costing less than $9.00
        val q2 = for {
          c <- coffees if c.price < 9.0
          s <- suppliers if s.id === c.supID
        } yield (c.name, s.name)

    }

}
//这点与一般的应用程序不同
CoffeeExample.main(args)
 
 
  • 1
  • 2
  • 3
  • 4
  • 5
  • 6
  • 7
  • 8
  • 9
  • 10
  • 11
  • 12
  • 13
  • 14
  • 15
  • 16
  • 17
  • 18
  • 19
  • 20
  • 21
  • 22
  • 23
  • 24
  • 25
  • 26
  • 27
  • 28
  • 29
  • 30
  • 31
  • 32
  • 33
  • 34
  • 35
  • 36
  • 37
  • 38
  • 39
  • 40
  • 41
  • 42
  • 43
  • 44
  • 45
  • 46
  • 47
  • 48
  • 49
  • 50
  • 51
  • 52
  • 53
  • 54
  • 55
  • 56
  • 57
  • 58
  • 59
  • 60
  • 61
  • 62
  • 63
  • 64
  • 65
  • 66
  • 67
  • 68
  • 69
  • 70
  • 71
  • 72
  • 73
  • 74
  • 75
  • 76
  • 77
  • 78

通过上述代码不难发现,脚本编程与一般的Scala应用程序开发有着非常多的相似之处,不同之处仅在于在脚本编程需要加入下面这样的样板代码

#!/bin/sh  //样板代码
exec scala -classpath "lib/slick_2.11_2.1.0.jar:lib/mysql-connector-java-5.1.18-bin.jar" "$0" "$@"
!# //样板代码

....................

CoffeeExample.main(args) //样板代码
 
 
  • 1
  • 2
  • 3
  • 4
  • 5
  • 6
  • 7
  • 1
  • 2
  • 3
  • 4
  • 5
  • 6
  • 7

有时候,我们也需要对命令行参数进行捕获(例如判断命令行的个数或输入的参数类型等),然后进行相应的操作,前面已经演示了如何打印输出命令行参数,这里我们更多实际中可能会遇到的一些经典案例:


1 判断输入参数的个数,不满足要求则给出提示

#!/bin/sh
exec scala "$0" "$@"
!#
if (args.length != 2) {
    Console.err.println("Usage: replacer <search> <replace>")
    System.exit(1)
}
val searchPattern = args(0)
val replacePattern = args(1)
println(s"Replacing $searchPattern with $replacePattern ...")
 
 
  • 1
  • 2
  • 3
  • 4
  • 5
  • 6
  • 7
  • 8
  • 9
  • 10
  • 1
  • 2
  • 3
  • 4
  • 5
  • 6
  • 7
  • 8
  • 9
  • 10

执行结果如下:

root@sparkmaster:/home/zhouzhihu/scalaLearning# ./argsNumberDemo.sh xuetuwu xuetuwuyou
Replacing xuetuwu with xuetuwuyou ...
root@sparkmaster:/home/zhouzhihu/scalaLearning# ./argsNumberDemo.sh
Usage: replacer <search> <replace>


  • 1
  • 2
  • 3
  • 4
  • 5
  • 1
  • 2
  • 3
  • 4
  • 5

2 交互式命令行,提示用户输入

#!/bin/sh
exec scala "$0" "$@"
!#
// write some text out to the user with Console.println
Console.println("Hello")
// Console is imported by default, so it's not really needed, just use println
println("World")
// readLine lets you prompt the user and read their input as a String
val name = readLine("What's your name? ")
// readInt lets you read an Int, but you have to prompt the user manually
print("How old are you? ")
val age = readInt()
// you can also print output with printf
println(s"Your name is $name and you are $age years old.")
 
 
  • 1
  • 2
  • 3
  • 4
  • 5
  • 6
  • 7
  • 8
  • 9
  • 10
  • 11
  • 12
  • 13
  • 14
  • 1
  • 2
  • 3
  • 4
  • 5
  • 6
  • 7
  • 8
  • 9
  • 10
  • 11
  • 12
  • 13
  • 14

下面给出的是其执行结果:

root@sparkmaster:/home/zhouzhihu/scalaLearning# ./promptDemo.sh 
Hello
World
What's your name? yaobaishaonianmeng
How old are you? 27
Your name is yaobaishaonianmeng and you are 27 years old.


  • 1
  • 2
  • 3
  • 4
  • 5
  • 6
  • 7
  • 1
  • 2
  • 3
  • 4
  • 5
  • 6
  • 7

3 加速代码的执行:


scala脚本在执行的过程中,也是通过编译、执行的步骤来进行的,有时候为加速脚本的执行,意图是将编译后的脚本保存下来,在执行时候如果脚本创建之后没有发生变化的话,则直接使用以前编译好的脚本。实现方式是在脚本声明的时候用-savecompiled。

#!/bin/sh
exec scala -savecompiled "$0" "$@"
!#
println("Hello, world!")
args foreach println
 
 
  • 1
  • 2
  • 3
  • 4
  • 5
  • 1
  • 2
  • 3
  • 4
  • 5

它的原理是在代码第一次执行后,生成相应的jar文件,当下次再执行的便调用该jar文件来执行,第一次执行后生成的jar文件如下:


这里写图片描述


3. 结束语

本节内容是scala入门到精通系列课程的最后一节,通过本课程,我相信可以让大家成为一个中级scala语言开发者。Scala语言功能非常强大,其中内容还有很多,还有许多内容我们没有涉及,例如scala 的GUI编程、Scala的定界延续等,但这些功能在实际开发中应用的并不是特别广泛,特别是Scala GUI编程,我们知道

Java

在GUI编程方面并不是它的强项,scala语言也是如此。这门课程的目的是让大家学完之后能够快速上手spark应用程序开发,希望在学完本课程之后,大家将这门课作为自己学习scala的起点,而非终点。