上回
提到可使用 initrd 实现两阶段启动,有啥好处呢?
- 访问根文件系统需要的附加驱动、内核模块和软件包等可以放到 initrd 中,基础内核保持小而精。
- 内核 + initrd 即可启动计算机基础环境,可实现不依赖目标系统环境的“独立应用”,如 ubuntu 网络安装程序,系统维护(恢复)环境等。
initrd 全称 “initial RAM disk”,详情参考
man initrd
(更详细?)或
Linux initrd 文档
。Linux 文档摘录如下:
initrd is mainly designed to allow system startup to occur in two phases,
where the kernel comes up with a minimum set of compiled-in drivers, and where additional modules are loaded from initrd.
加载 initrd 文件
可使用内核启动参数
initrd=
指定 initrd 文件路径(未测试)。
通常应使用引导器(如 GRUB)加载 initrd 并提供给内核
,这样加载内核时不依赖文件系统,更清晰易用。
同样,qemu 虚拟机支持直接加载宿主机上的 initrd 文件。
执行 initrd
内核加载 initrd 为最初的根文件系统。
经测试加载 initrd 后会执行其
/init
文件,可以是脚本或二进制文件。
注意内核启动参数
init=
是设置系统 init 入口(默认
/sbin/init
),不会影响 initrd init 入口(默认
/init
)。
随后 initrd 可使用
pivot_root
切换到新的系统根目录。
initrd 的 init 脚本关键逻辑是挂载好
/proc
等关键系统目录和目标系统根目录,
如本机 initrd 的 init 脚本包含如下内容:
export PATH=/sbin:/usr/sbin:/bin:/usr/bin

[ -d /dev ] || mkdir -m 0755 /dev
[ -d /root ] || mkdir -m 0700 /root
[ -d /sys ] || mkdir /sys
[ -d /proc ] || mkdir /proc
[ -d /tmp ] || mkdir /tmp
mkdir -p /var/lock
mount -t sysfs -o nodev,noexec,nosuid sysfs /sys
mount -t proc -o nodev,noexec,nosuid proc /proc
# Some things don't work properly without /etc/mtab.
ln -sf /proc/mounts /etc/mtab

# ... ...
mountroot
# ... ...

# Move virtual filesystems over to the real filesystem
mount -n -o move /sys ${rootmnt}/sys
mount -n -o move /proc ${rootmnt}/proc

# Chain to real filesystem
exec run-init ${drop_caps} ${rootmnt} ${init} "$@" ${recovery:+--startup-event=recovery} <${rootmnt}/dev/console >${rootmnt}/dev/console 2>&1-
mountroot
是相关脚本中定义的一个 shell 函数。 -
run-init
是 initrd 上的一个二进制文件,其主要功能是执行 pivot_root 切换到目标系统根目录,并执行目标系统 init 。(?)
ubuntu 网络安装程序 initrd 则是挂载相关系统目录后直接执行系统 init(默认为
busybox init
),其 initrd init 脚本内容如下:
#!/bin/sh -e
# used for initramfs
export PATH
. /lib/debian-installer/init-debug
debugshell "just booted"

mount /run
mkdir -p /run/lock
mount /proc
mount /sys
/lib/debian-installer/start-udev

init='/bin/busybox init'
for i in $(cat /proc/cmdline); do
    case $i in
        init=/init|init=init)
            # Avoid endless loop
            : ;;
        init=*)
            init=${i#init=} ;;
        noshell)
            sed -i '/^tty[23]/s/^/#/' /etc/inittab ;;
    esac
done
debugshell "before init"
exec $init
其中
/etc/inittab
启动安装程序配置如下:
# main setup program
::respawn:/sbin/reopen-console /sbin/debian-installer-
reopen-console
是一个脚本。尝试获取控制台并运行安装程序。
initrd 文档上提到,引入 pivot_root 之前的老内核上使用
change_root
机制,
即先执行 initrd 上的
/linuxrc
,linuxrc 退出后自动挂载系统根目录(
/proc/sys/kernel/real-root-dev
指定)并执行系统 init。
新内核启动参数
root=
不为
/dev/ram0
时可能兼容此行为。
新内核启动参数
root=/dev/ram0
时,直接执行 initrd 上的
/sbin/init
,可使用 pivot_root 切换新系统目录。
以上两种方式均未测试成功,即无论
root=
如何设置,initrd 上的
/linuxrc
和
/sbin/init
都未被执行。
解开本机系统 initrd 文件看了下,只找一个
/init
文件。
$ find -name linuxrc -o -name init
./init
可见
上面提到的 initrd 相关描述已过时。
后来了解到
现代内核支持使用 cpio 文件
,加载后即执行
/init
,与
root=
设置无关。
cpio 文件实际上直接挂载为文件系统,所以又叫做
initramfs
。
这是一种技术革新,从挂载块设备变成直接挂载文件系统,同时去掉了
/dev/ram0
。
很多时候依然统称为 initrd 。
手动制作 initrd 文件
initrd 既然是内存盘,可直接制作磁盘镜像(如之前使用的
sda.raw
)作为 initrd 文件(未测试)。
现代内核还支持使用 cpio 文件(initramfs),这样制作更简便,将所有文件拷贝到一个目录下,打包 cpio 文件即可。
mkdir initrd
rsync -rtpLOi /bin/busybox -R initrd/
ln -sf /bin/busybox -T initrd/bin/sh
echo $'#!/bin/sh\n/bin/sh' > initrd/init
chmod +x initrd/init
( cd initrd && find . | cpio -o -H newc --file ../initrd.cpio )-
注意:上述示例特意编写
/init
脚本执行 sh,避免 busybox 直接作为 init 执行,便于检查执行 initrd 时的原始状态。
同时清空 sda 系统盘,避免干扰:
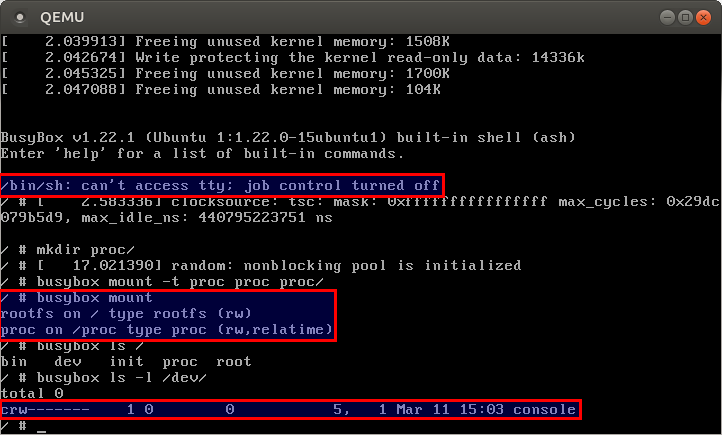
mkfs.ext4 sda.raw -F启动虚拟机:
qemu-system-x86_64 -enable-kvm -cpu host -smp 1 -m 1G -drive file=sda.raw,format=raw \
-kernel ./vmlinuz -initrd ./initrd.cpio -append "root=/dev/sda
结果如下:

- initrd 被挂载为 rootfs,这是一个可读写的内存盘。
-
busybox sh 报 tty 无法访问,应该是因为 dev 未正确挂载(自动产生了一个
/dev/console
文件)(?)。
手动制作简单系统维护环境,只需要挂载好相关目录,使用 busybox 作为 init 即可。
使用 initramfs-tools
ubuntu 下使用 initramfs-tools 维护系统 initrd (initramfs) 文件,也可以制作自定义 initrd 文件。
参考
man initramfs-tools
。
-
mkinitramfs
,制作 initrd 文件。 -
lsinitramfs
,查看 initrd 文件内容。 -
update-initramfs
,更新系统 initrd 文件。
拷贝系统 initramfs 配置,可修改制作自定义 initrd 文件而不影响系统配置。
rsync -ai /etc/initramfs-tools/ initramfs/
mkinitramfs -d initramfs/ -o initrd.img
制作的 initrd 文件默认逻辑为挂载根文件系统并启动系统(即执行根文件系统上的 init)。
可配置包含的内核模块和网络启动参数等,详情参考
man initramfs.conf
和默认
initramfs.conf
文件内容。
使用 initrd 启动目标系统
准备一个空根文件系统,创建相关系统目录,同样拷贝 busybox 测试:
mkfs.xfs -f sda.raw
sudo mount -o loop sda.raw /mnt/
( cd /mnt/ && sudo mkdir dev/ proc/ sys/ etc/ tmp/ var/ run/ -p && sudo chmod 1777 tmp/ )
sudo rsync -rtpLOi /bin/busybox -R /mnt/
sudo ln -s /bin/busybox /mnt/bin/sh
sudo umount /mnt/
尝试启动虚拟机:
qemu-system-x86_64 -enable-kvm -cpu host -smp 1 -m 1G -drive file=sda.raw,format=raw \
-kernel ./vmlinuz -initrd ./initrd.img -append "root=/dev/sda init=/bin/sh console=ttyS0" -nographic-
qemu 参数
-nographic
, 不使用图形界面,这时虚拟机串口重定向到控制台。
这非常方便我们在纯命令行下使用虚拟机,非常方便在控制台查看内核启动时的输出。
>-nographic

>Normally, QEMU uses SDL to display the VGA output.
With this option, you can totally disable graphical output so that QEMU is a simple command line application.
The emulated serial port is redirected on the console and muxed with the monitor (unless redirected elsewhere explicitly).
Therefore, you can still use QEMU to debug a Linux kernel with a serial console.
Use C-a h for help on switching between the console and monitor.
-
内核参数
console=ttyS0
设置使用串口作为控制台,最终输出到执行 qemu 命令的控制台。
运行结果如下:
BusyBox v1.22.1 (Ubuntu 1:1.22.0-15ubuntu1) built-in shell (ash)
Enter 'help' for a list of built-in commands.

/bin/sh: can't access tty; job control turned off
/ # tty
/dev/console
/ # ls -l /dev/console /dev/ttyS0
crw-------    1 0        0           5,   1 Mar 21 16:14 /dev/console
crw-------    1 0        0           4,  64 Mar 21 16:13 /dev/ttyS0
/ # ls -l /proc/$$/fd/
total 0
lrwx------    1 0        0               64 Mar 21 16:14 0 -> /dev/console
lrwx------    1 0        0               64 Mar 21 16:14 1 -> /dev/console
lrwx------    1 0        0               64 Mar 21 16:14 2 -> /dev/console

/ # mount
sysfs on /sys type sysfs (rw,nosuid,nodev,noexec,relatime)
proc on /proc type proc (rw,nosuid,nodev,noexec,relatime)
udev on /dev type devtmpfs (rw,nosuid,relatime,size=487028k,nr_inodes=121757,mode=755)
devpts on /dev/pts type devpts (rw,nosuid,noexec,relatime,gid=5,mode=620,ptmxmode=000)
tmpfs on /run type tmpfs (rw,nosuid,noexec,relatime,size=101596k,mode=755)
/dev/sda on / type xfs (ro,relatime,attr2,inode64,noquota)-
相关系统目录都已经正确挂载了,busybox sh 依然报
can't access tty
,相关命令可以正常使用。 - 默认支持 xfs 文件系统(因为本机安装了 xfs 软件包?),根文件系统默认挂载为只读 (ro) 模式(?),添加内核参数 rw 可指定为可写模式。
initramfs-tools 可以非常简便的定制和创建可以启动系统的 initrd 文件,其自动处理了挂载系统目录,pivot_root 等相关事宜。
如何方便的创建可以独立运行的 initrd 文件(如 ubuntu 网络安装程序)呢?
友好排版可
阅读原文
。