文章目录
0 预备工作
前往github下载源码,版本为4.1,地址:
https://github.com/netty/netty
1 官方的启动example代码
服务端的启动代码为EchoServer,具体路径为io.netty.example.echo.EchoServer。
本文分析的也就是这个类,具体代码如下:
public final class EchoServer {

    static final boolean SSL = System.getProperty("ssl") != null;
    static final int PORT = Integer.parseInt(System.getProperty("port", "8007"));

    public static void main(String[] args) throws Exception {
        // Configure SSL. 不是本文重点,不进行源码分析
        final SslContext sslCtx;
        if (SSL) {
            SelfSignedCertificate ssc = new SelfSignedCertificate();
            sslCtx = SslContextBuilder.forServer(ssc.certificate(), ssc.privateKey()).build();
        } else {
            sslCtx = null;
        }

        // Configure the server.
        // 1. 创建bossGroup和workerGroup时入参为何不同
        // 2. 创建NioEventLoopGroup的具体源码实现
        EventLoopGroup bossGroup = new NioEventLoopGroup(1);
        EventLoopGroup workerGroup = new NioEventLoopGroup();
        final EchoServerHandler serverHandler = new EchoServerHandler();
        try {
            // 3. 创建ServerBootstrap
            ServerBootstrap b = new ServerBootstrap();
            b.group(bossGroup, workerGroup)
             .channel(NioServerSocketChannel.class)
             .option(ChannelOption.SO_BACKLOG, 100)
             .handler(new LoggingHandler(LogLevel.INFO))
             .childHandler(new ChannelInitializer<SocketChannel>() {
                 @Override
                 public void initChannel(SocketChannel ch) throws Exception {
                     ChannelPipeline p = ch.pipeline();
                     if (sslCtx != null) {
                         p.addLast(sslCtx.newHandler(ch.alloc()));
                     }
                     //p.addLast(new LoggingHandler(LogLevel.INFO));
                     p.addLast(serverHandler);
                 }
             });

            // 4. 启动服务器,本文重点
            ChannelFuture f = b.bind(PORT).sync();

            // Wait until the server socket is closed.
            f.channel().closeFuture().sync();
        } finally {
            // Shut down all event loops to terminate all threads.
            bossGroup.shutdownGracefully();
            workerGroup.shutdownGracefully();
        }
    }
}
上文代码的注释中列出了启动服务器的几个关键点:
- 创建bossGroup和workerGroup时入参为何不同
- 创建NioEventLoopGroup的具体源码实现
- 创建ServerBootstrap
- 启动服务器,本文重点
接下来对这几个关键点分别进行分析。
2 创建bossGroup和workerGroup时入参为何不同
关于bossGroup和workerGroup,可以看这张图,不了解的需要先去了解netty的线程模型,可见:
https://blog.csdn.net/qq_35751014/article/details/104443715

bossGroup和workerGroup是netty的两个核心对象,基于了单reactor多线程这一线程模型。bossGroup用于接收tcp请求,它会将请求交给workerGroup。workerGroup会获取到真正的链接,然后和链接进行通信。
既然是基于单reactor多线程模型,那么一般情况下,bossGroup只有一个线程,而workerGroup是由多线程组成。
因此EventLoopGroup bossGroup = new NioEventLoopGroup(1); bossGroup由一个线程组成。
而EventLoopGroup workerGroup = new NioEventLoopGroup(); 默认含有cpu*2的线程数(I/O密集型常用线程数)。
//默认线程数 = cpu*2
DEFAULT_EVENT_LOOP_THREADS = Math.max(1, SystemPropertyUtil.getInt(
        "io.netty.eventLoopThreads", NettyRuntime.availableProcessors() * 2));
3 创建NioEventLoopGroup的具体源码实现
进入构造方法,一直继续this(…)、super(…)的跟进,最后会来到真正的实现部分:
    protected MultithreadEventExecutorGroup(int nThreads, Executor executor,
                                            EventExecutorChooserFactory chooserFactory, Object... args) {
        checkPositive(nThreads, "nThreads");

        if (executor == null) {
            executor = new ThreadPerTaskExecutor(newDefaultThreadFactory());
        }

        children = new EventExecutor[nThreads];

        for (int i = 0; i < nThreads; i ++) {
            boolean success = false;
            try {
            	//1. 初始化EventLoop数组children
                children[i] = newChild(executor, args);
                success = true;
            } catch (Exception e) {
                throw new IllegalStateException("failed to create a child event loop", e);
            } finally {
                if (!success) {
                   // 关闭代码略
                   ...
                }
            }
        }

		//2. 生成选择器chooser
        chooser = chooserFactory.newChooser(children);

		//3. 创建关闭时的监听器
        final FutureListener<Object> terminationListener = new FutureListener<Object>() {
            @Override
            public void operationComplete(Future<Object> future) throws Exception {
                if (terminatedChildren.incrementAndGet() == children.length) {
                    terminationFuture.setSuccess(null);
                }
            }
        };

        for (EventExecutor e: children) {
            e.terminationFuture().addListener(terminationListener);
        }
		//4. 生成可读集合childrenSet
        Set<EventExecutor> childrenSet = new LinkedHashSet<EventExecutor>(children.length);
        Collections.addAll(childrenSet, children);
        readonlyChildren = Collections.unmodifiableSet(childrenSet);
    }
创建NioEventLoopGroup主要有四步:
- 初始化EventLoop数组children
- 生成选择器chooser
- 创建关闭时的监听器
- 生成可读集合childrenSet
下面只对1和2两点进行展开详解
3.1 初始化EventLoop数组children
这里调用了NioEventLoop的构造方法,不详细进行展开了:
    @Override
    protected EventLoop newChild(Executor executor, Object... args) throws Exception {
        EventLoopTaskQueueFactory queueFactory = args.length == 4 ? (EventLoopTaskQueueFactory) args[3] : null;
        return new NioEventLoop(this, executor, (SelectorProvider) args[0],
            ((SelectStrategyFactory) args[1]).newSelectStrategy(), (RejectedExecutionHandler) args[2], queueFactory);
    }
3.2 生成选择器chooser
选择器有两种:PowerOfTwoEventExecutorChooser和GenericEventExecutorChooser
	/**
	* 选择器使用的是round-robin(轮询)算法。
	* 另外,当长度为2的n次方时,使用&进行位运算的效率会比直接%的效率要高。
	* 这是netty对性能的压榨。
	*/
    @Override
    public EventExecutorChooser newChooser(EventExecutor[] executors) {
        if (isPowerOfTwo(executors.length)) {
            return new PowerOfTwoEventExecutorChooser(executors);
        } else {
            return new GenericEventExecutorChooser(executors);
        }
    }
PowerOfTwoEventExecutorChooser:
  public EventExecutor next() {
      return executors[idx.getAndIncrement() & executors.length - 1];
  }

GenericEventExecutorChooser:
   public EventExecutor next() {
       return executors[(int) Math.abs(idx.getAndIncrement() % executors.length)];
   }
4 创建ServerBootstrap
		ServerBootstrap b = new ServerBootstrap();
        b.group(bossGroup, workerGroup)
        .channel(NioServerSocketChannel.class)
        .option(ChannelOption.SO_BACKLOG, 100)
        .handler(new LoggingHandler(LogLevel.INFO))
        .childHandler(new ChannelInitializer<SocketChannel>() {
            @Override
            public void initChannel(SocketChannel ch) throws Exception {
               ChannelPipeline p = ch.pipeline();
               if (sslCtx != null) {
                    p.addLast(sslCtx.newHandler(ch.alloc()));
               }
               p.addLast(new EchoServerHandler());
            }
        });
这一块就不详细展开了,每个属性的具体含义,会用netty的也都了解。
5 启动服务器,本文重点
     // 4. 启动服务器,本文重点
     ChannelFuture f = b.bind(PORT).sync();
bind()方法中的内容决定了我们的服务器是如何启动起来的。而sync()方法只是同步等待创建结果的而已。因此应该着重关注bind()方法:
    private ChannelFuture doBind(final SocketAddress localAddress) {
    	//1. 初始化一个channel并将其注册
        final ChannelFuture regFuture = initAndRegister();
        final Channel channel = regFuture.channel();
        if (regFuture.cause() != null) {
            return regFuture;
        }

        if (regFuture.isDone()) {
            // At this point we know that the registration was complete and successful.
            ChannelPromise promise = channel.newPromise();
            //2. doBind0()
            doBind0(regFuture, channel, localAddress, promise);
            return promise;
        } else {
			...
        }
    }
5.1 初始化一个channel并将其注册
    final ChannelFuture initAndRegister() {
        Channel channel = null;
        try {
        	//1. 生产channel
            channel = channelFactory.newChannel();
            //2. 初始化channel
            init(channel);
        } catch (Throwable t) {
        	异常场景,代码略
            ...
        }
		//3. 注册channel
        ChannelFuture regFuture = config().group().register(channel);

        if (regFuture.cause() != null) {
            if (channel.isRegistered()) {
                channel.close();
            } else {
                channel.unsafe().closeForcibly();
            }
        }

        return regFuture;
    }
5.1.1 channel = channelFactory.newChannel();
public class ReflectiveChannelFactory<T extends Channel> implements ChannelFactory<T> {
    public ReflectiveChannelFactory(Class<? extends T> clazz) {
        ObjectUtil.checkNotNull(clazz, "clazz");
        try {
            this.constructor = clazz.getConstructor();
        } catch (NoSuchMethodException e) {
            throw new IllegalArgumentException("Class " + StringUtil.simpleClassName(clazz) +
                    " does not have a public non-arg constructor", e);
        }
    }

    @Override
    public T newChannel() {
        try {
            return constructor.newInstance();
        } catch (Throwable t) {
            throw new ChannelException("Unable to create Channel from class " + constructor.getDeclaringClass(), t);
        }
    }
}
跟进方法内部发现是通过工厂模式 反射创建clazz对象实例,clazz实际上是在我们第二步中channel方法进行指定的。newChannel()方法的作用就是就是创建出我们的NioServerSocketChannel实例对象。


5.1.2 init(channel);
@Override
    void init(Channel channel) {
    	//1. 配置一些相关属性
        setChannelOptions(channel, newOptionsArray(), logger);
        setAttributes(channel, newAttributesArray());

        ChannelPipeline p = channel.pipeline();

        final EventLoopGroup currentChildGroup = childGroup;
        final ChannelHandler currentChildHandler = childHandler;
        final Entry<ChannelOption<?>, Object>[] currentChildOptions = newOptionsArray(childOptions);
        final Entry<AttributeKey<?>, Object>[] currentChildAttrs = newAttributesArray(childAttrs);

		//2. 帮助bossGroup自动生成ChannelInitializer,这个重要
        p.addLast(new ChannelInitializer<Channel>() {
            @Override
            public void initChannel(final Channel ch) {
                final ChannelPipeline pipeline = ch.pipeline();
                // config.handler() 就是 配置时设置的handler。
                ChannelHandler handler = config.handler();
                if (handler != null) {
                    pipeline.addLast(handler);
                }
				//3. ch.eventLoop().execute 异步启动线程。
				//4. 用于添加ServerBootstrapAcceptor到pipeline中
                ch.eventLoop().execute(new Runnable() {
                    @Override
                    public void run() {
                    	// 4. 添加使用的是pipeline.addLast()方法
                        pipeline.addLast(new ServerBootstrapAcceptor(
                                ch, currentChildGroup, currentChildHandler, currentChildOptions, currentChildAttrs));
                    }
                });
            }
        });
    }
这个方法前大半部分的操作都是将我们给ServerBootStrap()注册的那些属性(options、attrs等等)赋值给我们的ServerSocketChannel,后半部分的代码很重要。
对于bossGroup,我们无需自定义ChannelInitializer。因为netty会帮助bossGroup自动生成ChannelInitializer,这个ChannelInitializer包含了我们在
.handler(new LoggingHandler(LogLevel.INFO))
时自定义的Handler。同时,还会另起一个线程来添加Handler:ServerBootstrapAcceptor。
ServerBootstrapAcceptor
的功能有两点:
- 帮助bossGroup监听accpect事件,获取对应的socketChannel
- 将socketChannel注册到workerGroup上。
接下来分别对第2、4两点进行讲解。而第3点ch.eventLoop().execute()涉及netty的任务执行机制,会在第二篇《netty 源码分析(二)- 任务执行机制 及 epoll bug解决方案》单独进行讲解。
5.1.2.1 pipeline.addLast()
pipeline.addLast() 并不是大家以为的加到了tail的后面,而是加在了tail的前面。

    private void addLast0(AbstractChannelHandlerContext newCtx) {
        AbstractChannelHandlerContext prev = tail.prev;
        newCtx.prev = prev;
        newCtx.next = tail;
        prev.next = newCtx;
        tail.prev = newCtx;
    }
5.1.3 register(channel);
//3. 注册channel
ChannelFuture regFuture = config().group().register(channel);
对于register,我是带着两个疑问来分析的:
- config().group()指的是workGoup还是bossGroup?
- 为什么channel是注册到group上?
5.1.3.1 config().group()指的是workGoup还是bossGroup?
通过debug,我们先看一下bossGroup和workerGroup的id。
        // Configure the server.
        EventLoopGroup bossGroup = new NioEventLoopGroup(1);
        EventLoopGroup workerGroup = new NioEventLoopGroup();

接着往下debug,可以看到,在启动时,config().group()为NioEventLoopGroup@1254,也就是说,config().group()指的是bossGroup。

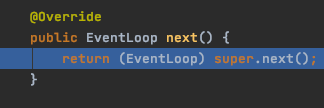
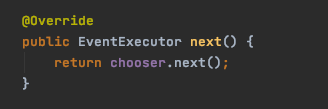
5.1.3.2 channel究竟注册到了哪儿?(重点)
我们沿着config().group().register(channel)往下调试:

可以看到,channel不是注册在group上,而是注册在next()返回的对象上。通过下面的代码可以看到:next()实际上返回的是选择器chooser所指向的EventLoop。
接着我们再进入register()方法:
    @Override
    public ChannelFuture register(final ChannelPromise promise) {
        ObjectUtil.checkNotNull(promise, "promise");
        //取得
        promise.channel().unsafe().register(this, promise);
        return promise;
    }
顺着register,会走到AbstractChannel的register()方法:
        @Override
        public final void register(EventLoop eventLoop, final ChannelPromise promise) {
			...

            AbstractChannel.this.eventLoop = eventLoop;
			//这里为false
            if (eventLoop.inEventLoop()) {
                register0(promise);
            } else {
            	//调用eventLoop.execute()来异步执行register0()
                try {
                    eventLoop.execute(new Runnable() {
                        @Override
                        public void run() {
                            register0(promise);
                        }
                    });
                } catch (Throwable t) {
					...
                }
            }
        }
关于eventLoop.inEventLoop()为什么会返回false,以及eventLoop.execute()方法,会在第二篇:
netty 源码分析(二)- 任务执行机制 及 epoll bug解决方案
中进行讲解。
顺着register0(),会走到接口方法doRegister(),我们对其中的两个实现epoll和nio进行介绍。
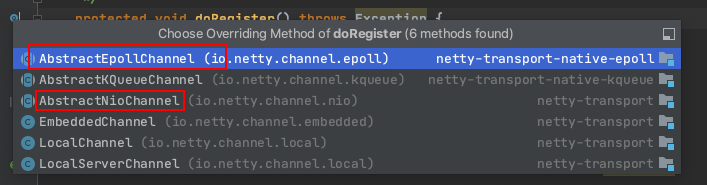
AbstractEpollChannel:
    @Override
    protected void doRegister() throws Exception {
        // Just in case the previous EventLoop was shutdown abruptly, or an event is still pending on the old EventLoop
        // make sure the epollInReadyRunnablePending variable is reset so we will be able to execute the Runnable on the
        // new EventLoop.
        epollInReadyRunnablePending = false;
        ((EpollEventLoop) eventLoop()).add(this);
    }

    void add(AbstractEpollChannel ch) throws IOException {
        assert inEventLoop();
        //1. 拿到socket的文件描述符
        int fd = ch.socket.intValue();
        //2. 使用epollCtl将fd添加到epoll中
        Native.epollCtlAdd(epollFd.intValue(), fd, ch.flags);
        //3. 保存fd和channel的映射关系
        AbstractEpollChannel old = channels.put(fd, ch);

        // We either expect to have no Channel in the map with the same FD or that the FD of the old Channel is already
        // closed.
        assert old == null || !old.isOpen();
    }
AbstractEpollChannel的注册channel主要分为三步:
- 拿到socket的文件描述符
- 使用epollCtl将fd添加到epoll中
- 保存fd和channel的映射关系
AbstractNioChannel:
    @Override
    protected void doRegister() throws Exception {
        boolean selected = false;
        for (;;) {
            try {
                selectionKey = javaChannel().register(eventLoop().unwrappedSelector(), 0, this);
                return;
            } catch (CancelledKeyException e) {
            ...
            }

    }
AbstractNioChannel的注册channel,是将channel注册到selector中,并返回selectionKey。
5.1.3.3 总结
总结一下:对于注册channel,
config().group().register(channel)
这行代码看上去像是注册到group上,
实际上底层是使用chooser.next()来选择一个eventLoop,然后将channel注册到eventLoop的selector中。
对于5.1小节的
config().group().register(channel);
因为config().group()返回的是bossGroup。
所以实际上是将一条新的channel注册到了bossGroup的eventLoop(一般只有一个)的selector中,用于监听客户端的请求。
5.2 doBind0()
在初始化并生成channel后,便可以将channel与端口进行绑定
    private static void doBind0(
            final ChannelFuture regFuture, final Channel channel,
            final SocketAddress localAddress, final ChannelPromise promise) {

        // This method is invoked before channelRegistered() is triggered.  Give user handlers a chance to set up
        // the pipeline in its channelRegistered() implementation.
        channel.eventLoop().execute(new Runnable() {
            @Override
            public void run() {
                if (regFuture.isSuccess()) {
                    channel.bind(localAddress, promise).addListener(ChannelFutureListener.CLOSE_ON_FAILURE);
                } else {
                    promise.setFailure(regFuture.cause());
                }
            }
        });
    }
实际上只需要关注一行代码:
channel.bind(localAddress, promise).addListener(ChannelFutureListener.CLOSE_ON_FAILURE);
这行代码做了几件事:
- 使用nio的channel的bind方法,将channel绑定到端口上。
- 注册关闭的监听事件
bind方法,通过debug发现,最后会进入NioServerSocketChannel的doBind方法
    @Override
    protected void doBind(SocketAddress localAddress) throws Exception {
        if (PlatformDependent.javaVersion() >= 7) {
        	//用的是ServerSocketChannel,也就是说,底层实际上是socket的bind方法。
            javaChannel().bind(localAddress, config.getBacklog());
        } else {
            javaChannel().socket().bind(localAddress, config.getBacklog());
        }
    }

    @Override
    protected ServerSocketChannel javaChannel() {
    	//可以看到,用的channel是java.nio的ServerSocketChannel
        return (ServerSocketChannel) super.javaChannel();
    }
至此,启动部分就讲完了。
接下来第二篇会对netty的任务执行机制 及 epoll bug解决方案进行介绍。