prepare env
nouveau模式为开源的非nvidia官方认可的驱动,因此需要关闭nouveau模式
#Disable the Nouveau Drivers
sudo vim /etc/modprobe.d/blacklist-nouveau.conf
#Add the following two lines to the file
blacklist nouveau
options nouveau modeset=0
#Regenerate the kernel initramfs
sudo update-initramfs -u
reboot
编译组件
#sudo apt-get install gcc
sudo apt-get install build-essential
GPU-CUDA-cuDNN对应版本
TensorFlow各个GPU版本CUDA和cuDNN对应版本
pytorch各个GPU版本CUDA和cuDNN对应版本
driver
# 查看已经安装的驱动版本号,为后续步骤选择最新的版本号做参考,如果没有安装,请跳过此步骤
cat /proc/driver/nvidia/version
驱动下载
,选择自己对应显卡的驱动
chmod +x NVIDIA-Linux-x86_64-410.78.run
sudo init 3    #重点,否则会出现安装后任然找不到显卡驱动
sudo ./NVIDIA-Linux-x86_64-410.78.run
reboot
nvidia-smi   #查看GPU设备
nvidia-settings #图形化显卡配置
watch -n 0.1 nvidia-smi #查看GPU实时资源使用情况
#If there are some troubles, remove the driver, and run the installer:
sudo apt-get remove --purge nvidia*
sudo apt-get remove --purge *nvidia* #推荐方法,防止清理不干净
sudo ./NVIDIA-Linux-x86_64-410.78.run --no-opengl-files
推荐参考
其它安装方式:2 ways
#open up a terminal window and check which driver is being used for Nvidia card with the following command.
sudo lshw -c display

#You can also use video instead of display as the class name.
sudo lshw -c video

#run the following command to list available driver for your Nvidia card from the default Ubuntu repository.
sudo ubuntu-drivers devices

#To install the recommended driver, run the following command.
# method 1
sudo ubuntu-drivers autoinstall
# method 3
sudo apt install nvidia-driver-version-number
#for example
#sudo apt install nvidia-driver-430
sudo reboot

#Now the proprietary Nvidia driver is being used.
sudo lshw -c display

#You can check which card is being used now with following command:
prime-select query

#If you want to use Intel graphics card, run the following command:
sudo prime-select intel

#To switch back to Nvidia card, run
sudo prime-select nvidia
WARNING:root:_pkg_get_support nvidia-driver-390: package has invalid Support Legacyheader, cannot determine support level
sudo ubuntu-drivers devices
WARNING:root:_pkg_get_support nvidia-driver-390: package has invalid Support Legacyheader, cannot determine support level
...
#此warnning无法通过软件方式解决,由于当时选用的legacy方式安装的ubuntu18系统导致的,不过不影响nvidia-driver的安装和使用
#只有一种方法:重装系统,选择UEFI方式安装ubuntu系统
卸载显卡驱动
#If for some reason you don’t want the proprietary driver any more, you can remove it by running the following command.
sudo apt purge nvidia-driver*
sudo apt autoremove
升级显卡驱动
#必须先卸载原有的驱动
sudo apt purge nvidia-driver*
sudo apt autoremove
#安装指定版本的驱动
sudo apt install nvidia-driver-version-number
Notice that you may need reboot for the change to take effect if you had swithced the Intel graphics/Nvidia card.
双显卡自动切换,集显用于显示,nvidia独显用于计算:
https://www.jianshu.com/p/5bbf234da1d7
http://www.61k.com/1162359.html
如果是uefi模式安装的ubuntu18系统,安装显卡是需要安全密码,根据提示设置一个密码,显卡驱动安装完成后,系统重启会进入perform mok mangement
选择配置步骤如下
enroll mok -> continue -> yes -> 输入设定的密码 -> reboot
or

00:02.0 对应 如下配置文件 参数 BusID “PCI:0:2:0”
sudo vi /etc/X11/xorg.conf
Section "ServerLayout"
    Identifier "Layout0"
    Screen   0 "Screen0"
EndSection

Section "Screen"
    Identifier "Screen0"
    Device     "Device0"
EndSection

Section "Device"
    Identifier "Device0"
    Driver     "intel"
    VendorName "Intel Corporation"
    BusID      "PCI:0:2:0"
EndSection
sudo reboot
sudo prime-select nvidia
nvidia-smi    #可以看到n卡内存占用为0
lspci -i | grep VGA
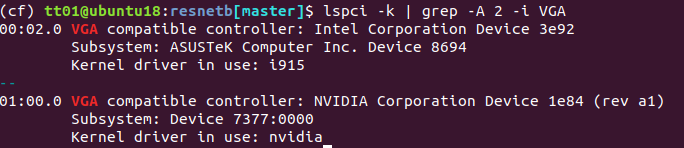
lspci -k | grep -A 2 -i "VGA"
cuda
重点注意:cuda版本对应的驱动版权要求
官方cuda下载
国内cuda下载
#选择自己需要的cuda10.1版本,其它cuda版本方法类似
sudo sh cuda_10.1.243_418.87.00_linux.run
#注意选项driver为no,因为已经先装了driver

gvim ~/.bashrc
#添加如下两行代码
export PATH=/usr/local/cuda-10.1/bin${PATH:+:${PATH}}
export LD_LIBRARY_PATH=/usr/local/cuda-10.1/lib64${LD_LIBRARY_PATH:+:${LD_LIBRARY_PATH}}

source ~/.bashrc
nvcc -V    #查看cuda版本信息
若不幸安装失败,执行下面的命令卸载cuda,然后重新安装
cd /usr/local/cuda/bin
sudo ./cuda-uninstaller
#高版本为如下
sudo ./uninstall_cuda_10.0.pl
deb方式安装方式
sudo apt-get --purge remove cuda
Ubuntu apt方式安装方式
sudo apt install nvidia-cuda-toolkit
sudo apt purge --autoremove nvidia-cuda-toolkit
cudnn
cudnn官方下载地址
根据自己的系统类型,cuda版本,选择对应的cudnn版本
推荐参考
方法一
下载 cuDNN Runtime Library xxx.Deb 文件
下载 cuDNN Developer Library xxx.Deb 文件
下载 cuDNN Code Samples xxx.Deb 文件
#分别安装:
sudo dpkg -i libcudnn7_7.6.5.32-1+cuda10.2_amd64.deb

#卸载cudnn安装包
sudo dpkg -r libcudnn7*
#清理cudnn配置信息
sudo dpkg -P libcudnn7*
方法二(推荐,可以兼容多个cuda版本的安装)
CUDNN官网
选择 cuDNN Library for Linux 一项进行下载
#cudnn*.tgz 文件解压,打开所在文件夹,执行下面的指令: tar xvf cudnn*.tgz

sudo cp cuda/include/cudnn*.h /usr/local/cuda/include/
sudo cp cuda/lib64/libcudnn* /usr/local/cuda/lib64/
sudo chmod a+r /usr/local/cuda/include/cudnn*.h
sudo chmod a+r /usr/local/cuda/lib64/libcudnn*

#注意/usr/local/cuda软连接的位置,根据不同的cuda版本,相应修改/usr/local/cuda
#/usr/local/cuda->/usr/local/cuda-10.1
#/usr/local/cuda->/usr/local/cuda-10.2
sudo ln -s /usr/local/cuda-10.1/ /usr/local/cuda

#添加环境变量,打开配置文件:
$ vim ~/.bashrc
#添加如下环境变量:
export LD_LIBRARY_PATH=/usr/local/cuda/lib64:$LD_LIBRARY_PATH
#使配置生效:
$ source ~/.bashrc
nvidia-video-codec-sdk
注意nvidia-video-codec-sdk版本对nvidia driver版本和cuda版本的对应要求
#安装 没有提供安装脚本,自己动手吧:
sudo cp include/*                /usr/include
# 10.版本是
sudo cp Interface/*                /usr/include
sudo cp Lib/linux/stubs/x86_64/* /usr/lib