背景
在做ocr项目时候,会涉及到两个部分,文字区域检测与文字图像识别。在之前的文章中有
介绍
目标检测图像数据增强(Data Augmentation)——对比度|加噪|随机调整颜色
, 以及旋转数据增强等;这里将介绍下文字图像识别数据增强。
方式
文字图像数据增强来源有两种:
- 基于文本内容去生成对应的图片
- 基于已标记的文本图片去进行数据增强
关于基本文本内容去生成对应的图片,网络上有很多生成工具箱: 比如
Text Recognition Data Generator
, 等,相关文章可以见
OCR文本图像合成工具
。这里讲解下基于已标记的文本图像进行数据增强。可以借鉴于
目标检测图像数据增强(Data Augmentation)——对比度|加噪|随机调整颜色
,比较相似,这里再讲解下图像扭曲等形式。
挤压、哈哈镜、扭曲三部曲
参考链接:
- https://www.shuzhiduo.com/A/MyJxjwQpdn/
- https://www.cnblogs.com/pingwen/p/12503047.html
上述是基于c语言写的,将其转化为python并用于文字图片扩增。
1. 挤压
图像压效果本质的图像坐标的非线性变换,将图像向内挤压,挤压的过程产生压缩变形,从而形成的效果。
挤压效果的实现是通过极坐标的形式。如下图所示,设图像中心为O(x,y),某点距离中心O的距离为半径R,非线性方式改变半径R但不改变点的方向,就构成了图像挤压。也可以自定义加压中心点,计算半径方式相同。图像像素变换倍率使用是 y=sqrt(x)。
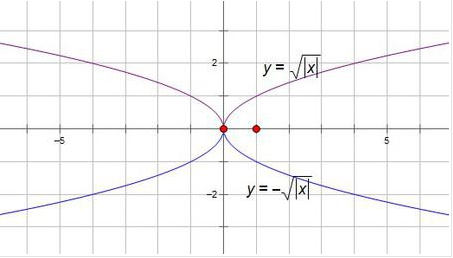

图像上点P与图像中心O的距离为R,图像挤压就是P点坐标映射到OP直线上的点R2位置,其中
|OR2 |=sqrt(OP)*ratio。
原始图片

代码如下
def min_frame(self, img, degree=11):
        frame = cv2.imread(img) if isinstance(img, str) else img
        height, width, channels = frame.shape
        center_x = width/2
        center_y = height/2
        new_data = frame.copy()
        for i in range(width):
            for j in range(height):
                tx = i - center_x
                ty = j - center_y
                theta = math.atan2(ty, tx)
                # 半径
                radius = math.sqrt(tx**2 + ty**2)
                radius = math.sqrt(radius) * degree
                new_x = int(center_x + radius * math.cos(theta))
                new_y = int(center_y + radius * math.sin(theta))
                if new_x < 0:
                    new_x = 0
                if new_x >= width:
                    new_x = width-1
                if new_y < 0:
                    new_y = 0
                if new_y >= height:
                    new_y = height-1

                for channel in range(channels):
                    new_data[j][i][channel] = frame[new_y][new_x][channel]
        return new_data

2.哈哈镜
哈哈镜原理与挤压类似,本质上也是图像坐标的非线性变换,将图像向外扩张,扩张的过程产生变形,从而形成的效果。
代码如下
def max_frame(self, img, degree=1):
        frame = cv2.imread(img) if isinstance(img, str) else img
        height, width, n = frame.shape
        center_x = width / 2
        center_y = height / 2
        randius = 40*degree  # 直径
        real_randius = int(randius / 2)  # 半径
        new_data = frame.copy()
        for i in range(width):
            for j in range(height):
                tx = i - center_x
                ty = j - center_y
                distance = tx ** 2 + tx ** 2
                # 为了保证选择的像素是图片上的像素
                if distance < randius ** 2:
                    new_x = tx / 2
                    new_y = ty / 2
                    # 图片的每个像素的坐标按照原来distance 之后的distance(real_randius**2)占比放大即可
                    new_x = int(new_x * math.sqrt(distance) / real_randius + center_x)
                    new_y = int(new_y * math.sqrt(distance) / real_randius + center_y)
                    # 当不超过new_data 的边界时候就可赋值
                    if new_x < width and new_y < height:
                        new_data[j][i][0] = frame[new_y][new_x][0]
                        new_data[j][i][1] = frame[new_y][new_x][1]
                        new_data[j][i][2] = frame[new_y][new_x][2]
        return new_data

3.扭曲
对图像的像素坐标进行正弦变换,映射到对应坐标就完成了图像扭曲。
代码如下:
 def sin_frame(self, img, degree=3):
        frame = cv2.imread(img) if isinstance(img, str) else img
        height, width, channels = frame.shape
        new_data = np.zeros([height, width, 3], np.uint8)  # null img
        for j in range(width):
            temp = degree * math.sin(360 * j / width * math.pi/180)   # [-degree,degree]
            temp = degree + temp  # [0, 2*degree]
            for i in range(int(temp+0.5), int(height+temp-2*degree)):
                x = int((i - temp) * height / (height - degree))
                if x >= height:
                    x = height-1
                if x < 0:
                    x = 0
                for channel in range(channels):
                    new_data[i][j][channel] = frame[x][j][channel]
        return new_data

参考资源