前言
Sharding-JDBC是以jar的形式提供服务,无需单独部署,可理解为增强版的 JDBC驱动,完全兼容JDBC和各种ORM框架。此完成一个最原始,最简单的案例,请大家参考。
一、Sharding-JDBC分表示例
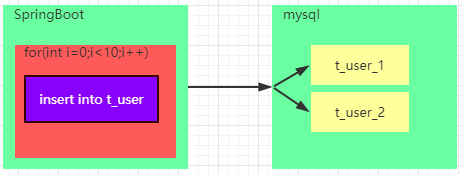
如上图所以,springboot工程中通过for循环向
t_user
表插入数据。通过Sharding-JDBC进行分表配置,将数据依次插入
t_user_1
和
t_user_2
表。
1、实体User.java
@TableName("t_user")
public class User
{

	private Long id;
	private String name;
	private Integer groupId;
	//get set省略
}
2、UserMapper.java
@Mapper
public interface UserMapper extends BaseMapper<User>
{
}
3、启动类Application.java
@SpringBootApplication
@MapperScan("com.test.mapper")
public class Application
{
	public static void main(String[] args) {
		SpringApplication.run(Application.class, args);
	}
}
4、配置文件
如果不指定主键的信息时,主键默认使用的
SNOWFLAKE
生成的。
#配置数据源  名字为m1 和数据源m1的信息
spring.shardingsphere.datasource.names=m1
spring.shardingsphere.datasource.m1.type=com.alibaba.druid.pool.DruidDataSource
spring.shardingsphere.datasource.m1.driver-class-name=com.mysql.cj.jdbc.Driver
spring.shardingsphere.datasource.m1.url=jdbc:mysql://localhost:3306/test?serverTimezone=GMT%2B8
spring.shardingsphere.datasource.m1.username=root
spring.shardingsphere.datasource.m1.password=root


#m1数据源的t_user表可以分为t_user_1表和t_user_2表
spring.shardingsphere.sharding.tables.t_user.actual-data-nodes=m1.t_user_$->{1..2}

#根据id列进行分表
spring.shardingsphere.sharding.tables.t_user.table-strategy.inline.sharding-column= id
#分表规则是 id%2+1
spring.shardingsphere.sharding.tables.t_user.table-strategy.inline.algorithm-expression= t_user_$->{id%2+1}

# 打印日志
spring.shardingsphere.props.sql.show=true
spring.main.allow-bean-definition-overriding=true
5、pom文件
<?xml version="1.0" encoding="UTF-8"?>
<project xmlns="http://maven.apache.org/POM/4.0.0"
         xmlns:xsi="http://www.w3.org/2001/XMLSchema-instance"
         xsi:schemaLocation="http://maven.apache.org/POM/4.0.0 http://maven.apache.org/xsd/maven-4.0.0.xsd">
    <modelVersion>4.0.0</modelVersion>

    <groupId>org.example</groupId>
    <artifactId>shardingSphereTest</artifactId>
    <version>1.0-SNAPSHOT</version>
    <parent>
        <groupId>org.springframework.boot</groupId>
        <artifactId>spring-boot-starter-parent</artifactId>
        <version>2.3.1.RELEASE</version>
        <relativePath/> <!-- lookup parent from repository -->
    </parent>
    <dependencies>
        <dependency>
            <groupId>org.apache.shardingsphere</groupId>
            <artifactId>sharding-jdbc-spring-boot-starter</artifactId>
            <version>4.1.1</version>
        </dependency>
        <dependency>
            <groupId>org.springframework.boot</groupId>
            <artifactId>spring-boot-starter</artifactId>
        </dependency>
        <dependency>
            <groupId>org.springframework.boot</groupId>
            <artifactId>spring-boot-starter-test</artifactId>
            <scope>test</scope>
        </dependency>
        <dependency>
            <groupId>com.alibaba</groupId>
            <artifactId>druid</artifactId>
            <version>1.1.22</version>
        </dependency>
        <dependency>
            <groupId>mysql</groupId>
            <artifactId>mysql-connector-java</artifactId>
        </dependency>
        <dependency>
            <groupId>com.baomidou</groupId>
            <artifactId>mybatis-plus-boot-starter</artifactId>
            <version>3.0.5</version>
        </dependency>
    </dependencies>
    <build>
        <finalName>${project.artifactId}</finalName>
        <plugins>
            <plugin>
                <groupId>org.springframework.boot</groupId>
                <artifactId>spring-boot-maven-plugin</artifactId>
            </plugin>
        </plugins>
    </build>

</project>
6、数据库信息
CREATE TABLE `t_user` (
  `id` bigint(20) NOT NULL,
  `name` varchar(255) DEFAULT NULL,
  `group_id` int(11) DEFAULT NULL,
  PRIMARY KEY (`id`)
) ENGINE=InnoDB DEFAULT CHARSET=utf8;
7、测试
@RunWith (SpringRunner.class)
@SpringBootTest(classes = Application.class)
public class ShardingTest
{
	@Resource
	private UserMapper userMapper;
	@Test
	public void Test1(){
		 for(int i= 0 ;i<50;i++){
		 	User user = new User ();
		 	user.setName ("name_"+i);
		 	user.setGroupId (i);
		 	userMapper.insert (user);
		 }
	}
}

二、分库分表配置
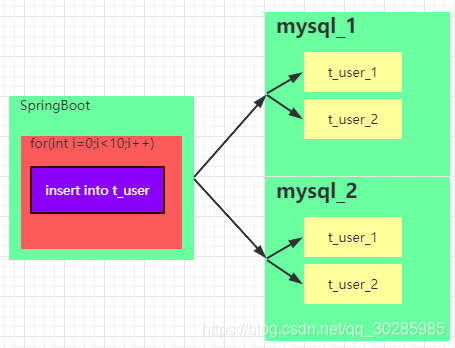
就如上java代码。通过group_id进行分库,id进行分表将数据分别插入
mysql_1
和
mysql_2
的
t_user_1
和
t_user_2
表中。配置如下。代码无需修改。
# 分库分表配置


#配置数据源
spring.shardingsphere.datasource.names=m1,m2
spring.shardingsphere.datasource.m1.type=com.alibaba.druid.pool.DruidDataSource
spring.shardingsphere.datasource.m1.driver-class-name=com.mysql.cj.jdbc.Driver
spring.shardingsphere.datasource.m1.url=jdbc:mysql://localhost:3306/test?serverTimezone=GMT%2B8
spring.shardingsphere.datasource.m1.username=root
spring.shardingsphere.datasource.m1.password=root


spring.shardingsphere.datasource.m2.type=com.alibaba.druid.pool.DruidDataSource
spring.shardingsphere.datasource.m2.driver-class-name=com.mysql.cj.jdbc.Driver
spring.shardingsphere.datasource.m2.url=jdbc:mysql://localhost:3306/test2?serverTimezone=GMT%2B8
spring.shardingsphere.datasource.m2.username=root
spring.shardingsphere.datasource.m2.password=root


#m1数据源的t_user表可以分为t_user_1表和t_user_2表
spring.shardingsphere.sharding.tables.t_user.actual-data-nodes=m$->{1..2}.t_user_$->{1..2}

# 数据库选择配置
spring.shardingsphere.sharding.tables.t_user.database-strategy.inline.sharding-column= group_id
#分表规则是 id%2+1
spring.shardingsphere.sharding.tables.t_user.database-strategy.inline.algorithm-expression=m$->{group_id%2+1}


#根据id列进行分表
spring.shardingsphere.sharding.tables.t_user.table-strategy.inline.sharding-column= id
#分表规则是 id%2+1
spring.shardingsphere.sharding.tables.t_user.table-strategy.inline.algorithm-expression=t_user_$->{id%2+1}

# 打印日志
spring.shardingsphere.props.sql.show=true
spring.main.allow-bean-definition-overriding=true
以上是最简单的单库分表配置,另外还有
分库分表、代码中实现分表、hinit指定分表、广播表、绑定表、读写分离配置
,直接到git地址拉取代码即可,每个分支都是针对每个功能纯净的配置,亲测有效。