序言
Maven 作为 Java 项目管理工具,它不仅可以用作包管理,还有许多的插件,可以支持整个项目的开发、打包、测试、部署等一系列行为。
而包管理又是其核心功能,除非是个人项目,我们获取包都是从中央仓库(或者 github 获取,但是公司项目呢,为了提供高速,一般都会搭建公司内部或者团队内部的 Maven 私服仓库。
官网/版本收费
首先要吐槽官网慢的一比,下载不下来。
地址:https://www.sonatype.com/
下载地址:https://www.sonatype.com/download-nexus-repo-oss
版本/收费/免费:Nexus Repository Manager 仓库管理有2个版本,专业版和oss版,oss版是免费的,专业版是收费的,我们使用oss版。
简介
nexus是一个强大的maven仓库管理器,它极大的简化了本地内部仓库的维护和外部仓库的访问.
nexus是一套开箱即用的系统不需要数据库,它使用文件系统加Lucene来组织数据
nexus使用ExtJS来开发界面,利用Restlet来提供完整的REST APIs,通过IDEA和Eclipse集成使用
nexus支持webDAV与LDAP安全身份认证.
nexus提供了强大的仓库管理功能,构件搜索功能,它基于REST,友好的UI是一个extjs的REST客户端,占用较少的内存,基于简单文件系统而非数据库.
为什么使用
- 节省外网带宽。
- 加速Maven构建。
- 部署第三方构件。
- 提高稳定性,增强控制。
- 降低中央仓库的负荷。
- 控制和审计
- 建立本地内部公用仓库
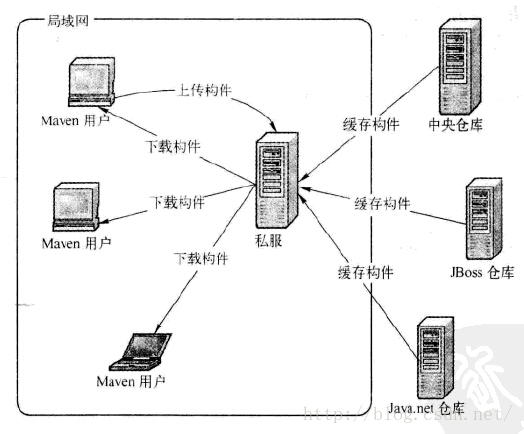
私服仓库的工作流程
私服搭建流程
Nexus 是用来搭建 Maven 私服的,可以说是最好的免费工具了,它的官网上是这样说的:“世界上第一个也是唯一的免费使用的仓库解决方案”。目前的最新版本是 OSS 3.x。提供了针对 Windows、Unix、OS X 三种系统的版本。
这里只简单说明 Linux 下的安装方式,如果是下载的最新版本,它对系统内存和 jdk 版本是有要求的,要求内存大于4G,jdk 最低是1.8版本。
-
下载包,并解压缩,运行命令
tar -zxvf nexus-version-unix.tar.gz -
进入
nexus-version/bin/`` 目录,执行命令
./nexus start` -
访问 默认的 8081 端口即可
没错,就是这么简单。
通常情况下,以上三步就可以完成安装,如果有问题,并且提示“ NOT RECOMMENDED TO RUN AS ROOT ”,可以通过修改
/bin/nexus
文件,在其中加入
RUN_AS_USER=root
,然后重新启动即可。
另外,如果是 docker 环境,可以直接获取 nexus 的镜像完成安装。
https://hub.docker.com/r/sonatype/nexus3
 mkdir nexus-data && chown -R 200 nexus-data
docker run -d -p 8081:8081 --name nexus -v nexus-data:/nexus-data sonatype/nexus3
初识 Nexus
当我们通过地址,在浏览器上访问 nexus 的首页,是下图这样子的:

默认的账号名是
admin
,密码是 再这个文件里
**/nexus-data/admin.password**
。管理员登录后,可以在设置页面管理角色、用户等其他一系列的操作。例如创建一个角色,给角色设置某一仓库的管理权限,然后向这个角色中添加人员。具体操作不做过多介绍,一看就明白。
管理员还可以管理仓库,不过一般来说,默认的那几个仓库就可以了。默认有如下几个仓库:

Nexus仓库类型介绍
proxy
:这是代理方式,它是用来代理中央仓库的,例如我们依赖的包在本地仓库没有,就会到私服获取,私服没有的话,会到中央仓库先把包下载到这里,然后再下载到本地仓库;
hosted
:指的是我们公司或团队内部的包,并且 hosted 类型的仓库会分为 releases 和 snapshots 两个,前者是正式版,后者一般是开发测试版;
group
:它的目的就是把多个仓库组合起来,然后我们项目中只需要配置上这个类型的仓库地址,就可以把它里面组合的几个仓库都关联上。
管理本地仓库
我们前面讲到类型为hosted的为本地仓库,Nexus预定义了3个本地仓库,分别是Releases, Snapshots, 3rd Party. 分别讲一下这三个预置的仓库都是做什么用的:
Releases:
这里存放我们自己项目中发布的构建, 通常是Release版本的, 比如我们自己做了一个FTP Server的项目, 生成的构件为ftpserver.war, 我们就可以把这个构建发布到Nexus的Releases本地仓库. 关于符合发布后面会有介绍.
**Snapshots:**这个仓库非常的有用, 它的目的是让我们可以发布那些非release版本, 非稳定版本, 比如我们在trunk下开发一个项目,在正式release之前你可能需要临时发布一个版本给你的同伴使用, 因为你的同伴正在依赖你的模块开发, 那么这个时候我们就可以发布Snapshot版本到这个仓库, 你的同伴就可以通过简单的命令来获取和使用这个临时版本.
**3rd Party:**顾名思义, 第三方库, 你可能会问不是有中央仓库来管理第三方库嘛,没错, 这里的是指可以让你添加自己的第三方库, 比如有些构件在中央仓库是不存在的. 比如你在中央仓库找不到Oracle 的JDBC驱动, 这个时候我们就需要自己添加到3rdparty仓库。
Maven用到的Repositories说明
:
maven-central:maven中央库,默认从https://repo1.maven.org/maven2/拉取jar
maven-releases:私库发行版jar
maven-snapshots:私库快照(调试版本)jar
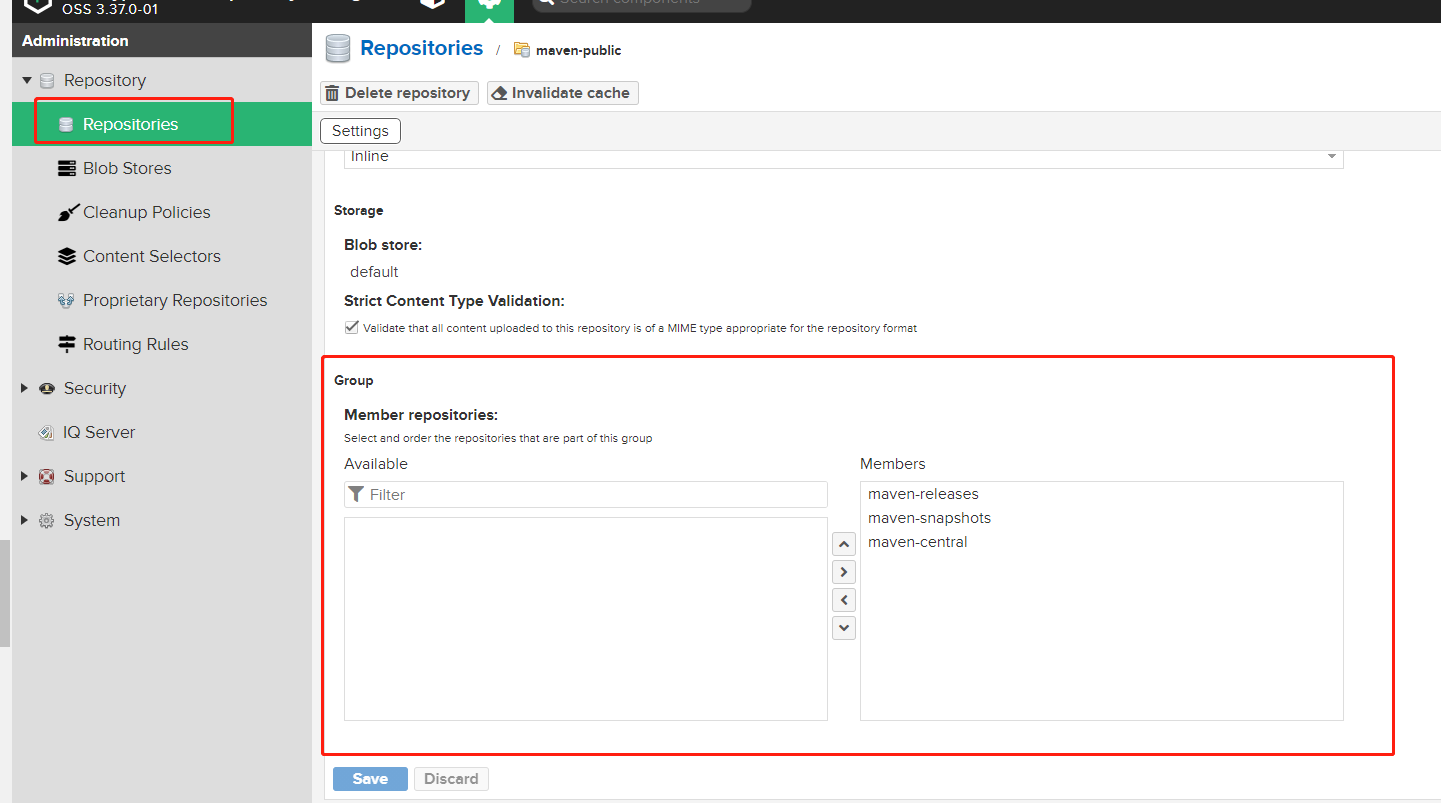
maven-public:仓库分组,把上面三个仓库组合在一起对外提供服务,在本地maven基础配置settings.xml中使用。
如果不够用,自己也可以根据博文上面的仓库类型进行选用创建。
在项目中使用
获取依赖包
如果是普通项目成员,不需要向私服发布包的,只需要在 pom 文件中加入以下配置即可。
<repositories>
      <repository>
            <id>maven-public</id>
            <name>maven-public</name>
            <url>http://nexus.local:32768/repository/maven-public/</url>
            <snapshots>
               <enabled>true</enabled>
            </snapshots>
       </repository>
</repositories>
其中 id 要和你的仓库名称一致,url 就是私服的仓库地址,就是 type 为 group 的那个,它组合了一个 proxy 类型的和两个 hosted 类型的仓库。设置 snapshots 的 enabled 为ture,表示允许下载 snapshots 版本的包。
maven-public 默认配置 Group 。Members有顺序之分。
发布(deploy)包
- 如果需要向仓库中发布包的,首先需要对仓库有权限才可以,没有权限的用户是没办法发布的。
打开 maven 的配置文件
setting.xml
,找到
servers
节点,然后在其中添加一个
server
节点。
用户名和密码也可以是管理员账号,或者管理员新创建的账号,制药对仓库有添加权限即可。
       <server>
            <id>nexus-releases</id>
            <username>admin</username>
            <password>admin123</password>
        </server>

        <server>
            <id>nexus-snapshots</id>
            <username>admin</username>
            <password>admin123</password>
        </server>
请注意上面的 id,一会儿在 pom 文件中还会用到。
-
然后需要在 pom 文件中配置下面的内容:
nexus-releases maven-releases http://nexus.local:8081/repository/maven-releases/ nexus-snapshots maven-snapshots http://nexus.local:8081/repository/maven-snapshots/
我们看到其中配置了一个 repository ,另外还有一个 snapshotRepository,上面表示的是 releases 版。
同样注意 id 要和
setting.xml
里 server 下的 id 一致
,不然会出现权限问题。url 分别指定 maven-releases 和 maven-snapshots 的地址。
只要在项目中配置 1.0-SNAPSHOT 这样,带有 SNAPSHOT 的就会到 snapshots 仓库,如果不加 SNAPSHOT 就会到 releases 仓库。
还有要注意的是,你要发布的包不应该是上级,也就是不能有 parent 依赖。否则在获取依赖的时候会有问题。
最后执行
mvn clean deploy
命令,即可发布包到私服仓库中。
通过以上配置和操作,就可以完成包的发布过程。
项目配置拿去不谢
<?xml version="1.0" encoding="UTF-8"?>

<settings xmlns="http://maven.apache.org/SETTINGS/1.0.0"
          xmlns:xsi="http://www.w3.org/2001/XMLSchema-instance"
          xsi:schemaLocation="http://maven.apache.org/SETTINGS/1.0.0 http://maven.apache.org/xsd/settings-1.0.0.xsd">
  <!-- localRepository
   | The path to the local repository maven will use to store artifacts.
   |
   | Default: ${user.home}/.m2/repository
    -->
  <localRepository>D:Maven
epository</localRepository>

  <servers>
    <server>
      <id>nexus_release</id>
      <username>admin</username>
      <password>admin123</password>
    </server>

    <server>
      <id>nexus_snapshots</id>
      <username>admin</username>
      <password>admin123</password>
    </server>

    <!-- Another sample, using keys to authenticate.
    <server>
      <id>release</id>
      <privateKey>/path/to/private/key</privateKey>
      <passphrase>optional; leave empty if not used.</passphrase>
    </server>
    -->
  </servers>

  <mirrors>
    <!-- mirror
     | Specifies a repository mirror site to use instead of a given repository. The repository that
     | this mirror serves has an ID that matches the mirrorOf element of this mirror. IDs are used
     | for inheritance and direct lookup purposes, and must be unique across the set of mirrors.
     |
    <mirror>
      <id>mirrorId</id>
      <mirrorOf>repositoryId</mirrorOf>
      <name>Human Readable Name for this Mirror.</name>
      <url>http://my.repository.com/repo/path</url>
    </mirror>
     -->
  </mirrors>

  <profiles>

     <profile>
      <id>nexus</id>
      <repositories>
        <!--包含需要连接到远程仓库的信息 -->
        <repository>
          <!--远程仓库唯一标识 -->
          <id>nexus_release</id>
          <!--远程仓库名称 -->
          <name>nexus_repo</name>
           <!--远程仓库URL,按protocol://hostname/path形式 -->
          <url>http://192.168.1.13:8081/nexus/content/groups/public</url>
          <!--用于定位和排序构件的仓库布局类型-可以是default(默认)或者legacy(遗留)。Maven 2为其仓库提供了一个默认的布局;然而,Maven 1.x有一种不同的布局。我们可以使用该元素指定布局是default(默认)还是legacy(遗留)。 -->
          <layout>default</layout>
          <!--如何处理远程仓库里发布版本的下载 -->
          <releases>
            <!--true或者false表示该仓库是否为下载某种类型构件(发布版,快照版)开启。 -->
            <enabled>true</enabled>
            <!--该元素指定更新发生的频率。Maven会比较本地POM和远程POM的时间戳。这里的选项是:always(一直),daily(默认,每日),interval:X(这里X是以分钟为单位的时间间隔),或者never(从不)。 -->
            <updatePolicy>never</updatePolicy>
            <!--当Maven验证构件校验文件失败时该怎么做-ignore(忽略),fail(失败),或者warn(警告)。 -->
            <checksumPolicy>warn</checksumPolicy>
          </releases>
          <!--如何处理远程仓库里快照版本的下载。有了releases和snapshots这两组配置,POM就可以在每个单独的仓库中,为每种类型的构件采取不同的策略。例如,可能有人会决定只为开发目的开启对快照版本下载的支持。参见repositories/repository/releases元素 -->
          <snapshots>
            <!--true或者false表示该仓库是否为下载某种类型构件(发布版,快照版)开启。 -->
            <enabled>true</enabled>
            <!--该元素指定更新发生的频率。Maven会比较本地POM和远程POM的时间戳。这里的选项是:always(一直),daily(默认,每日),interval:X(这里X是以分钟为单位的时间间隔),或者never(从不)。 -->
            <updatePolicy>always</updatePolicy>
            <!--当Maven验证构件校验文件失败时该怎么做-ignore(忽略),fail(失败),或者warn(警告)。 -->
            <checksumPolicy>warn</checksumPolicy>
          </snapshots>
        </repository>
      </repositories>

      <pluginRepositories>
        <pluginRepository>
          <id>nexus_release</id>
          <name>Maven China Mirror</name>
          <url>http://192.168.1.13:8081/nexus/content/groups/public</url>
          <releases>
            <enabled>true</enabled>
          </releases>
          <snapshots>
            <enabled>true</enabled>
          </snapshots>
        </pluginRepository>
      </pluginRepositories>

    </profile>
  </profiles>


  <!-- activeProfiles
   | List of profiles that are active for all builds.
   -->
  <activeProfiles>
    <activeProfile>nexus</activeProfile>
  </activeProfiles>

</settings>
Nexus 3.x配置deployment角色
Nexus 3.x取消默认的deployment角色,需要手动添加deployment角色,只需要配置如下权限即可!
添加 Role
- Role ID: nx-deployment
- Role name: nx-deployment
- Role description: Nexus Deployment Role
为 Role 配置 Privileges
(1)针对指定仓库权限
nx-component-upload
nx-repository-view-maven2-maven-public-*
nx-repository-view-maven2-maven-releases-*
nx-repository-view-maven2-maven-snapshots-*
(2)针对所有仓库权限
nx-component-upload
nx-repository-view-maven2-*-add
nx-repository-view-maven2-*-browse
nx-repository-view-maven2-*-edit
nx-repository-view-maven2-*-read
K8s 部署
kind: Deployment
apiVersion: apps/v1
metadata:
  name: nexus3
  labels:
    app: nexus3
spec:
  replicas: 1
  selector:
    matchLabels:
      app: nexus3
  template:
    metadata:
      labels:
        app: nexus3
    spec:
      containers:
        - name: nexus3
          image: sonatype/nexus3
          ports:
            - name: nexus3-8081
              containerPort: 8081
              protocol: TCP
          resources:
            limits:
              memory: 6G
              cpu: 1000m
          imagePullPolicy: IfNotPresent
          volumeMounts:
          - name: data
            mountPath: /nexus-data
      restartPolicy: Always
      volumes:
        - name: data
          persistentVolumeClaim:
            claimName: pvc-nexus3
            readOnly: false
---
#PVC
apiVersion: v1
kind: PersistentVolumeClaim
metadata:
  name: pvc-nexus3
spec:
  accessModes:
  - ReadWriteOnce
  storageClassName: pv-nexus3
  resources:
    requests:
      storage: 50Gi
---
#PV
apiVersion: v1
kind: PersistentVolume
metadata:
  name:  pv-nexus3
spec:
  capacity:
    storage: 50Gi
  accessModes:
  - ReadWriteOnce
  storageClassName: pv-nexus3
  persistentVolumeReclaimPolicy: Retain
  nfs:
    path: /mnt/data/nfs/nexus3
    server: 192.168.0.192
---
kind: Service
apiVersion: v1
metadata:
  name: nexus3
  labels:
    app: nexus3
spec:
  ports:
    - name: nexus3-8081
      protocol: TCP
      port: 80
      targetPort: 8081
  selector:
    app: nexus3
  type: ClusterIP
# ------------------- App Ingress ------------------- #
kind: Ingress
apiVersion: networking.k8s.io/v1
metadata:
  name: nexus3
  annotations:
    kubernetes.io/ingress.class: nginx
spec:
  rules:
    - host: nexus3.xxx.com
      http:
        paths:
          - path: /
            pathType: Prefix
            backend:
              service:
                name: nexus3
                port:
                  number: 80