**
一.部署mysql
**
我这里使用的阿里云轻量级服务器centOS7.0
1.下载mysql8.0安装包
地址:https://dev.mysql.com/downloads/mysql/
找到你要下载的版本,自行选择
我这里使用8.0.13版本 mysql-8.0.13-linux-glibc2.12-x86_64.tar.xz
2.解压
xz -d mysql-8.0.13-linux-glibc2.12-x86_64.tar.xz
tar -cvf  mysql-8.0.13-linux-glibc2.12-x86_64.tar.xz

或者
tar -xzJf mysql-8.0.13-linux-glibc2.12-x86_64.tar.xz
3.重命名一下移动文件到/usr/local/
mv mysql-8.0.13-linux-glibc2.12-x86_64 mysql-8.0.13
mv mysql-8.0.13 /usr/local/
4.进入/usr/local/目录下,创建用户和用户组并授权
创建用户组合用户
groupadd mysql
useradd -r -g mysql mysql
授权
进入mysql目录
chown -R mysql:mysql
5./usr/local/mysql,创建data文件夹
mkdir data
6.初始化数据库生成随机密码,记录下来,登录的时候会用
注意命令所在文件,不然会提示找不到mysqld
/usr/local/mysql/bin
./mysqld --initialize --user=mysql --basedir=/usr/local/mysql --`datadir=/usr/local/mysql/data`
7.编辑/etc/my.cnf 如下
[mysql]
port=3306
socket=/var/lib/mysql/mysql.sock
[client]
port=3306
socket=/var/lib/mysql/mysql.sock
[mysqld]
port=3306
socket=/var/lib/mysql/mysql.sock
[mysqld_safe]
log-error=/var/log/mariadb/mariadb.log
pid-file=/var/run/mariadb/mariadb.pid
esc退出编辑
:wq保存退出
8.配置mysql服务
cp -a ./support-files/mysql.server /etc/init.d/mysqld
chmod +x /etc/rc.d/init.d/mysqld
chkconfig --add mysqld
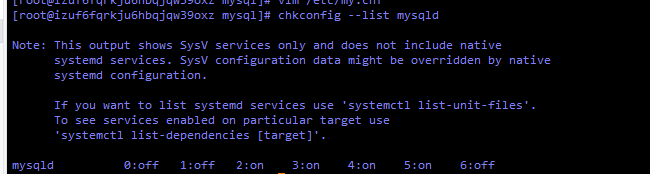
检查是否生效
chkconfig –list mysqld
9.配置环境变量 /etc/profile
添加两行
export MYSQL_HOME=/usr/local/mysql
PATH=/usr/local/mysql/bin:/usr/local/mysql/lib:$PATH
配置立即生效
[root@izuf6fqrkju6hbqjqw39oxz mysql]# source /etc/profile
10.启动mysql
[root@izuf6fqrkju6hbqjqw39oxz mysql]# service mysql start
Redirecting to /bin/systemctl start  mysql.service
要使用systemctl来启动
[root@izuf6fqrkju6hbqjqw39oxz mysql]# systemctl start mysqld.service
查看mysql启动状态
`[root@izuf6fqrkju6hbqjqw39oxz mysql]# systemctl status mysqld.service
● mysqld.service - LSB: start and stop MySQL
   Loaded: loaded (/etc/rc.d/init.d/mysqld; bad; vendor preset: disabled)
   Active: active (running) since Sat 2020-02-15 20:39:09 CST; 3h 56min ago
     Docs: man:systemd-sysv-generator(8)
  Process: 24379 ExecStop=/etc/rc.d/init.d/mysqld stop (code=exited, status=0/SUCCESS)
  Process: 24396 ExecStart=/etc/rc.d/init.d/mysqld start (code=exited, status=0/SUCCESS)
   CGroup: /system.slice/mysqld.service
           ├─24407 /bin/sh /usr/local/mysql/bin/mysqld_safe --datadir=/usr/local/mysql/data --pid-file=/usr/local/mysql...
           └─24548 /usr/local/mysql/bin/mysqld --basedir=/usr/local/mysql --datadir=/usr/local/mysql/data --plugin-dir=...

Feb 15 20:39:07 izuf6fqrkju6hbqjqw39oxz systemd[1]: Starting LSB: start and stop MySQL...
Feb 15 20:39:09 izuf6fqrkju6hbqjqw39oxz mysqld[24396]: Starting MySQL..[  OK  ]
Feb 15 20:39:09 izuf6fqrkju6hbqjqw39oxz systemd[1]: Started LSB: start and stop MySQL.
停止服务
[root@izuf6fqrkju6hbqjqw39oxz mysql]# systemctl stop mysqld.service
11.登录mysql
使用刚才初始化数据库的密码登录
或者在/etc/my.cnf 里添加skip-grant-table,先跳过验证,改密码后再删除
[root@izuf6fqrkju6hbqjqw39oxz mysql]# mysql -uroot -p
Enter password:
Welcome to the MySQL monitor.  Commands end with ; or \g.
Your MySQL connection id is 8
Server version: 8.0.13 MySQL Community Server - GPL

Copyright (c) 2000, 2018, Oracle and/or its affiliates. All rights reserved.

Oracle is a registered trademark of Oracle Corporation and/or its
affiliates. Other names may be trademarks of their respective
owners.

Type 'help;' or '\h' for help. Type '\c' to clear the current input statement.

mysql>
11.修改密码
use mysql;
ALTER USER ‘root’@'%' IDENTIFIED WITH mysql_native_password BY '密码';

执行报错执行
ALTER USER root@localhost IDENTIFIED  BY '123456';
至此结束部署结束
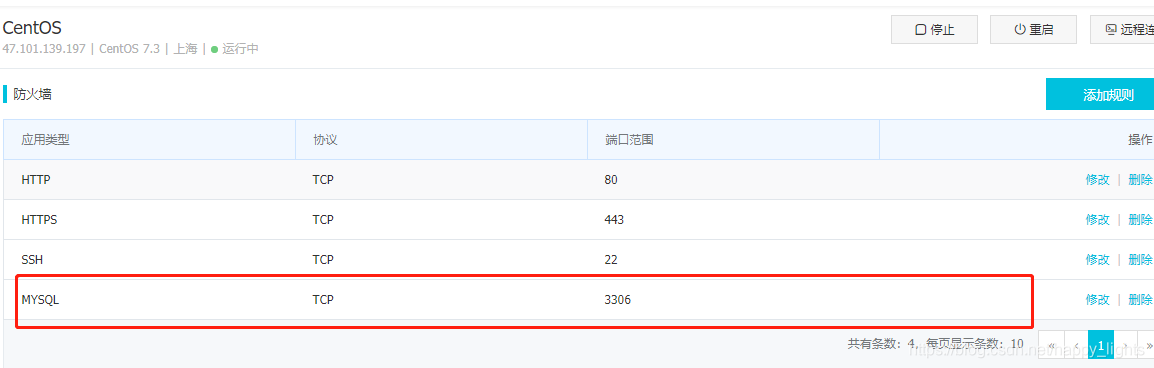
二.授权远程连接,使用navicat连接
阿里云mysql8.0远程连接
在阿里云客户端添加tcp
我这里是授权远程连接的,在myql5.7版本以前可使用
grant all privileges on *.* to 'root'@'%' identified by `123` with grant option;
而mysql8.0不能授权给自己
这里我们创建一个用户
mysql> create user 'myuser'@'%' identified by 'myuser';
Query OK, 0 rows affected (0.05 sec)
mysql> grant all privileges on *.* to 'myuser'@'%';
Query OK, 0 rows affected (0.11 sec)
mysql> flush privileges;
Query OK, 0 rows affected (0.01 sec)
mysql> alter user 'myuser'@'%' identified with mysql_native_password by '123456';
Query OK, 0 rows affected (0.04 sec)
mysql> flush privileges;
Query OK, 0 rows affected (0.00 sec)
mysql8.0以前加密规则是mysql_native_password,mysql8.0的加密规则是caching_sha2_password,这里我们需要把加密规则换成mysql_native_password,还有另外的一种方法是升级navicat的驱动
alter user ‘myuser’@’%’ identified with mysql_native_password by ‘123456’;
使用navicat连接数据库报错如下
1251 client does not support authentication protocol requested by server;consider upgrading Mysql client
先登录 mysql
mysql -u root -p

mysql> use mysql;
mysql> select user,host from user;
+------------------+-----------+
| user             | host      |
+------------------+-----------+
| myuser           | %         |
| mysql.infoschema | localhost |
| mysql.session    | localhost |
| mysql.sys        | localhost |
| root             | localhost |
+------------------+-----------+
然后根据对应的用户执行
mysql> ALTER USER 'root'@'localhost' IDENTIFIED WITH mysql_native_password BY '123456';
Query OK, 0 rows affected (0.10 sec)

mysql> flush privileges;
Query OK, 0 rows affected (0.01 sec)
以上是我的分享,用来记录一下以前走过的坑