最近在学习如何基于
OpenPCDet框架进行PointPillars网络训练
,由于对框架以及完整训练过程都不了解,因此打算记录下自己的学习过程,感谢学习过程中狸花猫sensei的大力支持,目标是实现自定义数据集(因为笔者
只有激光雷达的数据,仿照kitti格式进行标注
)的训练,然后再实现评估\然后再通过TensorRT加速\然后再加入ROS结点……哈哈哈不做梦了(其实主要是立个flag,〒▽〒)。
文章目录
前言
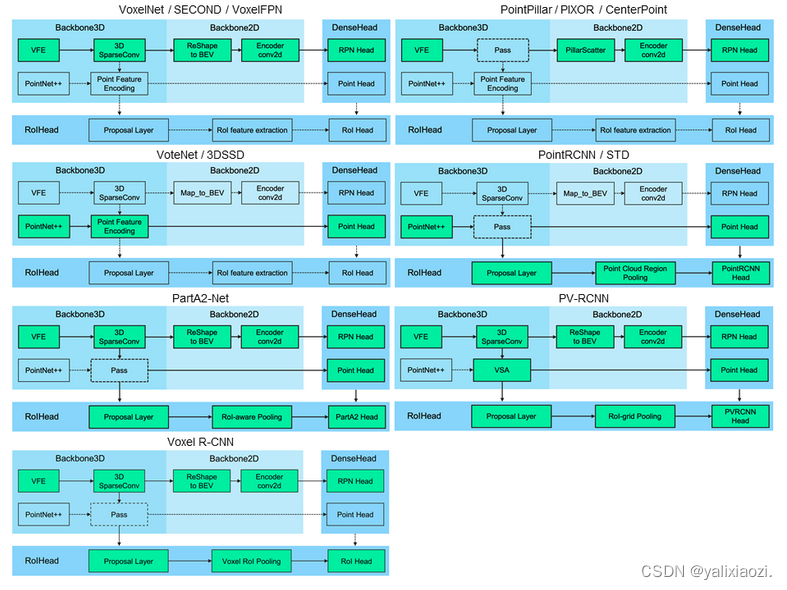
OpenPCDet是一个基于PyTorch实现的3D目标检测框架,以其模块化网络结构、复用性强、组合灵活等特点闻名,目前该框架已经支持目前已有的绝大多数面向Lidar点云的3D目标检测算法,比如voxel-based,point-based,point-voxel hybrid以及one-stage/two-stage等,下图为支持模型示例图。
总而言之,说人话就是,通过这个框架定义好的各类模块,我们可以像搭积木一样,把一个神经网络的预处理、backbone、检测头、后处理等各部分按自己的需求搭好,然后写好对应的config文件后就能用了,而且对于像我这样的神经网络小白很友好,省去了没有框架支持情况下从头编写网络代码的烦琐细节(其实主要是不懂/(ㄒoㄒ)/)。
好了,废话不多说,下面是官网的链接,gitclone下来就可以开始后续工作了。
OpenPCdet的官网链接:
GitHub – open-mmlab/OpenPCDet: OpenPCDet Toolbox for LiDAR-based 3D Object Detection.
一、数据集准备
笔者使用的数据集是仿照KITTI数据集的标注顺序进行标注的,这里的仿照是指笔者的标注文件每一列数据的含义是基本和KITTI标注文件的每一列数据含义一样。如果要加载自定义数据进行训练,首先需要搞懂自己的数据集标注文件和KITTI数据集标注文件有什么区别、以及和OpenPCDet的标注文件有什么区别。(这里笔者就默认大家已经对KITTI数据集有一定了解了,就不在此过多赘述;如果不太了解的话,网上一搜就能搜到很多解析)
KITTI数据集官网链接:
The KITTI Vision Benchmark Suite (cvlibs.net)
首先来看下KITTI数据集中的一个标注文件:
Truck 0.00 0 -1.57 599.41 156.40 629.75 189.25 2.85 2.63 12.34 0.47 1.49 69.44 -1.56
Car 0.00 0 1.85 387.63 181.54 423.81 203.12 1.67 1.87 3.69 -16.53 2.39 58.49 1.57
Cyclist 0.00 3 -1.65 676.60 163.95 688.98 193.93 1.86 0.60 2.02 4.59 1.32 45.84 -1.55
DontCare -1 -1 -10 503.89 169.71 590.61 190.13 -1 -1 -1 -1000 -1000 -1000 -10
DontCare -1 -1 -10 511.35 174.96 527.81 187.45 -1 -1 -1 -1000 -1000 -1000 -10
DontCare -1 -1 -10 532.37 176.35 542.68 185.27 -1 -1 -1 -1000 -1000 -1000 -10
DontCare -1 -1 -10 559.62 175.83 575.40 183.15 -1 -1 -1 -1000 -1000 -1000 -10
大家数一数就可以知道,上面每一行都只有15列数据,每一列都有不同的定义。但其实,一个完整的KITTI标注文件有16列数据,其中最后一列为score,也即针对测试场景下目标的置信度得分,但是我们用于训练的数据集,没有对这一列进行专门标注,据大佬的解释是说可以认为在训练时,score全部等于1。下图是每一列数据的基本含义:

需要注意的是,
在KITTI数据集的标注文件中,数据都是位于下图车辆左侧的二号彩色相机的相机坐标系下进行标注的
。
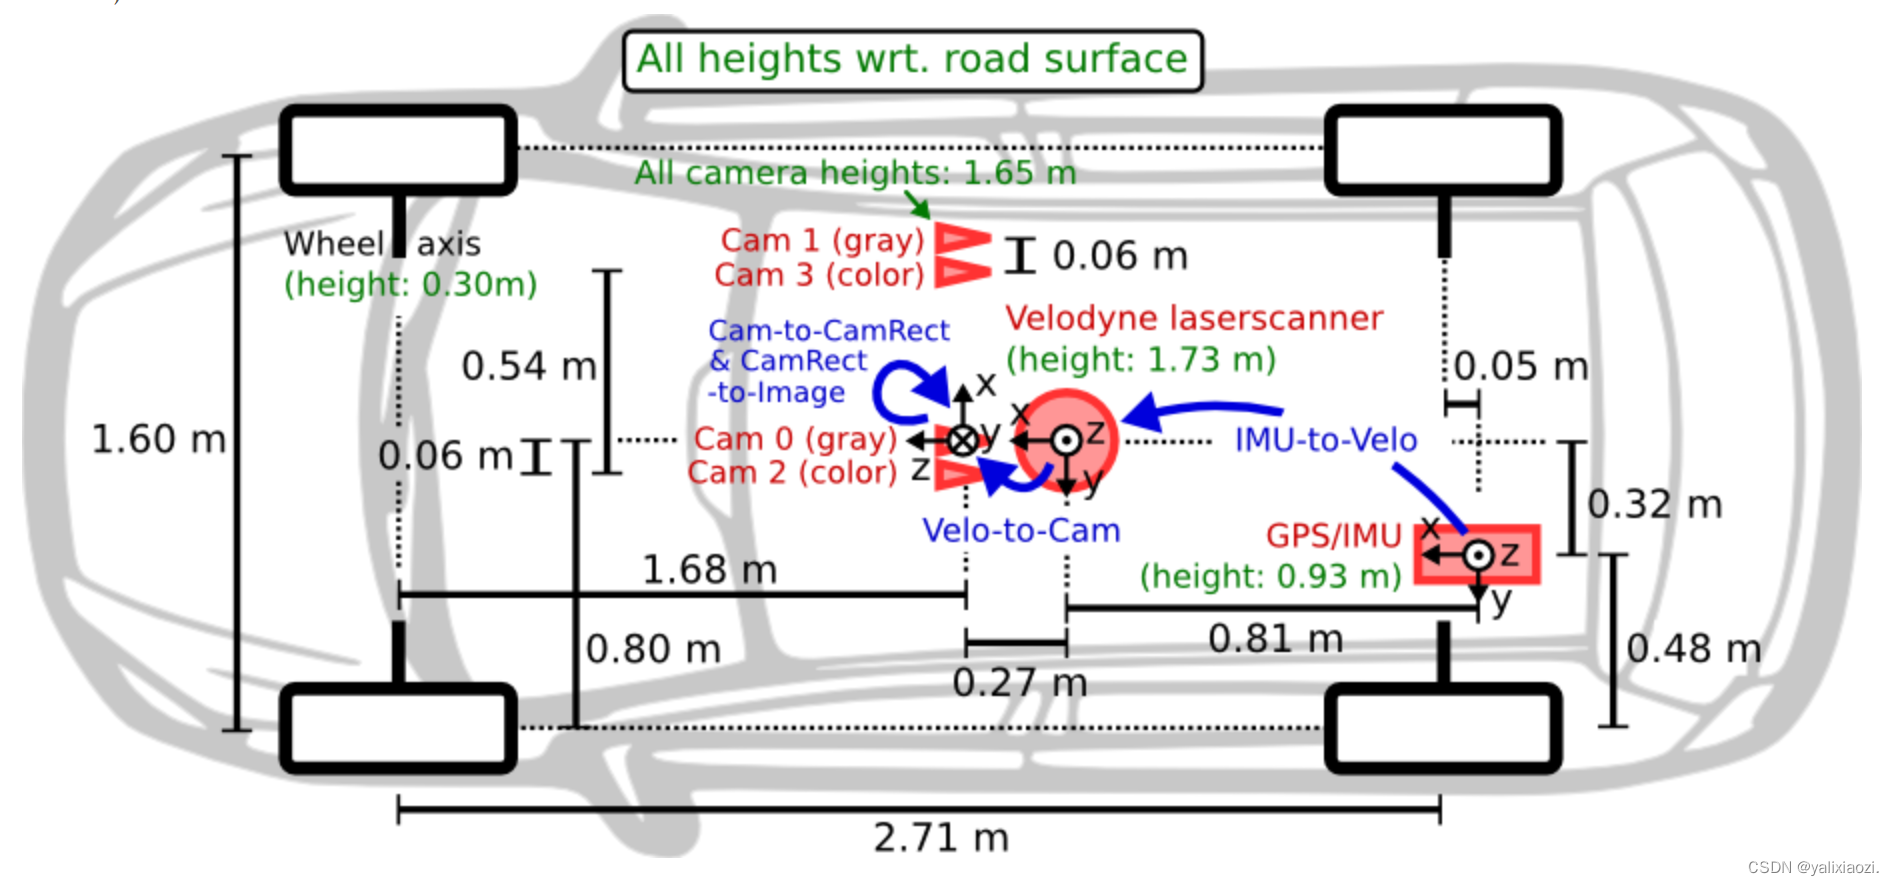
相机坐标系下,x方向为汽车前进方向的右侧垂直方向、y方向为竖直高度方向(向下为正方向)、z方向为汽车前进方向,满足右手定则。
激光雷达坐标系下,x方向为汽车前进方向、y方向为汽车前进方向的左侧垂直方向、z方向为竖直高度方向(向上为正方向),同样满足右手定则。
两坐标系的直观体现如下图所示,红色为相机坐标系、蓝色为激光雷达坐标系:

好的,看完KITTI的坐标系和标注文件含义后,再来看看我们要用的OpenPCDet框架里的定义也很有必要。框架作者说的话我真的狠狠赞同。可以看作者的这篇知乎:
OpenPCDet: Open-MMLab 面向LiDAR点云表征的3D目标检测代码库 – 知乎 (zhihu.com)
统一的3D目标检测坐标定义:LIDAR和Camera坐标系定义与KITTI相同,只是转角定义不同,KITTI的转角定义在相机坐标系下,PCDet的在雷达坐标系下。
不同的点云数据集在坐标系以及3D框的定义上往往不一样(KITTI数据集中的camera和LiDAR两个坐标系的混用也常使新手迷茫),因此在 PCDet 中我们采用了固定的统一点云坐标系(如图1右下角所示),以及更规范的3D检测框定义,贯穿整个数据增强、处理、模型计算以及检测后处理过程。
基于 PCDet 所采用的标准化3D框定义,我们再也不用纠结到底是物体3D中心还是物体底部中心;再也不用纠结物体三维尺寸到底是l-w-h排列还是w-l-h排列;再也不用纠结heading 0度角到底是哪,到底顺时针增加还是逆时针增加。
综上所述,现在我们已经了解了数据集的各列信息的含义了,也知道了我由于没有相机数据,所以不用关心转角定义、也不需要关心雷达和相机之间的坐标转换。我自己的数据集标注都是基于雷达坐标系下的,只是每一列含义的顺序和KITTI一样。
在官网上clone下来的代码中,其数据文件的结构如下,我所采用的点云为.bin格式,然后将自己的数据集按如下组织划分好即可。
custom
├── ImageSets
│   ├── test.txt
│   ├── train.txt
├── testing
│   ├── velodyne
├── training
│   ├── label_2
│   ├── velodyne
二、训练流程各部分解析
1.主要修改处
按照框架作者的说法是:
PCDet的数据-模型分离框架设计与规范化的坐标表示使得其很容易扩展到新的数据集上。具体来说,研究者只需要在自己的dataloader里面做以下两件事:
(1) 在
self.
_
getitem
_
()
中加载自己的数据,并将点云与3D标注框均转至前述统一坐标定义下,送入数据基类提供的
self.prepare_data()
;
(2) 在
self.generate_prediction_dicts()
中接收模型预测的在统一坐标系下表示的3D检测框,并转回自己所需格式即可。
但是根据笔者的亲身经历,由于只有激光雷达的数据,没有图像、没有calib数据,所以让我的自定义数据集适配起来的细节远不止上述简单的两件事。下面是主要需要修改的文件:
-
OpenPCDet/pcdet/datasets/custom/custom_dataset.py
-
OpenPCDet/tools/cfgs/dataset_configs/custom_dataset.yaml
-
OpenPCDet/tools/cfgs/custom_models/pointpillar.yaml
当然,除了上述三个文件的修改外,还有一些涉及到别的文件的细节,会在下文涉及时给出。
下面开始对相应的代码进行修改。
2.修改相应代码
官方代码clone下来后,对于我这样的小白来说,有点友好但又不是完全友好,因为框架采用的是工厂设计模式,很多变量、函数为了复用性高的缘故?都是套来套去,一时之间难以摸清其数据流向,因此笔者从main函数开始,顺着执行的流程往前,遇到功能嵌套的就先往里钻一下,看看其具体作用后再返回主线,也即有点类似BFS的方式来看代码。
在阅读的时候也可以在自己的vscode上打开一份代码,方便修改。
-
首先来看
OpenPCDet/pcdet/datasets/custom/custom_dataset.py
下图是该文件的一个总览图,可以看到,其函数不少,而前代码行数也挺多;

那我们现在来瞅瞅main函数在干嘛:
if __name__ == '__main__':
    import sys
    if sys.argv.__len__() > 1 and sys.argv[1] == 'create_custom_infos':
        import yaml
        from pathlib import Path
        from easydict import EasyDict
        dataset_cfg = EasyDict(yaml.safe_load(open(sys.argv[2])))
        ROOT_DIR = (Path(__file__).resolve().parent / '../../../').resolve()
        print(ROOT_DIR)

        # create_kitti_infos(
        #     dataset_cfg=dataset_cfg,
        #     class_names=['Car', 'Pedestrian', 'Cyclist'],
        #     data_path=ROOT_DIR / 'data' / 'kitti',
        #     save_path=ROOT_DIR / 'data' / 'kitti'
        # )
        create_custom_infos(
            dataset_cfg=dataset_cfg,
            class_names=['Car'],
            data_path=ROOT_DIR / 'data' / 'custom',
            save_path=ROOT_DIR / 'data' / 'custom'
        )
其实就是简单的利用sys.argv[]获取传入的参数,然后确定一下路径,最重要的是调用了create_custom_infos这个方法。
# 用于创建自定义数据集的信息
def create_custom_infos(dataset_cfg, class_names, data_path, save_path, workers=4):
dataset = CustomDataset(dataset_cfg=dataset_cfg, class_names=class_names, root_path=data_path, training=False)
train_split, val_split = 'train', 'val'
# 定义文件的路径和名称
train_filename = save_path / ('custom_infos_%s.pkl' % train_split)
val_filename = save_path / ('custom_infos_%s.pkl' % val_split)
trainval_filename = save_path / 'custom_infos_trainval.pkl'
test_filename = save_path / 'custom_infos_test.pkl'
print('---------------Start to generate data infos---------------')
dataset.set_split(train_split)
# 执行完上一步,得到train相关的保存文件,以及sample_id_list的值为train.txt文件下的数字
# 下面是得到train.txt中序列相关的所有点云数据的信息,并且进行保存
custom_infos_train = dataset.get_infos(num_workers=workers, has_label=True, count_inside_pts=True)
with open(train_filename, 'wb') as f:
pickle.dump(custom_infos_train, f)
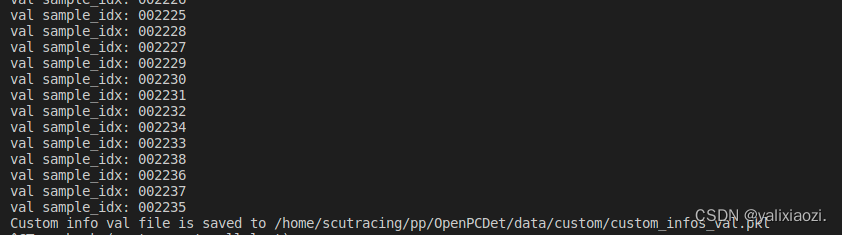
print('Custom info train file is saved to %s' % train_filename)
dataset.set_split(val_split)
# 对验证集的数据进行信息统计并保存
custom_infos_val = dataset.get_infos(num_workers=workers, has_label=True, count_inside_pts=True)
with open(val_filename, 'wb') as f:
pickle.dump(custom_infos_val, f)
print('Custom info val file is saved to %s' % val_filename)
with open(trainval_filename, 'wb') as f:
pickle.dump(custom_infos_train + custom_infos_val, f)
print('Custom info trainval file is saved to %s' % trainval_filename)
dataset.set_split('test')
# kitti_infos_test = dataset.get_infos(num_workers=workers, has_label=False, count_inside_pts=False)
custom_infos_test = dataset.get_infos(num_workers=workers, has_label=False, count_inside_pts=False)
with open(test_filename, 'wb') as f:
pickle.dump(custom_infos_test, f)
print('Custom info test file is saved to %s' % test_filename)
print('---------------Start create groundtruth database for data augmentation---------------')
# 用trainfile产生groundtruth_database
# 只保存训练数据中的gt_box及其包围点的信息,用于数据增强
dataset.set_split(train_split)
dataset.create_groundtruth_database(info_path=train_filename, split=train_split)
print('---------------Data preparation Done---------------')
看到create_custom_infos这个方法如上,最直观的感受就是它生成了很多个pkl文件,pkl文件是python中的一种存储方式,可以将项目过程中用到的一些变量、或者需要提取、暂存的数据类型如字符串、列表、字典等保存起来,方便用的时候读取。至于怎么个方便法,大致可以理解为存入pkl的数据,在被load的时候,不需要重新计算得到这些数据,可以节省计算机资源,如果不存入pkl,那每次load的时候就需要计算一次。感兴趣的话可自行搜索。
那么问题来了,要存入pkl的数据是哪里来的呢?可以看到方法中第一句就实例化了CustomDataset类的一个对象dataset,原来是在该文件中定义的一个类,这个类就包含了总览图中除create_custom_infos和main函数外的全部方法,如下:

可以看到,该类继承自DatasetTemplete,即数据集模板,我们点开这个模板一看(在dataset.py文件中),发现这个类又继承自我们熟悉的torch_data.Dataset,如果对pytorch有所了解的话,就会发现,这个DatasetTemplete其实很妙,因为pcdet整个框架是基于pytorch实现的,所以框架的很多操作就是pytorch原生的操作,比如说pytorch里本来就有__getitem__\__len__\这些方法,然后按照工厂模式进行设计,给我们复用。

通过上述了解,我们现在大致知道,这其实就是个数据集的模板,然后里面有很多方法,我们只需要按照自己的需求对其进行重写即可。
下面回到CustomDataset中,再次看到我们之前的总览图,对这个类里的方法的作用有个大致了解,然后再开始细看每个方法的实现。
代码的相关注释我这里写的比较简略,网上有很多博主写的比我的好很多,可以多去参考一下他们对原代码的注释,也方便理解。
好的,现在已经完成了CustomDataset类的实例化,会自动执行__init__这个魔法方法。
def __init__(self, dataset_cfg, class_names, training=True, root_path=None, logger=None,ext="bin"):
        """
        Args:
            root_path:
            dataset_cfg:
            class_names:
            training:
            logger:
            ext:
        """
        # ext为文件扩展名的类型,如“.txt”
        # 初始化类,将参数赋值给类的属性
        super().__init__(
            dataset_cfg=dataset_cfg, class_names=class_names, training=training, root_path=root_path, logger=logger
        )
        self.split = self.dataset_cfg.DATA_SPLIT[self.mode]
        self.root_split_path = self.root_path / ('training' if self.split != 'test' else 'testing')

        # split_dir = self.root_path / 'ImageSets' / (self.split + '.txt')
        # self.sample_id_list = [x.strip() for x in open(split_dir).readlines()] if split_dir.exists() else None

        split_dir = os.path.join(self.root_path,'ImageSets',(self.split + '.txt'))
        self.sample_id_list = [x.strip() for x in open(split_dir).readlines()] if os.path.exists(split_dir) else None

        self.custom_infos = []
        self.include_custom_data(self.mode)
        self.ext = ext
顺着往下看,继承了父类的init,然后根据路径找到ImageSets里的txt文件,进行读取……这些都比较容易懂,然后到了include_custom_data方法:
    def include_custom_data(self, mode):
        if self.logger is not None:
            self.logger.info('Loading Custom dataset')
        custom_infos = []
        # self.custom_infos = []

        for info_path in self.dataset_cfg.INFO_PATH[mode]:
            info_path = self.root_path / info_path
            if not info_path.exists():
                continue
            with open(info_path, 'rb') as f:
                infos = pickle.load(f)
                custom_infos.extend(infos)

        self.custom_infos.extend(custom_infos)

        if self.logger is not None:
            self.logger.info('Total samples for CUSTOM dataset: %d' % (len(custom_infos)))
发现这方法的主要作用就是从指定的路径中读取pkl文件,然后从中获取信息。这里根据大佬的说法是当该路径下没有对应的pkl文件时, self.custom_infos.extend(custom_infos)添加空的custom_infos;当在后续经过create_custom_infos及其get_infos后,生成了对应的pkl文件,那么这里读取数据就能读到了。
接下来回到create_custom_infos中,经过类实例化后,我们得到了dataset这个对象,接下来是dataset调用了set_split方法。
   # 用于数据集划分
    def set_split(self, split):
        super().__init__(
            dataset_cfg=self.dataset_cfg, class_names=self.class_names, training=self.training, root_path=self.root_path, logger=self.logger
        )
        self.split = split
        # 路径
        self.root_split_path = self.root_path / ('training' if self.split != 'test' else 'testing')

        # 从Imageset文件夹里的txt文件,划分数据集
        split_dir = self.root_path / 'ImageSets' / (self.split + '.txt')
        print('--------------------------------split_dir---------------------------------------')
        print(split_dir)
        self.sample_id_list = [x.strip() for x in open(split_dir).readlines()] if split_dir.exists() else None
不难看出,其实就是根据是training还是testing来设置路径,然后根据ImageSet文件夹里的txt文件,来划分数据集。
得到如何划分数据集及其路径后,就进行下一步,也是非常重要的一步,dataset.get_infos(),也就是如何获取这个路径里的文件的信息。
def get_infos(self, num_workers=4, has_label=True, count_inside_pts=True, sample_id_list=None):
        import concurrent.futures as futures
        # 线程函数,主要是为了多线程读取数据,加快处理速度

        # 处理一帧
        def process_single_scene(sample_idx):
            print('%s sample_idx: %s' % (self.split, sample_idx))
            # 创建一个用于存储一帧信息的空字典
            info = {}
            # 定义该帧点云信息,pointcloud_info
            pc_info = {'num_features': 4, 'lidar_idx': sample_idx}
            # 将pc_info这个字典作为info字典里的一个键值对的值,其键名为‘point_cloud’添加到info里去
            info['point_cloud'] = pc_info
            '''
            # image信息和calib信息都暂时不需要

            # image_info = {'image_idx': sample_idx, 'image_shape': self.get_image_shape(sample_idx)}
            # info['image'] = image_info
            # calib = self.get_calib(sample_idx)

            # P2 = np.concatenate([calib.P2, np.array([[0., 0., 0., 1.]])], axis=0)
            # R0_4x4 = np.zeros([4, 4], dtype=calib.R0.dtype)
            # R0_4x4[3, 3] = 1.
            # R0_4x4[:3, :3] = calib.R0
            # V2C_4x4 = np.concatenate([calib.V2C, np.array([[0., 0., 0., 1.]])], axis=0)
            # calib_info = {'P2': P2, 'R0_rect': R0_4x4, 'Tr_velo_to_cam': V2C_4x4}

            # info['calib'] = calib_info
            '''
            if has_label:
                # 通过get_label函数,读取出该帧的标签标注信息
                obj_list = self.get_label(sample_idx)
                # 创建用于存储该帧标注信息的空字典
                annotations = {}
                # 下方根据标注文件里的属性将对应的信息加入到annotations的键值对,可以根据自己的需求取舍
                annotations['name'] = np.array([obj.cls_type for obj in obj_list])
                # annotations['truncated'] = np.array([obj.truncation for obj in obj_list])
                # annotations['occluded'] = np.array([obj.occlusion for obj in obj_list])
                # annotations['alpha'] = np.array([obj.alpha for obj in obj_list])
                # annotations['bbox'] = np.concatenate([obj.box2d.reshape(1, 4) for obj in obj_list], axis=0)
                annotations['dimensions'] = np.array([[obj.l, obj.h, obj.w] for obj in obj_list])  # lhw(camera) format
                annotations['location'] = np.concatenate([obj.loc.reshape(1, 3) for obj in obj_list], axis=0)
                annotations['rotation_y'] = np.array([obj.ry for obj in obj_list])
                annotations['score'] = np.array([obj.score for obj in obj_list])
                # annotations['difficulty'] = np.array([obj.level for obj in obj_list], np.int32)

                # 统计有效物体的个数,即去掉类别名称为“Dontcare”以外的
                num_objects = len([obj.cls_type for obj in obj_list if obj.cls_type != 'DontCare'])
                # 统计物体的总个数,包括了Dontcare
                num_gt = len(annotations['name'])
                # 获得当前的index信息
                index = list(range(num_objects)) + [-1] * (num_gt - num_objects)
                annotations['index'] = np.array(index, dtype=np.int32)

                # 从annotations里提取出从标注信息里获取的location、dims、rots等信息,赋值给对应的变量
                loc = annotations['location'][:num_objects]
                dims = annotations['dimensions'][:num_objects]
                rots = annotations['rotation_y'][:num_objects]
                # 由于我们的数据集本来就是基于雷达坐标系标注,所以无需坐标转换
                #loc_lidar = calib.rect_to_lidar(loc)
                loc_lidar = self.get_calib(loc)
                # 原来的dims排序是高宽长hwl,现在转到pcdet的统一坐标系下,按lhw排布
                l, h, w = dims[:, 0:1], dims[:, 1:2], dims[:, 2:3]

                # 由于我们基于雷达坐标系标注,所以获取的中心点本来就是空间中心,所以无需从底面中心转到空间中心
                # bottom center -> object center: no need for loc_lidar[:, 2] += h[:, 0] / 2
                # print("sample_idx: ", sample_idx, "loc: ", loc, "loc_lidar: " , sample_idx, loc_lidar)
                # get gt_boxes_lidar see https://zhuanlan.zhihu.com/p/152120636
                # loc_lidar[:, 2] += h[:, 0] / 2
                gt_boxes_lidar = np.concatenate([loc_lidar, l, w, h, -(np.pi / 2 + rots[..., np.newaxis])], axis=1)
                # 将雷达坐标系下的真值框信息存入annotations中
                annotations['gt_boxes_lidar'] = gt_boxes_lidar
                # 将annotations这整个字典作为info字典里的一个键值对的值
                info['annos'] = annotations

            return info
            # 后续的由于没有calib信息和image信息,所以可以直接注释
            '''
            #     if count_inside_pts:
            #         points = self.get_lidar(sample_idx)
            #         calib = self.get_calib(sample_idx)
            #         pts_rect = calib.lidar_to_rect(points[:, 0:3])

            #         fov_flag = self.get_fov_flag(pts_rect, info['image']['image_shape'], calib)
            #         pts_fov = points[fov_flag]
            #         corners_lidar = box_utils.boxes_to_corners_3d(gt_boxes_lidar)
            #         num_points_in_gt = -np.ones(num_gt, dtype=np.int32)

            #         for k in range(num_objects):
            #             flag = box_utils.in_hull(pts_fov[:, 0:3], corners_lidar[k])
            #             num_points_in_gt[k] = flag.sum()
            #         annotations['num_points_in_gt'] = num_points_in_gt

            # return info
            '''
        sample_id_list = sample_id_list if sample_id_list is not None else self.sample_id_list
        with futures.ThreadPoolExecutor(num_workers) as executor:
            infos = executor.map(process_single_scene, sample_id_list)
        return list(infos)
        # 此时返回值infos是列表,列表元素为字典类型
此方法的思路比较清晰,先把一帧里的信息根据自己的需要收集起来,最后汇总起来得到总的infos信息。(
由于我们只有激光雷达的数据,且在激光雷达坐标系下进行标注,所以涉及到相机的部分(如
get_image\get_image_shape\get_depth_map\get_road_plane\get_fov_flag等方法
)我们都可以注释掉,因为也用不上
)
在process_single_scene方法中,要读取与点云文件对应的标签标注信息,这就涉及到具体如何读取了,看到get_label方法如下:
    # 用于获取标签
    def get_label(self, idx):
        # 从指定路径中提取txt内容
        label_file = self.root_split_path / 'label_2' / ('%s.txt' % idx)
        assert label_file.exists()
        # 主要就是从这个函数里获取具体的信息
        return object3d_custom.get_objects_from_label(label_file)
返回值是object3d_custom.py文件中的get_objects_from_label方法,那么我们跟着进去看:
def get_objects_from_label(label_file):
    with open(label_file, 'r') as f:
        lines = f.readlines()
    objects = [Object3d(line) for line in lines]
    return objects
发现它返回的是objects,是一个Object3d类型的值,那么继续看到这个Object3d,是在该文件下定义的一个类,这里揭示了如何从label.txt文件中读取每列数据:
class Object3d(object):
    def __init__(self, line):
        label = line.strip().split(' ')
        self.src = line
        self.cls_type = label[0]
        self.cls_id = cls_type_to_id(self.cls_type)
        self.truncation = float(label[1])
        self.occlusion = float(label[2])  # 0:fully visible 1:partly occluded 2:largely occluded 3:unknown
        self.alpha = float(label[3])
        self.box2d = np.array((float(label[4]), float(label[5]), float(label[6]), float(label[7])), dtype=np.float32)
        self.h = float(label[8])
        self.w = float(label[9])
        self.l = float(label[10])
        self.loc = np.array((float(label[11]), float(label[12]), float(label[13])), dtype=np.float32)
        self.dis_to_cam = np.linalg.norm(self.loc)
        self.ry = float(label[14])
        self.score = float(label[15]) if label.__len__() == 16 else -1.0
        self.level_str = None
        self.level = self.get_custom_obj_level()
笔者这里是根据自己的标注情况进行读取的,可能参考性不强,大家按照自己的需求来读取即可。
读取完后,返回process_single_scene中,其中
比较重要的是涉及到坐标转换的部分
,我在标注时通过激光雷达获取的物体空间中心3维坐标是基于激光雷达坐标系下的,所以在
get_calib
方法下可以直接赋值如下:
    # 用于获取标定信息
    def get_calib(self, loc):
        # calib_file = self.root_split_path / 'calib' / ('%s.txt' % idx)
        # assert calib_file.exists()
        # return calibration_kitti.Calibration(calib_file)

        # loc_lidar = np.concatenate([np.array((float(loc_obj[2]),float(-loc_obj[0]),float(loc_obj[1]-2.3)),dtype=np.float32).reshape(1,3) for loc_obj in loc])
        # return loc_lidar
        # 这里做了一个由相机坐标系到雷达坐标系翻转(都遵从右手坐标系),但是 -2.3这个数值具体如何得来需要再看下

        # 我们的label中的xyz就是在雷达坐标系下,不用转变,直接赋值
        loc_lidar = np.concatenate([np.array((float(loc_obj[0]),float(loc_obj[1]),float(loc_obj[2])),dtype=np.float32).reshape(1,3) for loc_obj in loc])
        return loc_lidar
随着后面的一些对数据的操作,get_infos方法完成了,回到create_custom_infos方法中去,发现我们是根据是train还是val来划分数据集,有如下操作:
train_split, val_split = 'train', 'val'
   # 定义文件的路径和名称
    train_filename = save_path / ('custom_infos_%s.pkl' % train_split)
    val_filename = save_path / ('custom_infos_%s.pkl' % val_split)
dataset.set_split(train_split)
    # 执行完上一步,得到train相关的保存文件,以及sample_id_list的值为train.txt文件下的数字
    # 下面是得到train.txt中序列相关的所有点云数据的信息,并且进行保存
    custom_infos_train = dataset.get_infos(num_workers=workers, has_label=True, count_inside_pts=True)
    with open(train_filename, 'wb') as f:
        pickle.dump(custom_infos_train, f)
    print('Custom info train file is saved to %s' % train_filename)

    dataset.set_split(val_split)
    # 对验证集的数据进行信息统计并保存
    custom_infos_val = dataset.get_infos(num_workers=workers, has_label=True, count_inside_pts=True)
    with open(val_filename, 'wb') as f:
        pickle.dump(custom_infos_val, f)
    print('Custom info val file is saved to %s' % val_filename)
不难发现,其实就是根据所谓的”mode”是train还是val,生成对应的infos,并把这些数据都存入pkl中,放在指定的文件目录下,其它如此类推。
再接着往下看,到了dataset.create_groundtruth_database方法的调用,该方法的主要作用是生成gtbox的同时还建立一个存储gtbox的数据库。当时看的时候也很迷惑,为什么要生成这样一个gt数据库呢?后来了解到,原来这是借鉴了SECOND论文(PointPillars论文的前身)中的数据增强方法gt-paste,为的是在检测目标较少的时候,将提前建立好的数据库中的gtbox及那一部分点云粘贴到训练集中进行数据增强,适用于数据样本较少的情况,这个的话大家可以根据自身情况取舍。(具体可见pointpillar.yaml中的sample_groups部分)
   def create_groundtruth_database(self, info_path=None, used_classes=None, split='train'):
        import torch

        database_save_path = Path(self.root_path) / ('gt_database' if split == 'train' else ('gt_database_%s' % split))
        db_info_save_path = Path(self.root_path) / ('custom_dbinfos_%s.pkl' % split)

        database_save_path.mkdir(parents=True, exist_ok=True)
        all_db_infos = {}

        with open(info_path, 'rb') as f:
            infos = pickle.load(f)

        for k in range(len(infos)):
            print('gt_database sample: %d/%d' % (k + 1, len(infos)))
            info = infos[k]
            sample_idx = info['point_cloud']['lidar_idx']
            points = self.get_lidar(sample_idx,False)
            annos = info['annos']
            names = annos['name']
            # difficulty = annos['difficulty']
            # bbox = annos['bbox']
            gt_boxes = annos['gt_boxes_lidar']

            num_obj = gt_boxes.shape[0]
            point_indices = roiaware_pool3d_utils.points_in_boxes_cpu(
                torch.from_numpy(points[:, 0:3]), torch.from_numpy(gt_boxes)
            ).numpy()  # (nboxes, npoints)

            for i in range(num_obj):
                filename = '%s_%s_%d.bin' % (sample_idx, names[i], i)
                filepath = database_save_path / filename
                gt_points = points[point_indices[i] > 0]

                gt_points[:, :3] -= gt_boxes[i, :3]
                with open(filepath, 'w') as f:
                    gt_points.tofile(f)

                if (used_classes is None) or names[i] in used_classes:
                    db_path = str(filepath.relative_to(self.root_path))  # gt_database/xxxxx.bin
                    # db_info = {'name': names[i], 'path': db_path, 'image_idx': sample_idx, 'gt_idx': i,
                    #            'box3d_lidar': gt_boxes[i], 'num_points_in_gt': gt_points.shape[0],
                    #            'difficulty': difficulty[i], 'bbox': bbox[i], 'score': annos['score'][i]}
                    db_info = {'name': names[i], 'path': db_path,  'gt_idx': i,
                               'box3d_lidar': gt_boxes[i], 'num_points_in_gt': gt_points.shape[0], 'score': annos['score'][i]}

                    if names[i] in all_db_infos:
                        all_db_infos[names[i]].append(db_info)
                    else:
                        all_db_infos[names[i]] = [db_info]
        for k, v in all_db_infos.items():
            print('Database %s: %d' % (k, len(v)))

        with open(db_info_save_path, 'wb') as f:
            pickle.dump(all_db_infos, f)
上述代码中需要注意的一点是,在当从annos、info里取值的时候,可按需取舍。然后get_lidar方法的话,也比较简单,就是指定点云数据的文件目录,像笔者这里就是按照最经典的kitti文件结构来放置数据的,然后从文件中返回reshape后的点,-4是代表点云特征为4,然后reshape(-1,4)代表返回n行4列的数据。
 # 用于获取雷达点云信息
    def get_lidar(self, idx,getitem):
        # 从指定路径获取点云数据
        if getitem == True:
            lidar_file = self.root_split_path + '/velodyne/' + ('%s.bin' % idx)
        else:
            lidar_file = self.root_split_path / 'velodyne' / ('%s.bin' % idx)
        assert lidar_file.exists()
        return np.fromfile(str(lidar_file), dtype=np.float32).reshape(-1, 4)
至此,我们已经完成了自定义数据集的读取工作,可以按照官网给的命令,在xx/OpenPCDet目录下执行(xx为自己的路径):
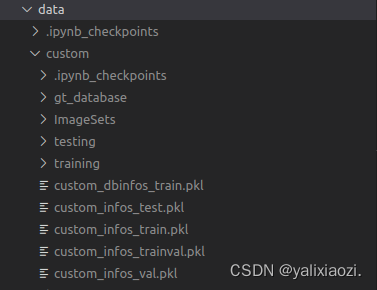
python -m pcdet.datasets.custom.custom_dataset create_custom_infos xx/OpenPCDet/tools/cfgs/dataset_configs/custom_dataset.yaml 进行生成pkl文件,执行后生成有如下:

小结
没想到真正写起来还是长篇大论。本篇就先把数据集准备和数据准备介绍了一下,笔者也是初学者,很多地方是自己的理解,不一定正确,希望各位批评指正,有什么想法都可以一起讨论。
接下来会继续完善这系列文章,最终希望能有一个清晰的数据流向图。