前言
在前文
layui+springboot实现表格增删改查
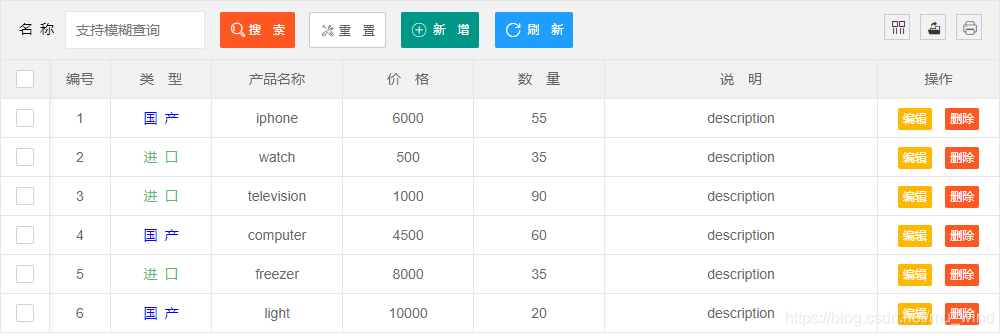
中,我们展示了如何使用layui将数据库数据渲染到前端表格中,但现在问题来了,如果不加特殊处理,前端表格直接显示数据库存储信息是不合适的,例如数据库有一个类型字段:0和1,0表示国产,1表示进口,前端显然不能直接显示0和1,而是应该根据后端返回的数字进行判断,展示相应的内容。
layui table
的自定义模板功能能非常方便地解决这个问题,首先看下效果图。
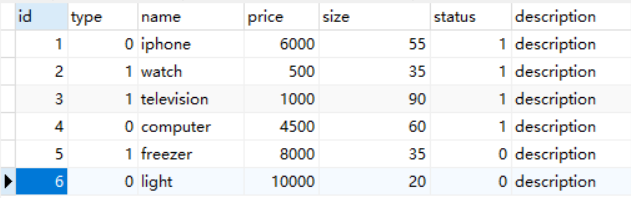
数据库数据:
前端展示:
甚至,更复杂一些,将select下拉选择框和switch开关集成到table表格里(具体的实现请见
https://blog.csdn.net/mu_wind/article/details/106598666
):

后端返回的完整数据:
{{
	"msg": "操作成功!",
	"code": "0",
	"data": [
		{
			"id": 1,
			"name": "iPhone",
			"type": "0",
			"price": 6000.0,
			"size": 55,
			"status": 0,
			"description": "说明"
		},
		{
			"id": 2,
			"name": "watch",
			"type": "1",
			"price": 500.0,
			"size": 35,
			"status": 1,
			"description": "说明"
		},
		{
			"id": 3,
			"name": "television",
			"type": "1",
			"price": 1000.0,
			"size": 90,
			"status": 1,
			"description": "说明"
		},
		{
			"id": 4,
			"name": "computer",
			"type": "1",
			"price": 4500.0,
			"size": 60,
			"status": 1,
			"description": "说明"
		}
	],
	"count": 4
}}
方式一:函数转义
所谓函数转义,就是在表格cols的对应列中直接写一段函数:
table.render({
elem: '#goods_table'
, id: 'goodsReload'
, url: '/test/getGoodsInfo'
, method: 'get'
, title: '用户表'
, toolbar: '#goods_headerBar' //开启工具栏,此处显示默认图标,可以自定义模板,详见文档
, cols:
[[{type: 'checkbox', fixed: true},
{
field: 'type',
title: '类 型',
width: 100,
align: 'center',
// data就是行数据:{"id": 1,"name": "iPhone","type": "1","price": 6000.0,"size": 55,"status": 0,"description": "说明"}
templet: function (d) {
var type = d.type;
if (type == 0) {
return '<font color="#0000FF">国 产</font>';
} else {
return '<font color="#5FB878">进 口</font>';
}
}
}
// 其他行省略,可去【前端系列-3】获得完整代码
{
fixed: 'right',
title: '操作',
toolbar: '#goos_lineBar',
align: 'center',
width: 120,
style: 'font-size:13px'
}
]]
});
这样的写法,简单直接,缺点是复用性差,有可能导致代码冗余。
方式二:绑定模版选择器
下述是templet对应的模板,它可以存放在页面的任意位置。模板遵循于 laytpl 语法,可读取到返回的所有数据。
<script type="text/html" id="typeTpl">
{{# if(d.type ==0 ){ }}
<p style="color: #0000FF">国 产</p>
{{# } else { }}
<p style="color: #00FF00">进 口</p>
{{# } }}
</script>
table.render中的对应列templet内容中直接引用上面的模板即可
table.render({
    elem: '#goods_table'
    , id: 'goodsReload'
    , url: '/test/getGoodsInfo'
    , method: 'get'
    , title: '用户表'
    , toolbar: '#goods_headerBar' //开启工具栏,此处显示默认图标,可以自定义模板,详见文档
    , cols:
        [[{type: 'checkbox', fixed: true},
           {
                field: 'type',
                title: '类 型',
                width: 100,
                align: 'center',
                templet: '#typeTpl'
            }
           // 其他行省略,可去【前端系列-3】获得完整代码
           {
                fixed: 'right',
                title: '操作',
                toolbar: '#goos_lineBar',
                align: 'center',
                width: 120,
                style: 'font-size:13px'
            }
        ]]
});
这样的话,如果有多处表格使用同一个模板,代码复用性将得到加强。
还有一种方式:
直接赋值模版字符
templet: '<div><a href="/detail/{{d.id}}" class="layui-table-link">{{d.title}}</a></div>'

注意:这里一定要被一层 <div></div> 包裹,否则无法读取到模板